ノートブックをcodespaceに変換
スタンドアロンのノートブックを作成した後、永続的なファイルストレージやGitとの互換性など、追加のワークフロー機能を組み込むことができます。 これらのタイプの機能にはcodespaceが必要です。 DataRobotでは、スタンドアロンのノートブックをcodespaceに変換することができます。
スタンドアロンのノートブックをcodespaceに変換する前に、ノートブックアセットの設定と関連するアーティファクトが変換時にどのように処理されるかを確認してください。
| ノートブックのアセット | 変換時の動作 |
|---|---|
| 環境設定 | リソースタイプ、環境、非アクティブ時のタイムアウトの設定は、新しいcodespaceでも保持されます。 |
| ノートブックのコンテンツ | The cells of the notebook are converted to an .ipynb file with the same name, populating at the root of the new codespace file system. |
| 環境変数 | 設定された環境変数はすべて保持され、codespaceで永続化されます。 |
| ジョブ定義 | スタンドアロンのノートブックでスケジュールされたジョブの定義は、新しいcodespaceではスケジュールされたジョブとして保持されます。 All run history records for previous jobs of the notebook will be preserved and will continue to be accessible from the “Run history” tab of the Use Case. 各実行レコードの「ソース」フィールドは、新しく変換されたcodespaceのメタデータを表すように更新されます。 各実行レコードに関連付けられたノートブックのスナップショットも保持され、実行履歴テーブルの対応する行をクリックすることでアクセスできます。 |
| 実行履歴 | The built-in revision history (accessible from the “Revision history” side panel) for the standalone notebook will not be preserved (with the exception of any revisions that are tied to run history records for previous notebook jobs). 保存したいリビジョンがある場合は、変換を開始する前に、まずリビジョン履歴サイドパネルからダウンロードしてください。 Codespaceでは、外部のGitリポジトリを使用してバージョン管理することをお勧めします。 |
ワークベンチでのノートブックの変換
To convert a standalone notebook into a codespace, first list all assets using the Notebooks & codespaces tile. Use the Actions menu next to the notebook you want to convert and select Convert to codespace.
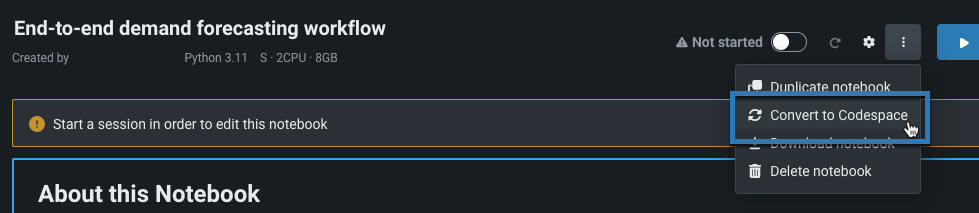
備考
You can only convert a standalone notebook to a codespace if the notebook is not currently being run in an active session. 変換を開始する前にセッションを終了します。
Review the dialog box that informs you of how the notebook's assets are treated during conversion and click Convert. 変換が完了したら、codespaceセッションを開始します。 If the notebook has a scheduled job, first go to the Codespace jobs tile and disable the job from the actions menu.
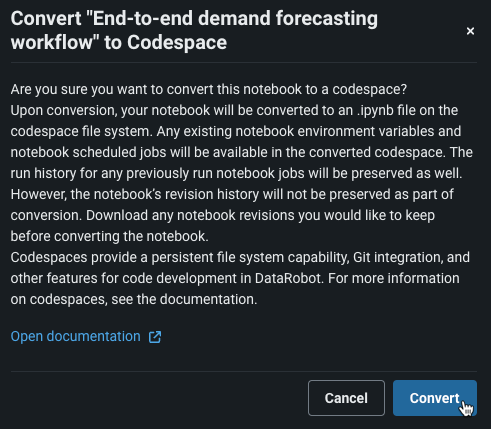
The notebook content is now available as an .ipynb file at the root of the codespace file system.
DataRobot Classicのノートブックの変換
DataRobot Classicのノートブックをcodespaceに変換することもできます。 Codespaceはワークベンチでのみ利用可能なので、変換を開始する際には、変換後のcodespaceが属するユースケースも指定する必要があります。 ノートブックが変換されると、Classicではアクセスできなくなります。
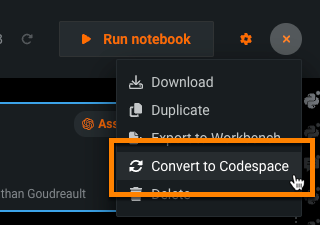
ノートブックインターフェイスのアクションメニューから、Codespaceに変換を選択します。 スタンドアロンのノートブックをcodespaceに変換できるのは、対象のノートブックが現在アクティブなセッションで実行されていない場合だけであることに注意してください。 変換を開始する前にセッションを終了します。
ダイアログボックスで、codespaceが属するユースケースを選択します。 さらに、ノートブックのアセットが変換時にどのように処理されるかを確認できます。 次に変換をクリックします。
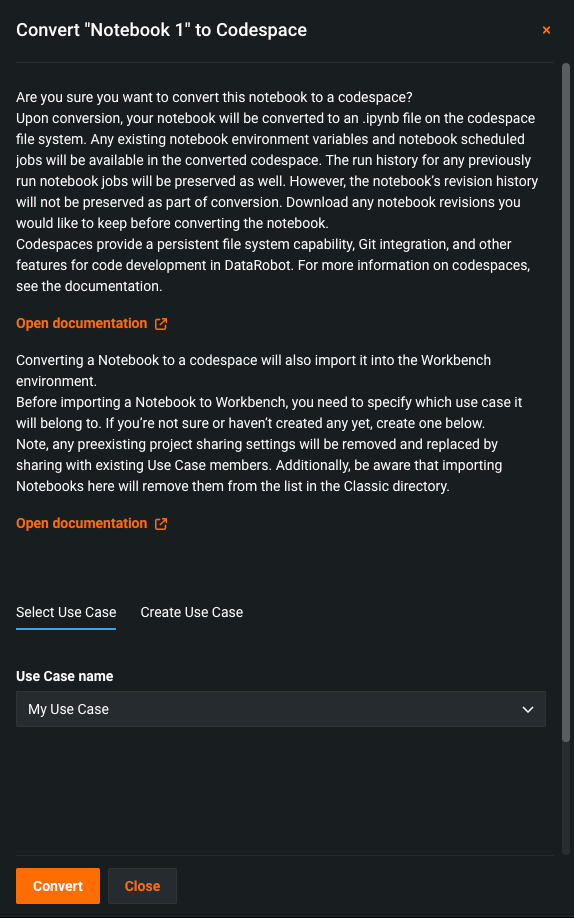
変換が完了したら、codespaceセッションを開始します。 The notebook content is now available as an .ipynb file at the root of the codespace file system.
次のステップ
After converting a notebook to a codespace, start working in the new environment or set up scheduling to automate its execution.
- Codespace sessions: Start a codespace session, upload files, and manage its persistent file system.
- Connect a local IDE to a codespace: Open the codespace from Visual Studio Code over SSH. The CLI starts the session if it is stopped.
- Codespace scheduling: Automate code-based workflows by scheduling notebooks in the codespace to run in non-interactive mode.
- Add a codespace: Learn about the other methods available for creating a codespace, including uploading files or cloning a Git repository.