Workbench overview
The Workbench interface streamlines the modeling process, minimizing time-to-value while still leveraging cutting-edge ML and GenAI techniques. With Workbench:
-
Accelerate iteration and collaboration with repeatable, measured experiments.
-
Convert raw data into modeling-ready prepared, partitioned data.
-
Automate to quickly generate key insights and predictions from the best models.
-
Build, govern, and operate enterprise-grade generative AI solutions; rapidly innovate and adapt with the best-of-breed components of your choice
-
Access from both an intuitive user interface and a notebook environment.
Workbench is the launch point for predictive, generative, and DataRobot Notebooks.
Predictive modeling
Workbench is designed to match the data scientist's iterative workflows with easy project creation and model review, smooth navigation, and all key insights in one place. The interface lets you group, organize, and share your modeling assets to better leverage DataRobot for enhanced experimentation. These assets are housed within folder-like containers known as Use Cases.
Because the modeling process extends beyond just model training, Workbench incorporates prepping data, training models, and leveraging results to make business decisions. It supports the idea of experiments to iterate through potential solutions until an outcome is reached. In other words, Workbench minimizes the time it takes to prep data, model, learn from modeling, prep more data, model again...and many iterations until a model is chosen and findings can be presented to stakeholders.
Once models are built, use:
- Registry to register and manage models, create custom models, jobs, and applications, and view and manage datasets.
- Console for model and deployment monitoring and management.
Generative AI
Workbench is the launch point for building and iterating on your GenAI and agentic initiatives, with tools for working with vector databases, prompt management, and building RAG and agentic workflows. The DataRobot GenAI platform provides both API and GUI options, allowing you to experiment, compare, and assess the best GenAI components through qualitative and quantitative comparisons at an individual prompt and response level. Use the included common LLMs or bring your favorite libraries, bring or choose your LLMs, vector databases, and embeddings, and integrate third-party tools.
DataRobot notebooks
Notebooks offer an in-browser editor to create and execute code for data science analysis and modeling. Create for code development within the platform: standalone notebooks and codespaces. Standalone notebooks are a useful option for fast, lightweight notebook-based development and reports. Codespaces offer a persistent file system experience and allow you to work with both notebook and non-notebook files in the same session
Navigation
DataRobot provides breadcrumbs to help with navigation and asset selection.
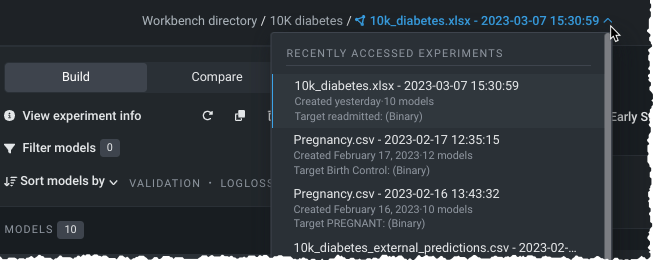
Click on any asset in the path to return to a location. For the final asset in the path, DataRobot provides a dropdown of same-type assets within the Use Case, to quickly access different assets without backtracking.
Use Case assets
A Use Case is composed of zero or more of the following assets:
| Asset (symbol) | Read more |
|---|---|
| Data preparation | |
| Vector databases | |
| Experiments | |
| Playgrounds | |
| Notebooks & codespaces | |
| Applications | |
| Deployments | Deployments |
| Registered models | Registered models |
Workbench directory
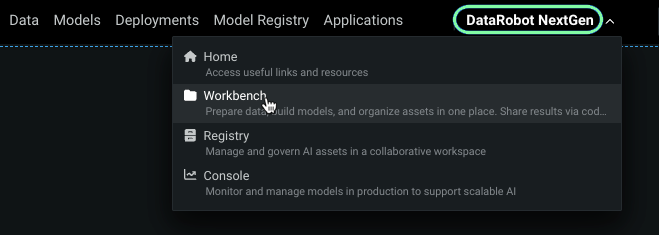
To get started with Workbench if you are in DataRobot Classic, click DataRobot NextGen in the top navigation bar of the DataRobot application and select Workbench.
DataRobot opens to your Workbench directory. The directory is the platform's landing page, providing a listing of Use Cases you are a member of and a button for creating new Use Cases.
On first entry, the landing page provides a welcome and displays quick highlights of what you can do in Workbench. After your first Use Case is started, the directory lists all Use Cases either owned by or shared with you.
See additional information on creating, managing, and sharing Use Cases.
Sample workflows
The following images illustrate, at a high level, the predictive and generative workflows.
Predictive workflow
The following workflow shows different ways you can navigate through DataRobot's Workbench when using predictive modeling:
flowchart TB
  A((Open Workbench)) --> B{Create/open a Use Case};
  B --> C[Add a dataset];
  B --> D[Add an experiment];
  B --> E[Add a notebook];
  C -. optional .-> F[Wrangle your data];
  E --> M[Create and execute code];
  F -.-> G[Create an experiment];
  G --> H[Set the target];
  D --> L[Select a dataset];
  L --> H;
  H --> I[Start modeling];
  I --> J[Evaluate models];
  J --> K[Make predictions];
  J --> N[Build an application<br> from a model];
Generative workflow
The following workflow shows different ways you can work with vector databases, playgrounds, and LLM blueprints when using generative modeling:
flowchart TB
  A((Open Workbench)) --> B{Create/open a Use Case};
  B -. optional .-> C[Add an<br> internal vector database];
  B -. optional .-> D[Add an<br> external vector database];
  C --> E[Configure vector database];
  D --> E[Configure vector database];
  E --> F[Add playground];
  F --> G[Configure LLM blueprint];
  G --> H[Chat];
  H -. optional .-> I[Tune];
  I -. optional .-> J[Compare];
  J --> K[Deploy];
Next steps
From here, you can: