Connectivity workflows
The DataRobot connectivity platform allows users to integrate with their data stores using either the DataRobot-provided native connectors or uploading the JDBC driver provided by the data store.
Users with the technical abilities and permissions can configure and establish data connections. Other users in the organization can then leverage those connections to solve business problems.
Related reference
The following pages are related to database connectivity:
Data store vs. data connection
In DataRobot, data store and data connection are used interchangeably, and both refer to where your data is stored and managed as well as the dynamic link to that data. You will see both terms in the UI.
Connector vs. Driver
Each data store connects to DataRobot through either a driver or a connector, and is indicated in the tables for supported unstructured and structured data stores.
| Type | Description | Recommended use |
|---|---|---|
| Connector | DataRobot connects through the data store's native API using an integration built and maintained by DataRobot. The connection is defined by connection fields instead of a JDBC URL, supports authentication methods such as OAuth and service principals, and, for many data stores, supports unstructured data. Connectors require a registered data store. | Recommended when you want to configure connections and credentials once and reuse them. They are also the preferred option when credentials or other sensitive configuration are stored in DataRobot and should not be embedded in your code. Connectors are also recommended for all agentic workflows due to lower latency and unstructured data support. |
| Legacy JDBC Driver | DataRobot connects using the JDBC driver provided by the database vendor. The connection is defined by a JDBC URL and JDBC parameters, authenticates with basic credentials, and supports structured (tabular) data. For Self-Managed AI Platform installations, an administrator uploads and manages the driver files. Requires a registered data store. | Recommended only for custom connection types that are not supported by connectors or a DataRobot-managed JDBC driver. |
| DataRobot-managed JDBC driver | DataRobot ships and manages the driver set as part of the install (bundled in the browser-jdbc service). There are three main differences from the legacy driver:
This driver currently supports Postgres, MySQL, SQL Server, BigQuery, Snowflake, Databricks, Trino, SAP Datasphere drivers. |
Recommended when you are prepared to manage the connection configuration and credentials directly in the your code. |
Terminology
Data store: A configured connection to a database. It has a name, a specified driver, and a JDBC URL. You can register data stores with DataRobot for ease of re-use. A data store has one connector but can have many data sources.Data source: A configured connection to the backing data store (the location of data within a given endpoint). A data source specifies, via a SQL query or a selected table and schema data, which data to extract from the data store to use for modeling or predictions. A data source has one data store and one connector but can have many datasets.Data driver: The software that allows the application to interact with a database; each data store is associated with either a driver or a connector (created by the administrator). The driver configuration saves the storage location in the application of the JAR file and any additional dependency files associated with the driver.Connector: Similarly to data drivers, a connector allows the application to interact with a database; each data store is associated with either a driver or a connector (created by the administrator). The connector configuration saves the storage location in the application of the JAR file and any additional dependency files associated with the connector.Dataset: Data, a file or the content of a data source, at a particular point in time. A data source can produce multiple datasets; a dataset has exactly one data source.
Connectivity options
By default, users can create, modify (depending on their role), and share data connections as well as create data sources. When you create or reconfigure a connection in one area of DataRobot, those updates are also applied across Workbench, Registry, and the Data Connections page (i.e., any area where you work with data connectivity).
The tabs below describe where you can establish database connectivity in DataRobot:
- From Account Settings > Data Connections, create data connection configuration(s).
- From Registry > Data, click Add > Data connection.
- From the Browse data modal within a Use Case.
- During vector database (VDB) creation when adding a new data source.
Interface overview
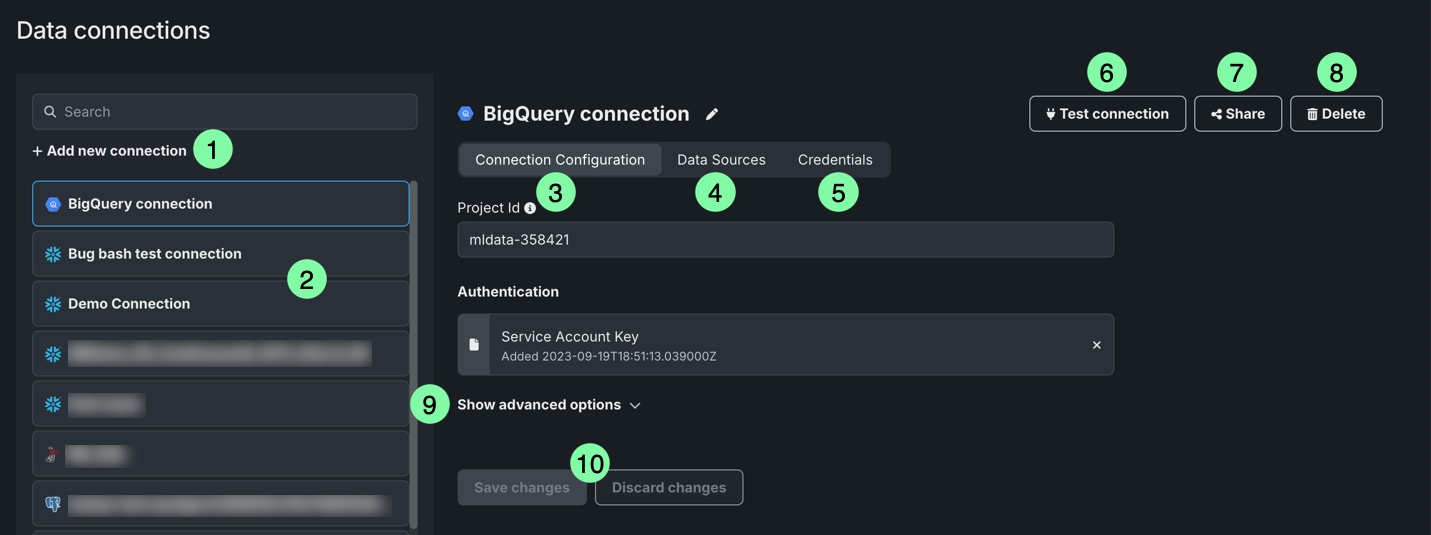
While the database connectivity user interface (UI) remains consistent across the platform, there are minor differences based on where you're working with connections. See the example below—which shows editing a connection from Account settings > Data connections—for a general description of the user interface (UI) elements in the database connectivity window:
| Element | Description | |
|---|---|---|
| 1 | + Add connection | Allows you to add and configure a new data connection. |
| 2 | List of connections | Lists all data connections associated with your DataRobot account. |
| 3 | Connection Configuration | Displays the parameters used to establish a connection between DataRobot and the external data source. |
| 4 | Data Sources | Displays a list of the datasets imported from the data connection. |
| 5 | Credentials | Displays a list of authentication credentials associated with the data connection. |
| 6 | Delete | Deletes the data connection. |
| 7 | Test | Tests the data connection configuration, including authentication credentials. |
| 8 | Share | Allows you to share the data connection with other users, groups, or organizations, as well as assign permissions. |
| 9 | Save | Saves any changes made to the connection configuration. |
| 10 | Show additional parameters | Allows you to add parameters to the connection configuration. |
Connect to a data source
Note
When configuring your data connection, configuration types, authentication options, and required parameters are based on the selected data source. The example below shows how to configure Snowflake with OAuth using existing credentials from the Browse data modal within a Use Case.
To create a data connection:
-
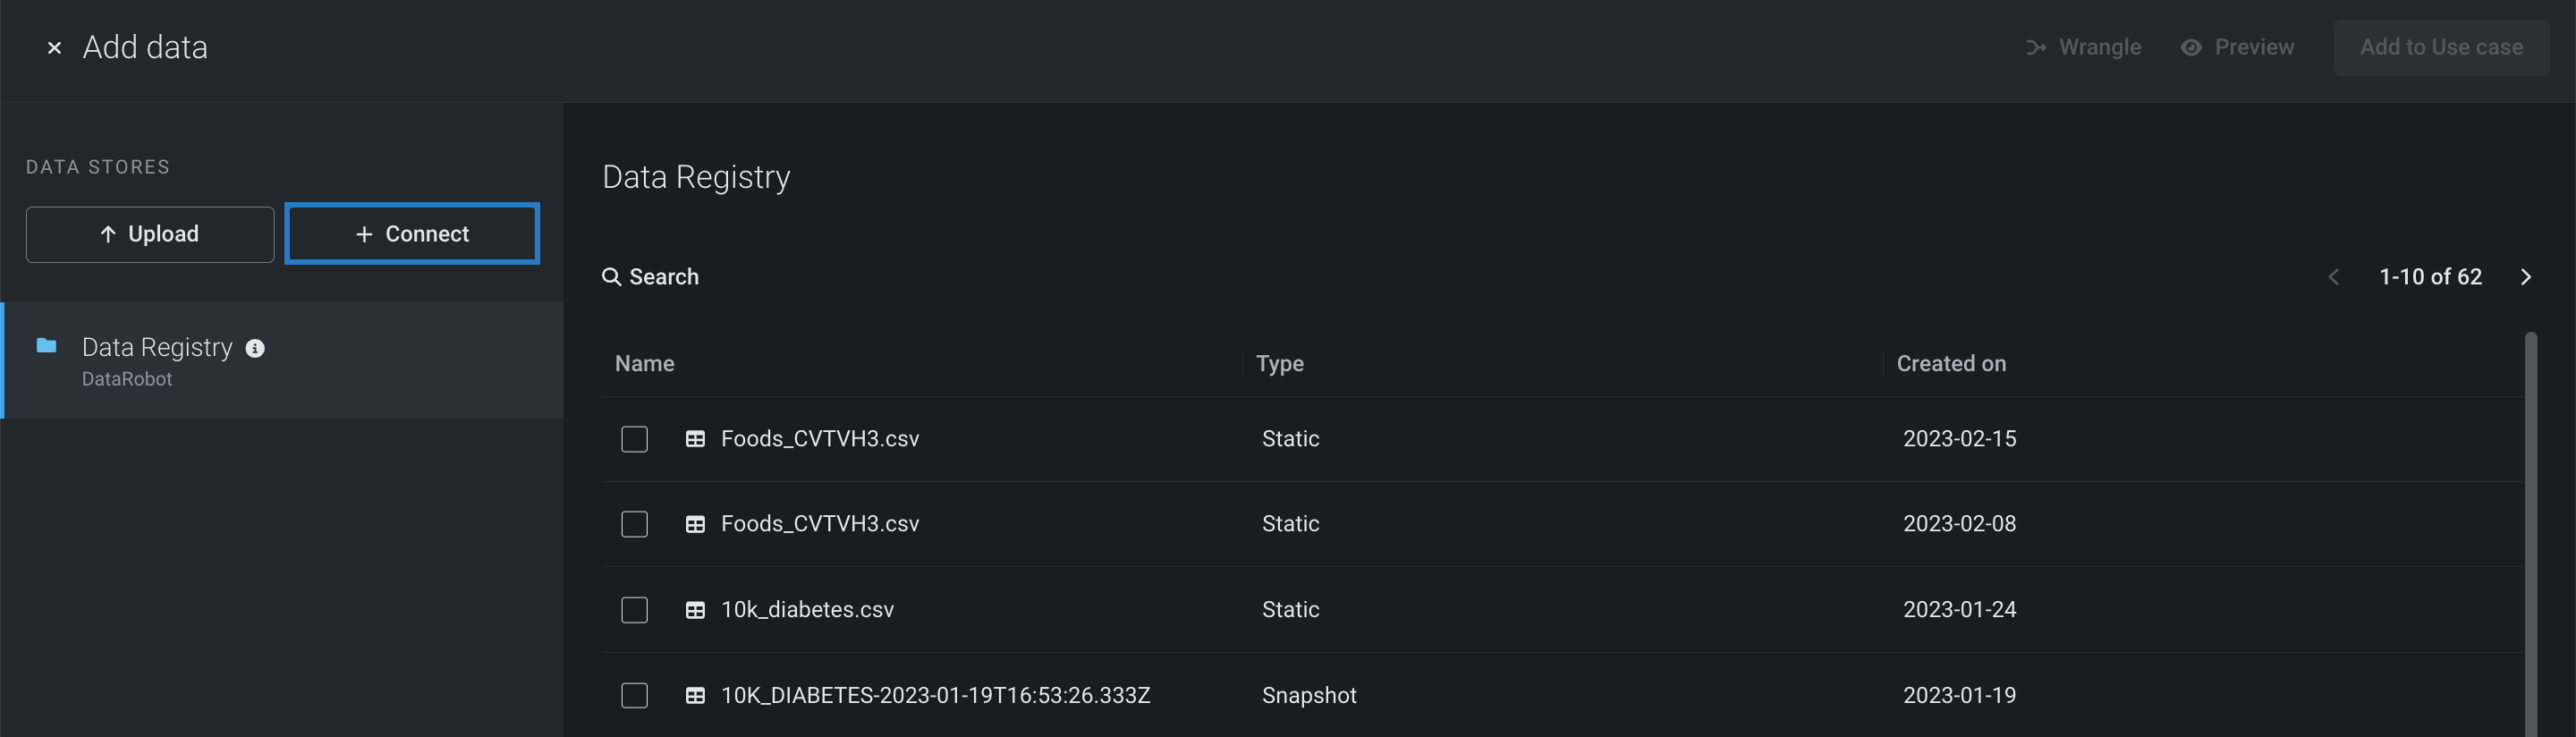
From the database connectivity window, click + Add connection.
-
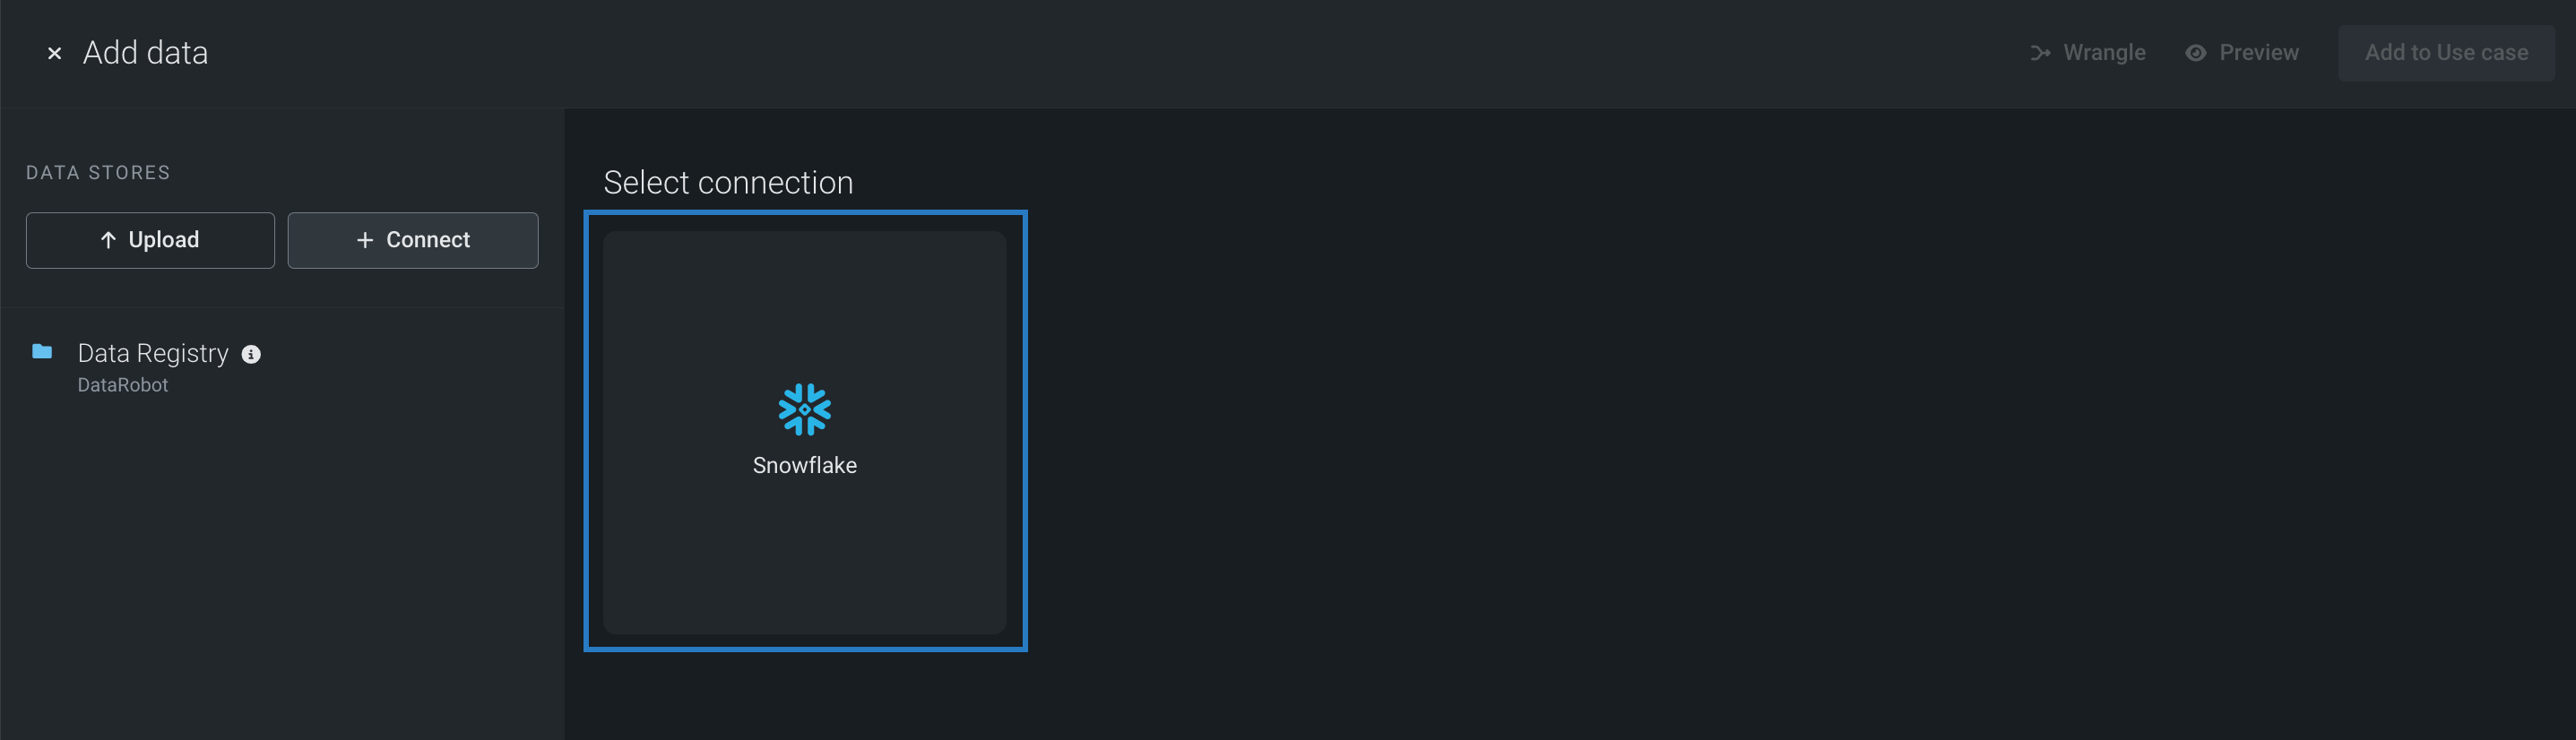
Choose either Structured for connections that support adding structured data, or Unstructured for connections that support unstructured data (only available during VDB creation). Then, select a data store.
Self-Managed AI Platform installations
For Self-Managed AI Platform installations, you might not see any data stores listed. In that case, click Add a new driver and add a driver from the list of supported connections.
Now, you can configure the data connection.
Configure the connection
To configure the data connection:
-
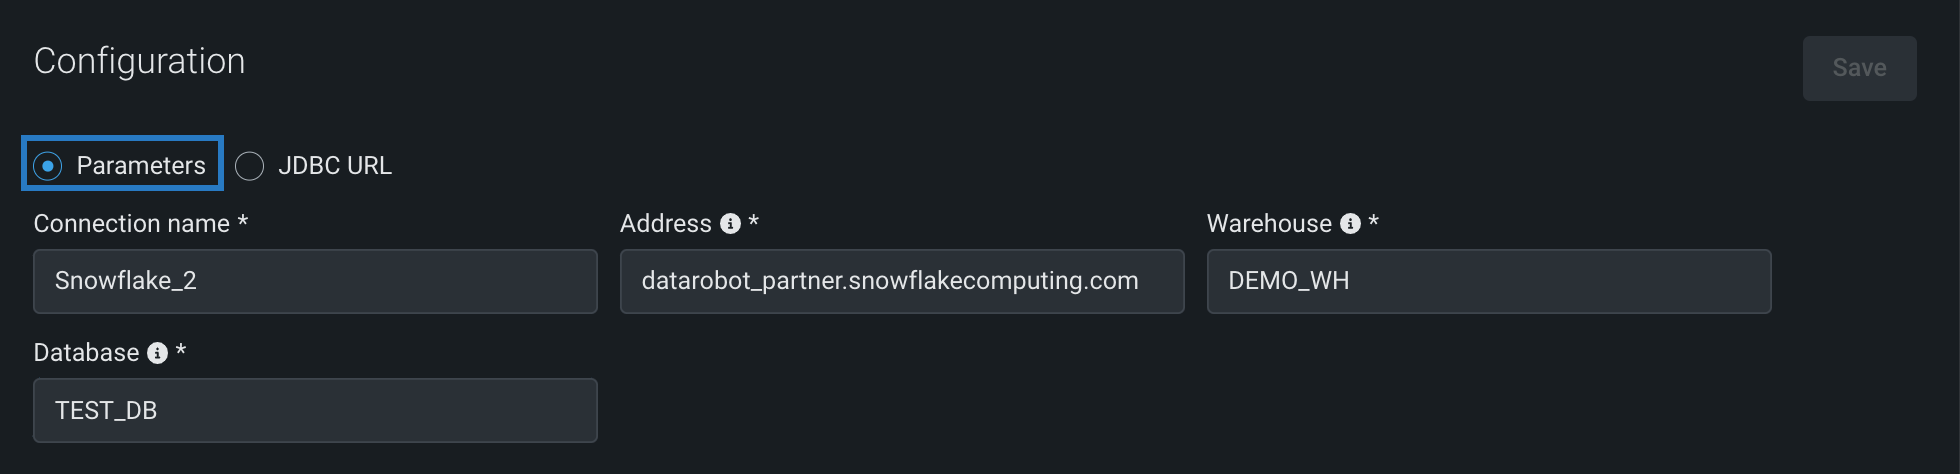
With the Connection Configuration tab selected in the Edit Connection modal, choose a configuration method—either Parameters or JDBC URL.
-
Enter the required parameters for the selected configuration method.
-
Click New Credentials and select an authentication method—the available authentication methods are based on the selected connection.
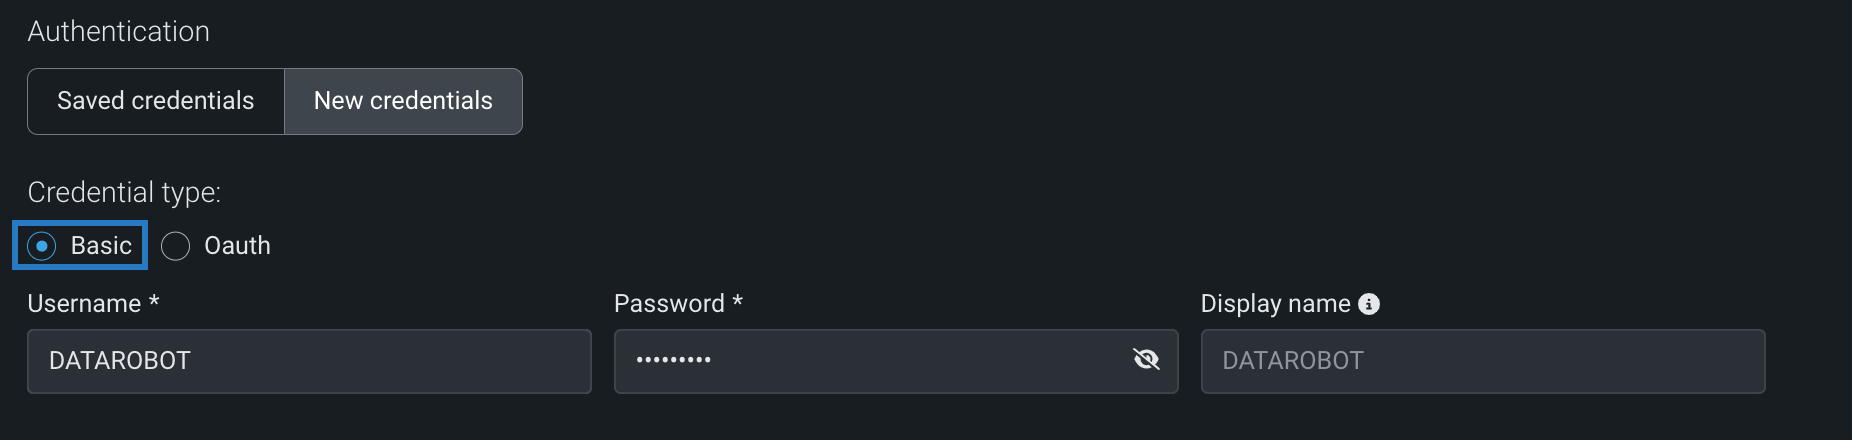
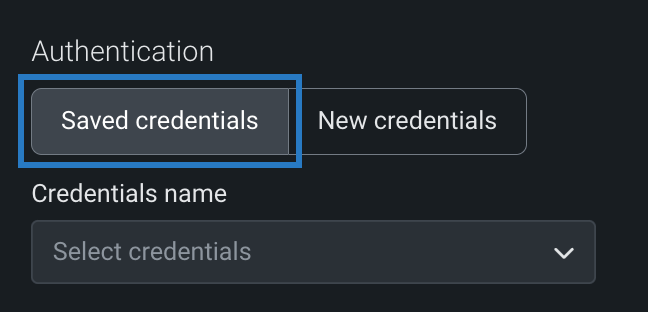
Saved credentials
If you previously saved credentials for the selected data source, click Saved credentials and select the appropriate credentials from the dropdown.
-
Click Save in the upper right corner. If your browser window is small, you may need to scroll up.
If you selected OAuth as your authentication method, you will be prompted to sign in before you can select data. See the list of supported data stores for more information about supported authentication methods and required parameters.
Additional parameters
The parameters provided for modification in the data connection configuration screen are dependent on the selected driver. Available parameters are dependent on the configuration done by the administrator who added the driver.
Many other fields can be found in a searchable expanded field. If a desired field is not listed, open Show additional parameters and click Add parameter to include it.
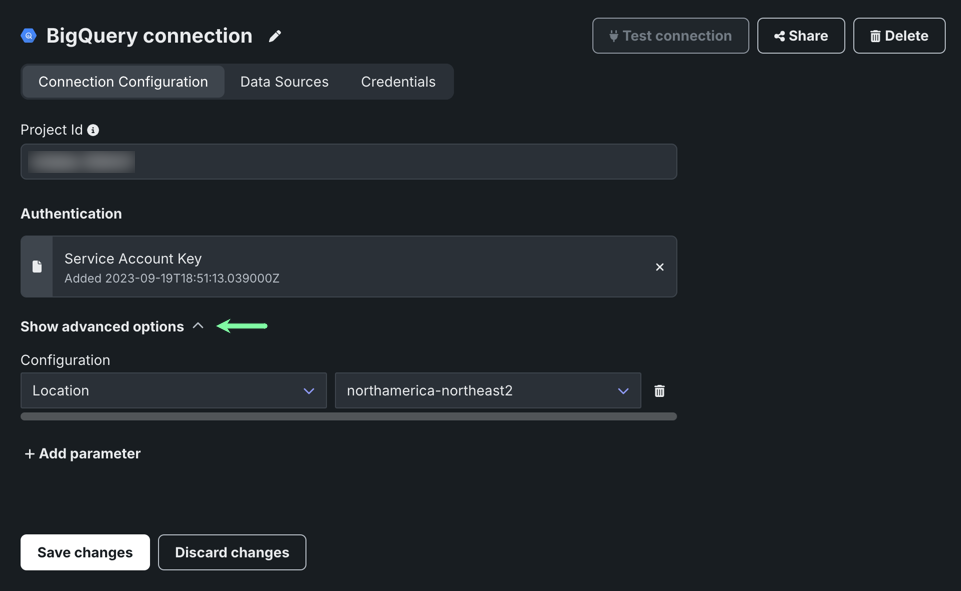
Click the delete icon to remove a listed parameter from the connection configuration.
Note
Additional parameters may be required to establish a connection to your database. These parameters are not always pre-defined in DataRobot, in which case, they must be manually added.
For more information on the required parameters, see the documentation for your database.
Select data
Your data sources specify, via SQL query or selected table and schema data, which data to extract from the data connection. It is the extracted data that you will use for modeling and predictions. You can point to entire database tables or use a SQL query to select specific data from the database.
To select data:
-
Select the schema associated with the table you want to add.
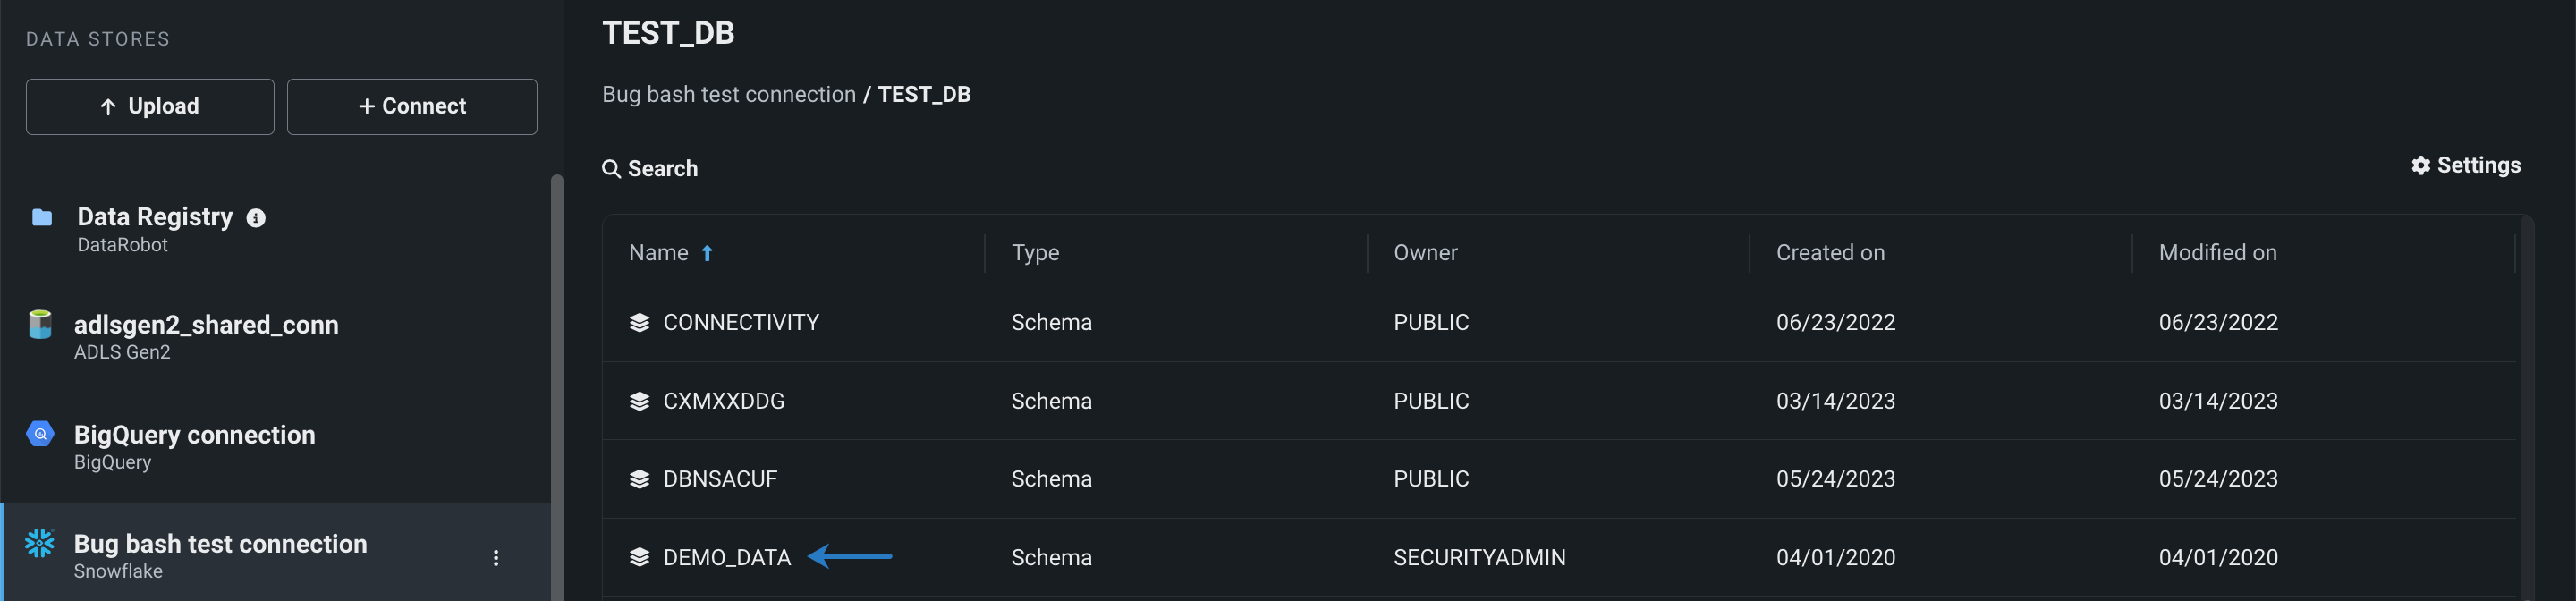
-
Select the box to the left of the appropriate table.
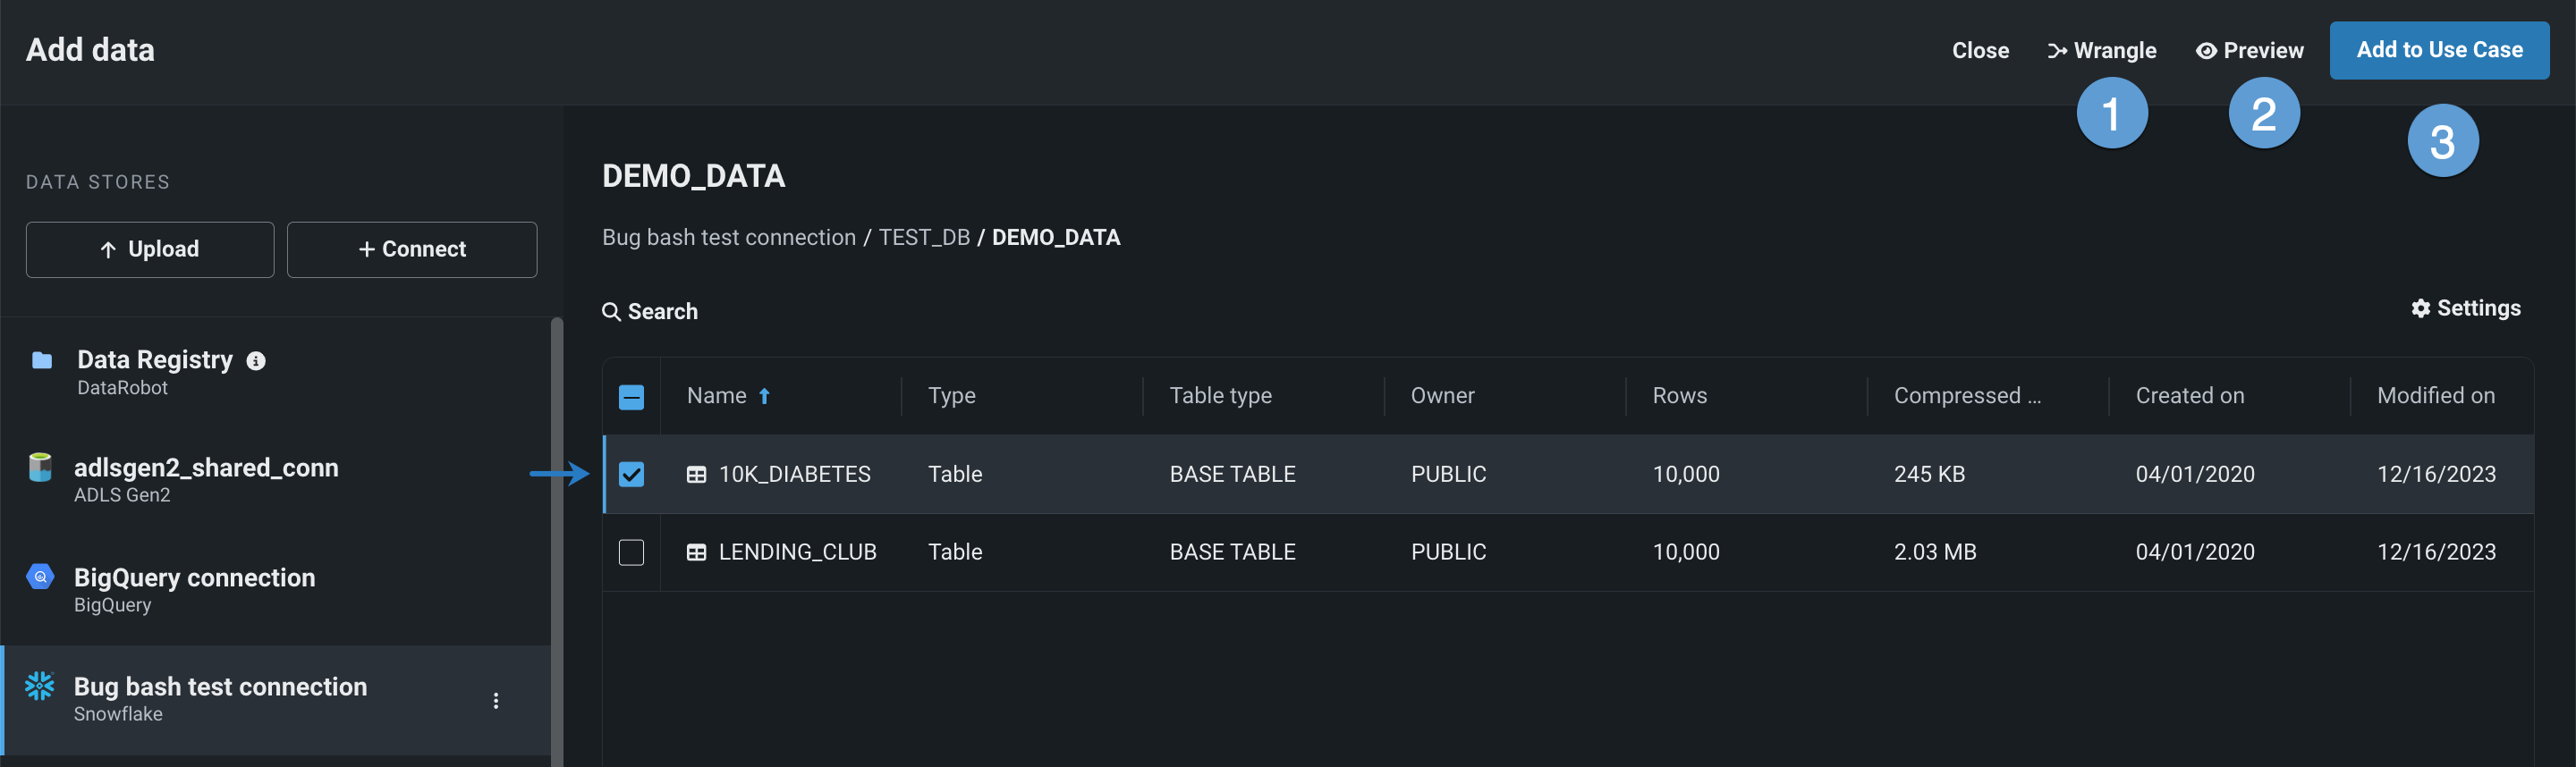
With a dataset selected, you can:
Element Description 1 Add to Use Case Adds the data asset to your Use Case, making it available to you and other team members. 2 Add from SQL query Allows you to use SQL queries to add data. 3 Settings Allows you to show, hide, and/or pin columns. 4 Actions menu Provides access to the following actions: - Preview: Open a snapshot preview to help determine if the dataset is relevant to your Use Case and/or if it needs to be modified in either Wrangler or the SQL Editor.
- Open in Wrangler: Perform data preparation before adding the asset to your Use Case.
- Open in SQL Editor: Create a recipe comprised of SQL queries that enrich, transform, shape, and blend datasets together.
Large datasets
If you want to decrease the size of the dataset before adding it to your Use Case, click Wrangle. When you publish a recipe, you can configure automatic downsampling to control the number of rows when Snowflake materializes the output dataset.
-
Click Add to Use Case, and then choose a snapshot policy by adding either dynamic data (Add as dynamic dataset) or a snapshot of the dataset (Add as snapshot). To go back without adding data, click Continue browsing.

Manage connections
Test connections
Once your data connection is created, test the connection by clicking Test.

In the resulting dialog box, enter or use stored credentials for the database identified in the JDBC URL field or the parameter-based configuration of the data connection creation screen. Click Sign in and when the test passes successfully, click Close to return to the Data Connections tile and create your data sources.
Snowflake and Google BigQuery users can set up a data connection using OAuth single sign-on. Once configured, you can read data from production databases to use for model building and predictions.
For information on setting up a data connection with OAuth, the required parameters, and troubleshooting steps, see the documentation for your database: Snowflake or BigQuery.
Edit connections
You can modify existing data connections, including configuration parameters, as well as associated credentials and data sources.
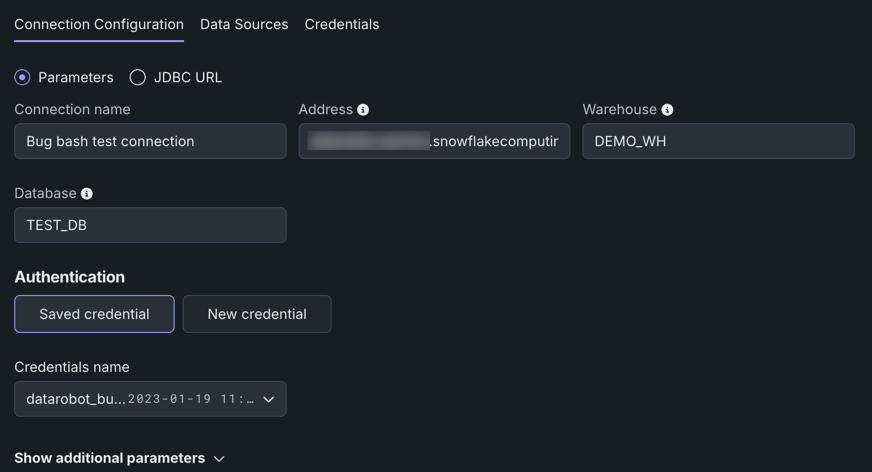
To edit a connection, click on the data connection in the left panel. See below for a description of each tab—what information is displayed on each and the available edit options:
On the Connection Configuration tab, you can modify connection parameters, including adding new parameters and selecting or creating new credentials.
The Data Sources tab displays all data assets that have previously been accessed through this connection. Using this list, you can explore the most frequently used tables and SQL queries for a database, as well as file locations for blob (Binary Large Object) and document stores. When a dataset or file is added from this connection to the Data Registry or Use Case, a pointer to the data is automatically added to this tab. Additionally, you can add data sources directly in the connection settings. Note that this view can also support data governance workflows.
From here, you can:
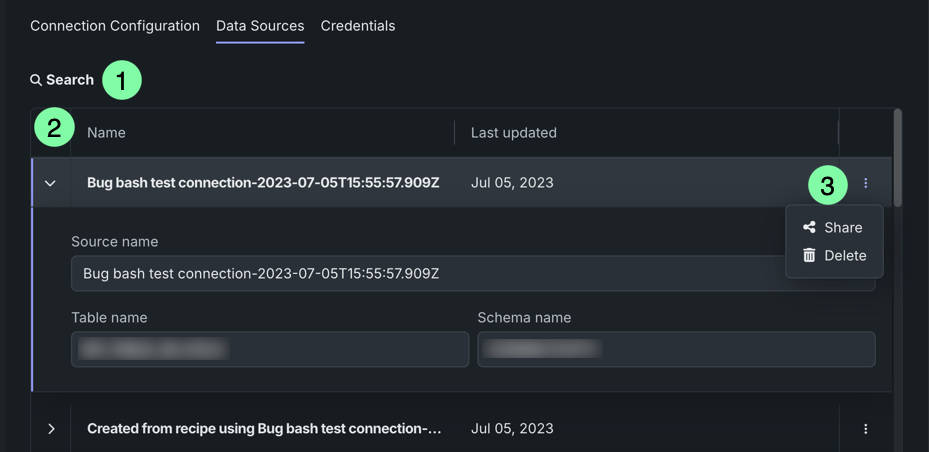
| Element | Description | |
|---|---|---|
| 1 | Search | Allows you to search for specific data sources. |
| 2 | Columns | Displays the name and date when the data pointer was last updated. |
| 3 | Actions menu | Provides access to the following actions:
|
The Credentials tab displays all credentials compatible with this connection type that were added by you or shared through a shared secure configuration. From here, you can:
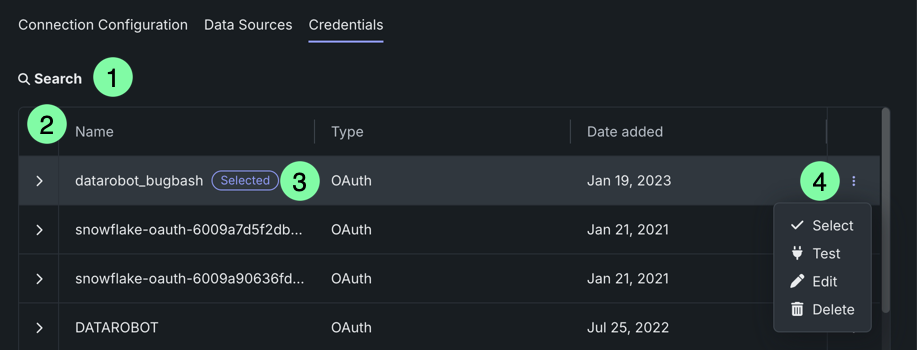
| Element | Description | |
|---|---|---|
| 1 | Search | Allows you to search for specific credentials. |
| 2 | Columns | Displays the name, credential type, and date the credentials were first added. |
| 3 | Selected badge | Indicates the credentials currently in use by the data connection. |
| 4 | Actions menu | Provides access to the following actions:
|
When you're done editing the connection, click Save.
Delete connections
You can delete any data connection that is not being used by an existing data source. If it is being used, you must first delete the dependencies. To delete a data connection:
-
From the Data Connections tab, select the data connection in the left-panel connections list.
-
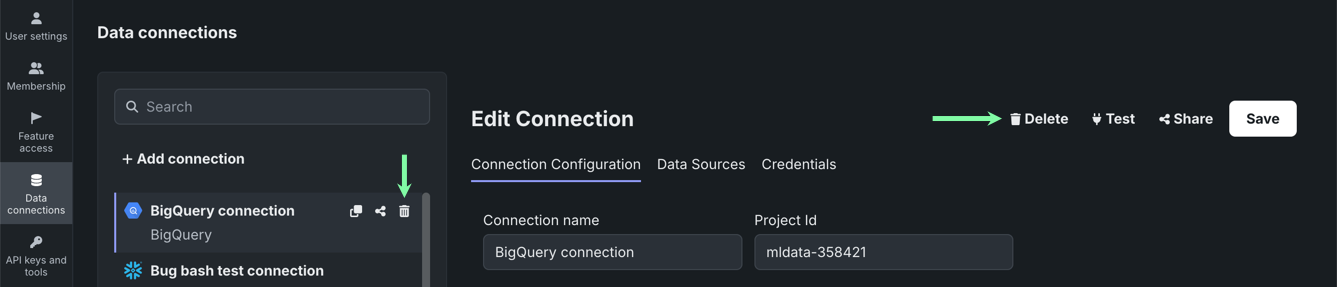
Click the Delete button in the upper right, or hover over the connection name in the left-panel and click the delete icon .
-
DataRobot prompts for confirmation. Click Delete to remove the data connection. If there are data sources dependent on the data connection, DataRobot returns a notification.
-
Once all dependent data sources are removed—either via the UI or API—try deleting the data connection again.
Stored credentials
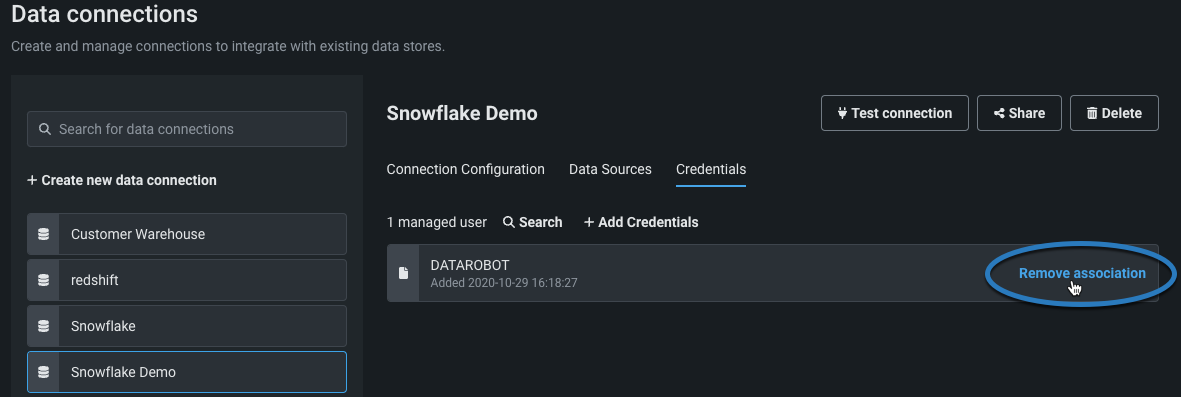
As an alternative to managing credentials from the Credentials management tile, you can interact with credentials when working with a data connection— on the Credentials tab, you can select and remove credentials associated with the connection, and on the Connection Configuration tab, you can create new credentials.
Create credentials
To create new saved credentials:
-
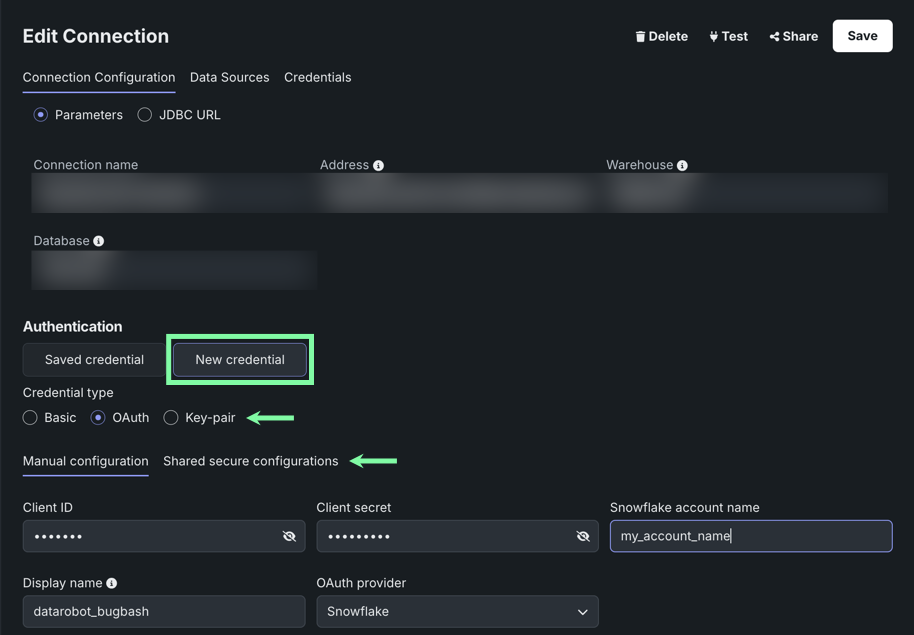
Select a data connection from the left panel and on the Connection Configuration tab, click New credential.
-
Select the Credential type and whether you're manually configuring the credentials or using a shared secure configuration.
- Enter the new credentials and click Save. Optionally, you can test your new credentials.
Remove credentials
From the Data connections tile, select the connection and then click the Credentials tab. Click the Actions menu next to the credentials you want to use for this connection and click Select. The credentials currently associated with the connection displays a "Selected" badge.
Share data connections
Because the user creating a data connection and the end-user may not be the same, or there may be multiple end-users for the data connection, DataRobot provides the ability to set user-level permissions for each entity. You can accomplish scenarios like the following:
- A user wants to set permissions on a selected data entity to control who has consumer-level, editor-level, or owner-level access. Or, the user wants to remove a particular user's access.
- A user that has had a data connection shared with them wants the shared entity to appear under their list of available entities.
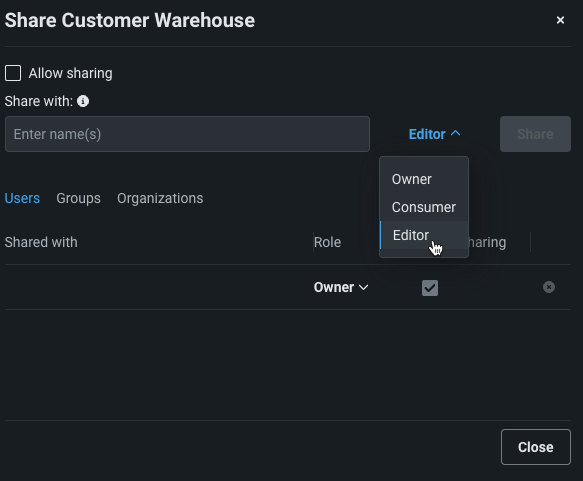
When you invite a user, user group, or organization to share a data connection, DataRobot assigns the default role of Editor to each selected target (not all entities allow sharing beyond a specific user). You can change the role from the dropdown menu.
To share data connections:
-
From the account menu on the top right, select Data Connections, select a data connection, and click Share in the upper-right corner.
Alternatively, you can hover over the connection name in the left-panel and click the share icon .
-
Enter the email address, group name, or organization you are adding and select a role. Check the box to grant sharing permission.
-
Click Share to add the user, user group, or organization.
-
Add any number of collaborators and when finished, click Close to dismiss the sharing dialog box.
Depending on your own permissions, you can remove any user or change access as described in the table of roles and permissions.
Note
There must be at least one Owner for each entity; you cannot remove yourself or remove your sharing ability if you are the only collaborating Owner.
Connection support for Wrangling and SQL Editor
You can connect to and add data from all connectors and JDBC drivers that are currently supported in DataRobot. Note that Snowflake, BigQuery, and Databricks connections use pushdown wrangling—all other connections use Spark wrangling.
The table below highlights the capabilities supported by each wrangling method:
| Wrangling method | Snapshot datasets | Dynamic datasets | Live preview | Wrangling | In-source materialization |
|---|---|---|---|---|---|
| Pushdown wrangling: Snowflake, BigQuery, Databricks | ✔ | ✔ | ✔ | ✔ | |
| Spark wrangling: snapshots uploaded from local files, public URLs, all supported connections | ✔ | ✔ |
For JDBC drivers, you can add and perform Feature Discovery on dynamic datasets, however, data previews and wrangling are not supported (using either Wrangler or the SQL Editor). You must first create a snapshot of the dataset to use these capabilities.