Deploy workflows
After you've connected an agentic workflow custom model to an agentic playground, compared and tested the workflow, and made any required modifications, you can register the production-ready agentic workflow for deployment to Console.
Register an agentic workflow
After experimenting in the agentic playground to build a production-ready agentic workflow, register the custom agentic workflow in the Registry workshop, in preparation for deployment to Console.
To register an agentic workflow from an agentic playground:
-
From an agentic playground, find the register option in the comparison chat, or a single-agent chat:
Click the actions menu for the agentic workflow you want to register, then click Register agentic workflow.
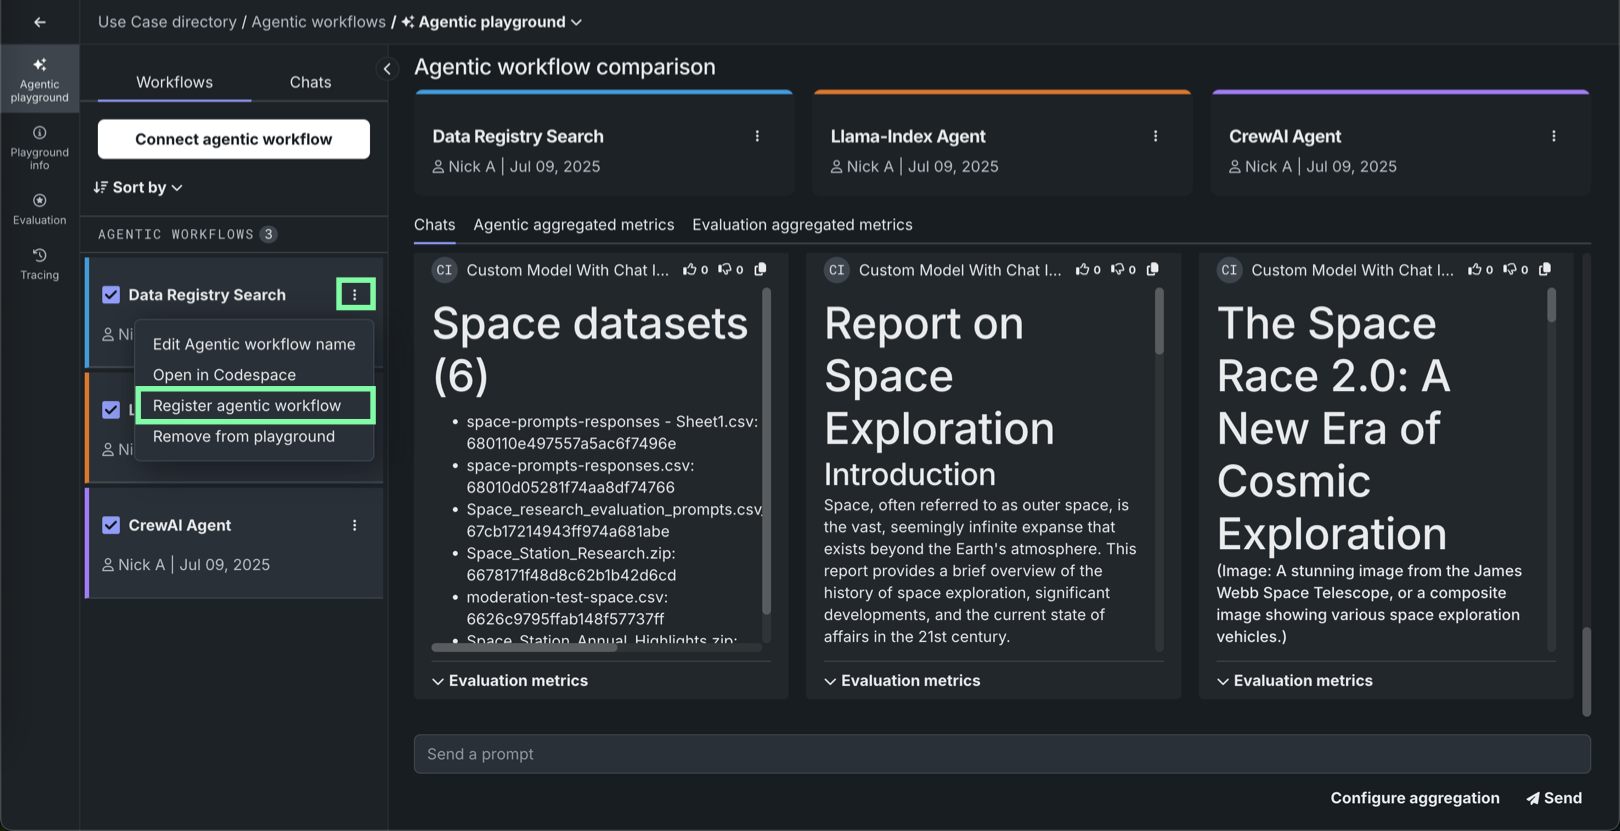
Actions menu locations
The actions menu is always available in the Workflows panel for connected agentic workflows. In addition, when a workflow is selected for comparison, the actions menu is available next to the agentic workflow name in the comparison chat area.
Click Register agentic workflow in the upper-right corner of the single-agent chat window.
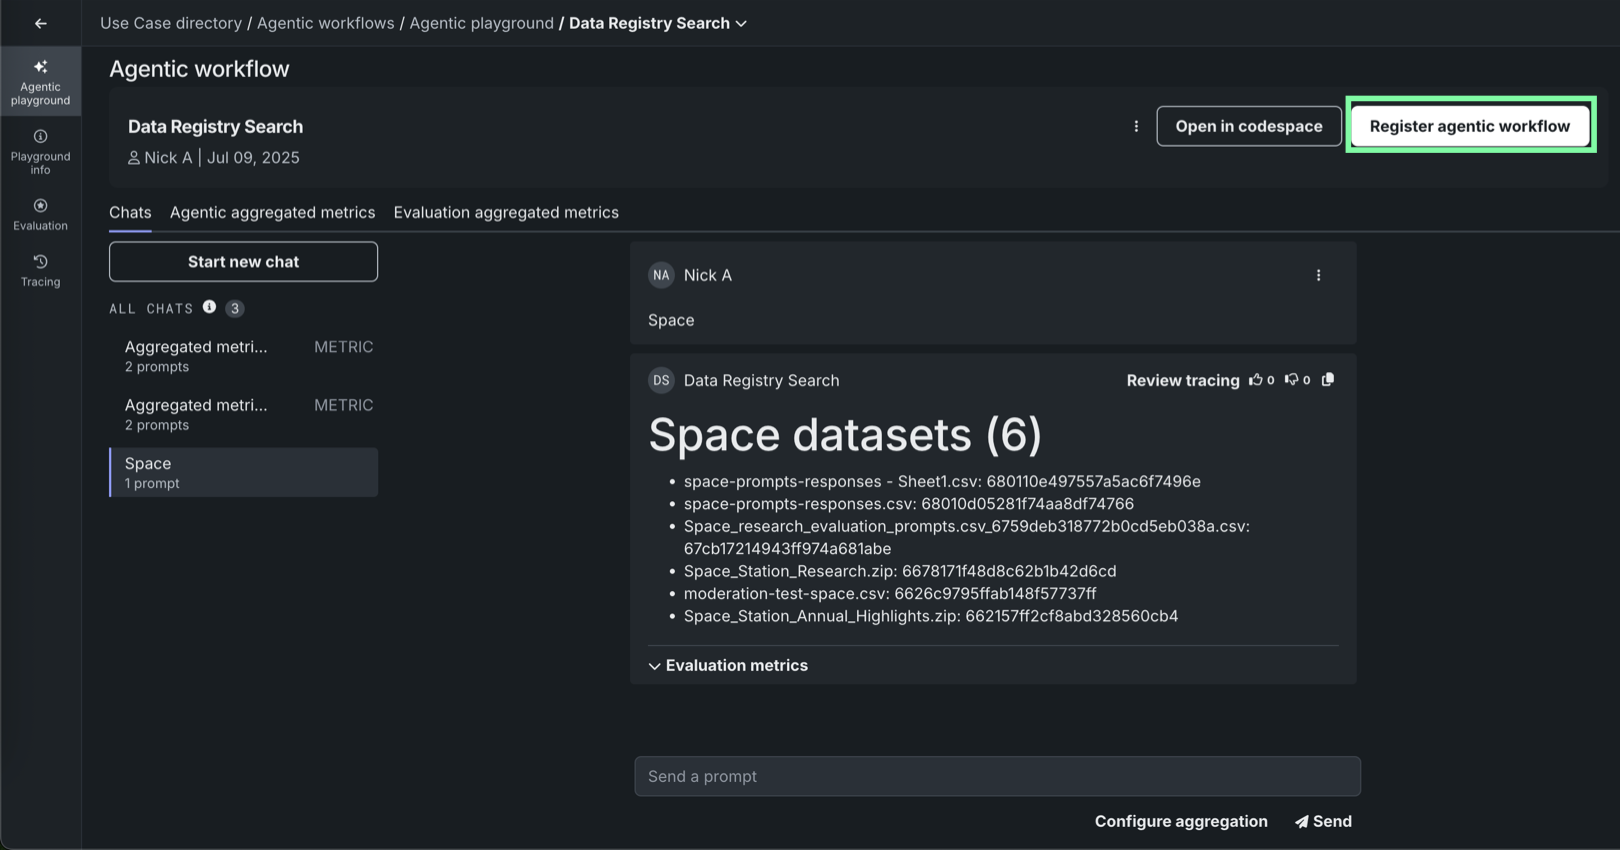
The agentic workflow opens in the Registry Workshop.
-
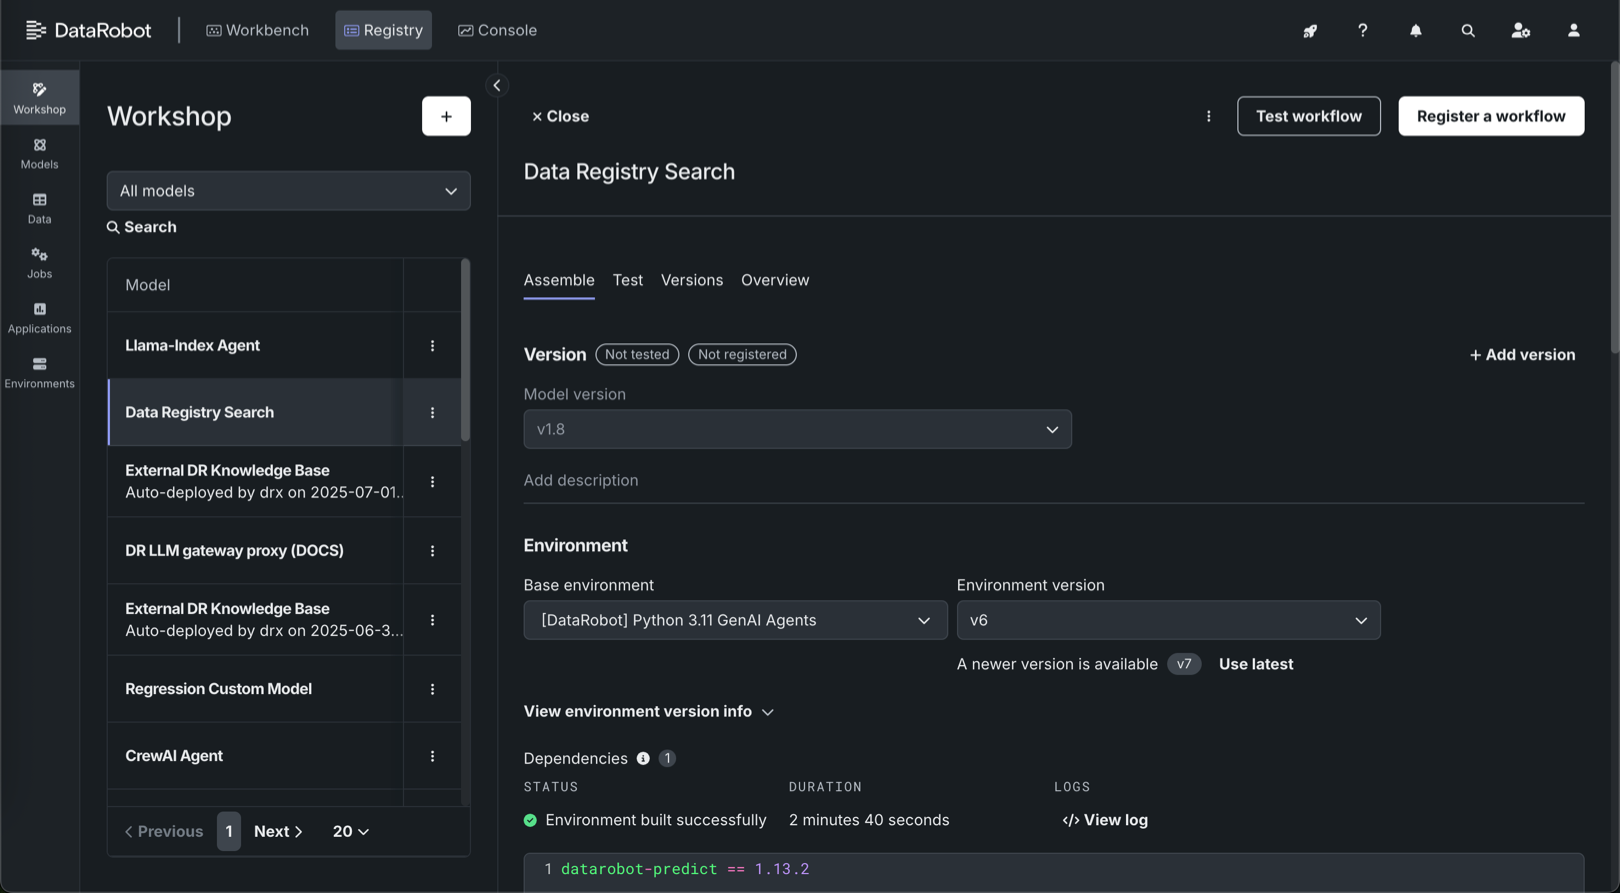
In Workshop, ensure the agentic workflow is assembled correctly by reviewing the following sections:
LLM gateway access runtime parameter requirement
To use the LLM gateway for an agentic workflow, the
ENABLE_LLM_GATEWAY_INFERENCEruntime parameter must be provided in themodel-metadata.yamlfile and set totrue. -
(Optional) Click Test workflow to provide a test dataset and test the agentic workflow response through the chat and/or score hooks.
-
Click Register a workflow to open the Register a workflow page. Under Configure the workflow, the Target is set based on the workflow you're registering and the Target type is set to Agentic Workflow. Select one of the following registration options:
-
Add a version to an existing registered workflow: Increment the version number and add a new version to the selected registered workflow.
-
Create a new registered workflow: Create a registered workflow and the first version (V1).
Then, configure the following fields:
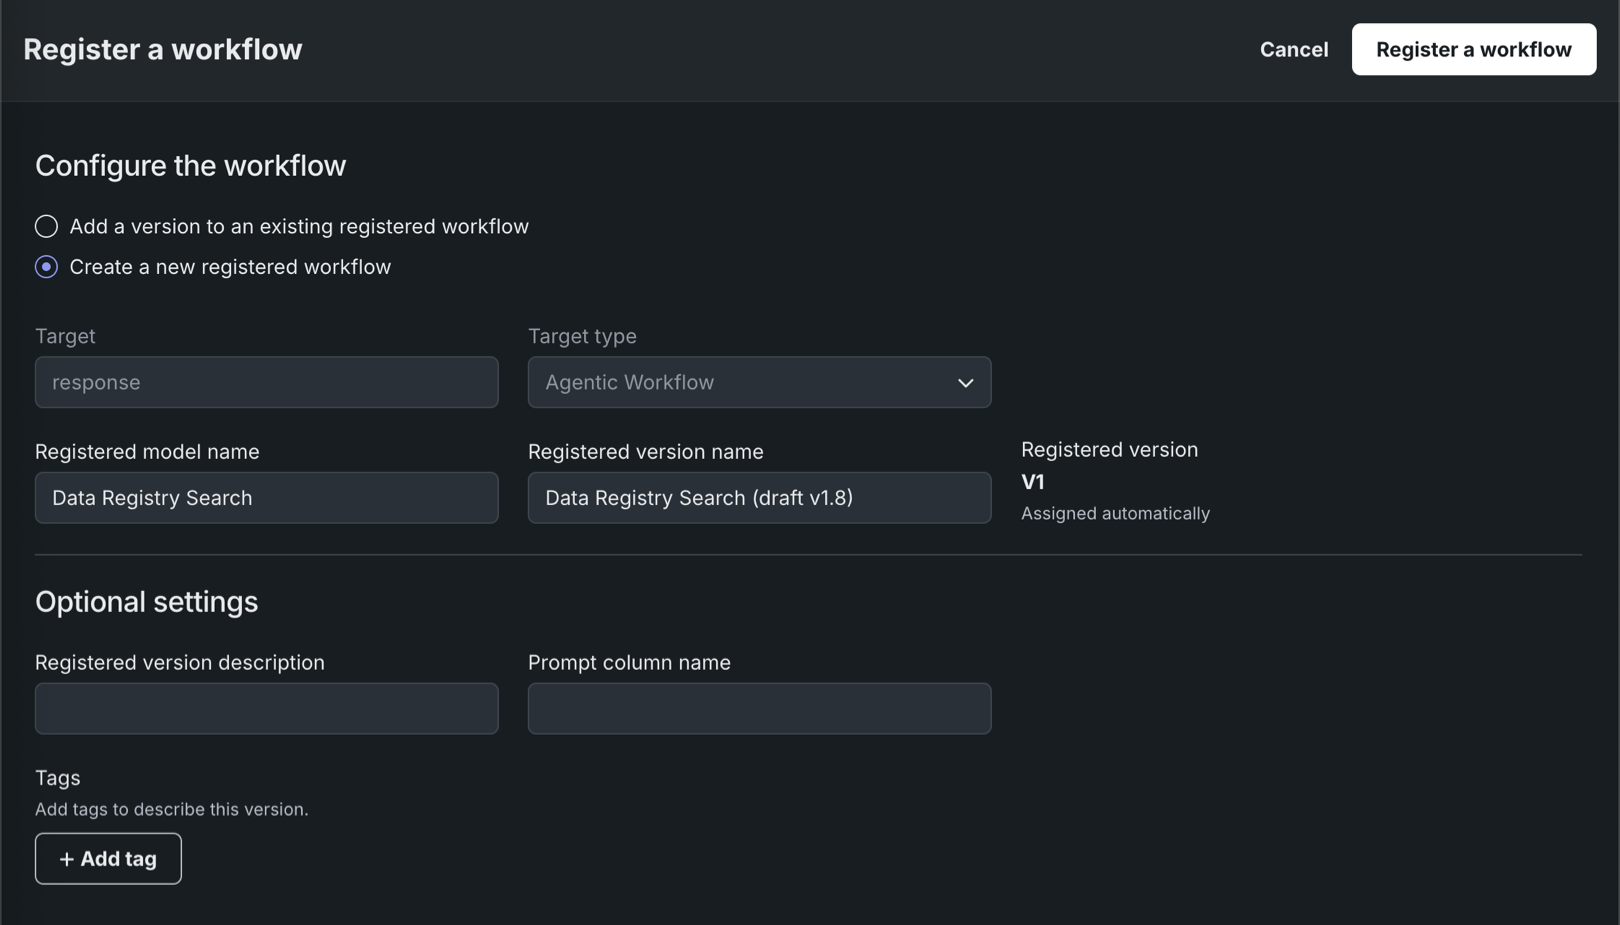
Field Description Registered model name / Registered model Do one of the following: - Registered model name: When registering a new workflow, enter a unique and descriptive name for the new registered workflow. If you choose a name that exists anywhere within your organization, a warning appears.
- Registered model: When saving as a version of an existing workflow, select the existing registered workflow you want to add a new version to.
Registered version name Automatically populated with the workflow name, date, and time. Change or modify the name as necessary. Registered version Assigned automatically. This displays the expected version number of the version (e.g., V1, V2, V3) you create. This is always V1 when you select Register as a new model. Optional settings Registered version description Enter a description of the business problem this workflow solves, or, more generally, describe the workflow represented by this version. Tags Click + Add tag and enter a Key and a Value for each key-value pair you want to tag the workflow version with. Tags added when registering a new workflow are applied to V1. Note
If you click Cancel on this page to return to the Registry, you lose the configuration progress on this page.
-
-
Click Register a workflow.
The agentic workflow version opens on the Registry > Models page with a Building status.
Deploy an agentic workflow
Once the agentic workflow is registered (listed in the Models tile in Registry), you can deploy it to Console as you would any other model type, providing access to DataRobot monitoring capabilities.
To deploy an agentic workflow from Registry:
-
On the Registry > Models page, if the registered agentic workflow isn't already open, click the Agentic Workflow tab and locate the workflow to deploy.
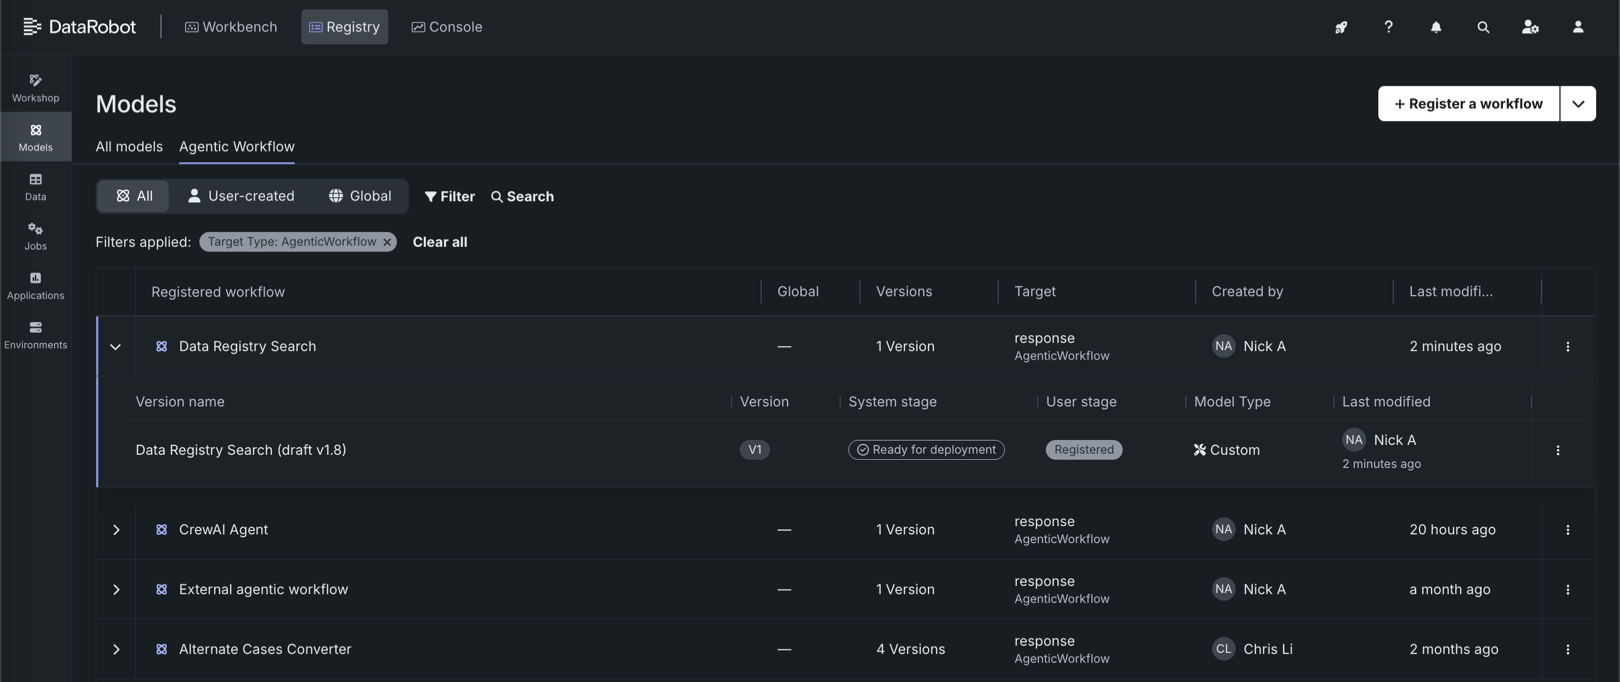
-
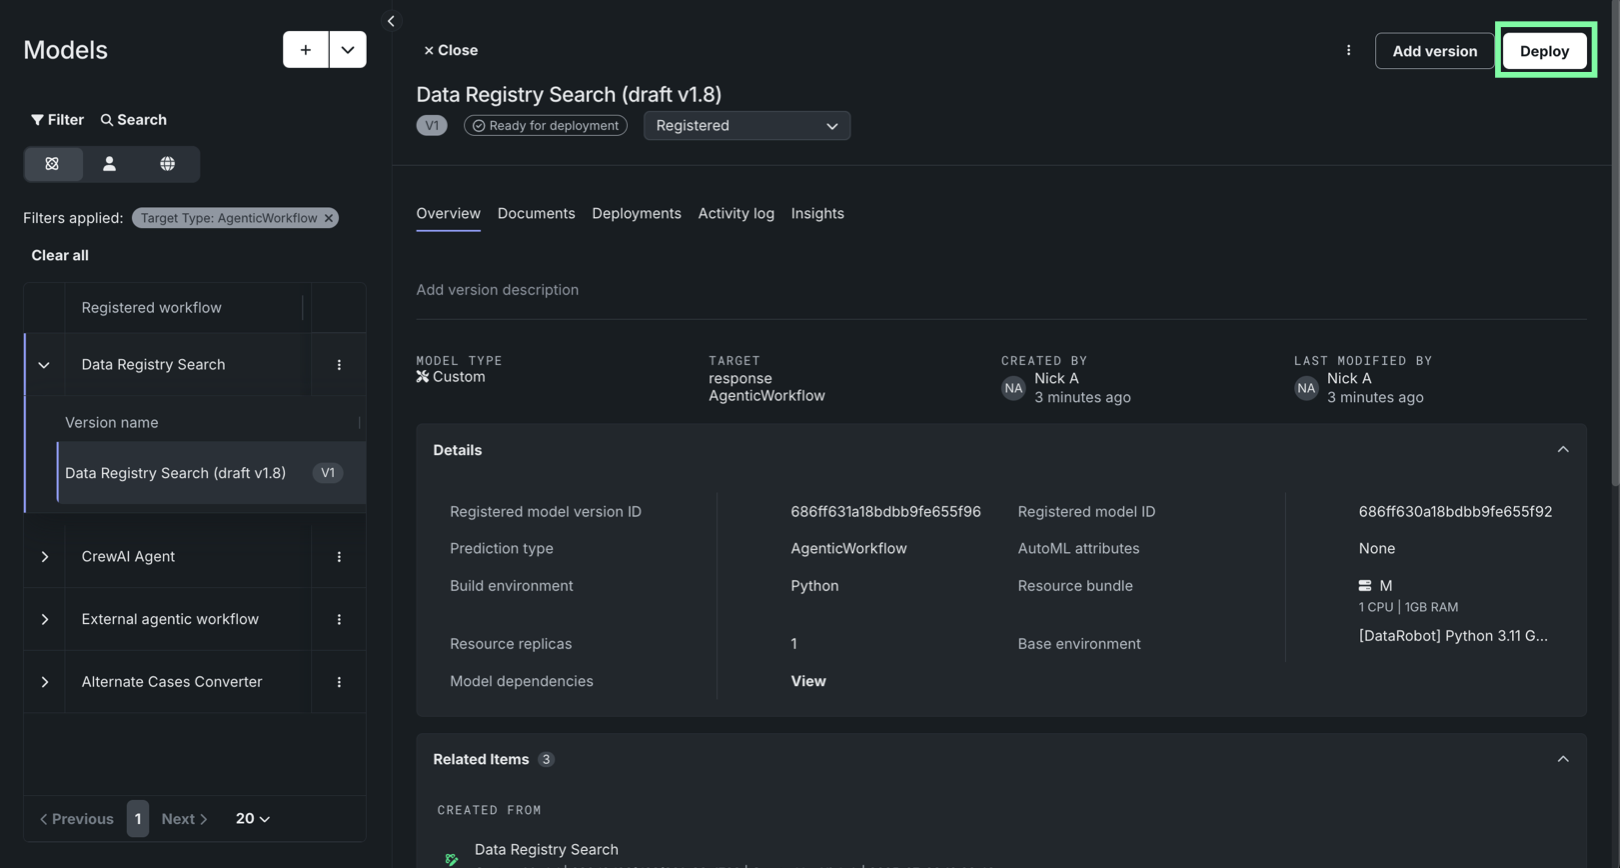
Click the agentic workflow to open it. If it has the Ready for deployment status badge, click Deploy.
-
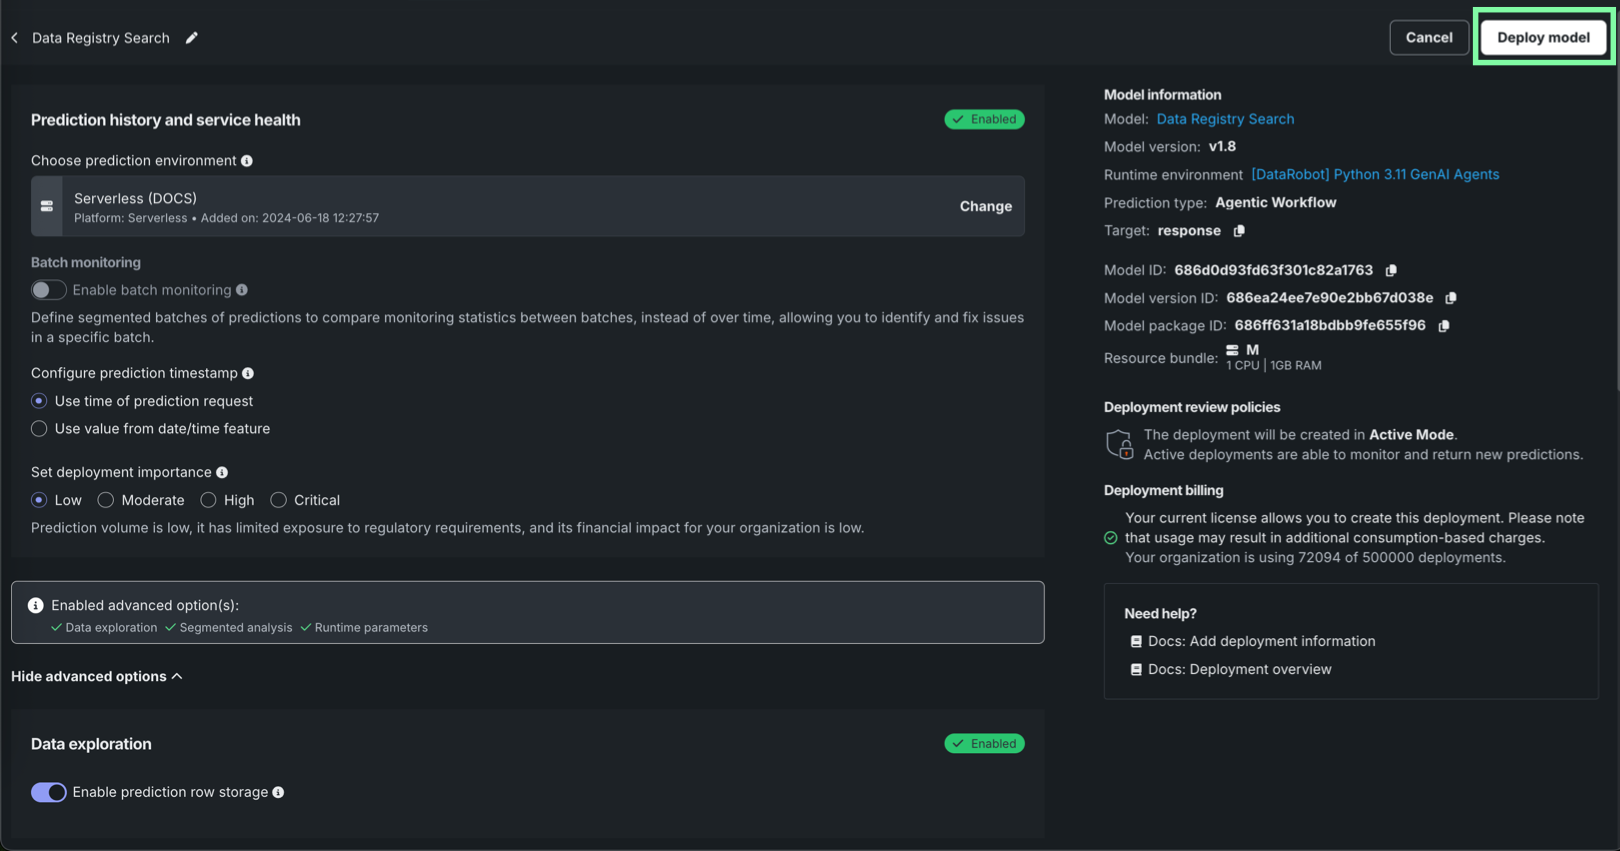
Configure the deployment settings for the agentic workflow. In particular, review the following sections:
- Prediction history and service health: Ensure the intended DataRobot Serverless prediction environment is selected. For this deployment type, you can only select serverless environments.
- Data exploration: Ensure that prediction row storage is enabled for data exploration and analysis.
- Custom metrics: Ensure automatic association ID generation for prediction rows is enabled—and an association ID feature name is provided—to enable custom metrics for the deployment.
- Runtime parameters: Ensure the runtime parameters provided during agentic workflow assembly are correct, and edit them if necessary.
Setting configuration post-deployment
You can configure these settings after the workflow is deployed; however, some settings, like runtime parameters, require temporary deactivation of the deployment.
-
After configuring the deployment settings, click Deploy model.
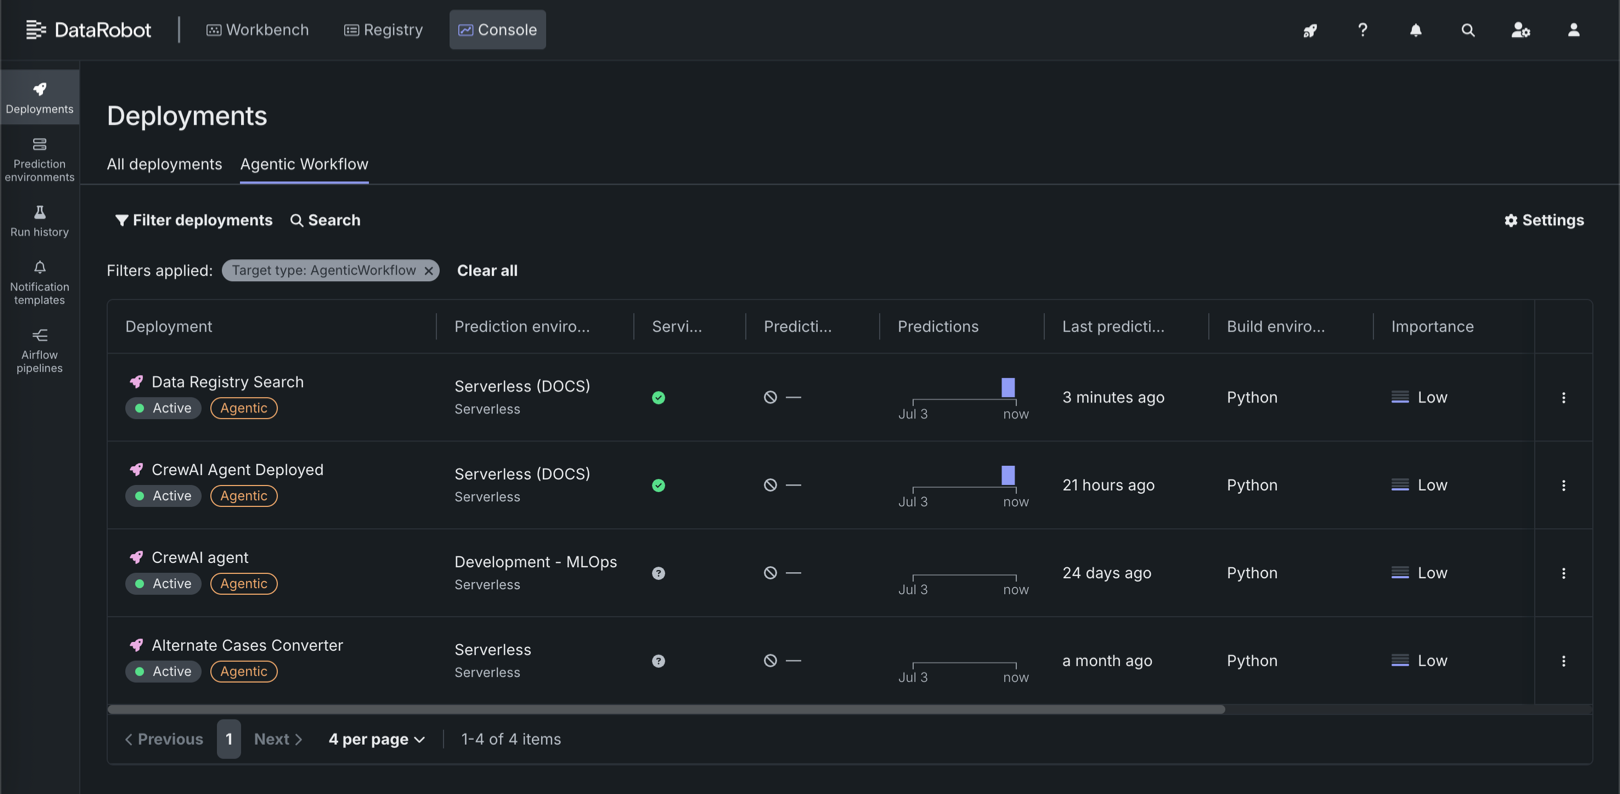
The Creating deployment dialog box appears. Wait for deployment creation, or click Return to deployments to open Console.
In Console, on the Deployments page, click the Agentic Workflow tab to view a list of agentic workflow deployments.
A fully configured agentic workflow deployment has access to the following Console features:
| Feature | Description |
|---|---|
| Overview | |
| Overview | Review deployment details, lineage, tags, runtime parameters, and—when guardrails are configured—evaluation and moderation summary information. |
| Monitoring | |
| Service health | Track model-specific deployment latency, throughput, and error rate. |
| Usage | Track prediction processing progress for use in accuracy, data drift, and predictions over time analysis. For agentic workflow deployments, includes quota usage monitoring segmented by user or agent. |
| Custom metrics | Create and monitor custom business or performance metrics or add pre-made metrics. When you configure evaluation and moderation for the workflow, guard metrics (for example, guard latency and blocked counts) are reported here. |
| Data exploration | Explore and export stored prediction data, actuals, and training data; assess response quality; and use Tracing to inspect agent traces and timelines. |
| Deployment reports | Generate reports, immediately or on a schedule, to summarize the details of a deployment, such as its owner, how the model was built, the model age, and the humility monitoring status. |
| Resource monitoring | Monitor CPU, memory, and replica utilization for the serverless deployment. |
| OTel metrics | Visualize OpenTelemetry metrics from your application alongside DataRobot native metrics. |
| Predictions | |
| Prediction API | Use downloadable snippets to call the deployment's prediction and chat completion APIs from your application (including real-time scoring integrations). |
| Activity log | |
| Standard output | View runtime logs from the custom model container to debug scoring and request failures. |
| Logs | View OpenTelemetry log events for troubleshooting and deeper analysis (span-related logs can also be filtered from Data exploration). |
| Moderation | When evaluation and moderation guardrails are enabled, review guard-related events to diagnose blocked requests and guard failures. |