Notebooks
Hosted data science notebooks where users can execute DataRobot API and other custom code-first workflows. Notebooks are Jupyter compatible and provide centralized governance, enterprise-grade security, and reproducibility for data science teams to collaborate across the code development experience.
Starting with DataRobot 9.1, Notebooks are enabled by default.
Starting with DataRobot 10.0, Codespaces are enabled by default.
Starting with DataRobot 10.2, custom execution environments are enabled by default.
Note
Notebooks need additional CRD.
Warning
Some notebooks services are now installed as a separate sub-chart and no longer share
configs via the notebooks.<service> section. Refer to the 11.0 changes at the end of this document for more details.
The following list outlines the available Notebooks services (services prefixed with notebooks. are configured under notebooks section):
- notebooks.audit-log
- notebooks.code-assistance
- notebooks.code-nuggets
- notebooks.data-retention
- notebooks.environment-variables
- notebooks.execution-environments
- notebooks.filesystems
- notebooks.notebook-import
- notebooks.notebook-revisions
- notebooks.notebooks
- notebooks.orchestrator
- notebooks.permissions
- notebooks.scheduling
- notebooks.terminals
- notebooks.usage-tracking
- notebooks.users
- nbx-ingress
- nbx-websockets
- nbx-operator
- nbx-vcs
- cfx-session-port-proxy
By default, each service has a replica count of 1.
To configure it for a particular service, you can use values.yaml like this:
notebooks:  # for services with prefix `notebooks.` from the list above
  <notebook-service-name>:
    deployment:
      replicaCount: 2

nbx-ingress:  # for services without prefix `notebooks.`
  deployment:
    replicaCount: 2

cfx-session-port-proxy:
  ...
or you can override for all notebooks services:
notebooks:  # only affects services with prefix `notebooks.` from the list above
  global:
    deployment:
      replicaCountOverride: 2
Configuration
To override configs for a notebooks service, use the configs.data section:
notebooks:
  # Common config variables for all services
  <notebook-service-name>:
    configs:
      data:
        ENVIRONMENT: production
        LOG_LEVEL: INFO
        DEBUG: false

        TELEMETRY_ENABLED: false
        TELEMETRY_EXPORTER: otlp
        TELEMETRY_OTLP__PROTOCOL: grpc
        TELEMETRY_OTLP__ENDPOINT: http://localhost:8200
        TELEMETRY_OTLP__INSECURE: true
        TELEMETRY_METRIC_EXPORT_INTERVAL: 5000
  # Service specific configs
  orchestrator:
    configs:
      data:
        ACTIVE_NOTEBOOK_SESSIONS_LIMIT_PER_USER: 2  # This value is the limit on active running sessions per user
        RUNNER_EPHEMERAL_STORAGE_LIMIT: "2Gi"
        NOTEBOOK_STARTUP_TIMEOUT_MIN: 15  # This value is used as a limit for session startup
        KERNEL_EPHEMERAL_STORAGE_LIMIT: "10Gi"
  filesystems:
    configs:
      data:
        MOUNT_DIR: "/home/notebooks/storage"
        ACCESS_MODES: '["ReadWriteOnce"]'
        SIZE: "10Gi"
        STORAGE_CLASS_NAME: default # to override default storage class for notebooks filesystem (https://kubernetes.io/docs/concepts/storage/storage-classes/)
  websocket:
    configs:
      data:
        WEBSOCKET_MAX_PARSER_BODY_SIZE: "64mb"
        WEBSOCKET_TOKEN_EXPIRATION_TIME: "1d"
        WEBSOCKET_IO_PATH: "/socket.io-nbx"
You can also apply these configs to all notebooks services prefixed with notebooks.:
notebooks:
  global:
    configMap:
      data:
        ENVIRONMENT: production
        LOG_LEVEL: INFO
        DEBUG: false
A runner configuration of note is the ability to alter the default values for liveness and readiness probes.
The values in the operator's config section can be optionally altered like so:
RUNNER_CONFIG: |
  startupProbe:
    initialDelaySeconds: 42
    failureThreshold: 333
  livenessProbe:
    initialDelaySeconds: 42
    timeoutSeconds: 41
    periodSeconds: 40
    failureThreshold: 39
    httpGet:
      path: /someOtherPath
      port: 8976
Notebooks currently has one (deprecated) private preview feature:
- Notebooks Filesystem Management - Persistent filesystem management for notebooks (deprecated in 9.2)
This feature can be toggled in User Settings or in the values.yaml like this:
core:
  config_env_vars:
    # ...
    ENABLE_NOTEBOOKS_FILESYSTEM_MANAGEMENT: "False" # deprecated in 9.2, use codespaces instead
To configure these options, refer to the Tuning DataRobot Environment Variables section of this guide.
Notebooks and codespaces active sessions limit
As seen above in the Configuration section, there is a cluster-level environment variable ACTIVE_NOTEBOOK_SESSIONS_LIMIT_PER_USER. This is the amount of DR Notebook/Codespace active sessions that are allowed per user.
Note
This works in tandem with an Org-level limit for active sessions that can be set in the Admin UI. This Org-level limit defaults to 5 and can be set as high as 100.
Notebooks machine sizes
Notebooks supports the following machine sizes:
- XS
- S
- M
- L
- XL
- XXL
- XXXL
The difference between machine sizes correlates to different resource allocation (CPU, RAM).
But not all of them are available by default. Initially, only XS, S, M and L are present in the list of sizes.
To be able to select a bigger one, you need to update NOTEBOOKS_MAX_MACHINE_SIZE eng config on monolith side (default value is L), e.g.
core:
  config_env_vars:
    NOTEBOOKS_MAX_MACHINE_SIZE: "XL"
Machine size changes only CPU and RAM resource request. There is also a way to change persistent file storage size:
notebooks:
  filesystems:
    configs:
      data:
        SIZE: "20Gi"
Notebooks filesystem
If either the notebook filesystem or codespaces feature (enabled by default) is enabled, persistent volumes need to be configured by setting storage class name.
There are several ways to do it in such priority:
STORAGE_CLASS_NAMEconfig item (for more details, see the Configuration section).storageClassNamefrom global section (for more information, see Persistent Storage)- If the previous values are empty, Helm tries to run the lookup operation to get the default storage class name (you need the required permissions to run this operation).
- Default value is
ebs-standard.
Note
If Volume Snapshots aren't configured then Codespaces are not restorable.
Data retention
The data retention service runs hard deletion on a periodic basis. When initially deleted, a notebook and its related resources (at time of deletion) are soft-deleted. Assuming there's been no request for restoration, after a certain period of time (30 days by default) the service hard deletes the assets. This default value can be modified, as shown in the examples below. However, please note that this value can also be set in the DataRobot admin GUI ("Notebooks/codespaces soft-deletion retention period") and that value takes precedence over this default.
notebooks:
  data-retention:
    configs:
      data:
        RETENTION_WINDOW: "7d" # 7 days retention - example of other valid values: "30min", "6h", "90d", etc.
Note
If Volume Snapshots aren't configured then Codespaces are not restorable.
Codespaces
Codespaces are the next generation of the notebook filesystem functionality.
Starting from 9.2, the notebook filesystem feature is being deprecated (feature flag: ENABLE_NOTEBOOKS_FILESYSTEM_MANAGEMENT). For new installations (or if the notebook filesystem feature had not been previously enabled), only Codespaces should be used (enabled by default).
For existing installations that already have the notebook filesystem feature enabled, codespaces should be used (enabled by default) along with the existing notebook filesystem feature.
Custom environments
Custom Environments in Notebooks allow users to build, manage, and use their specific environment images tailored to their data science workflows.
The custom environments feature has been enabled by default since DataRobot 10.2
This feature is built on top of Custom Models.
Note
In order for custom environments to work when Custom Models are enabled and configured, you must ensure that notebooks environments service is aware of Custom Models Image Registry.
There are 2 ways to achieve that, first one is where you need to make sure that both IMAGE_BUILDER_CUSTOM_MODELS_REGISTRY_HOST and IMAGE_BUILDER_CUSTOM_MODELS_ENVIRONMENT_REGISTRY_REPO are configured globally (via modeling-envvars configmap) according to this section. The second option is to set the EXECUTION_ENVIRONMENTS_REGISTRY_REPO config directly for the notebooks execution-environments service like this:
notebooks:
  execution-environments:
    configs:
      data:
        EXECUTION_ENVIRONMENTS_REGISTRY_REPO: "<custom models base image registry>" # usually equal to custom models IMAGE_BUILDER_CUSTOM_MODELS_REGISTRY_HOST + IMAGE_BUILDER_CUSTOM_MODELS_ENVIRONMENT_REGISTRY_REPO configuration
        # some example values:
        # EXECUTION_ENVIRONMENTS_REGISTRY_REPO: 1234567890.dkr.ecr.us-east-1.amazonaws.com (base-image suffix added automatically)
        # EXECUTION_ENVIRONMENTS_REGISTRY_REPO: 1234567890.dkr.ecr.us-east-1.amazonaws.com/custom-models (base-image suffix added automatically)
        # EXECUTION_ENVIRONMENTS_REGISTRY_REPO: 1234567890.dkr.ecr.us-east-1.amazonaws.com/custom-models/base-image
        # EXECUTION_ENVIRONMENTS_REGISTRY_REPO: 1234567890.dkr.ecr.us-east-1.amazonaws.com/custom-models/<custom-image-name>
To disable custom environments on cluster level, use DISABLE_CUSTOM_ENVS config (false by default):
notebooks:
  execution-environments:
    configs:
      data:
        DISABLE_CUSTOM_ENVS: true
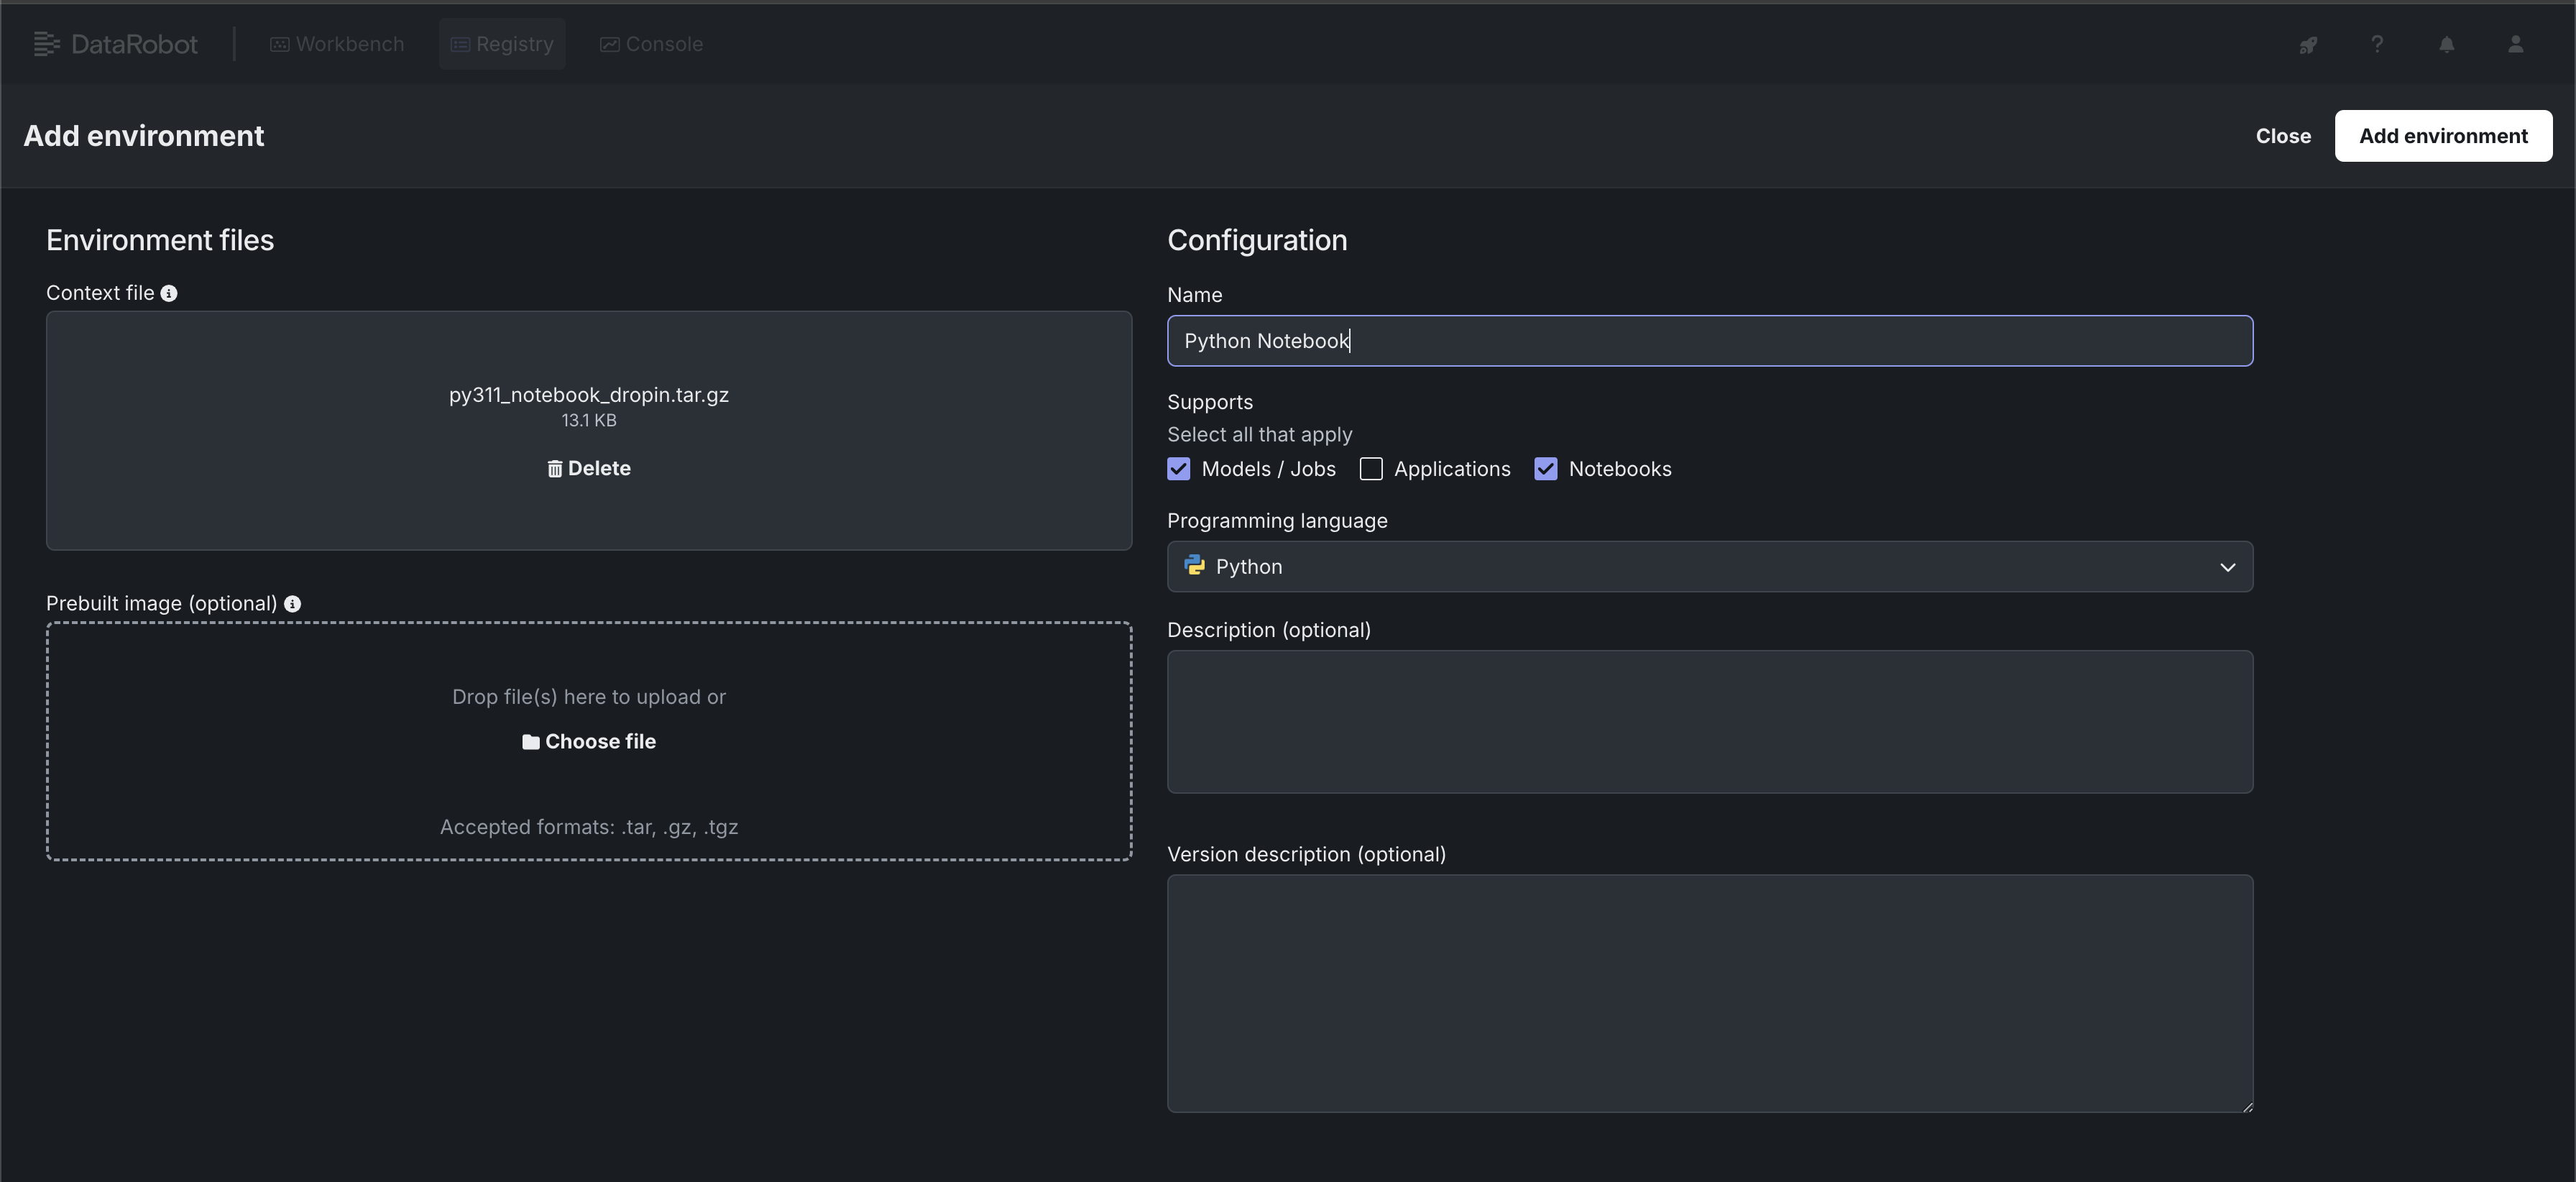
Create an environment
These steps use the "python311_notebook_base" environment.
The environment data must be uploaded as a .tar, .gz, or .zip. DataRobot provides example public environments as a starting point. You can clone the repository and create the tarball yourself or use the pre-made tarball called py311_notebook_dropin.tar.gz in the public_dropin_notebook_environments folder.
- Navigate to Registry > Environments
- Click "+ Add environment"
- Give the environment a name, upload the tarball, set the language to Python and select Environment type as Notebooks
- Press "Add environment" button
Notebook instance deployments
Each notebook instance has two running deployments: kernel and runner. Here is default config of notebook operator that's responsible for running these deployments
nbx-operator:
  imagePullSecrets:
    - name: datarobot-image-pullsecret
By default, it uses datarobot-image-pullsecret (common DR secret)
If you need to pull notebooks images with other pull secrets you could specify it here.
Session environment variables
You can inject extra environment variables into every notebook and codespace session workload by configuring extraEnvVars in the nbx-operator chart.
This is particularly useful in airgapped or self-managed environments that require a private Python package index.
nbx-operator:
  notebookSession:
    extraEnvVars:
      - name: PIP_INDEX_URL
        value: <INDEX_URL_VALUE_HERE>
      - name: PIP_TRUSTED_HOST
        value: <TRUSTED_HOST_VALUE_HERE>
The extraEnvVars list accepts any number of name/value pairs. Each entry is injected as an environment variable into every notebook and codespace session pod.
Revision storage using AWS S3
On-premise installations of DataRobot support storage of notebooks revision files in Amazon S3.
To configure it you need to set IAM role with appropriate permissions (e.g. AWS_IRSA_ROLE_NAME) in values.yaml like this:
notebooks:
  notebook-revisions:
    serviceAccount:
      annotations:
        eks.amazonaws.com/role-arn: AWS_IRSA_ROLE_NAME
For more details, check the following links:
Notebooks revision files are stored under <S3_BUCKET>/<FILE_STORAGE_PREFIX>nbx_rev. (FILE_STORAGE_PREFIX already contains a trailing slash, for example data/.)
GPU Usage configuration
To manage GPU utilization, the operator utilizes GPU-related configurations, which can be set by MACHINE_GPU_1, MACHINE_GPU_2, MACHINE_GPU_3, MACHINE_GPU_4 env vars.
By default, DataRobot doesn't have kernels configured to work with GPUs. You must first enable the ENABLE_NOTEBOOKS_GPU feature flag:
core:
  config_env_vars:
    ENABLE_NOTEBOOKS_GPU: "True"
Afterwards, create a custom notebook environment. For setup instructions, see Custom Environments.
Note
DataRobot previously had drop-in environment support for GPUs (see Python GPU Notebook), but in release/10.2 all such environments, have been deprecated and removed, except Python 3.11 Base, have been deprecated and removed.
Node selectors
Node selectors are utilized to ensure that the pods are scheduled on nodes with GPU capabilities. they're key-value pairs that are added to the nodeSelector term of the pod specification, enforcing that the pod is scheduled on nodes with the corresponding labels.
Example:
nodeSelectors:
  datarobot.com/instance-type: accelerated-computing
  datarobot.com/node-capability: gpu
  datarobot.com/node-type: on-demand
Toleration
Toleration enables the pods to be scheduled on nodes with specific taints, in this case, generally used for GPU resources. To disable the usage of toleration, you can either omit the field or explicitly set it to null.
Example with toleration:
toleration:
  effect: "NoExecute"
  key: "nvidia.com/gpu"
  operator: "Equal"
  value: "true"
Example without toleration:
toleration: null
Usage
Example Helm Values:
notebooks:
  execution-environments:
    configs:
      data:
        MACHINE_GPU_1: |
          name: "nvidia-g6-single"
          cpu: "5000m"
          memory: "54Gi"
          gpu: "1"
          ephemeral_storage: "15Gi"
          node_selector:
            datarobot.com/node-capability: gpu
            datarobot.com/node-type: on-demand
            datarobot.com/gpu-type: nvidia-g6-single
          tolerations:
            - effect: "NoExecute"
              key: "nvidia.com/gpu"
              operator: "Equal"
              value: "true"
where:
name: any name for the GPU resource; this is what's shown in the UIcpu,memory: provisioned resource values for CPU and RAMephemeral_storage: temp storage size (not permanent; it's destroyed when the notebook stops)gpu: GPU count (should be minimum 1 for GPU config)node_selector,tolerations: see Node Selectors and Toleration sections
⚠️ Notebooks require an additional 1Gb/0.5-1 vCPU core for system needs, so recommendation here is reserve those resources. E.g. if required GPU config is 16Gb, 5vCPU, better to set it as 15Gb/4vCPU
Notebooks service supports up to four GPU machine configuration, which could be defined by MACHINE_GPU_1, MACHINE_GPU_2, MACHINE_GPU_3 or MACHINE_GPU_4 env vars.
There is no recommended RAM/CPU values for GPU configs, everything depends on node capacity and machine type. Check as reference:
Default GPU configurations
If MACHINE_GPU_* is not defined, the execution environments utilizes the following default configurations:
- NodeSelectors:
datarobot.com/node-capability: "gpu"datarobot.com/node-type: "on-demand"datarobot.com/gpu-type: "nvidia-g6-single"
- Toleration:
effect: "NoExecute"key: "nvidia.com/gpu"operator: "Equal"value: "true"
Notebook resource configuration
Each of notebook resource types (XS, S, M, L, XL, XXL, XXXL) can be configured by environment variables. Default values are:
notebooks:
  execution-environments:
    configs:
      data:
        # XS - 1 CPU - 4 GB RAM
        MACHINE_XSMALL__CPU: '1000m'
        MACHINE_XSMALL__RAM: '4Gi'
        # S - 2 CPU - 8 GB RAM
        MACHINE_SMALL__CPU: '2000m'
        MACHINE_SMALL__RAM: '8Gi'
        # M - 4 CPU - 16 GB RAM
        MACHINE_MEDIUM__CPU: '4000m'
        MACHINE_MEDIUM__RAM: '16Gi'
        # L - 8 CPU - 32 GB RAM
        MACHINE_LARGE__CPU: '8000m'
        MACHINE_LARGE__RAM: '32Gi'
        # XL - 15 CPU - 63 GB RAM
        MACHINE_XLARGE__CPU: '15000m'
        MACHINE_XLARGE__RAM: '63Gi'
        # XXL - 16 CPU - 256 GB RAM
        MACHINE_XXLARGE__CPU: '16000m'
        MACHINE_XXLARGE__RAM: '256Gi'
        # XXXL - 32 CPU - 256 GB RAM
        MACHINE_XXXLARGE__CPU: '32000m'
        MACHINE_XXXLARGE__RAM: '256Gi'
Private git repositories
The private git integration is available since DataRobot 11.0. It supports cloud versions of GitHub, GitLab, Bitbucket and Microsoft Azure Repos. It also supports GitLab Enterprise Self-Managed for on-prem and STS deployments. The self-hosted versions are to be supported in the future releases.
If you want to work with private git repositories stored in GitHub Cloud, GitLab Cloud, GitLab Enterprise, Bitbucket Cloud. or Azure Repos Cloud, you should configure the OAuth applications first in the DataRobot cluster.
After that, DataRobot users can authorize their accounts and get access to their private repos.
Note for GitHub users: Install the OAuth application created above in your organization so that the OAuth application can access the organization's private repositories.
For personal private repositories, each user must install the same OAuth application in their GitHub account.
If you are enabling a GitLab Enterprise OAuth Provider then you must update the nbx-operator chart like so (where value my-example.net is added):
nbx-operator:
  runner:
    configMap:
      ALLOWED_GIT_HOSTS: "my-example.net,github.com,gitlab.com,bitbucket.org,login.microsoftonline.com"
Kernel gateway authorization
An opt-in feature adds the use of KG_AUTH_TOKEN for all kernel gateway requests (requests made to the kernel pods from the associated runner pod). See the Kernel Gateway config options for details.
To opt in, add the ENABLE_KERNEL_GATEWAY_TOKEN value, set to True, to the orchestrator config.
This feature is an added layer of security for the runner to kernel communication that can be helpful if the default cluster networking policies aren't in place. Meaning, that by default runner A can only communicate with kernel A and not kernel B. However as a way to prevent communication via respective 401 HTTP responses this feature can be enabled for an on-prem setup that doesn't have these default networking policies in place.
This feature isn't enabled by default because it's not normally needed and also since it relies on a modified code path in the NBX operator which then slightly lowers reliability of the startup probe for the kernel. It uses TCP for the probe in that case instead of HTTP and therefore there's a slight chance that the indication the kernel gateway server is ready before it's fully up and running - this is however quite a small chance and an acceptable risk in this case.
Troubleshooting
Hydra (10.0 or below)
Notebooks services are using Hydra, and can possibly have some instabilities. During provisioning, hydra pods may fail on DB migration.
One solution is to remove hydra pods, and it should come up next time in a healthy state.
If you still have issue with notebooks service it's good to check customer resources oauth2clients.hydra.ory.sh
To check it run: kubectl -n DR_CORE_NAMESPACE get oauth2clients.hydra.ory.sh
It should return several records with nbx- prefix (it could be more but these should be present for notebooks).
Each of these clients should have an associated secret. To check it run kubectl -n DR_CORE_NAMESPACE get secrets | grep "oauth2".
If the secret wasn't created, try to check hydra and hydra-maester pods.
You can try to remove these pods and wait for new pods to be created. Appropriate secrets should be created after that.
If the secret wasn't created after previous operation, you can try to delete the oauth2clients custom resource using this command:
kubectl get oauth2clients.hydra.ory.sh -o custom-columns=NAME:.metadata.name | grep 'nbx-' | xargs kubectl delete oauth2clients.hydra.ory.sh
helm upgrade. That should trigger hydra-maester to retry creating the secret.
Scaledown To 0
Scaling cluster down to 0 can lead to the problem with hydra secrets as well. To mitigate the risks of such problems, consider keeping hydra deployments with one pod per deployment. In case of this issue try to do the same procedures described above.
kubectl -n DR_CORE_NAMESPACE delete oauth2clients.hydra.ory.sh <oauth2_client_name>

helm upgrade --install ...
Helm release limitation for version 9.1.1 and prior
For version 9.1.1 and previous versions, there is a limitation regarding the Helm release name.
It must use dr in the Helm release name.
This limitation has been identified and fixed in the forthcoming 9.1.2 and 9.2 releases.
Notebooks upgrade guide
In Helm, when you execute the helm upgrade command, it doesn't automatically upgrade the Custom Resource Definitions (CRDs). Outdated CRDs can lead to compatibility issues and may cause unexpected behavior in the functionality of notebooks. Follow the instructions related to notebooks CRDs.
9.1
In the recent 9.1 upgrade, significant changes were made to the naming standards in the values file for notebooks.
Changes
Prior to version 9.1, services related to notebooks in the values file used a prefix notebooks-. For instance, the notebook operator was defined as:
notebooks:
  notebooks-notebook-operator:
    imagePullSecrets:
      - name: datarobot-image-pullsecret
From version 9.1 onward, the notebooks- prefix has been removed, leading to a more simplified structure. The above example would now be:
notebooks:
  notebook-operator:
    imagePullSecrets:
      - name: datarobot-image-pullsecret
If you have scripts, tools, or other configurations relying on the old naming convention, you'll need to update them to accommodate for this change.
10.1
In 10.1, notebooks machine resource configuration was added.
Changes
For execution-environments service there are separate configuration for each machine size (XS, S, M, L, XL, XXL, XXXL)
Default values are:
notebooks:
  execution-environments:
    configs:
      data:
        # XS - 1 CPU - 4 GB RAM
        MACHINE_XSMALL__CPU: '1000m'
        MACHINE_XSMALL__RAM: '4Gi'
        # S - 2 CPU - 8 GB RAM
        MACHINE_SMALL__CPU: '2000m'
        MACHINE_SMALL__RAM: '8Gi'
        # M - 4 CPU - 16 GB RAM
        MACHINE_MEDIUM__CPU: '4000m'
        MACHINE_MEDIUM__RAM: '16Gi'
        # L - 8 CPU - 32 GB RAM
        MACHINE_LARGE__CPU: '8000m'
        MACHINE_LARGE__RAM: '32Gi'
        # XL - 15 CPU - 63 GB RAM
        MACHINE_XLARGE__CPU: '15000m'
        MACHINE_XLARGE__RAM: '63Gi'
        # XXL - 16 CPU - 256 GB RAM
        MACHINE_XXLARGE__CPU: '16000m'
        MACHINE_XXLARGE__RAM: '256Gi'
        # XXXL - 32 CPU - 256 GB RAM
        MACHINE_XXXLARGE__CPU: '32000m'
        MACHINE_XXXLARGE__RAM: '256Gi'
        # GPU
        MACHINE_GPU_DEFAULT__CPU: '8000m'
        MACHINE_GPU_DEFAULT__RAM: '61Gi'
10.2
In the 10.2 release, significant changes were made to notebooks GPU configuration.
Changes
Notebooks GPU configs have moved to the execution-environments service and supports up to four separate configurations. GPU_CONFIG from the operator's service has been removed.
E.g. of new configuration setup:
notebooks:
  execution-environments:
    configs:
      data:
        MACHINE_GPU_1: |
          name: "nvidia-g6-single"
          cpu: "5000m"
          memory: "54Gi"
          gpu: "1"
          ephemeral_storage: "15Gi"
          node_selector:
            datarobot.com/node-capability: gpu
            datarobot.com/node-type: on-demand
            datarobot.com/gpu-type: nvidia-g6-single
          tolerations:
            - effect: "NoExecute"
              key: "nvidia.com/gpu"
              operator: "Equal"
              value: "true"
11.0
The major change in the 11.0 release is extraction of some notebooks services from the notebooks umbrella chart into separate sub-charts (and repositories).
This change requires a special level of attention during the upgrade process since some configs previously defined in the notebooks section now must be set on a per-service basis.
Changes
Some services have been extracted from the notebooks umbrella chart into separate sub-charts:
- notebooks.ingress -> nbx-ingress
- notebooks.websockets -> nbx-websockets
- notebooks.operator -> nbx-operator
- notebooks.session-port-proxy -> cfx-session-port-proxy
To ensure a smooth upgrade, follow the instructions below:
- Backup your current
values.yamlfile. Before making any changes, ensure you have a backup of your current configuration. - Move service-specific overrides for all services from the list above into dedicated top level sections For example, for notebooks.notebooks-operator service:
notebooks: notebooks-notebook-operator: # this is how it's configured before 11.0 imagePullSecrets: - name: datarobot-image-pullsecret nbx-operator: # this is how it must be configured after 11.0 imagePullSecrets: - name: datarobot-image-pullsecret - Review the
notebooks.globalsection as well as any other "non-service-specific" related overrides in thenotebooks.section and make sure to replicate them for each of the new sub-charts following example in point 2.
11.4
As of 11.4 MAX_FILES_UPLOAD_REQUEST_SIZE and MAX_FILES_UPLOAD_SIZE values for filesystems service are no longer used.
Changes
MAX_FILES_UPLOAD_REQUEST_SIZE and MAX_FILES_UPLOAD_SIZE values for filesystems service are no longer used for the limits applied to uploading Codespace files. Instead there is an Org-level setting (in DR Admin UI) "Max Codespace file upload size (in megabytes)". This is the value that's used for what max size is allowed.