ワークベンチの概要
ワークベンチのインターフェイスは、モデリングプロセスを効率化し、最先端の機械学習およびGenAI技術を活用しながらも、価値を生み出すまでの時間を最小限に抑えます。 ワークベンチでは、以下のことを行います。
-
繰り返し測定が可能なエクスペリメントで、反復とコラボレーションを加速させる。
-
元のデータを、モデリング可能な準備済みのパーティション分割されたデータに変換する。
-
自動化により、最適なモデルから重要なインサイトと予測をすばやく生成する。
-
エンタープライズグレードのgenerative AIソリューションの構築、ガバナンス、運用。お好みの最高級のコンポーネントにより、迅速なイノベーションと適応を実現する。
-
直感的なユーザーインターフェイスとノートブック環境の両方からアクセスする。
ワークベンチは、予測、生成、およびDataRobot Notebooksの出発点です。
予測モデリング
ワークベンチは、データサイエンティストの反復的なワークフローに適合するように設計されており、簡単なプロジェクトの作成とモデルのレビュー、スムーズなナビゲーション、およびすべての重要なインサイトが1か所にまとめられています。 ワークベンチのユーザーインターフェイスを使用すると、モデリングアセットをグループ化、整理、および共有して、DataRobotを活用してエクスペリメントを強化できます。 これらのアセットは、ユースケースと呼ばれるフォルダーのようなコンテナ内に格納されます。
モデリングプロセスはモデルのトレーニングだけに留まらないため、ワークベンチではデータの準備、モデルのトレーニング、および結果を活用してビジネス上の意思決定を行います。 これは、結果に達するまで潜在的な解を_エクスペリメントで繰り返すというアイデアをサポートします。 言い換えれば、ワークベンチは、データを準備し、モデリングし、モデリングから学習し、さらにデータを準備し、またモデリングし...と、モデルを選択し、結果を利害関係者に提示できるまで何度も繰り返すのにかかる時間を最小限に抑えます。
モデル構築後は、以下を使用します。
生成AI
ワークベンチは、GenAIおよびエージェントの取り組みを構築および反復するための出発点であり、ベクターデータベース、プロンプト管理、RAGおよびエージェントのワークフローを構築するためのツールを備えています。 DataRobot GenAIプラットフォームには、APIとGUIの両方のオプションが用意されており、個々のプロンプトと回答レベルで定性的および定量的な比較を行うことで、最適なGenAIコンポーネントを実験、比較、評価できます。 付属の一般的なLLMを使用するか、お好みのライブラリを持ち込みます。また、LLM、ベクターデータベース、埋め込みの持ち込みや選択、サードパーティツールの統合を行うことができます。
DataRobot Notebooks
Notebooksは、データサイエンス分析やモデリングのためのコードを作成・実行するためのブラウザー内エディターを提供します。 プラットフォーム内でのコード開発のためにスタンドアロンノートブックとCodespaceの2種類が用意されています。 スタンドアロンノートブックは、高速で軽量なノートブックベースの開発およびレポート作成に便利なオプションです。 Codespaceは永続的なファイルシステム環境を提供し、ノートブックとノートブック以外のファイルを同じセッションで扱うことができます。
ナビゲーション
DataRobotは、ナビゲーションとアセットの選択に役立つブレッドクラムを提供します。
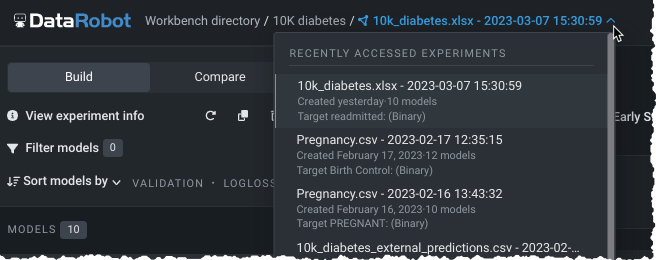
パス内の任意のアセットをクリックすると、その場所に戻ることができます。 パス内の最終的なアセットについては、DataRobotはユースケース内の同じタイプのアセットのドロップダウンを提供し、バックトラックなしでさまざまなアセットにすばやくアクセスできるようにします。
ユースケースアセット
ユースケース は、以下に示す0個以上のアセットで構成されます。
| アセット(記号) | 続けて読む |
|---|---|
| データプレパレーション | |
| ベクターデータベース | |
| エクスペリメント | |
| プレイグラウンド | |
| ノートブックとcodespace | |
| アプリケーション | |
| デプロイ | デプロイ |
| 登録済みのモデル | 登録済みのモデル |
ワークベンチディレクトリ
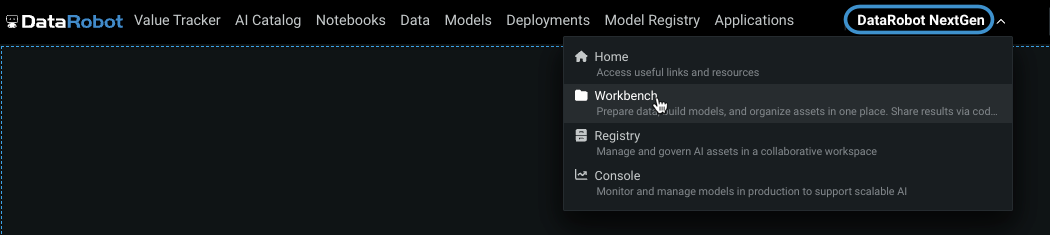
DataRobot Classicを使用している場合、ワークベンチを使い始めるには、DataRobotアプリケーションの上部のナビゲーションバーでDataRobot NextGenをクリックし、ワークベンチを選択します。
ワークベンチのディレクトリが表示されます。 ディレクトリはプラットフォームのランディングページで、ユーザーが属するユースケースのリストと、新しいユースケースを作成するためのボタンがあります。
最初のエントリーでは、ランディングページにようこそが表示され、ワークベンチで実行できる操作の簡単なハイライトが表示されます。 最初のユースケースが開始されると、ディレクトリには、所有または共有しているすべてのユースケースが一覧表示されます。
ユースケースの作成、管理、および共有に関する追加情報を参照してください。
サンプルワークフロー
以下の図は、予測ワークフローと生成ワークフローの概要を示しています。
予測ワークフロー
次のワークフローは、予測モデリングを使用する際にDataRobotのワークベンチで実行できるさまざまな方法を示しています。
flowchart TB
  A((Open Workbench)) --> B{Create/open a Use Case};
  B --> C[Add a dataset];
  B --> D[Add an experiment];
  B --> E[Add a notebook];
  C -. optional .-> F[Wrangle your data];
  E --> M[Create and execute code];
  F -.-> G[Create an experiment];
  G --> H[Set the target];
  D --> L[Select a dataset];
  L --> H;
  H --> I[Start modeling];
  I --> J[Evaluate models];
  J --> K[Make predictions];
  J --> N[Build an application<br> from a model];
生成ワークフロー
次のワークフローは、生成モデリングを使用する際のベクター・データベース、プレイグラウンド、LLMブループリントの操作方法を示しています。
flowchart TB
  A((Open Workbench)) --> B{Create/open a Use Case};
  B -. optional .-> C[Add an<br> internal vector database];
  B -. optional .-> D[Add an<br> external vector database];
  C --> E[Configure vector database];
  D --> E[Configure vector database];
  E --> F[Add playground];
  F --> G[Configure LLM blueprint];
  G --> H[Chat];
  H -. optional .-> I[Tune];
  I -. optional .-> J[Compare];
  J --> K[Deploy];
次のステップ
ここから、次のことができます。
- ユースケースを構築します。
- データを追加してラングリングします。
- エクスペリメントを作成します。