Files
The Files tab in Registry is a centralized place to store, share, and search files of any type, including structured and unstructured data, documents, and binaries. It's commonly used to hold the data behind unstructured knowledge workflows, but you can use it for any files you need to manage and reuse.
See also:
When unstructured data is added as part of a workflow within DataRobot, after registration is complete, the file is accessible from this page (even if the associated Use Case is deleted).
From here, you can:
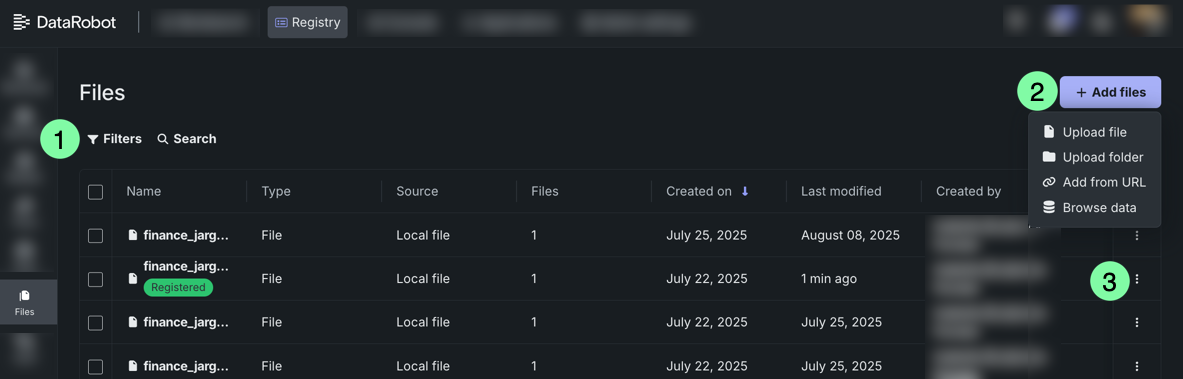
| Element | Description | |
|---|---|---|
| 1 | Filters / Search | Filter files by Source, Owner, and Tags, or search by file name. |
| 2 | + Add files | Register files using the selected method:
|
| 3 | Actions menu | Open the menu to download or delete the file. |
For each registered file, the following columns are displayed in the table:
| Column | Description |
|---|---|
| Name | The name of the registered file. Click the file to modify its name. |
| Type | Indicates if the item is a file or folder. |
| Source | Indicates how the file was uploaded (e.g., local file). |
| Files | The number of files within the container. |
| Created on | When the file was first added. |
| Last modified | When the file was last updated. |
| Created by | The user who first added the file. |
| Tags | User-defined tags associated with the file. |
Select one or more files to activate additional file actions at the top of the page.
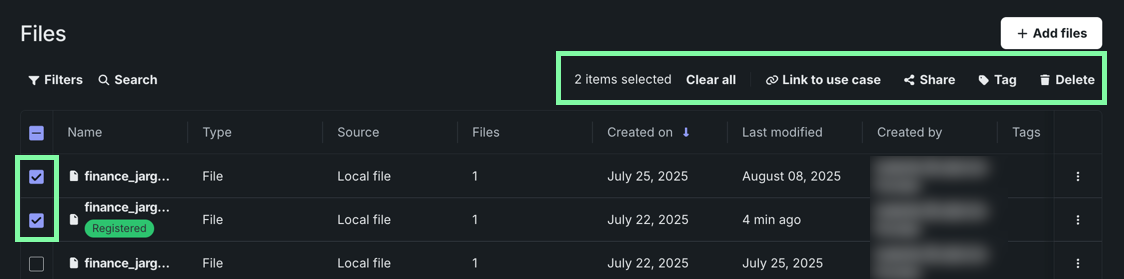
A counter displays the number of items actively selected and to the right, you have the option to:
- Link to Use Case: Link the files to one or more Use Cases.
- Share: Share the files with a user, group, and/or organization.
- Tag: Add tags to the files to use for filtering.
- Delete: Delete the files from Registry. Doing so removes the files from and Use Cases they're associated with.
View files
Click on a file row to open the file details pane, providing additional information about the specific item, including a preview and version history. The center panel displays a tabular preview, as well as file actions:
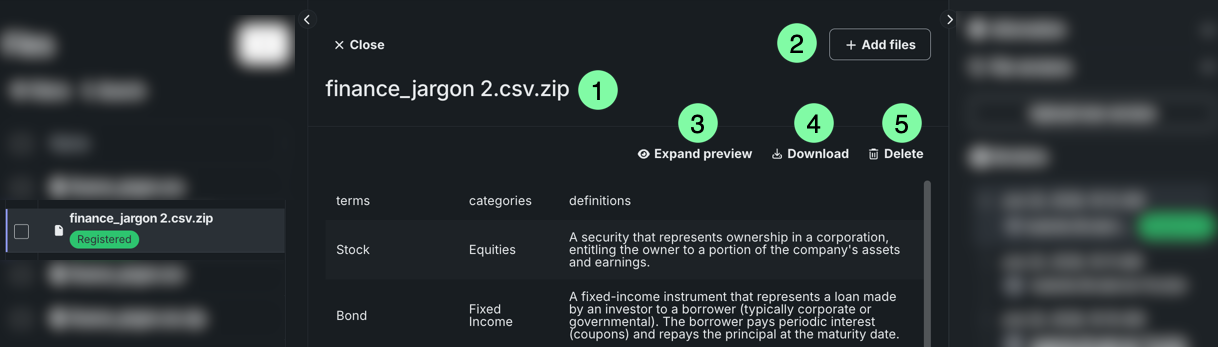
| Element | Description | |
|---|---|---|
| 1 | File name | Click to edit the file name. |
| 2 | Actions | Opens the Actions dropdown, where you can:
The new version appears under File versions on the right. |
| 3 | Expand preview | Opens a full-page version of the preview. |
| 4 | Download | Downloads the file to your local machine. |
| 5 | Delete | Deletes the file from Registry and all Use Cases linked to it. |
Viewing folders
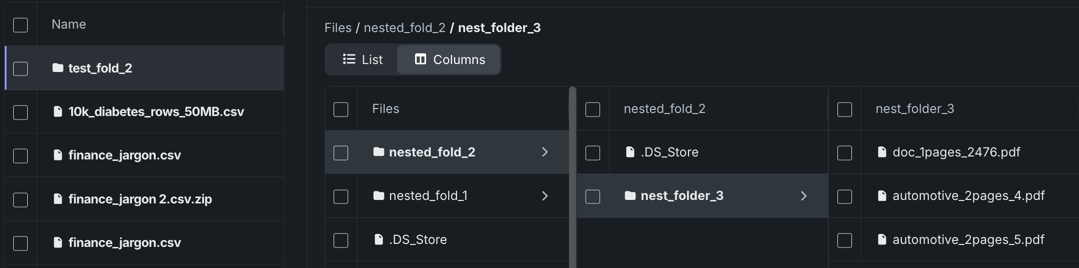
When viewing folders, there are two display options:
-
List: Selecting a new folder only displays the information for that specific folder. Use the breadcrumbs at the top see the current hierarchy. In this example, the main folder
test_fold_2is selected, and then the foldernest_fold_1.
-
Columns: Selecting a new folder opens a new panel the right. This view is recommended for browsing as it allows you to view more of your data once as well as easily navigate between folders.
Viewing Jira and Confluence files
Files added from the Jira and Confluence connectors are stored as structured JSON. Selecting one opens an interactive preview that displays the content as a collapsible tree rather than raw text.
Expand and collapse the items to move through the structure—issue fields and comments for Jira, page content and metadata for Confluence. If a value contains additional JSON, the preview unwraps it so you can expand it in place instead of reading an escaped string.
As with any other file, click Expand preview to open the full-page view and Download to save the original JSON.
File metadata
In the right panel, the Information dropdown displays file metadata:
| Row | Description |
|---|---|
| Tags | User-defined tags added to the file. |
| Size | The size of the file. |
| Created | When the file was uploaded, represented as YYYY-MM-DD HH:MM:SS. |
| Modified | When the file was last updated, represented as YYYY-MM-DD HH:MM:SS. |
| Owner | Who uploaded the file. |
| Catalog ID | The unique identifier used to reference the file programmatically. Each catalog item has its own ID, permissions, and version history (i.e., there is one catalog, but there can be more than one version). |
| Version ID | The unique identifier for specific file version. |
Schedule file refreshes
Availability information
The ability to create a scheduled file refresh is only available for files that allow DataRobot to reread the original source to add the latest version. This includes files that were originally:
- Added from an external data source via the Browse data modal.
- Added from a URL.
Files uploaded from a local machine cannot be automatically refreshed because there is no source for DataRobot to re-read.
Scheduling allows you to automatically refresh a file on a specified schedule, so the latest version in Registry remains current with the source. Each time a scheduled refresh runs, DataRobot re-reads the file from its original source and adds it as a new version—all previous versions are listed under File versions, allowing you to compare what changed or use a previous version.
To schedule a file refresh:
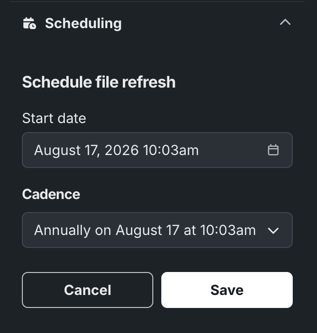
- Expand Scheduling in the right panel and click + Schedule file refresh.
-
To set a date for scheduled refreshes to begin, click the field below Start date and use the calendar picker to choose a date. The start date and cadence default to your current time.
-
Under Cadence, select how often you want file refreshes to occur—daily, weekly, monthly, or annually.
- To finish creating the schedule, click Save.
Access and view the status of all scheduled refreshes by expanding Scheduling.
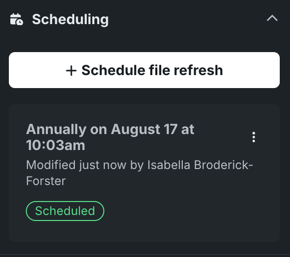
Open the Actions menu next to a refresh to:
- Pause/Resume: Pause or resume the scheduled refresh.
- Edit: Edit the schedule of the refresh.
- Delete: Delete the scheduled refresh.
All scheduled file refreshes appear with one of the following status badges:
| Badge | Description |
|---|---|
| Scheduled | The schedule is active and DataRobot will perform the refresh at the specified date/time/cadence. |
| Paused | The schedule is not active and must be manually unpaused to resume the schedule. |
| In progress | The schedule was recently edited and is being saved. |
Troubleshooting
If DataRobot cannot reach the source to perform a refresh, for example, if credentials expired or access was revoked, the schedule is disabled rather than retrying because reauthorization requires users to sign in. When this happens, you cannot activate the same scheduled refresh. Instead, you must reconnect to the source and create the schedule again.
File versioning
In the right panel, the Versions dropdown displays a version history of the file, including when the version was added and by whom.
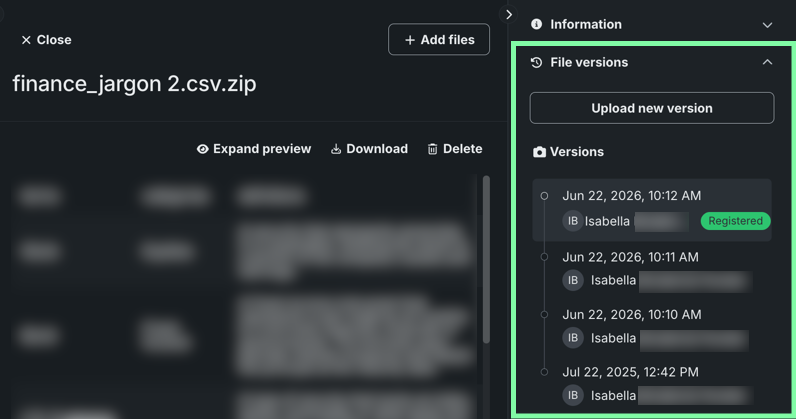
Each file entry supports multiple versions, allowing you to upload a new version of the file without creating a separate entry, preserving a history of how the file changes. Click to view a specific version of the file.
Next steps
Once files are registered, use them as source data for other workflows or manage them alongside your other registered assets.
- Create a vector database: Use a dataset from the File Registry as the knowledge source when building a vector database for RAG.
- Create custom models: Assemble a custom model in the workshop using a collection of registered files.
- Data: Manage structured datasets in the companion Data Registry, which converts uploaded files into CSV format for use in experiments.