SAML SSO
DataRobot allows you to use external services (Identity Providers, known as IdPs) for user authentication through single sign-on (SSO) technology. SSO support in DataRobot is based on the SAML 2.0 protocol. To use SAML SSO in DataRobot, you must make changes to both the IdP and service provider (DataRobot) configurations.
Availability information
Availability of single sign-on (SSO) is dependent on your DataRobot package. If it is not enabled for your organization, contact your DataRobot representative.
Required permission: Enable SAML SSO
The basic workflow for configuring SAML SSO is as follows:
- Review and complete the prerequisites.
- Configure SSO in your identity provider and identify DataRobot as the service provider.
- Configure SSO in DataRobot:
- Choose a configuration option to set up the Entity ID and IdP metadata.
- Use mapping to define how attributes, groups, and roles are synchronized between DataRobot and the IdP.
- Set SSO requirements, including making SSO optional or required for all users.
The Self-Managed AI Platform provides enhanced SAML SSO :
Availability information
Required permission: Enable Enhanced Global SAML SSO
The basic workflow for configuring SAML SSO is as follows:
- Review and complete the prerequisites.
- Configure SSO in your identity provider and identify DataRobot as the service provider.
- Configure SSO in DataRobot:
- Choose a configuration option to set up the Entity ID and IdP metadata.
- Use mapping to define how attributes, groups, and roles are synchronized between DataRobot and the IdP.
- Modify security parameters to increase or decrease the SAML protocol security strength.
- Set up advanced options.
- Set SSO requirements, including making SSO optional or required for all users.
Prerequisites
Make sure the following prerequisites are met before starting the SAML SSO configuration process:
- SAML for SSO is enabled.
- The organization has at least one Org/System admin; the admin will be responsible for SAML SSO configuration once it is enabled.
Contact your DataRobot representative to enable SAML SSO, and if necessary, to set up the first Org/System admin user (that user can then assign additional users to the Org/System admin role).
- SAML for SSO is enabled.
- The organization has at least one System admin; the System admin will be responsible for SAML SSO configuration once it is enabled.
Contact your DataRobot representative to enable SAML SSO, and if necessary, to set up the first System admin user (that user can then assign additional users to the System admin role).
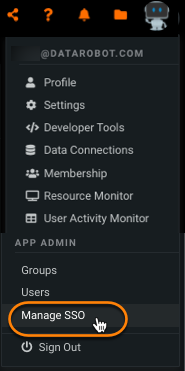
The following describes configuration necessary to enable SAML SSO for use with DataRobot. Admins can access the information required for setup on DataRobobt's SAML SSO configuration page, which can be accessed from Settings > Manage SSO:
Identity Provider (IdP) configuration
Note
- Because configurations differ among IdPs, refer to your provider's documentation for related instructions.
- DataRobot does not provide a file containing the metadata required for IdP configuration; you must manually configure this information.
When configuring the IdP, you must create a new SAML application with your IdP and identify DataRobot as the service provider (SP) by providing SP sign-in and sign-out URLs.
To retrieve this information in DataRobot, go to Settings > Manage SSO and locate Service provider details, which lists URL details.

The following table describes the URLs:
Use the root URL with the organization name appended. The organization name is the name assigned to your business by DataRobot, entered in lowercase with no spaces.
| URL type | Root URL | Description | Okta example |
|---|---|---|---|
| SP initiated login URL | app.datarobot.com/sso/sign-in/<org_name> | The endpoint URL that the IdP receives service provider requests from (where the requests originate). | Recipient URL |
| IdP initiated login URL | app.datarobot.com/sso/signed-in/<org_name> | The endpoint URL that receives the SAML sign-in request from the IdP. | Single sign-on URL |
| IdP initiated logout URL | app.datarobot.com/sso/sign-out/<org_name> | (Optional) The endpoint URL that receives the SAML sign-out request from the IdP. | N/A |
| URL type | Root URL | Description | Okta example |
|---|---|---|---|
| SP initiated login URL | https://app.datarobot.com/sso/sign-in/ | The endpoint URL that the IdP receives service provider requests from (where the requests originate). | Recipient URL |
| IdP initiated login URL | https://app.datarobot.com/sso/signed-in/ | The endpoint URL that receives the SAML sign-in request from the IdP. | Single sign-on URL |
| IdP initiated logout URL | https://app.datarobot.com/sso/sign-out/ | (Optional) The endpoint URL that receives the SAML sign-out request from the IdP. | N/A |
The tabs below provide example instructions for finishing IdP configuration in Okta, PingOne, and Azure Active Directory.
Third-party application screenshots
The following images were accurate at the time they were taken, however, they may not reflect the current user interface of the third-party application.
Make sure that the following required configuration is complete on the IdP side—this example uses Okta.
- If you don't already have an Okta developer account, sign up for free using your GitHub username or email.
- In Okta, click Applications > Applications in the left-hand navigation.
-
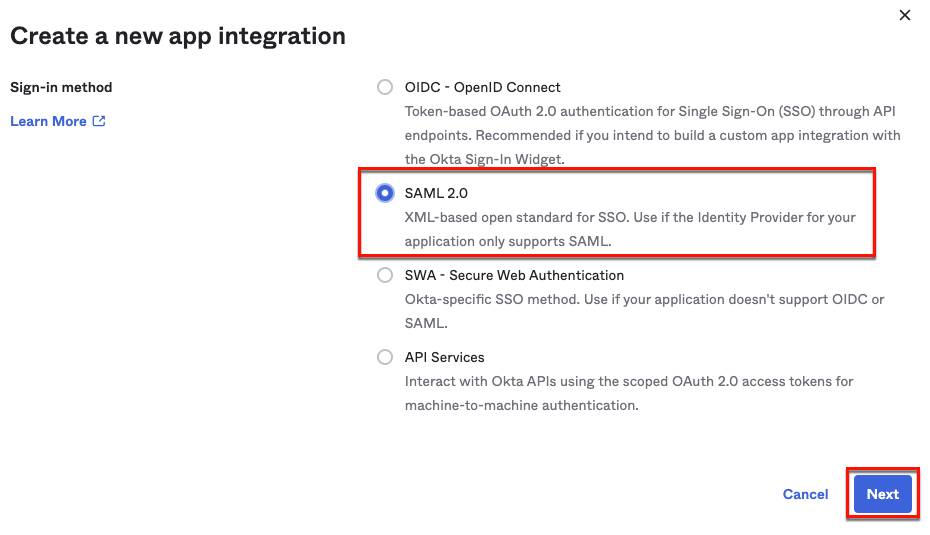
Click Create App Integration, select SAML 2.0, and click Next.
-
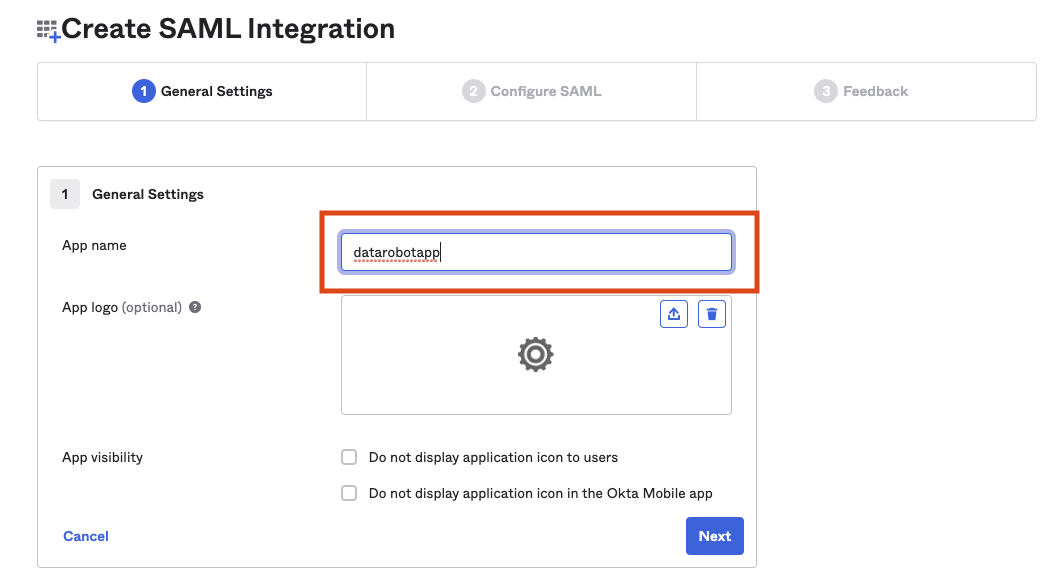
On the General Settings tab, enter a name for the application and click Next.
-
On the Configure SAML tab, fill in the following fields:
- Single sign-on URL
- Audience URI (SP Entity ID)
- Attribute Statement for
username
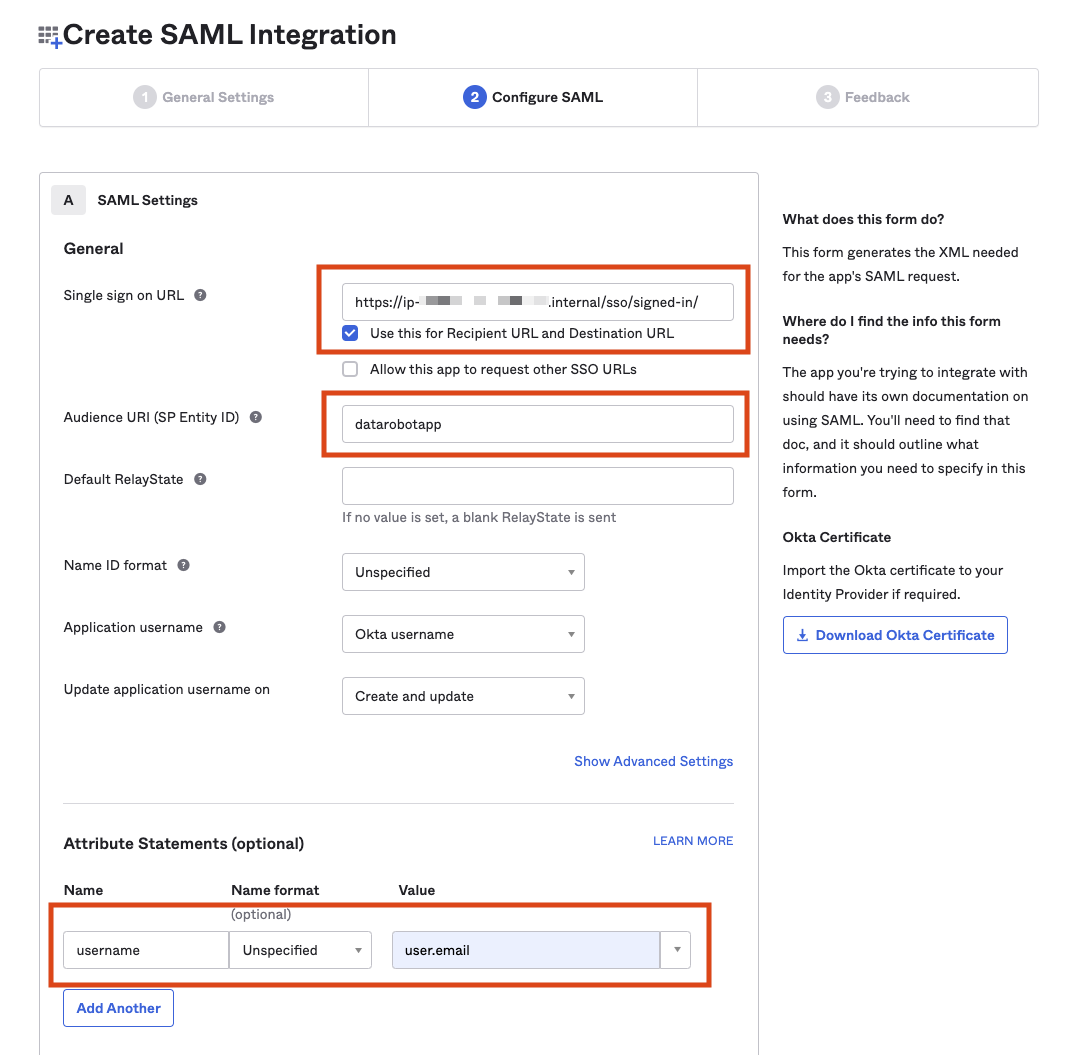
Note
The Single sign-on URL has
signed-inat the end. The attributeusernamemust be set touser.emailin order for SSO login to be successful with DataRobot. -
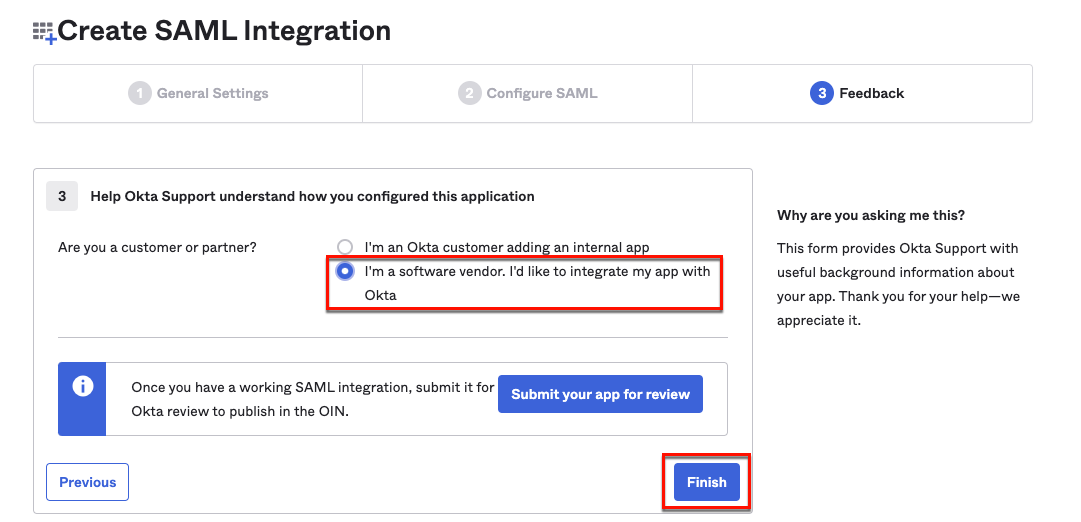
On the Feedback tab, select I’m a software vendor and click Finish.
-
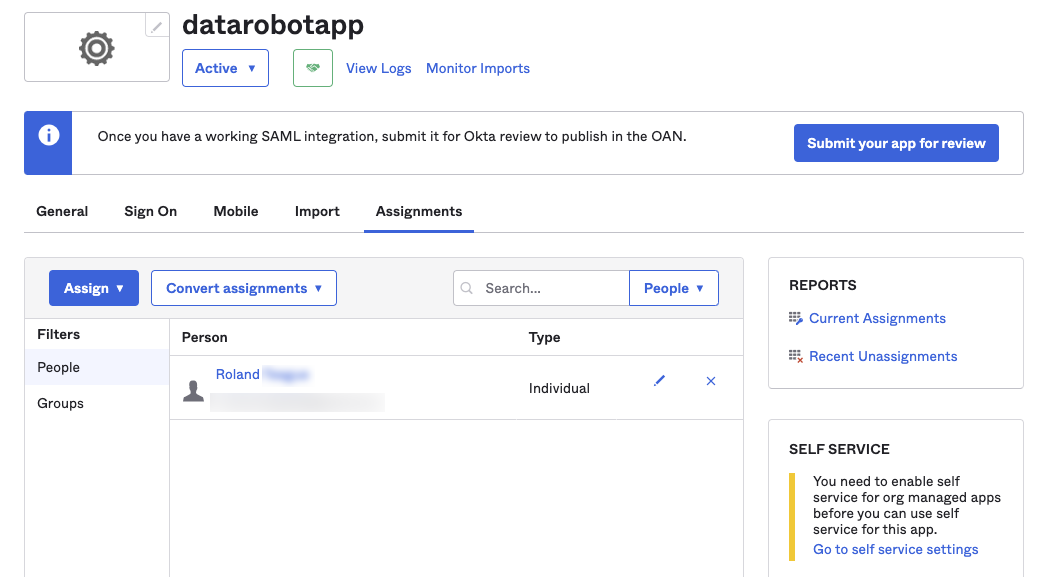
With your new application selected, click Applications > Assignments and assign People or Groups to your app.
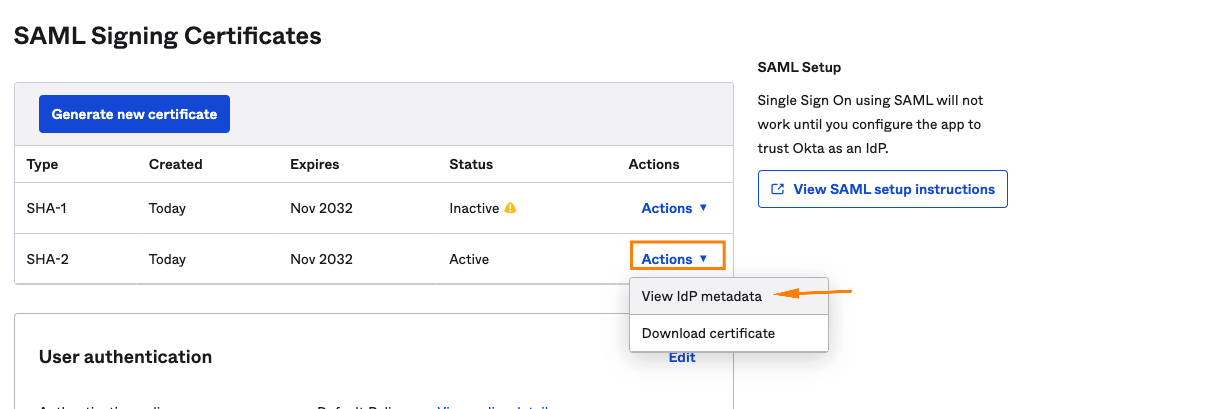
- On the Sign On tab, locate the SAML Signing Certificates section. Next to SHA-2, select Actions > View IdP metadata and copy the IdP metadata link address—you will need this to configure SSO in DataRobot.
Make sure that the following required configuration is complete on the IdP side—this example uses PingOne.
-
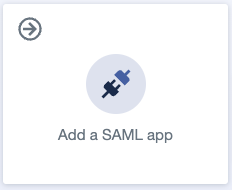
Click the Add a SAML app tile.
-
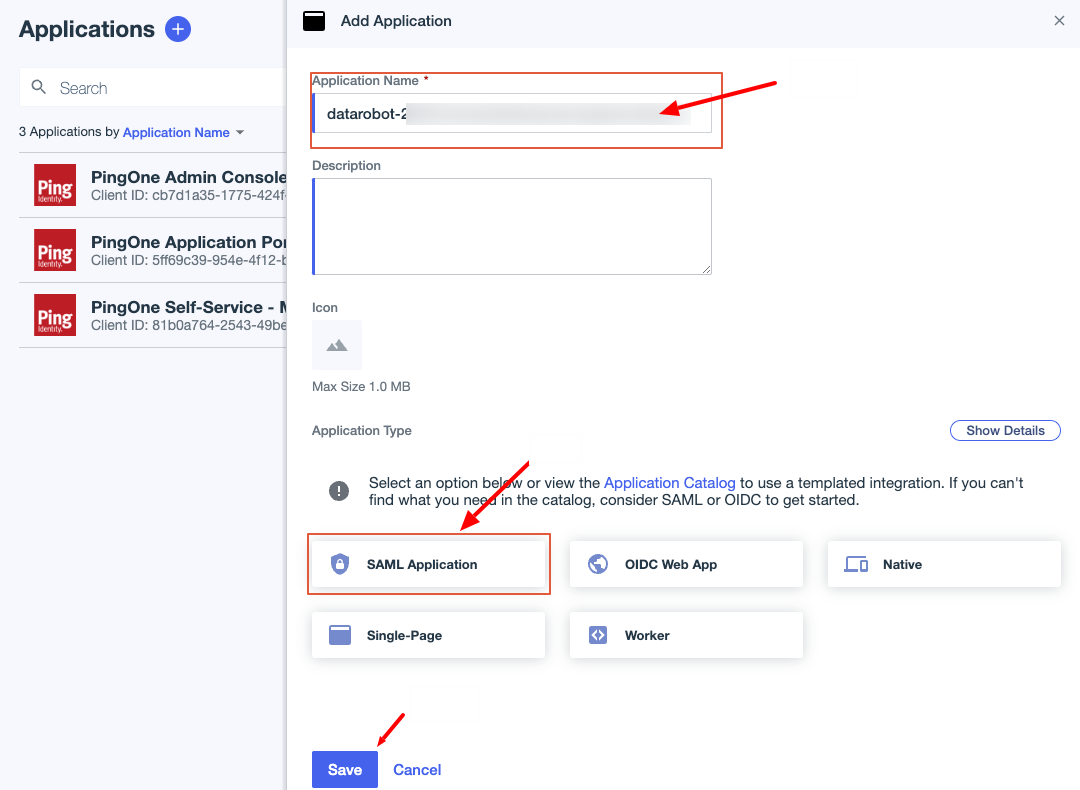
Click the + icon the right of the Applications.

-
Name the application, select SAML Application, and click Save.
-
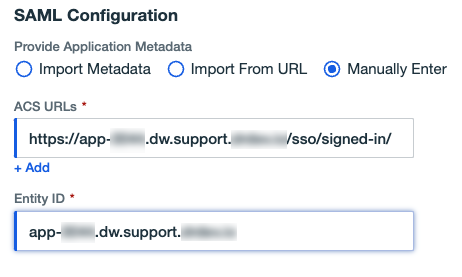
Select Manually Enter; then copy and paste the following:
- Copy the IdP initiated login URL from DataRobot and paste it in the ACS URLs field.
- Copy the Entity ID from DataRobot and paste it in the Entity ID field. Make sure to remove the leading
httpsand trailing path. This must be an exact match when configuring PingOne in DataRobot.
-
Click Save.
-
Open the Configuration tab and click the pencil icon.

-
Make sure Sign Assertion & Response is selected.

-
Scroll down to the Subject Named Format dropdown. Click the dropdown and select
urn:oasis:names:tc:SAML:2.0:name-id:transient.
-
Click Save.
-
Use the toggle to turn on the
Example Ping1 integration with DataRobotPingOne application.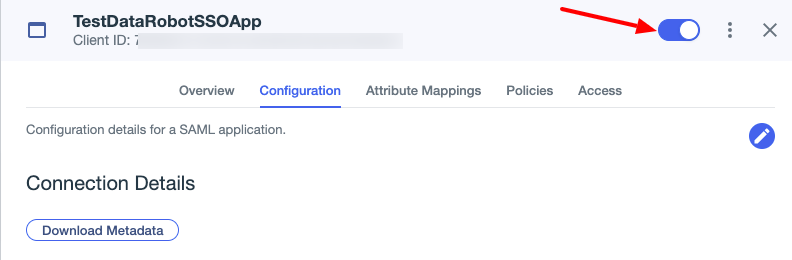
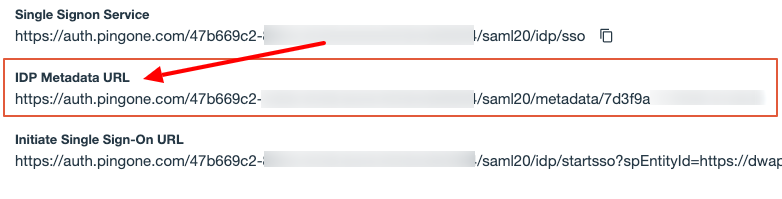
-
Save the IDP Metadata URL. You will need this to configure SSO in DataRobot.
Map Attributes (optional)
If you decide to map attributes, you must complete both of the steps below. Typically, DataRobot uses an email address to identify users, however PingOne uses their username. Do not skip this step because it maps email addresses to usernames.
-
Click the Attribute Mappings tab and click the pencil icon.

-
Next to
saml_subject, change the PingOne Mapping to Email Address. Click Add, enterusernameunder Attributes, and select Email address for the PingOne Mapping.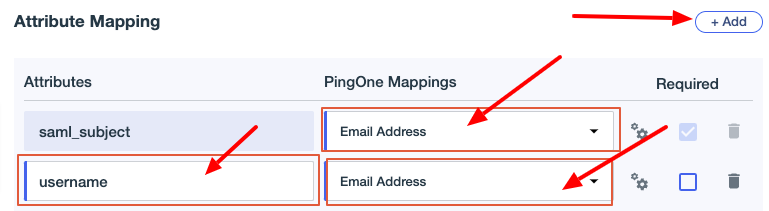
-
-
Click Save.
Make sure that the following required configuration is complete on the IdP side—this example uses Azure Active Directory.
- Sign into Azure as a cloud application admin.
-
Navigate to Azure Active Directory > Enterprise applications and click + Create your own application.
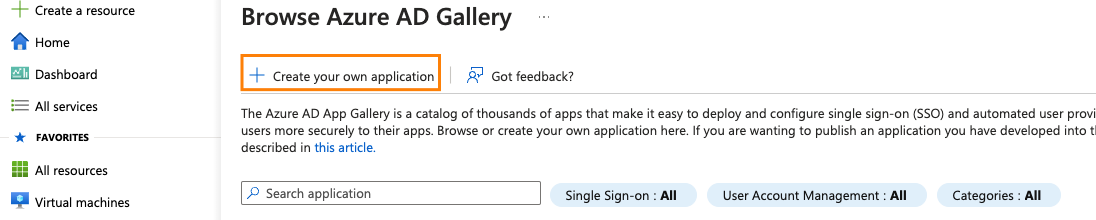
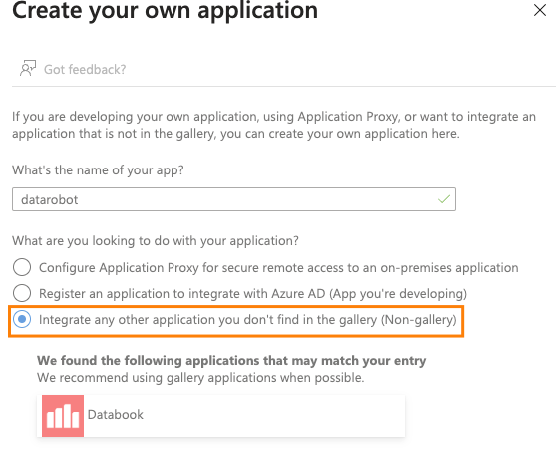
-
Name the application, select Integrate any other application you don't find in the gallery (Non-gallery), and click Add.
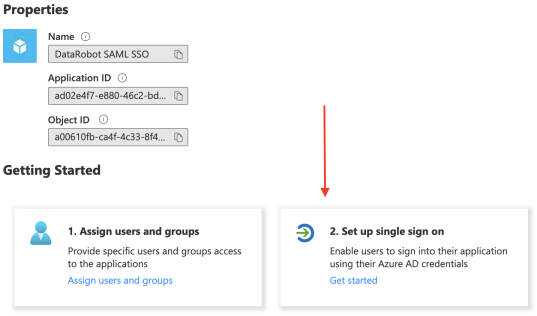
-
On the Overview page, select Set up single sign on and select SAML as the single sign-on method.
-
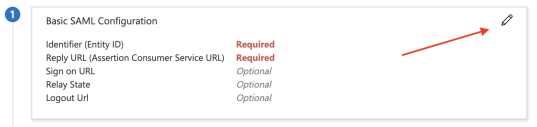
Click the pencil icon to the right of Basic SAML Configuration. Populate the following fields:
- For Identifier (Entity ID), enter an arbitrary string.
- For Reply URL (Assertion Consumer Service URL), enter
<domain>/sso/saml/signed-in/.
-
Click Save.
-
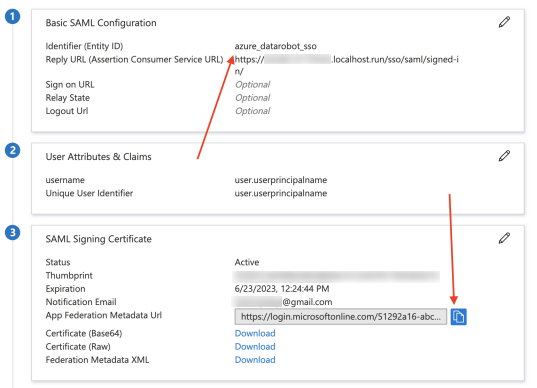
Click the pencil icon to the right of User Attributes & Claims. Delete all default additional claims and add the following claims:
usernameas Name.Attributeas Source.user.userprincipalnameas Source attribute.

If the form prevents you from saving without a Namespace value, provide any string, click Save, and then edit it again to remove the Namespace value. After saving, the new claim appears in the table.
-
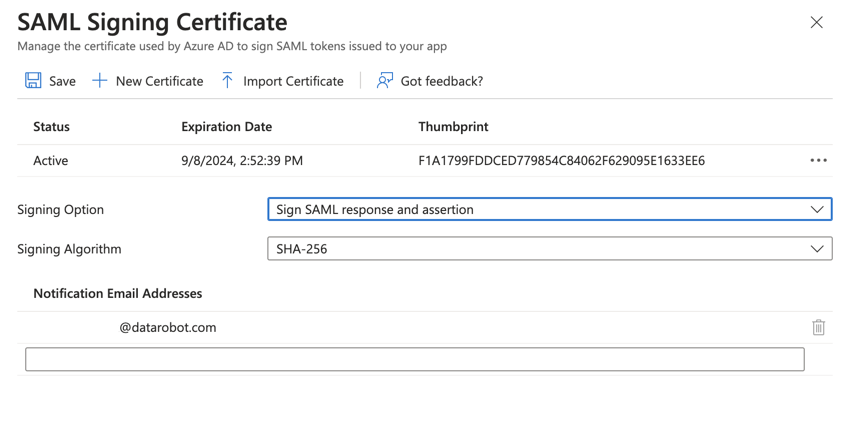
Before proceeding, ensure the Signing Option is set to sign both the SAML response and assertion in the Azure Active Directory settings. Otherwise, you can encounter a SAML SSO authentication for a missing signature.
- In Azure's Set up Single Sign-On with SAML preview page, find the SAML Signing Certificate heading and click the Edit pencil icon to navigate to the SAML Signing Certificate page.
- In the Signing Option dropdown list, select Sign SAML response and assertion.
- Click Save to apply the new SAML signing certificate settings.
-
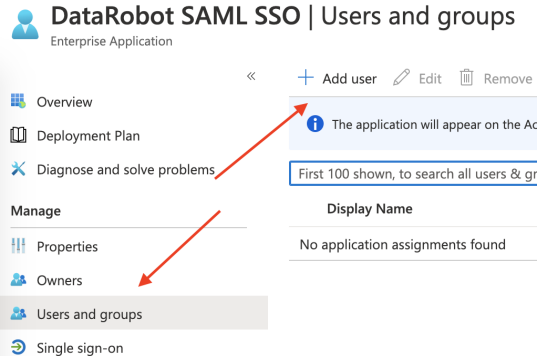
To make sure the test account has access to the application, open Users and groups in the left-hand navigation and click Add user.
-
Copy the Identifier (Entity ID) and App Federation Metadata URL—you will need these values to configure SSO in DataRobot.
After configuring SSO in the IdP, you can now configure SSO in DataRobot.
DataRobot configuration
Now, configure the IdP in DataRobot.
Saving progress
At any point in your configuration, and at configuration completion, click Save and Authorize. The button is only active when the minimum required fields are complete.

After configuring the IdP, you must configure SSO in DataRobot by setting up an Entity ID and IdP Metadata for your organization. There are two Entity IDs—one from the service provider (DataRobot) and one from the IdP:
- The Entity ID entered in the DataRobot SSO configuration is a unique string that serves as the service provider entity ID. This is what you enter when configuring service provider metadata for the DataRobot-specific SAML application on the IdP side.
- If manually configuring IdP metadata for the DataRobot-side configuration, the Issuer field is the unique identifier of the Identity Provider (IdP), found on the IdP DataRobot-specific SAML application configuration. Normally, it is a URL of an identity provider.
When logged in as an admin, open Settings > Manage SSO and click the Configure using dropdown to see the three options available to configure the IdP parameters (described in below).
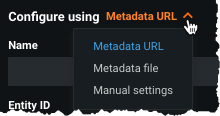
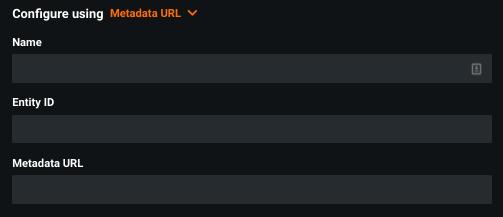
Metadata URL
Complete the following fields:
| Field | Description |
|---|---|
| Name | Specify a meaningful name for the IdP configuration (for example, the organization name). This name will be used in the service provider details URL fields. Enter the name in lowercase, with no spaces. The value entered in this field updates the values provided in the Service provider details section. |
| Entity ID | An arbitrary, unique-per-organization string (for example, myorg_saml) that serves as the service provider Entity ID. Enter this value to establish a common identifier between DataRobot (SP) app and IdP SAML application. |
| Metadata URL | A URL provided by the IdP that points to an XML document with integration-specific information. The endpoint must be accessible to the DataRobot application. (For a local file, use the Metadata file option.) |
| Verify IdP Metadata HTTPS Certificate | If toggled on, the host certificate is validated for a given metadata URL. |
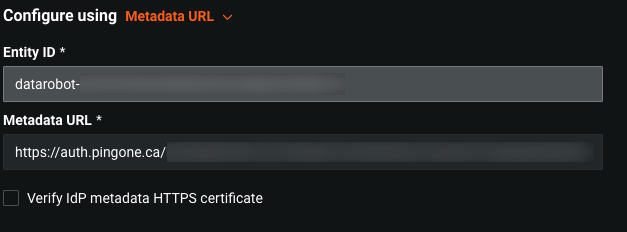
| Field | Description |
|---|---|
| Entity ID | An arbitrary, unique identifier of the SAML application created at Idp side, see SP Entity ID / Issuer / Audience above (some IdPs use Client ID term). Enter this value to establish a common identifier between the DataRobot (SP) app and the IdP SAML application. |
| Metadata URL | A URL provided by the IdP that points to an XML document with integration-specific information. The endpoint must be accessible to the DataRobot application. (For a local file, use the Metadata file option. In case the URLs triggers file downloading then also use the Metadata file option for downloaded metadata XML file.) |
| Verify IdP Metadata HTTPS Certificate | If toggled on, the host certificate is validated for a given metadata URL. |
Metadata file
Select Metadata file to provide IdP metadata as XML content.
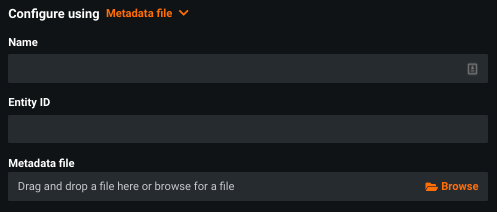
Complete the following fields:
| Field | Description |
|---|---|
| Name | Specify a meaningful name for the IdP configuration (for example, the organization name). This name will be used in the service provider details URL fields. Enter the name in lowercase, with no spaces. The value entered in this field updates the values provided in the Service provider details section. |
| Entity ID | An arbitrary, unique-per-organization string (for example, myorg_saml) that serves as the service provider Entity ID. Enter this value to set a matching between DataRobot (SP) app and IdP SAML application. |
| Metadata file | An XML document, provided by the IdP, with integration-specific information. Use this if the IdP did not provide a metadata URL. |
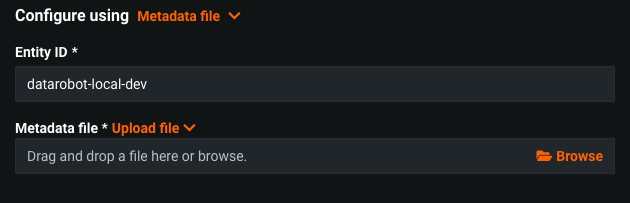
Complete the following fields:
| Field | Description |
|---|---|
| Entity ID | An arbitrary, unique identifier provided by the identity provider. Enter this value to establish a common identifier between the DataRobot (SP) app and the IdP SAML application. |
| Metadata file | An XML document, provided by the IdP, with integration-specific information. Use this if the IdP did not provide a metadata URL. |
Manual settings
Select Manual settings if IdP metadata is not available.
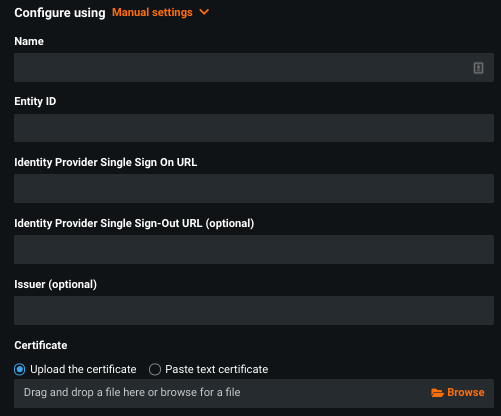
Complete the following fields:
| Field | Description |
|---|---|
| Name | Specify a meaningful name for the IdP configuration (for example, the organization name). This name will be used in the service provider details URL fields. Enter the name in lowercase, with no spaces. The value entered in this field updates the values provided in the Service provider details section. |
| Entity ID | An arbitrary, unique-per-organization string (for example, myorg_saml) that serves as the service provider Entity ID. Enter this value when manually configuring the IdP application for DataRobot. |
| Identity Provider Single Sign-On URL | The URL that DataRobot contacts to initiate login authentication for the user. This is obtained from the SAML application you created for DataRobot in the IdP configuration. |
| Identity Provider Single Sign-Out URL (optional) | The URL that DataRobot directs the user’s browser to after logout. This is obtained from the SAML application you created for DataRobot in the IdP configuration. If left blank, DatRobot redirects to the root DataRobot site. |
| Issuer | The IdP-provided Entity ID obtained from the SAML application you created for DataRobot in the IdP configuration. Note: Although the DataRobot UI shows this as optional, it is not and must be set correctly. |
| Certificate | The X.509 certificate, pasted or uploaded. Certificate is used for validating IdP signatures. This is obtained from the SAML application you created for DataRobot in the IdP configuration. |
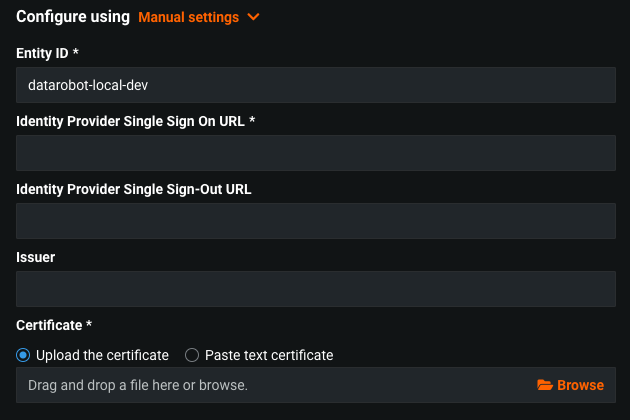
Complete the following fields:
| Field | Description |
|---|---|
| Entity ID | An arbitrary, unique identifier provided by the identity provider. Enter this value to set a matching between DataRobot (SP) app and IdP SAML application. |
| Identity Provider Single Sign-On URL | The URL that DataRobot contacts to initiate login authentication for the user. This is obtained from the SAML application you created for DataRobot in the IdP configuration. |
| Identity Provider Single Sign-Out URL (optional) | The URL that DataRobot directs the user’s browser to after logout. This is obtained from the SAML application you created for DataRobot in the IdP configuration. If left blank, DataRobot redirects to the root DataRobot site. |
| Issuer | The IdP-provided Entity ID obtained from the SAML application created for DataRobot in the IdP configuration. Note: Although the DataRobot UI shows this as optional, it is not and must be set correctly. |
| Certificate | The X.509 certificate, pasted or uploaded. Certificate is used for validating IdP signatures. This is obtained from the SAML application you created for DataRobot in the IdP configuration. |

Auto-generate Users automatically adds new users to DataRobot upon initial sign on.
Mapping
All three configuration options allow you to define how attributes, groups, and roles are synchronized between DataRobot and the IdP.
Mappings allow you to automatically provision users on DataRobot based on their settings in the IdP configuration. It also prevents individuals from teams not configured for DataRobot from entering the system.
Adding mappings both adds more restrictions on who can access DataRobot and controls which assets users can access. Without mappings, anyone in your organization who was manually added to the DataRobot system by an administrator can access the platform.
Mapping example
J_Doe joins Company A on Team A and J's manager sends a link to DataRobot. When J click's on the link, s/he's profile is automatically created in the DataRobot system based on the mappings from the identity provider. Permissions are assigned based on the role as defined by J's company and how that role is defined in the IdP configuration.
On the other hand, let's say J joins Company A on Team B, but Team B isn’t configured to use DataRobot. If J's manager sends J a DataRobot link, when s/he clicks on the link, access to DataRobot is denied and no user record is created.
You can set up the following mappings:
Attribute mapping allows you to map DataRobot attributes (data about the user) to the fields of the SAML response. In other words, because DataRobot and the IdP may use different names, this section allows you to configure the name of the field in the SAML response where DataRobot updates the user's display name, first name, last name, and email.
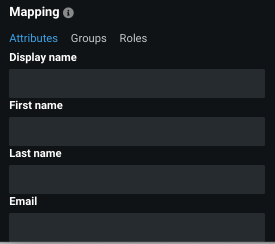
Groups mapping allows you to create an unlimited number of mappings between IdP groups and existing DataRobot groups. Mappings can only be one-to-one.
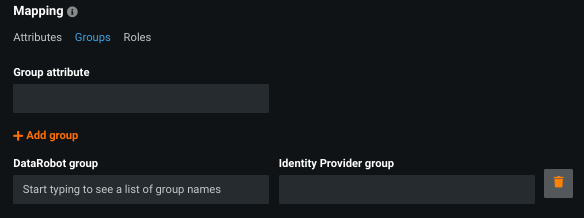
To configure, set:
| Field | Description |
|---|---|
| Group attribute | The name, in the SAML response, that identifies the string as a group name. |
| DataRobot group | The name of an existing DataRobot group to which the user will be assigned. |
| Identity provider group | The name of the IdP group to which the user belongs. |
Self-Managed AI Platform only
You can use custom RBAC roles to map one default role to each IdP group in DataRobot by creating a new role and assigning it to the desired group.
Roles mapping allows you to create an unlimited number of mappings between IdP and DataRobot roles. Mappings can be one-to-one, one-to-many, or many-to-many.
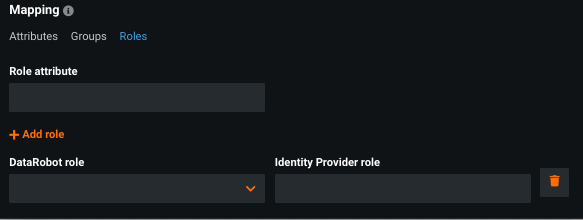
To configure, set:
| Field | Description |
|---|---|
| Role attribute | The name, in the SAML response, that identifies the string as a named user role. |
| DataRobot role | The name of the DataRobot role to assign to the user. |
| Identity provider role | The name of the role in the IdP configuration that is assigned to the user. |
Self-Managed AI Platform admins
See the Security Parameters section to modify the relationship between DataRobot and the IdP to either increase or decrease the SAML protocol security strength.
Set SSO requirements
After all fields are validated and connection is successful, choose whether to make SSO optional or required using the toggles.
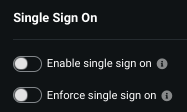
| Toggle | Description |
|---|---|
| Enable single sign-on | Makes SSO optional for users. If enabled, users have the option to sign into DataRobot using SSO or another authentication method (i.e., username/password). |
| Enforce single sign-on | Makes SSO required for users. If enabled, users in the organization must sign in using SSO. |
Note
Do not enforce sign on until you have completed configuration and testing.
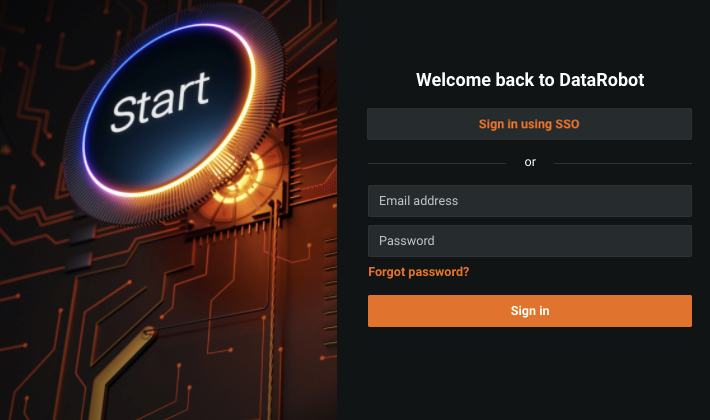
If you have selected to enforce SSO, the username and password login is hidden and only the SSO login displays:

If SSO is optional, users can choose their login method:
Once SSO is configured, provide users with the SP initiated login URL to sign into DataRobot (found under Manage SSO > Service Provider Details). Managed AI Platform users cannot access SSO via the login screen at app.datarobot.com.
After clicking the SSO button in DataRobot, users are redirected to the IdP's authentication page and then redirected back to DataRobot after successful sign on.
Self-Managed AI Platform admins
The following is available only on the Self-Managed AI Platform.
Security Parameters
Security Parameters modify the relationship between DataRobot and the IdP to either increase or decrease the SAML protocol security strength.

Use the following options to modify security strength:
| Field | Description |
|---|---|
| Allow unsolicited | When SSO is initiated in DataRobot (SP-initiated request), DataRobot sends an auth request with a unique ID to the IdP. The Idp then sends a response back using the same unique ID. Enabling this parameter means the ID in the request and response do not need to match (e.g., in case of IdP-initiated authentication). |
| Auth requests signed | DataRobot signs Authentication Requests before being sent to the IdP to make it possible to validate there was no third-party involvement. In Advanced Options > Client Config, configure a private key before enabling this parameter. |
| Want assertions signed | DataRobot recommends keeping this parameter enabled as it makes the DataRobot application require the IdP to send signed assertions. Admins can disable signed assertions for testing and/or debugging. |
| Want response signed | DataRobot recommends keeping this parameter enabled as it makes the DataRobot app require the IdP to send signed SAML responses. Admins can disable signed assertions for testing and/or debugging. |
| Logout requests signed | DataRobot signs logout requests before sending them to the IdP to make it possible to validate there was no third-party involvement. Configure a private key before enabling this parameter. |
See also the section on setting a private key in Advanced Options > Client Config, which is required for the options Auth requests signed and Logout requests signed.
Advanced Options
You can configure the following advanced options:
Session & Binding controls how DataRobot and the IdP communicate—SAML requirements vary by IdP.
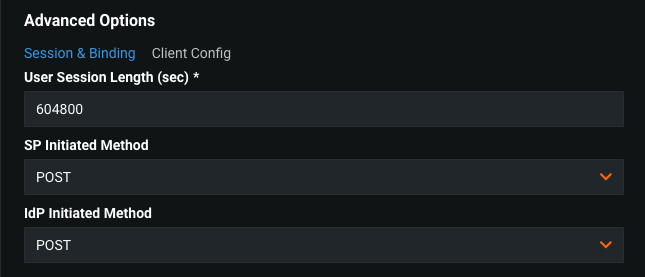
To configure, set:
| Field | Description |
|---|---|
| User Session Length (sec) | Session cookie expiration time. The default length is one week. Reducing this number increases a rate of authentication requests to the IdP. |
| SP Initiated Method | The HTTP method used to start SAML authentication negotiation. |
| IdP Initiated Method | The HTTP method used to move user to DataRobot after successful authentication. |
Client Config allows users to set private keys and certificates.
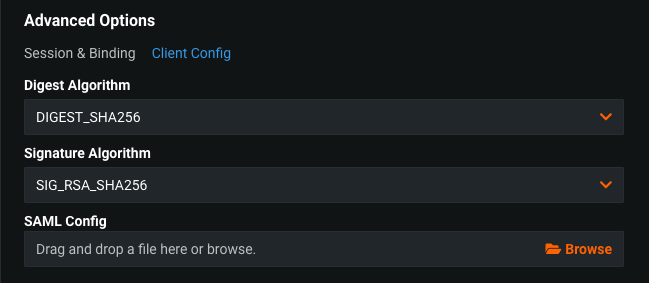
To configure, set:
| Field | Description |
|---|---|
| Digest Algorithm | A message digest algorithm used for calculating hash values. |
| Signature Algorithm | An algorithm used for producing signatures. |
| SAML Config | A JSON file that fine-tunes the SAML client configuration (for example, setting a private key). |
A private key must be set before DataRobot can sign SAML authentication requests.
To set a private key:
{
  "key_file": "/opt/datarobot/DataRobot-7.x.x/etc/certs/key.pem"
}
Where key_file is a path to the key PEM file. The same is valid for a certificate file (use the cert_file field in that case). The following JSON can also be provided to upload secrets as content:
{
  "key_file_value": "-----BEGIN RSA PRIVATE KEY-----\n...\n-----END RSA PRIVATE KEY-----",
  "cert_file_value": "-----BEGIN CERTIFICATE-----\n...\n-----END CERTIFICATE-----"
}
Where there is an ellipsis in the example, insert the private key (in PEM format) as a single line. The same is valid for certificate file (use cert_file_value field in that case).
Describe key pair to allow DataRobot to decipher IdP SAML responses. This step is required in case IdP cyphers its responses.
Example: Describe key pair
{
  "encryption_keypairs" : [{
    "key_file" : "/opt/datarobot/DataRobot-7.x.x/etc/certs/key.pem",
    "cert_file" : "/opt/datarobot/DataRobot-7.x.x/etc/certs/cert.pem"
  }]
}
Note that Okta requires an extra parameter (id_attr_name_crypto) when the key pair is described.
Example: Describe key pair in Okta
{
  "encryption_keypairs" : [{
    "key_file" : "/opt/datarobot/DataRobot-7.x.x/etc/certs/key.pem",
    "cert_file" : "/opt/datarobot/DataRobot-7.x.x/etc/certs/cert.pem"
  }],
  "id_attr_name_crypto" : "Id"
}
The key pair can also be described by its content rather than its file paths. See the private key example above.