Manage user accounts
The DataRobot deployment provides support for local authentication users. These are user accounts you create manually (through APP ADMIN > Manage Users). DataRobot provides restrictions for login and password settings. The login credentials for these locally authenticated users are stored as fully qualified domain names.
Availability information
Required permission: Org Admin
Availability information
Required permission: Can manage users
The DataRobot deployment provides support for three types of user accounts:
| User Account Type | Description |
|---|---|
| Internal | This is the default DataRobot administrator account, which authenticates using admin@datarobot.com. This account has full administrator access to the deployed cluster. You cannot revoke administrator privileges; the only change you can make to this account is password updates. |
| Local authentication | These are user accounts you create manually (through APP ADMIN > Manage Users). DataRobot provides restrictions for login and password settings. The login credentials for these locally authenticated users are stored as fully qualified domain names. |
| LDAP authentication configuration | These user accounts are created through an authentication integration with a defined LDAP directory service; you do not use the DataRobot UI to create these user accounts. |
LDAP accounts
When LDAP users sign into DataRobot for the first time, their user profiles are created and saved in DataRobot but their passwords are not. Usernames for these LDAP-authenticated users are simple usernames and not fully qualified domain names. Passwords cannot be changed. Not that if a user is removed from the LDAP Directory server or group, they are not able to access DataRobot. The user account, however, remains intact.
Note
Local authentication is not supported when LDAP is enabled (i.e., no "mixed mode").
See the instructions below for creating local authentication accounts.
Create user accounts
As an administrator, you create and add new users to your DataRobot installation. The first user account you should create is one for yourself, so that you can access DataRobot as a user in addition to using the default administrator account. Use the following steps to create your own user account, and then repeat them for each additional user.
-
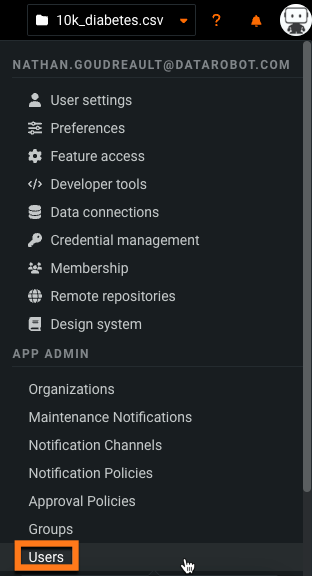
Expand the profile icon located in the upper right and click APP ADMIN > Users from the dropdown menu.
-
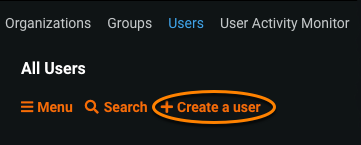
Click Create a user at the top of the displayed page.
-
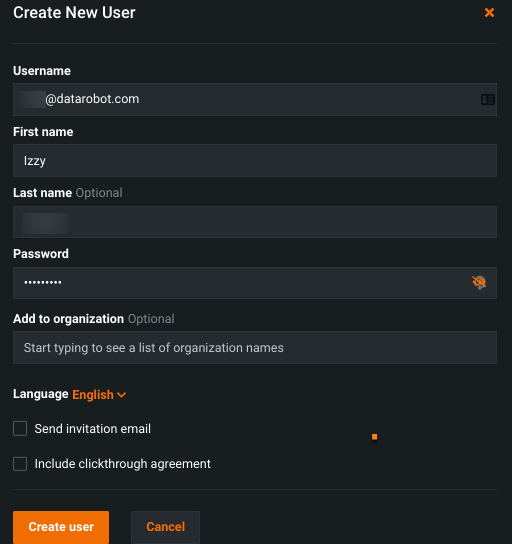
In the displayed dialog, enter the username (i.e., email address), first name, and password for the new user (other account settings are optional at this point).
-
Click Create user. If successful, you see the message "Account created successfully" and the username for the new account.
-
Click View user profile to view and configure user settings for this user, or click Close.
-
Expand the profile icon located in the upper right and click APP ADMIN > Users from the dropdown menu.
-
Click Create a user at the top of the displayed page.
-
In the displayed dialog, enter the username (i.e., email address), first name, and password for the new user (other account settings are optional at this point). If shown, selecting Require Clickthrough Agreement may be necessary for your cluster deployment.
-
Click Create user. If successful, you see the message "Account created successfully" and the username for the new account.
-
Click View user profile to view and configure user settings for this user, or click Close.
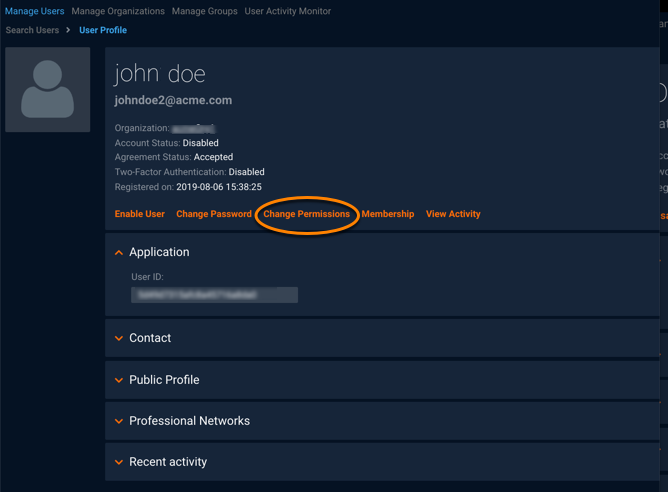
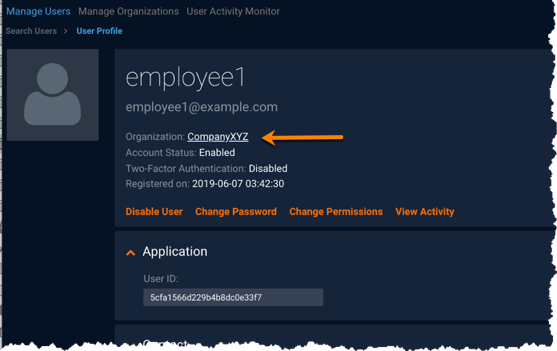
The new user will now be listed in the Users table. You can open the User Profile to see some important information including the user's application-assigned ID.
Set admin permissions for users
As an admin, you can set organization admin permissions for other DataRobot users within the application, including your personal user account. These permissions allow the recipient to enable or disable features per user, as needed. Visit the Settings page to see a list of available features; hover over a feature name for a brief description.
Below are the steps to enable administrator access for any user. This user will have administrator access to all DataRobot functionality configured for the application.
Note
Consider and control how you provide admin settings to non-administrator users. One way to do this is to add settings only on an as-needed basis and then remove those settings when related tasks are completed.
-
From the Users page, locate the user and select to open the user's profile page.
-
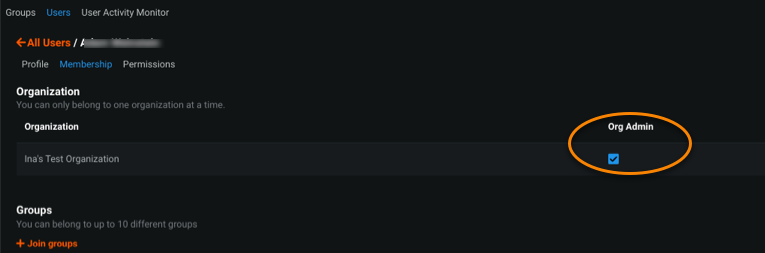
Click Membership to display the organization and groups that the user is a member of.
-
Under the Organization header, check the box in the Org Admin column to enable organization admin permissions for the user.
This user can now modify settings for other users. At any point, if you want to disable these permissions for the user, uncheck the box; the user will no longer have administrator capabilities.
As an admin, you can set admin permissions for other DataRobot users within the application, including your personal user account. These permissions allow the recipient to enable or disable features per user, as needed. Visit the Settings page to see a list of available features; hover over a feature name for a brief description.
Below are the steps to enable administrator access for any user. This user will have administrator access to all DataRobot functionality configured for the application.
Note
Consider and control how you provide admin settings to non-administrator users. One way to do this is to add settings only on an as-needed basis and then remove those settings when related tasks are completed.
-
From the Users page, locate the user and select to open the user's profile page.
-
On User Profile, click Change Permissions to display the User Permissions > Manage Settings page for the user
-
Select the Admin setting “Can manage users” and click Save.
This user now can modify settings for other users. At any point, if you want to disable the “Can manage users” setting for this user, uncheck the box and click Save; the user will no longer have administrator capabilities.
Self-Managed AI Platform admins
The following is available only on the Self-Managed AI Platform.
Additional permissions options
To set permissions and supported features for users, repeat the previous process selecting the desired permissions from those listed in the user's User Permissions > Manage Settings page. See the settings and features description for information on the available admin settings and optional features.
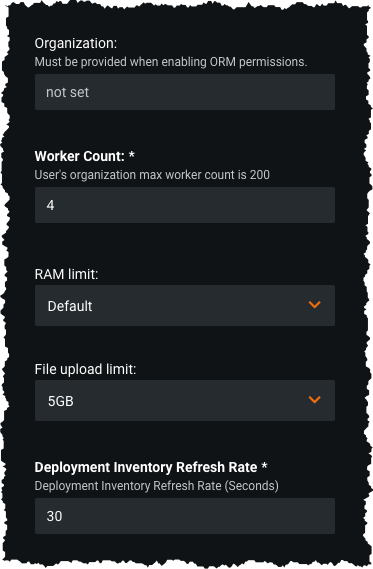
For each user you can also:
- Set their maximum personal worker allocation.
- Set their RAM usage limit.
- Set their file upload size limit.
- Set the rate at which the Deployment page refreshes (three second minimum).
- Assign them to an organization (you must create the organization first).
RBAC for users
Role-based access (RBAC) controls access to the DataRobot application by assigning users roles with designated privileges. The assigned role controls both what the user sees when using the application and which objects they have access to. RBAC is additive, so a user's permissions will be the sum of all permissions set at the user and group level.
To assign a user role:
-
From the Users page, locate and select the user to open their profile page.
-
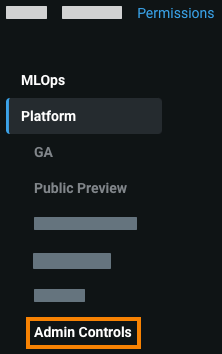
Click the Permissions tab to view a list of settings and permissions.

-
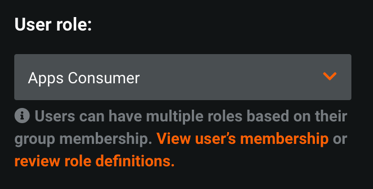
In the left panel, click Platform > Admin Controls. Then, open the User role dropdown menu and select the appropriate role(s) for the user.
-
When you're done, click Save changes.
Review the role and access definitions to understand the permissions enabled for each role.
Tip
Avoid granting access to specific features by assigning roles at the user-level because this makes managing permissions more difficult—causing you to have to modify several users, rather than a few groups, as well as increasing the possibility of having users with non-standardized levels of access. Make sure access to features required to complete work are defined at the group- or org-level, and that the user is a member.
Note
Note that RBAC overrides sharing-based role permissions. For example, consider a user is assigned the Viewer role via RBAC, which only has Read access to objects. If this user has a project shared with them that grants Owner permissions (which offers Read and Write access), the Viewer role takes priority and denies the user Write access.
Manage execution environment limits
The execution environment limit allows you to control how many custom model environments a user can add to the Custom Model Workshop. In addition, the execution environment version limit allows you to control how many versions a user can add to each of those environments. These limits can be:
-
Directly applied to the user: Set in a user's permissions. Overrides the limits set in the group and organization permissions.
-
Inherited from a user group: Set in the permissions of the group a user belongs to. Overrides the limits set in organization permissions.
-
Inherited from an organization: Set in the permissions of the organization a user belongs to.
If the environment or environment version limits are defined for an organization or a group, the users within that organization or group inherit the defined limits. However, a more specific definition of those limits at a lower level takes precedence. For example, an organization may have the environment limits set to 5, a group to 4, and the user to 3; in this scenario, the final limit for the individual user is 3.
For more information on adding custom model execution environments, see the Custom model environments documentation.
To manage the execution environment limits in the platform settings:
-
Click your profile avatar (or the default avatar
 ) in the upper-right corner of DataRobot, and then, under APP ADMIN, click Users.
 -
From the Users page, locate and select the user to open their profile page.
-
Click the Permissions tab to view a list of settings and permissions.
-
On the Permissions tab, click Platform, and then click Admin Controls.
-
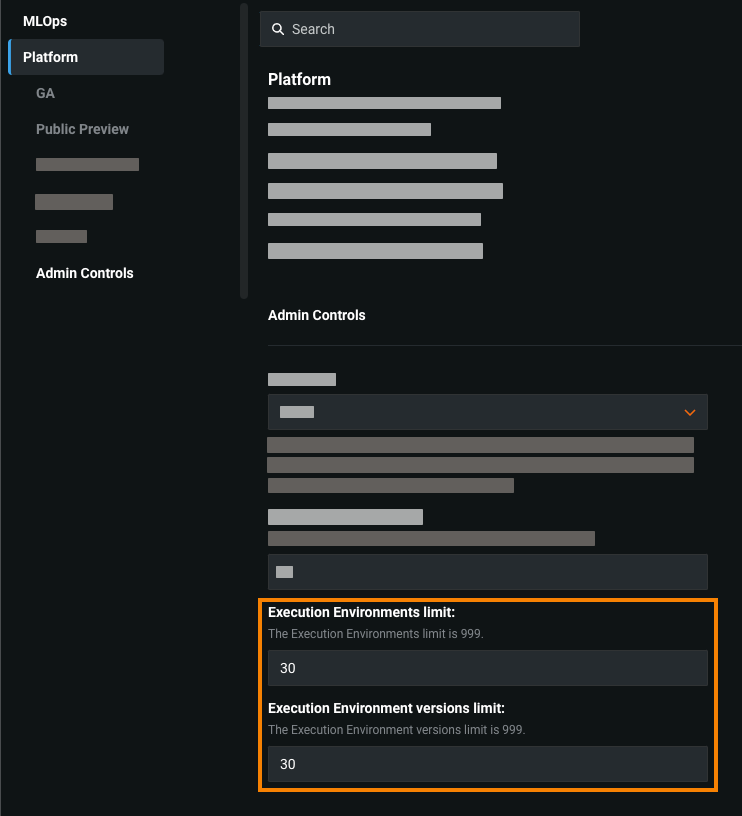
Under Admin Controls, set either or both of the following settings:
-
Execution Environments limit: The maximum number of custom model execution environments a user can add. This limit setting can't exceed 999.
-
Execution Environments versions limit: The maximum number of versions a user can add to each custom model execution environment. This limit setting can't exceed 999.
-
-
Click Save changes.
Change passwords
You can change passwords for internal and local authentication user accounts. If your cluster uses LDAP authentication, you cannot change the password for any of the user types (individual users or the admin@datarobot.com account). If you need help generating a new password for the default administrator, contact Customer Support.
Change your own password
To change your own password:
-
Expand the profile icon located in the upper right and click Settings.
-
On the displayed page, enter your current password and then the new password twice (to create and confirm). Click Change Password.
DataRobot enforces the following password policy:
- Only printable ASCII characters
- Minimum one capital letter
- Minimum one number
- Minimum 8 characters
- Maximum 512 characters
- Username and password cannot be the same
Change a user's password
-
From the APP ADMIN > Manage Users page, locate the user and click to open their profile.
-
Click Change Password.
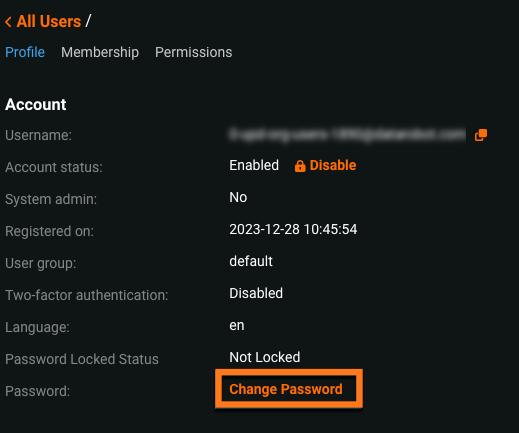
-
On the displayed page, enter and confirm the new password.
-
When finished, click Change Password.
Manage groups and organization membership
SaaS admins can manage groups; Self-Managed admins can manage groups and organizations.
Note
Users can have membership in up to 50 groups.
Configuring groups helps you to manage users across the DataRobot platform. For more information, see:
Once created, you can add one or more users as members from the group creation page. To add users individually, follow the steps below.
Note
Note that users can see which groups they belong to from the Membership page, but they do not have permissions to make changes to those memberships.
Browse to the Users page, select the user, and in User Profile click Membership. The User Membership page shows the currently configured groups for this user.
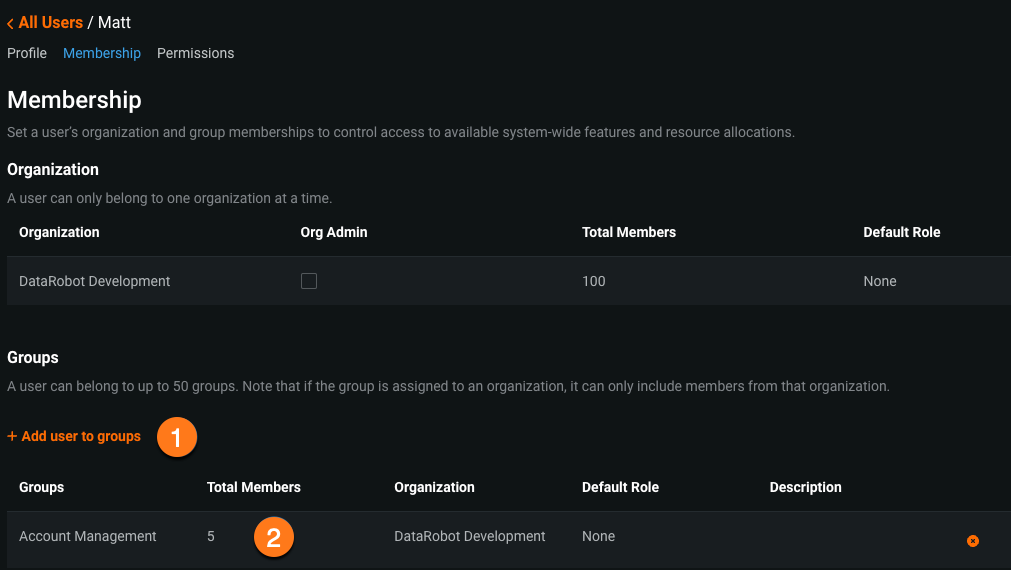
Work with the page as follows:
| Field | Description | |
|---|---|---|
| 1 | Add user to groups | Opens a dialog where you can enter the name(s) of groups to add the user to. Note that if a group is assigned to an organization, you can only add members from that organization. |
| 2 | Group name | Opens the group configuration to allow editing of the name and description. |
Configuring groups and organizations helps you to manage users and resources across the DataRobot platform. For more information, see:
Once created, you can add one or more users as members from the group and organization creation pages. To add users individually, follow the steps below.
Note
Note that users can see which organization and groups they belong to from the Membership page, but they do not have permissions to make changes to those memberships.
Browse to the Users page, select the user, and in User Profile click Membership. The User Membership page shows the currently configured organization and any groups for this user.
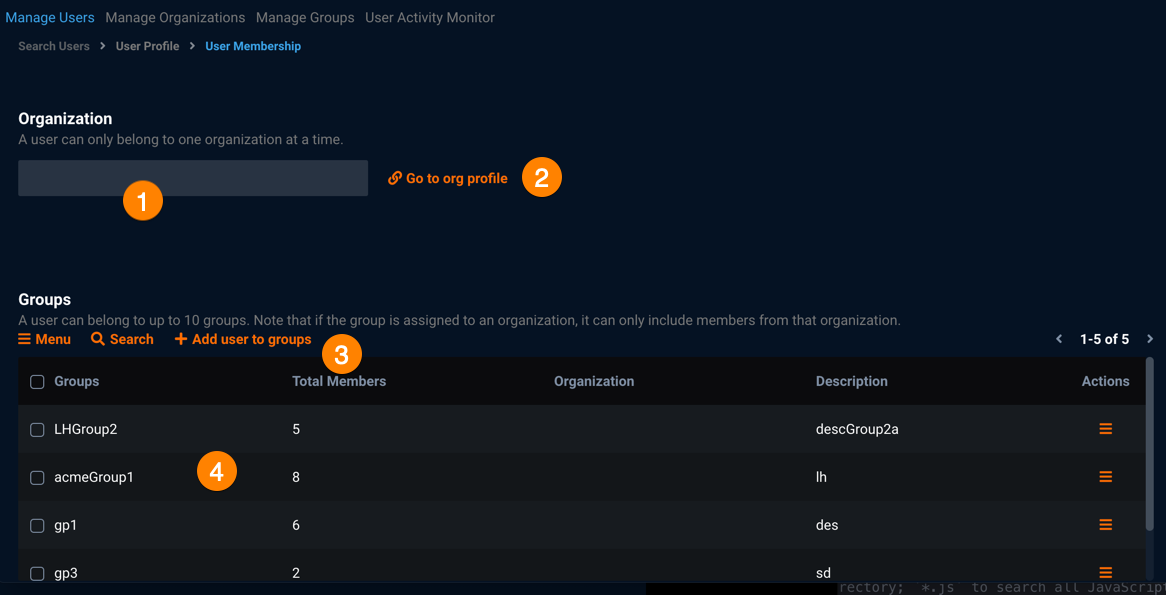
Work with the page as follows:
| Field | Description | |
|---|---|---|
| 1 | Organization | Enter the name for the organization. Each user can be a member of only one organization. |
| 2 | Go to org profile | Click to view the organization's profile. |
| 3 | Add user to groups | Opens a dialog where you can enter the name(s) of groups to add the user to. If the user is a member of an organization, only groups also part of the same organization, or part of no organization, are available for selection. Users can have membership in up to 50 groups. |
| 4 | <Group_name> | Opens the group configuration to allow editing of the name and description. |
When you next look at this user's profile, you see the organization for the user.
Deactivate user accounts
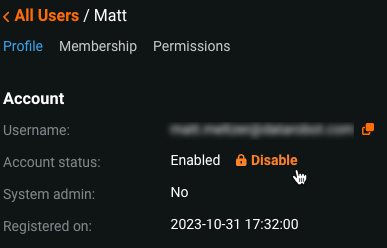
You cannot delete a user account from DataRobot—this ensures that your company's data is not lost, regardless of employee movement. However, the admin can block a user's access to DataRobot while ensuring the data and projects they worked on remain intact.
From APP ADMIN > Manage Users, locate the user:
- To deactivate, click the padlock icon next to their name, changing it to locked
 .
. - To restore access, click the padlock icon to open
 .
.
You can also change user account access from Users > User Profile by clicking Enable User or Disable User.
View latest user activity
From APP ADMIN > User Activity Monitor, you can quickly access the user activity monitor, which shows all app activities recorded for this user.