Custom environments
Once uploaded into DataRobot, custom models run inside of environments—Docker containers running in Kubernetes. In other words, DataRobot copies the uploaded files defining the custom task into the image container. In most cases, adding a custom environment is not required because there are a variety of built-in environments available in DataRobot. Python and/or R packages can be easily added to these environments by uploading a requirements.txt file with the task’s code. A custom environment is only required when a custom task:
- Requires additional Linux packages.
- Requires a different operating system.
- Uses a language other than Python, R, or Java.
This document describes how to build a custom environment for these cases. To assemble and test a custom environment locally, install both Docker Desktop and the DataRobot User Models (DRUM) CLI tool on your machine.
Custom environment guidelines
Note
DataRobot recommends using an environment template and not building your own environment except for specific use cases. (For example, you don't want to use DRUM but you want to implement your own prediction server.)
If you'd like to use a tool, language, or framework that is not supported by our template environments, you can make your own. DataRobot recommends modifying the provided environments to suit your needs; however, to make an easy-to-use, re-usable environment, you should adhere to the following guidelines:
-
Your environment must include a Dockerfile that installs any requirements you may want.
-
Custom models require a simple webserver to make predictions. DataRobot recommends putting this in your environment so you can reuse it with multiple models. The webserver must be listening on port
8080and implement the following routes:Note
URL_PREFIXis an environment variable that is available at runtime. It must be added to the routes below.Mandatory endpoints Description GET /URL_PREFIX/This route is used to check if your model's server is running. POST /URL_PREFIX/predict/This route is used to make predictions. Optional extension endpoints Description GET /URL_PREFIX/stats/This route is used to fetch memory usage data for DataRobot Custom Model Testing. GET /URL_PREFIX/health/This route is used to check if model is loaded and functioning properly. If model loading fails error with 513 response code should be returned. Failing to handle this case may cause the backend k8s container to enter crash and enter a restart loop for several minutes. -
An executable
start_server.shfile is required to start the model server. -
Any code and
start_server.shshould be copied to/opt/code/by your Dockerfile.
Note
To learn more about the complete API specification, you can review the DRUM server API yaml file.
Environment variables
When you build a custom environment with DRUM, your custom model code can reference several environment variables injected to facilitate access to the DataRobot Client and MLOps Connected Client:
| Environment Variable | Description |
|---|---|
MLOPS_DEPLOYMENT_ID |
If a custom model is running in deployment mode (i.e., the custom model is deployed), the deployment ID is available. |
DATAROBOT_ENDPOINT |
If a custom model has public network access, the DataRobot endpoint URL is available. |
DATAROBOT_API_TOKEN |
If a custom model has public network access, your DataRobot API token is available. |
Create the environment
Once DRUM is installed, begin your environment creation by copying one of the examples from GitHub. Log in to GitHub before clicking this link. Make sure:
- The environment code stays in a single folder.
- You remove the
env_info.jsonfile.
Add Linux packages
To add Linux packages to an environment, add code at the beginning of dockerfile, immediately after the FROM datarobot… line.
Use dockerfile syntax for an Ubuntu base. For example, the following command tells DataRobot which base to use and then to install packages foo, boo, and moo inside the Docker image:
FROM datarobot/python3-dropin-env-base
RUN apt-get update --fix-missing && apt-get install foo boo moo
Add Python/R packages
In some cases, you might want to include Python/R packages in the environment. To do so, note the following:
-
List packages to install in
requirements.txt. For R packages, do not include versions in the list. -
Do not mix Python and R packages in the same
requirements.txtfile. Instead, create multiple files and adjustdockerfileso DataRobot can find and use them.
Test the environment locally
The following example illustrates how to quickly test your environment using Docker tools and DRUM.
-
To test a custom task with a custom environment, navigate to the local folder where the task content is stored.
-
Run the following, replacing placeholder names in
< >brackets with actual names:drum fit --code-dir <path_to_task_content> --docker <path_to_a_folder_with_environment_code> --input <path_to_test_data.csv> --target-type <target_type> --target <target_column_name> --verbose
Add a custom environment to DataRobot
To add a custom environment, you must upload a compressed folder in .tar, .tar.gz, or .zip format. Be sure to review the guidelines for preparing a custom environment folder before proceeding. You may also consider creating a custom drop-in environment by adding Scoring Code and a start_server.sh file to your environment folder.
Note the following environment limits and environment version limits:
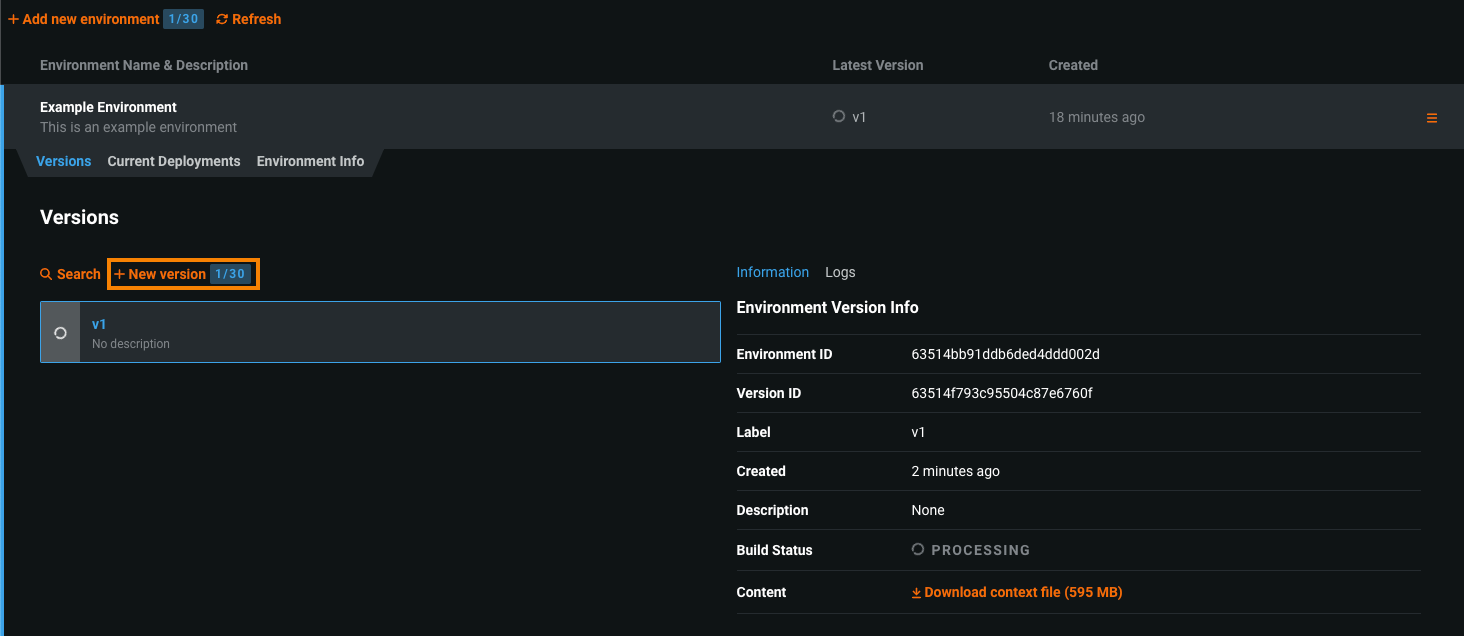
Next to the Add new environment and the New version buttons, there is a badge indicating how many environments (or environment versions) you've added and how many environments (or environment versions) you can add in total. With the correct permissions, an administrator can set these limits at a user or group level. The following status categories are available in this badge:
Next to the Add new environment and the New version buttons, there is a badge indicating how many environments (or environment versions) you've added and how many environments (or environment versions) you can add in total. With the correct permissions, an administrator can set these limits at a user, group, or organization level. The following status categories are available in this badge:
Navigate to Model Registry > Custom Model Workshop and select the Environments tab. This tab lists the environments provided by DataRobot and those you have created. Click + Add new environment to configure the environment details and add it to the workshop.
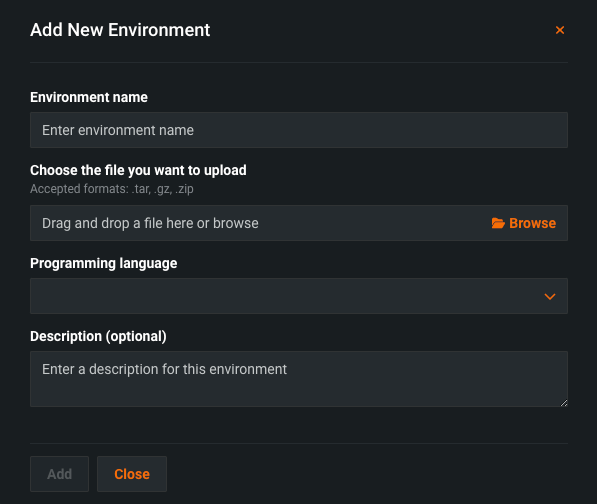
Complete the fields in the Add New Environment dialog box.
| Field | Description |
|---|---|
| Environment name | The name of the environment. |
| Context file | The archive containing a Dockerfile and any other files needed to build the environment image. This file is not required if you supply a prebuilt image. |
| Prebuilt image | (Optional) A prebuilt environment image saved as a tarball using the Docker save command. |
| Programming Language | The language in which the environment was made. |
| Description | (Optional) A description of the custom environment. |
| Environment type | The DataRobot artifact types supported by the environment: Custom models or Notebooks. |
Context file and environment image upload
If you upload both a context and an image file, the priority is given to the image file. Even though a context file is not required when you upload an image file, you should still upload the context file, as your workflow flow may include functionality that requires context.
When all fields are complete, click Add. The custom environment is ready for use in the Workshop.
After you upload an environment, you are the only one who can access it unless you share it with other individuals. To make changes to an existing environment, create a new version.
Add an environment version
Troubleshoot or update a custom environment by adding a new version of it to the Workshop. In the Versions tab, select New version.
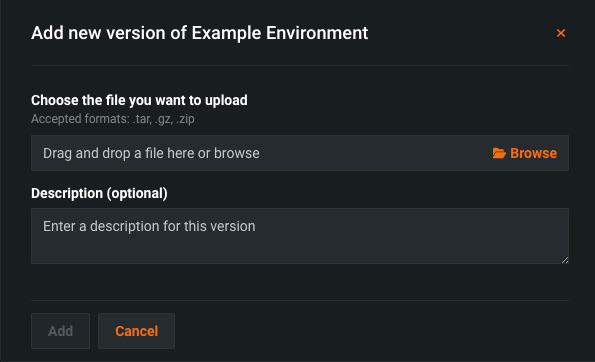
Upload the files for a new version and provide a brief description, then click Add.
| Field | Description |
|---|---|
| Context file | The archive containing a Dockerfile and any other files needed to build the environment image. This file is not required if you supply a prebuilt image. |
| Prebuilt image | (Optional) A prebuilt environment image saved as a tarball using the Docker save command. |
| Description | (Optional) A description of the custom environment. |
Context file and environment image upload
If you upload both a context and an image file, the priority is given to the image file. Even though a context file is not required when you upload an image file, you should still upload the context file, as your workflow flow may include functionality that requires context.
The new version is available in the Version tab; all past environment versions are saved for later use. By default, when creating a model version, if the selected execution environment does not change, the version of that execution environment persists from the previous custom model version, even if a newer environment version is available. For more information on how to ensure the custom model version uses the latest version of the execution environment, see Trigger base execution environment update.
Trigger base execution environment update
To override the default behavior for execution environment version selection, where the execution environment version persists between custom model versions even when a new environment version is available, you must temporarily change the Base Environment setting. To do this, create a new custom model version using a different Base Environment setting, then create a new custom model version, switching back to the intended Base Environment. After this change, the latest version of the custom model uses the latest version of the execution environment.
View environment information
There is a variety of information available for each custom and built-in environment. To view:
-
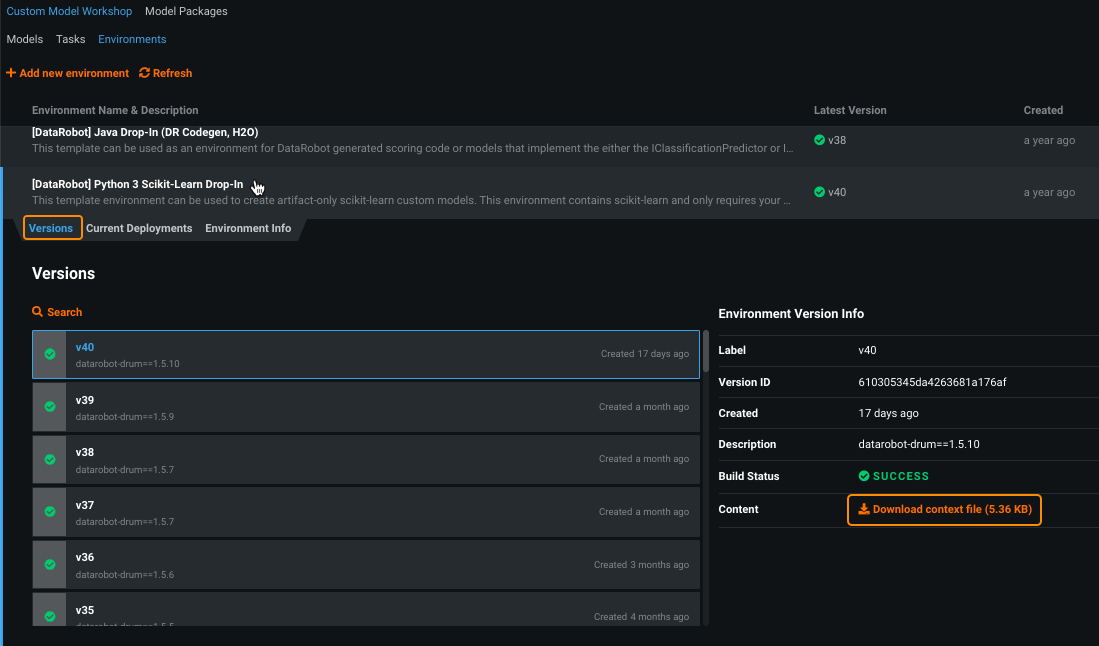
Navigate to Model Registry > Custom Model Workshop > Environments. The resulting list shows all environments available to your account, with summary information.
-
For more information on an individual environment, click to select:
The versions tab lists a variety of version-specific information and provides a link for downloading that version's environment context file.
-
Click Current Deployments to see a list of all deployments in which the current environment has been used.
-
Click Environment Info to view information about the general environment, not including version information.
Share and download an environment
You can share custom environments with anyone in your organization from the menu options on the right. These options are not available to built-in environments because all organization members have access and these environment options should not be removed.
Note
An environment is not available in the model registry to other users unless it was explicitly shared. That does not, however, limit users' ability to use blueprints that include tasks that use that environment. See the description of implicit sharing for more information.
From Model Registry > Custom Model Workshop > Environments, use the menu to share and/or delete any custom environment that you have appropriate permissions for. (Note that the link points to custom model actions, but the options are the same for custom tasks and environments.)
Self-Managed AI Platform admins
The following is available only on the Self-Managed AI Platform.
Environment availability
Each custom environment is either public or private (the default availability). Making an environment public allows other users that are part of the same DataRobot installation to use it without the owner explicitly sharing it or users needing to create and upload their own version. Private environments can only be seen by the owner and the users that the environment has been shared with. Contact your DataRobot system administrator to make a custom environment public.


