Set up Feature Discovery projects
Feature Discovery is based on relationships—between datasets and the features within those datasets. DataRobot provides an intuitive relationship editor that allows you to build and visualize these relationships. The end product is a multitude of additional features that result from these linkages. These derived features can then train more accurate models and generate better predictions. DataRobot’s Feature Discovery engine analyzes the graphs and the included datasets to determine a feature engineering “recipe,” and from that recipe generates secondary features for training and predictions.
Note
See the Feature Discovery file requirements for dataset sizes information.
Review the next section to get started with Feature Discovery or skip to the step-by-step instructions that describe how to:
- Add datasets to a project.
- Create relationships.
- Set join conditions.
- Assess the quality of relationship configurations.
- Start the project.
You can also take a deeper dive into:
- Feature Discovery integration with Snowflake.
- Feature engineering controls and feature reduction.
- Time-aware feature engineering.
- Derived features.
- Making predictions on models that have derived features.
Get started with Feature Discovery
In most cases, all you need to start a Feature Discovery project is a simple primary dataset that includes:
- The target (column that you want to predict).
- An identifier (for example, customer_id or transaction_id) to link the dataset to additional related datasets. This key serves as the basis of dataset joins.
- An optional time index—a date feature in the primary dataset—to support time-aware Feature Discovery. This date feature is used as the prediction point for generating new features.
Each record of the primary dataset represents the desired unit of analysis. From this primary dataset, DataRobot guides you through creating relationships to additional datasets, called secondary datasets.
Secondary datasets have features that can potentially enrich the primary dataset. While it may be the case that both primary and secondary datasets have one-to-one relationships when they are added, it is not required. In most cases, DataRobot aggregates and then summarizes features in the secondary datasets, and, from there, enriches the primary dataset.
Sample use case
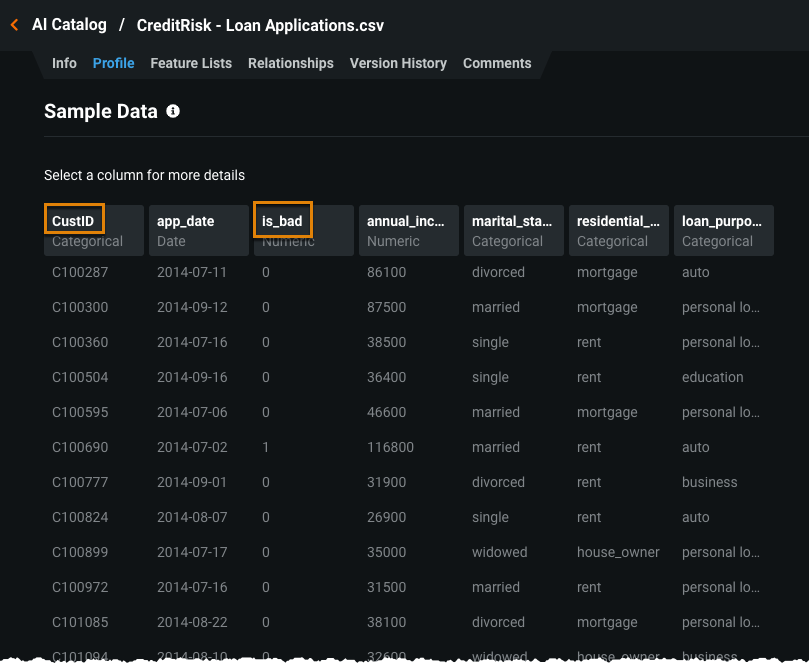
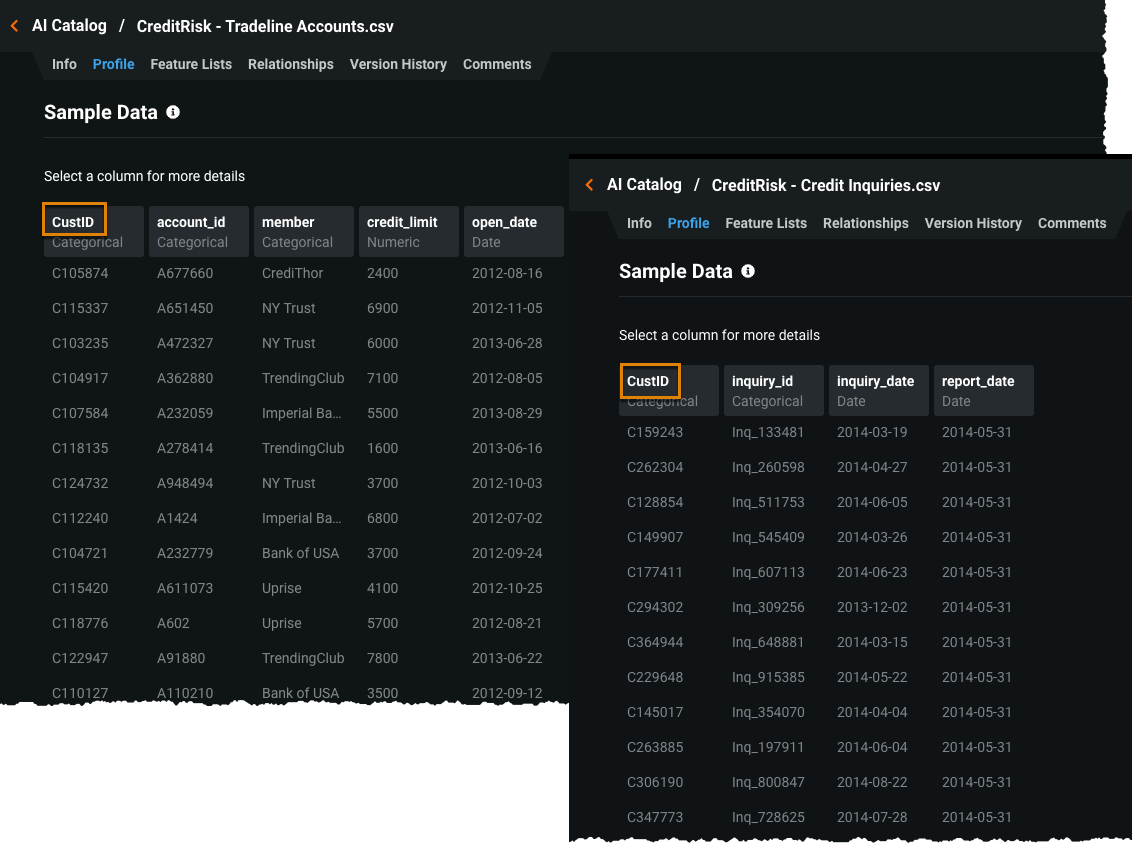
The following sections use an example to illustrate how DataRobot automatically discovers new features from multiple datasets to predict whether a loan will default. In the primary dataset, CreditRisk - Loan Applications, the is-bad column is the project target. The relation between the datasets is the CustID column.
Two additional relational datasets, CreditRisk - Credit Inquiries and CreditRisk - Tradeline Acccounts, are the secondary datasets used for Feature Discovery.
Once model building begins, DataRobot runs through EDA2, adding newly created features to the Data page. The Data page provides a variety of information about all the resulting project data, both new and old.
Add datasets
From the AI Catalog, select the primary dataset and click Create project. Then, enter the target feature.
Note
This procedure shows how to load datasets using the AI Catalog, so to begin, make sure all the assets are in the catalog. Alternatively, you can use the drag-and-drop method to upload datasets. If you do so, all datasets that you upload are automatically registered to the AI Catalog.
A valid Feature Discovery project requires at least one secondary dataset—the following tabs describe how to load additional datasets into the project from both the Start page and the relationship editor:
-
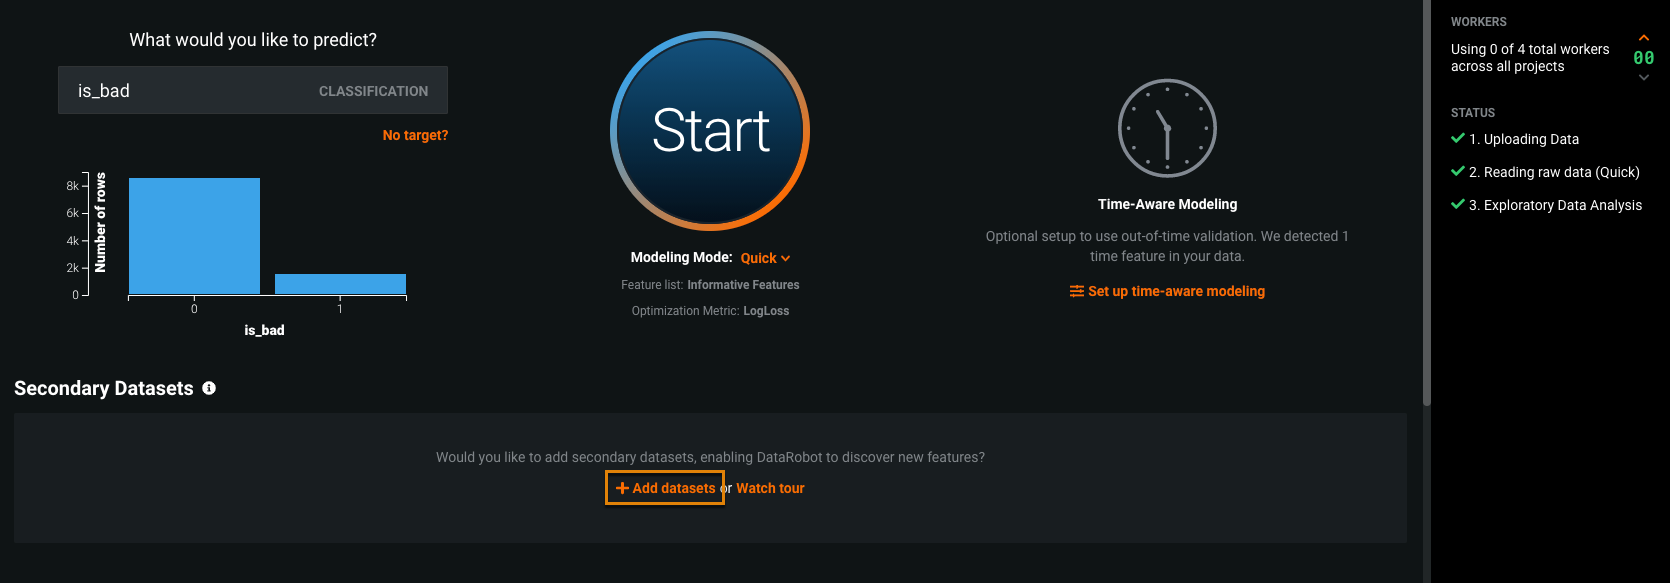
On the Start page, click Add datasets to add one or more additional datasets to the project.
-
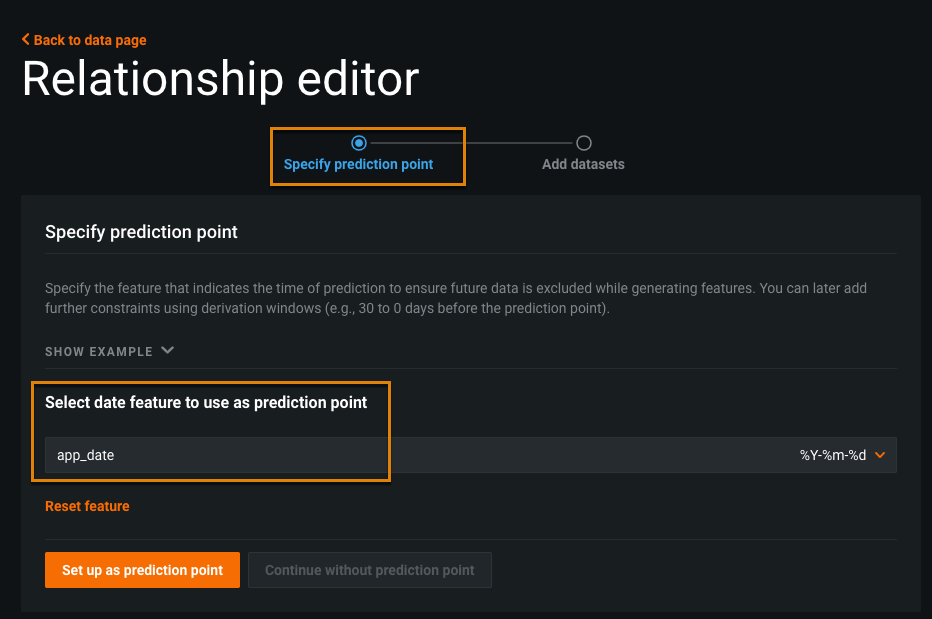
On the Specify prediction point page of the relationship editor, optionally Select a date feature to use as a prediction point. This date/time feature from the primary dataset serves as a reference date for feature derivation windows.
Note
The step to specify a prediction point does not display if you have already specified a prediction point for the project.
For an in-app explanation of prediction points, expand Show Example.
-
Click Set up as prediction point for a time-aware Feature Discovery project or Continue without prediction point for a non time-aware project.
Note
Although you can select the same date feature used for the out-of-time validation (OTV) partition as the prediction point, clicking Continue without prediction point automatically uses the OTV partition feature when generating new features.
If you add or edit the prediction point, DataRobot accounts for that change when generating new features.
-
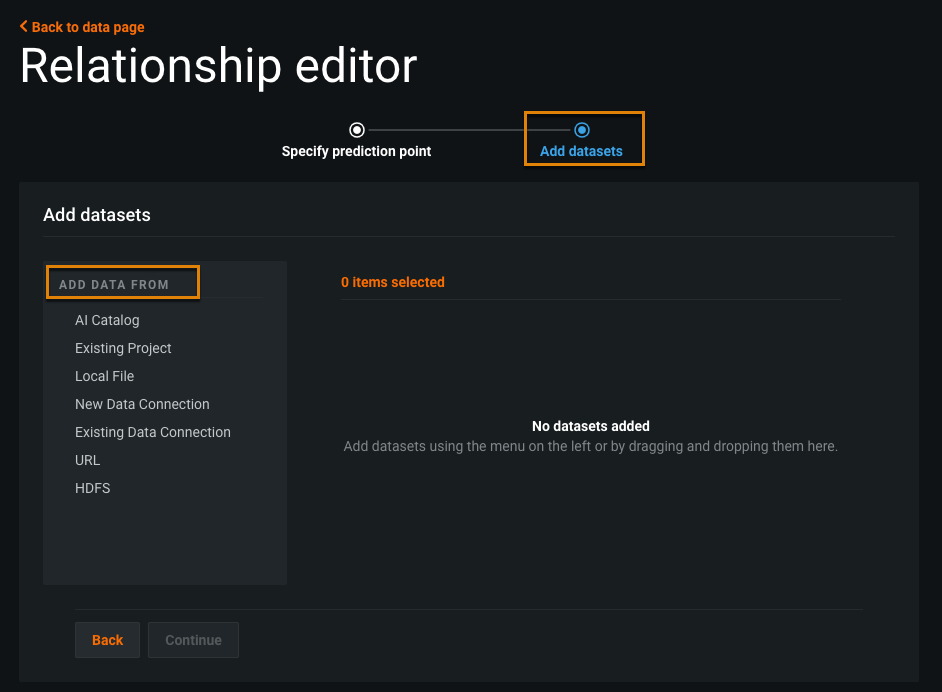
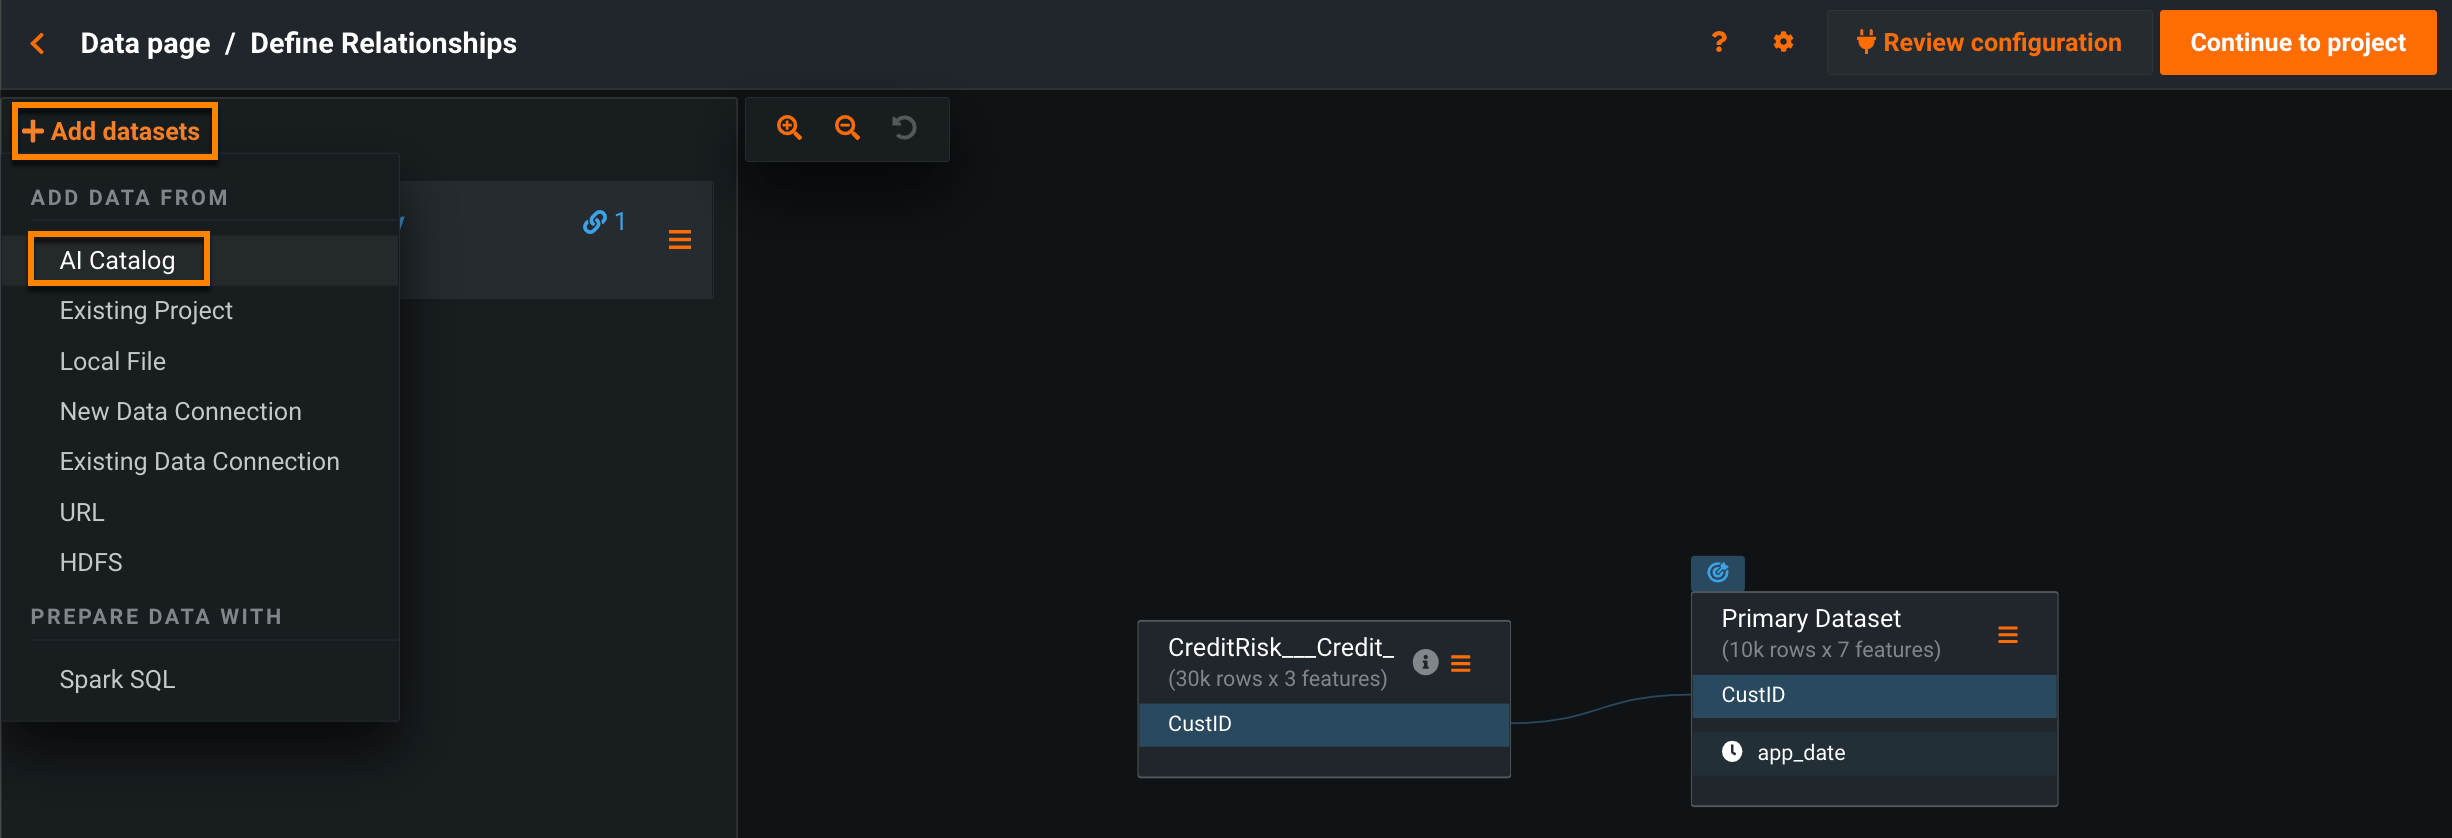
In the Add datasets page of the relationship editor, select a data import method under Add Data From.
This example shows how to add a dataset from the AI Catalog.
-
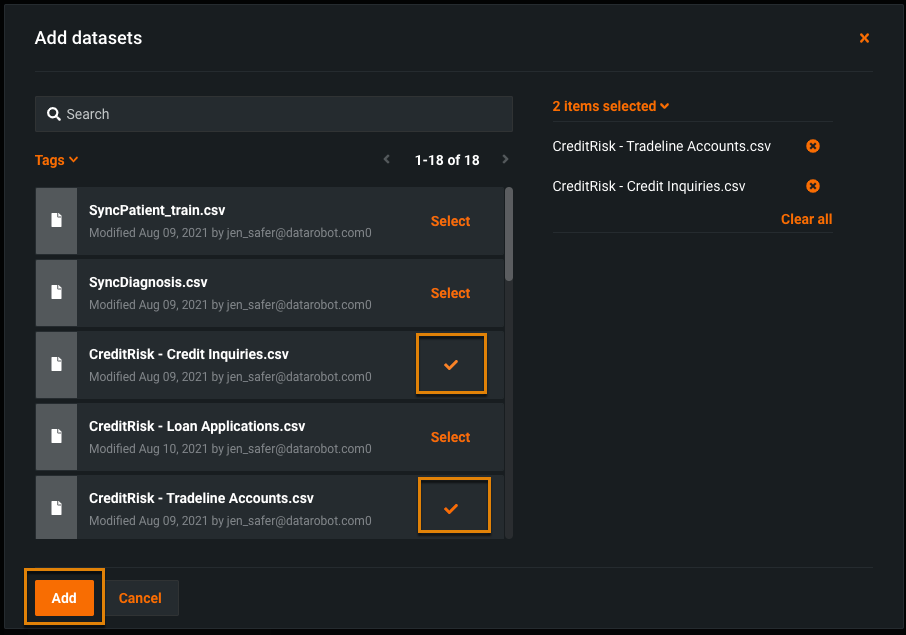
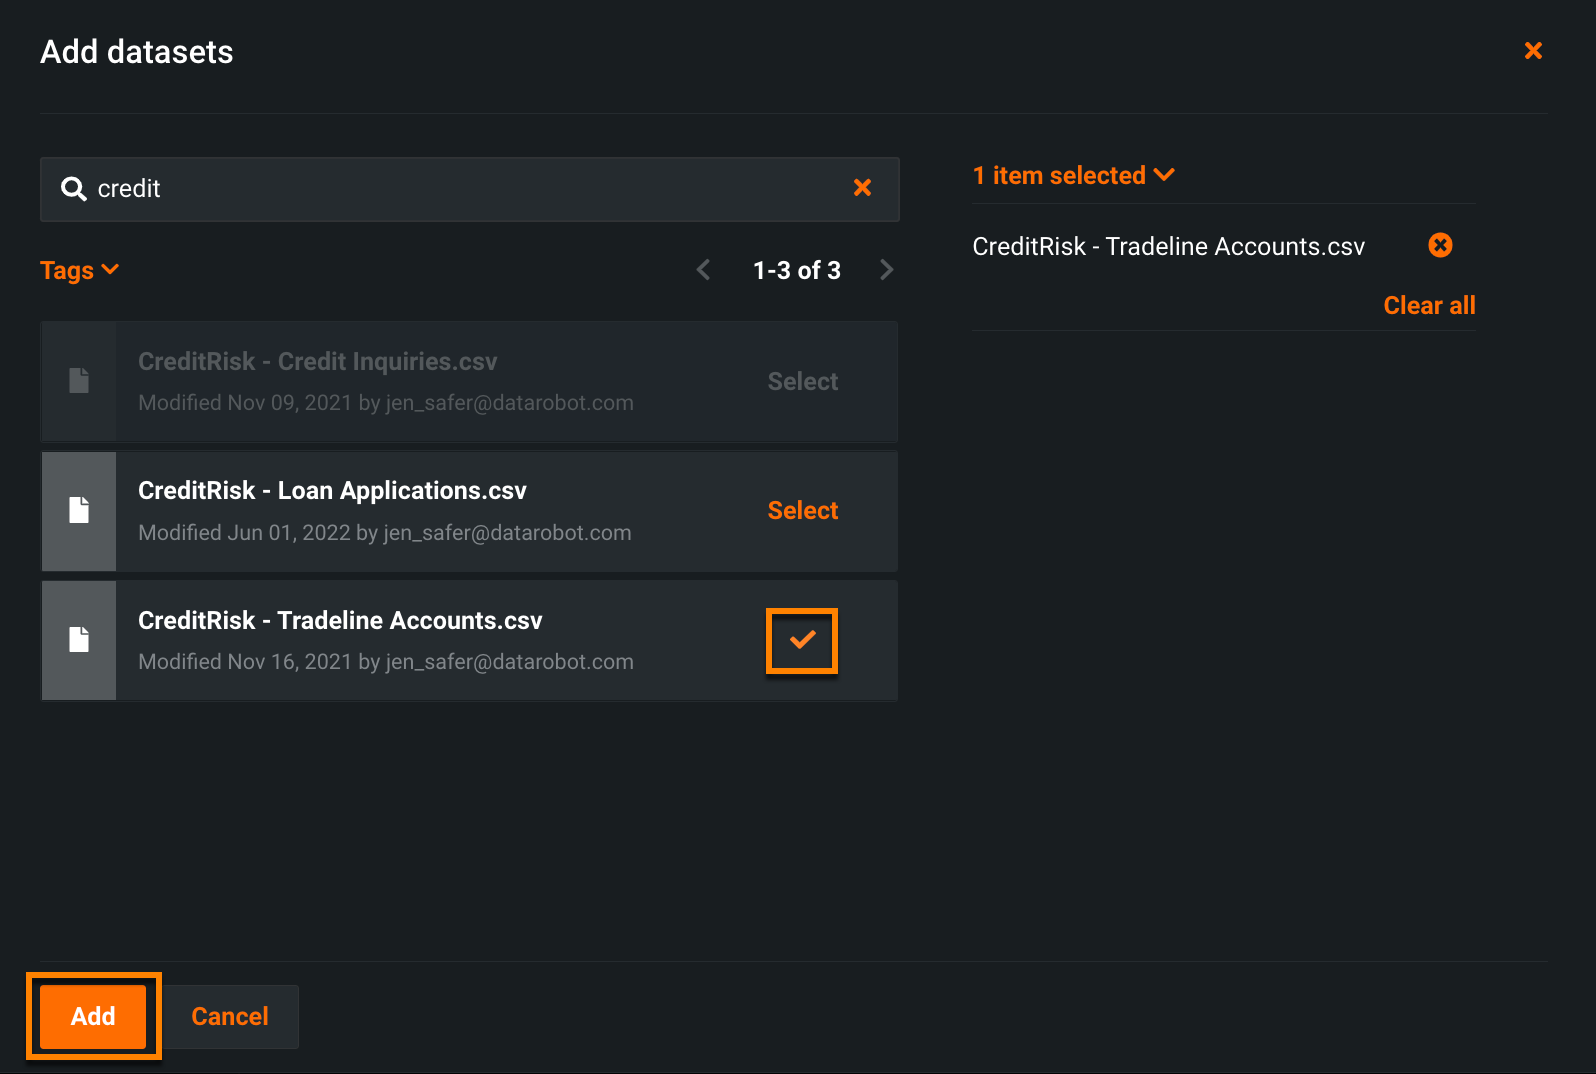
From the AI Catalog, select the datasets you want to include by clicking Select. Use the search functionality to easily locate datasets for selection. When finished, click Add.
-
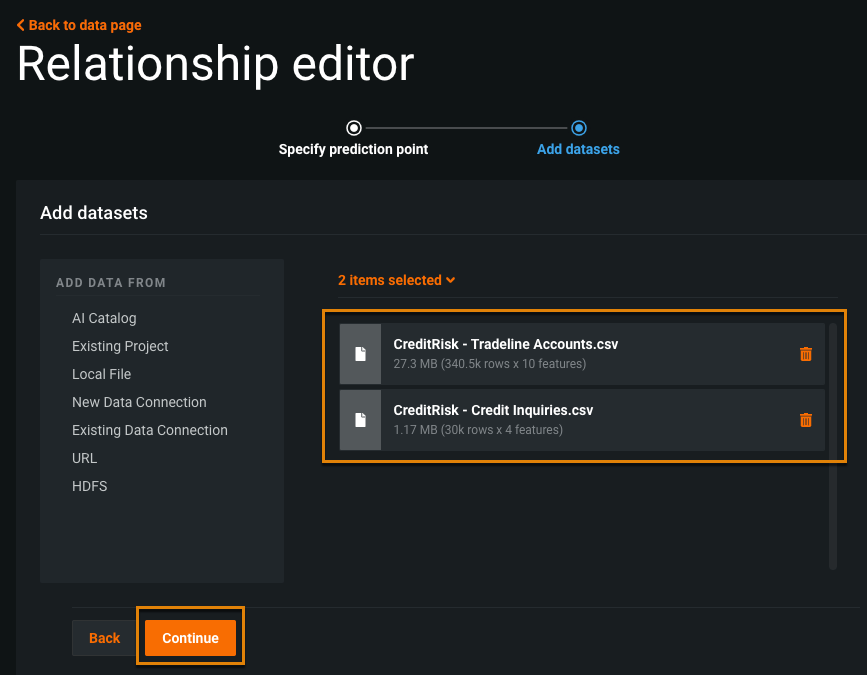
Click Continue to finalize your selection. The secondary datasets you select on this page are immediately added to the configuration, so if you reload the page without clicking Continue, the data is not lost.
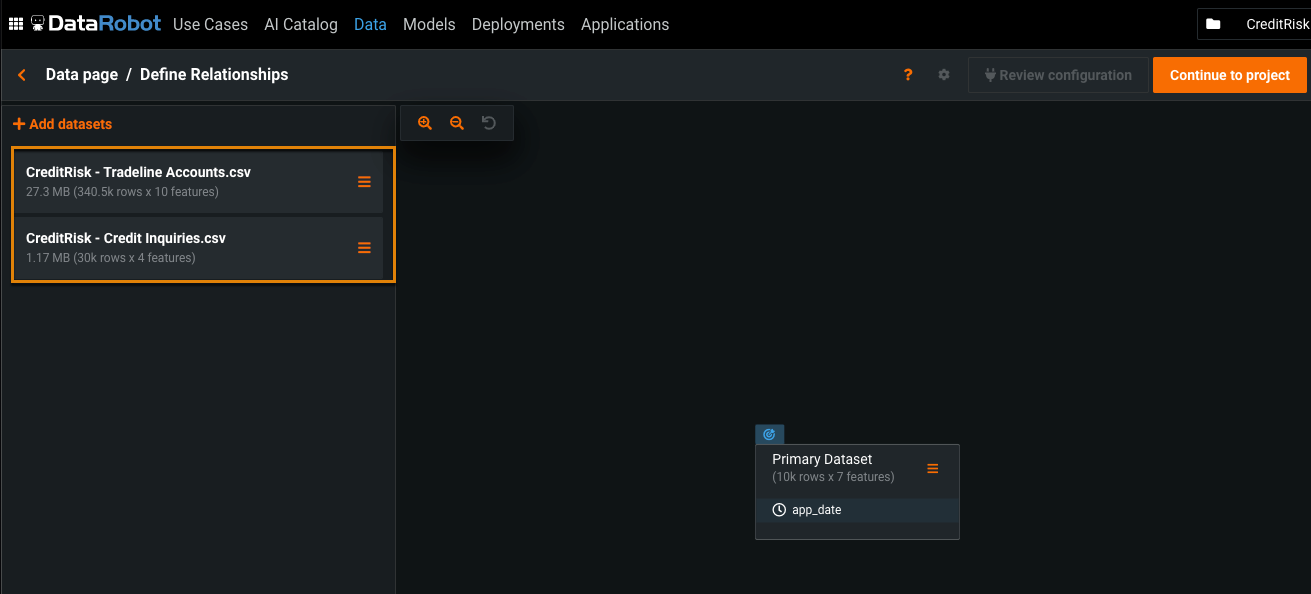
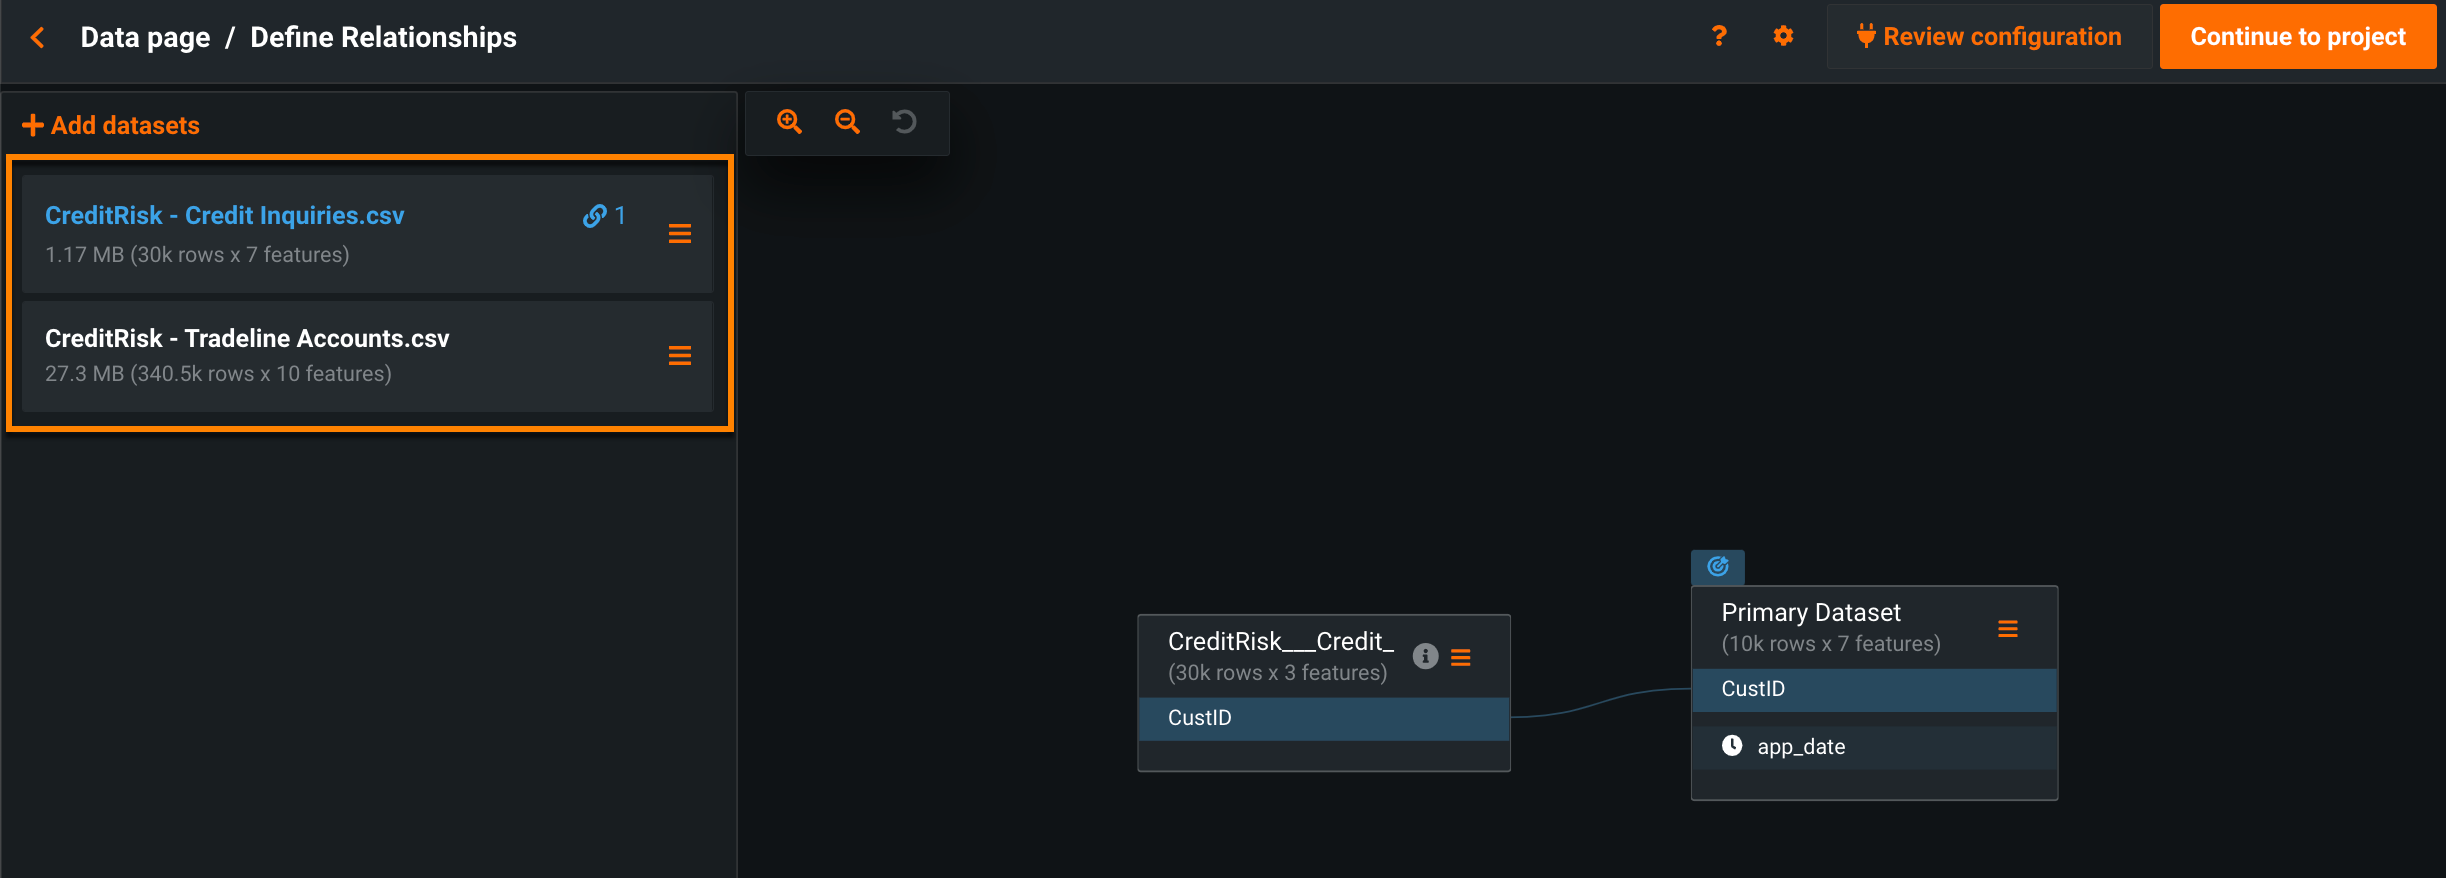
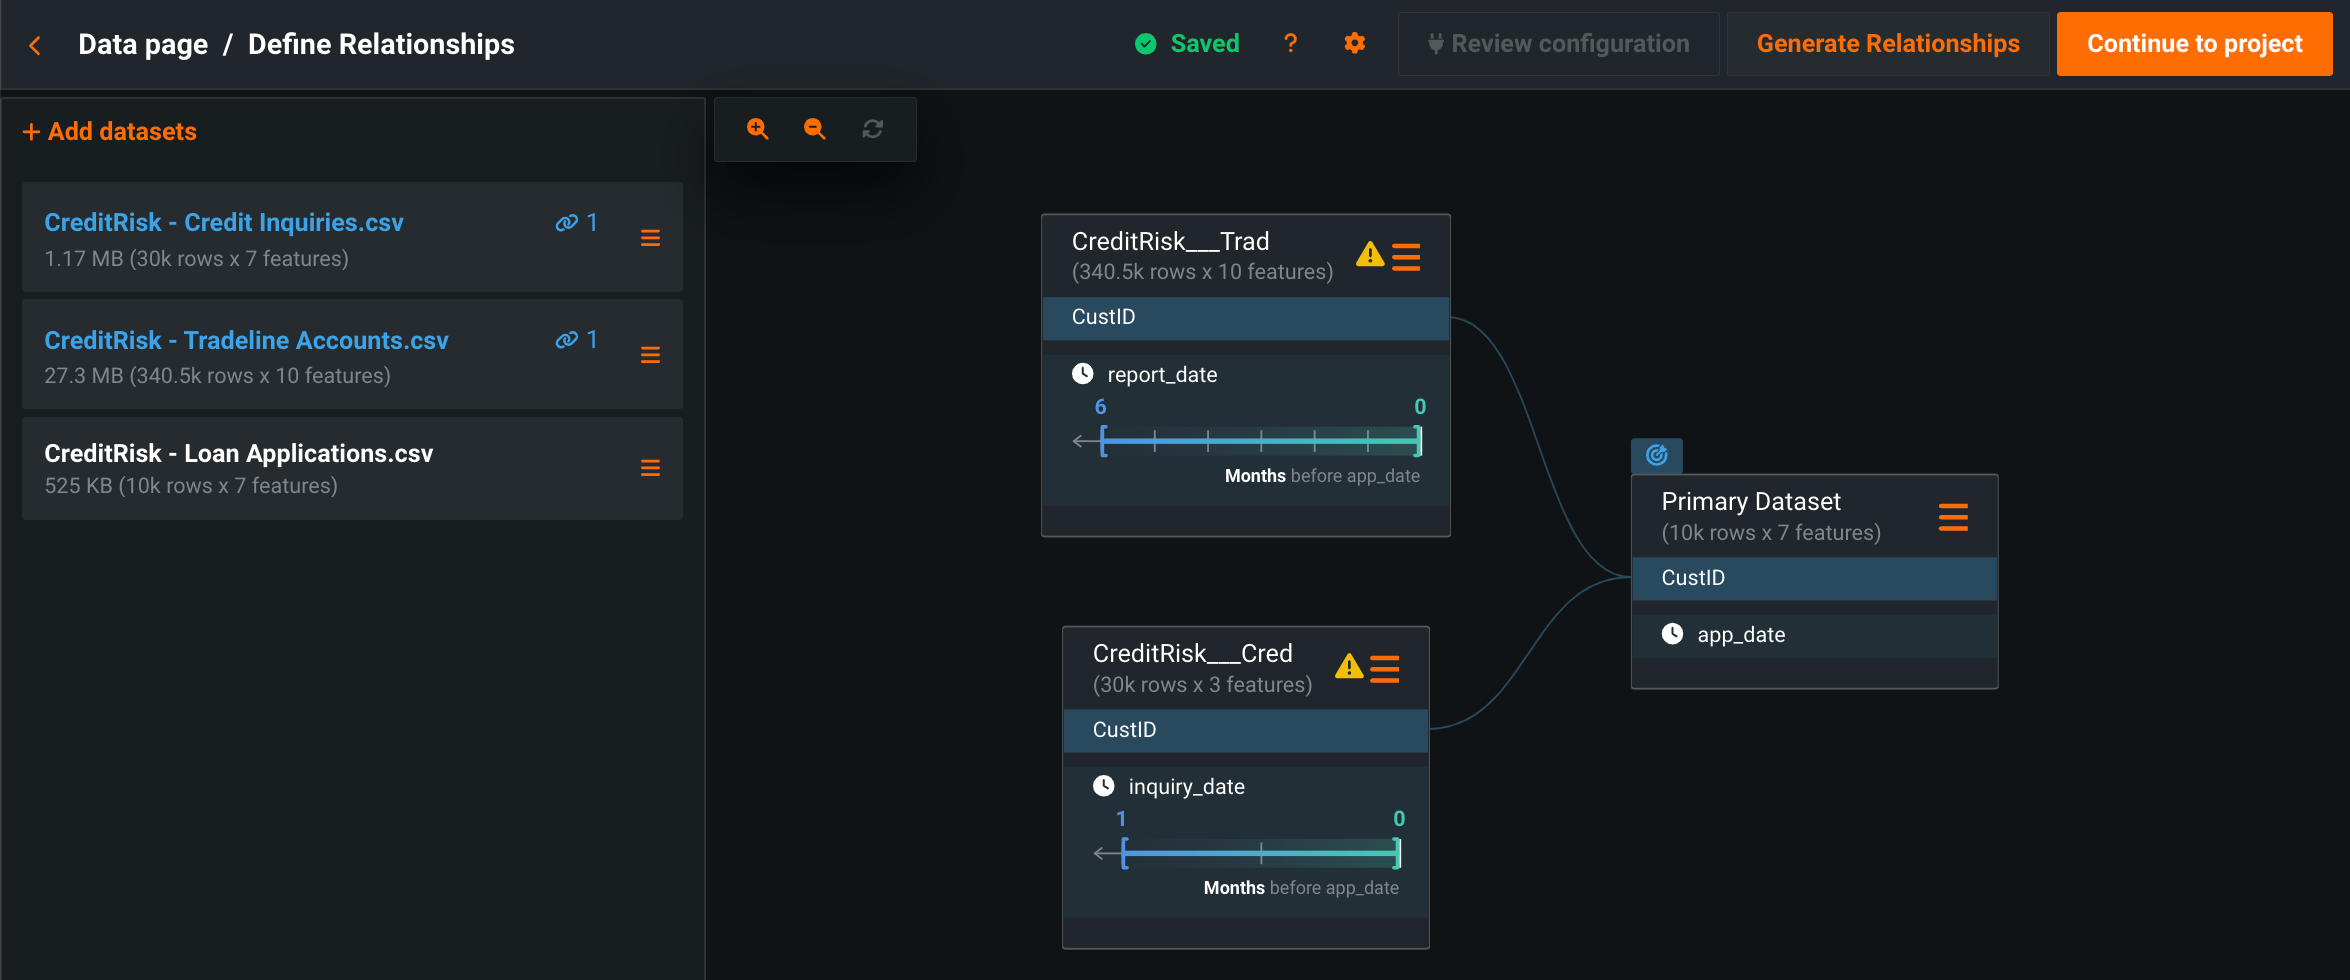
The Define Relationships page displays the datasets.
Best practice suggests continuing within this editor to define relationships. You can, however, click Continue to project to return to the Start screen.
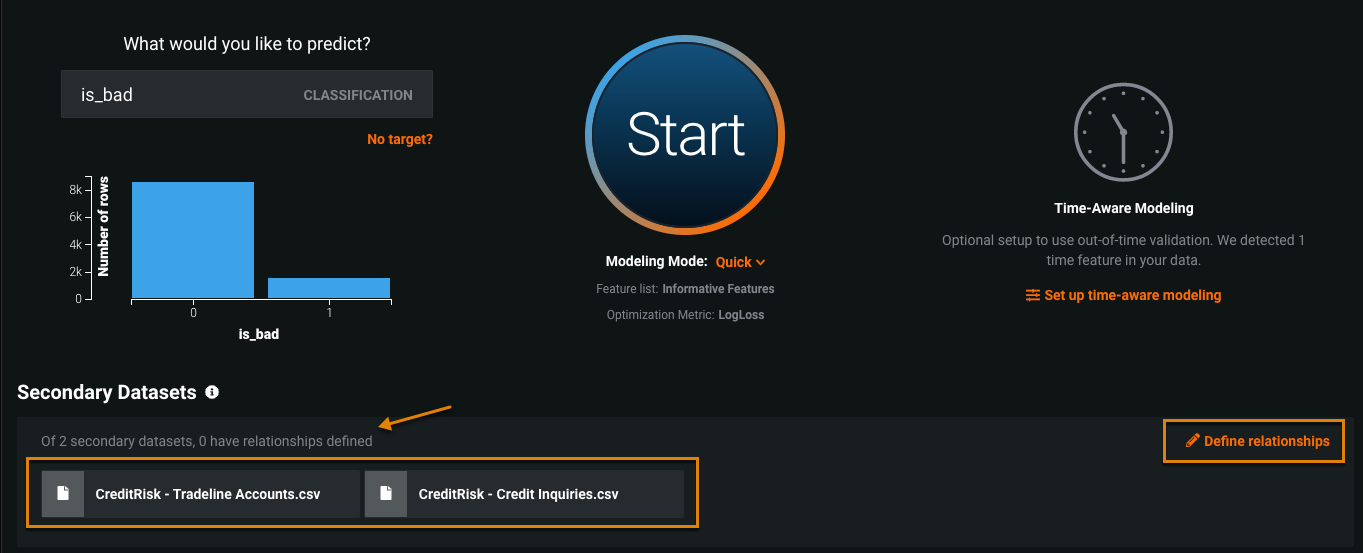
The datasets display and you can see the number of relationships that have been defined.
At any time, you can click Define relationships to return to the Define Relationships page.
If your project has more than one secondary dataset, you can add more datasets after saving. From the Define Relationships page:
-
Click Add datasets and select a data import method.
This example shows how to add a dataset from the AI Catalog.
-
From the AI Catalog, select the datasets you want to include by clicking Select. Use the search functionality to easily locate datasets for selection. When finished, click Add.
The Define Relationships page displays the datasets.
Each dataset displayed on the canvas has a menu with shortcuts to dataset-related tasks. See details of working with primary datasets and secondary datasets.
After adding secondary datasets to your project, define the relationships between the datasets.
View dataset details
You can access dataset details directly from the relationship editor using one of the following methods:
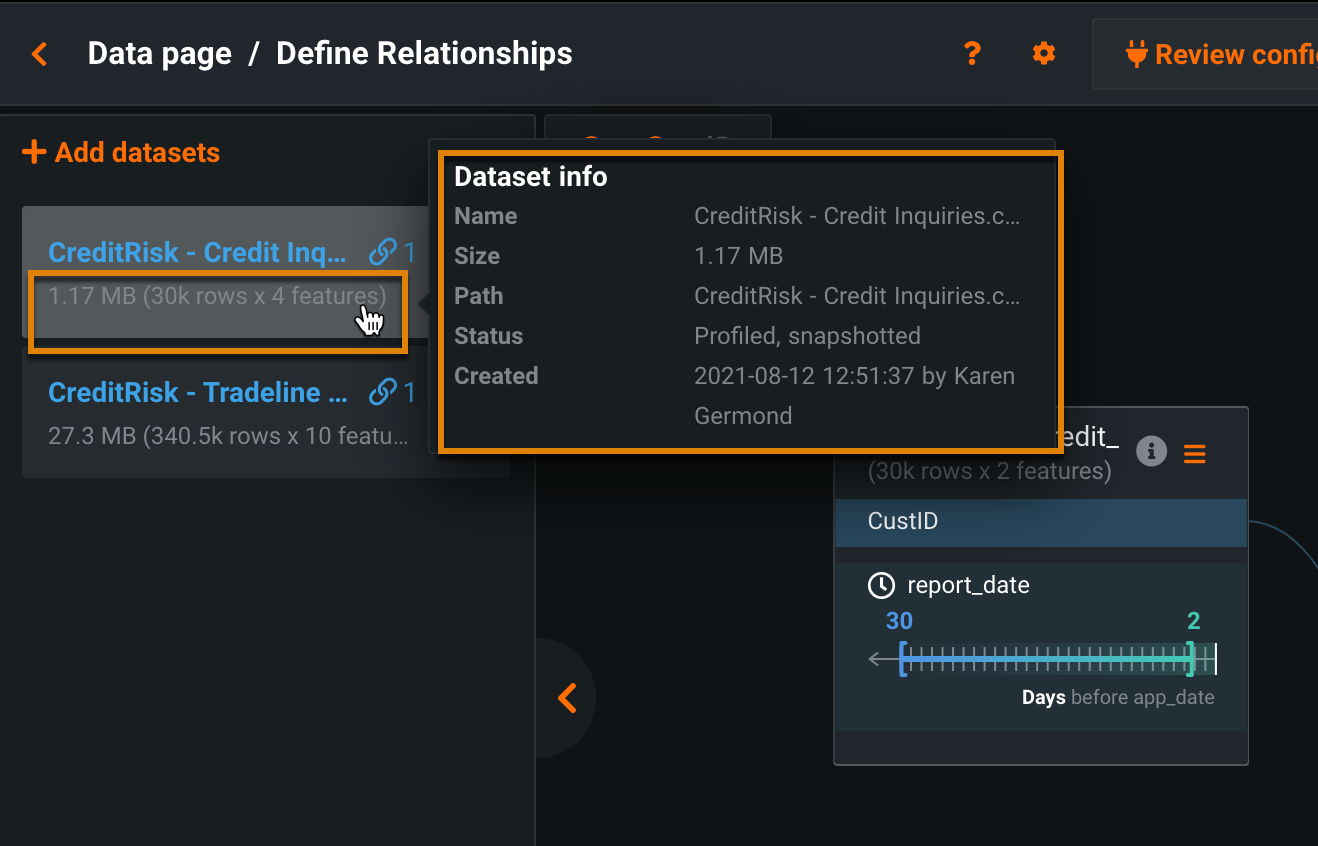
On the dataset tile, hover over the line beneath the dataset name to display metadata for the dataset.
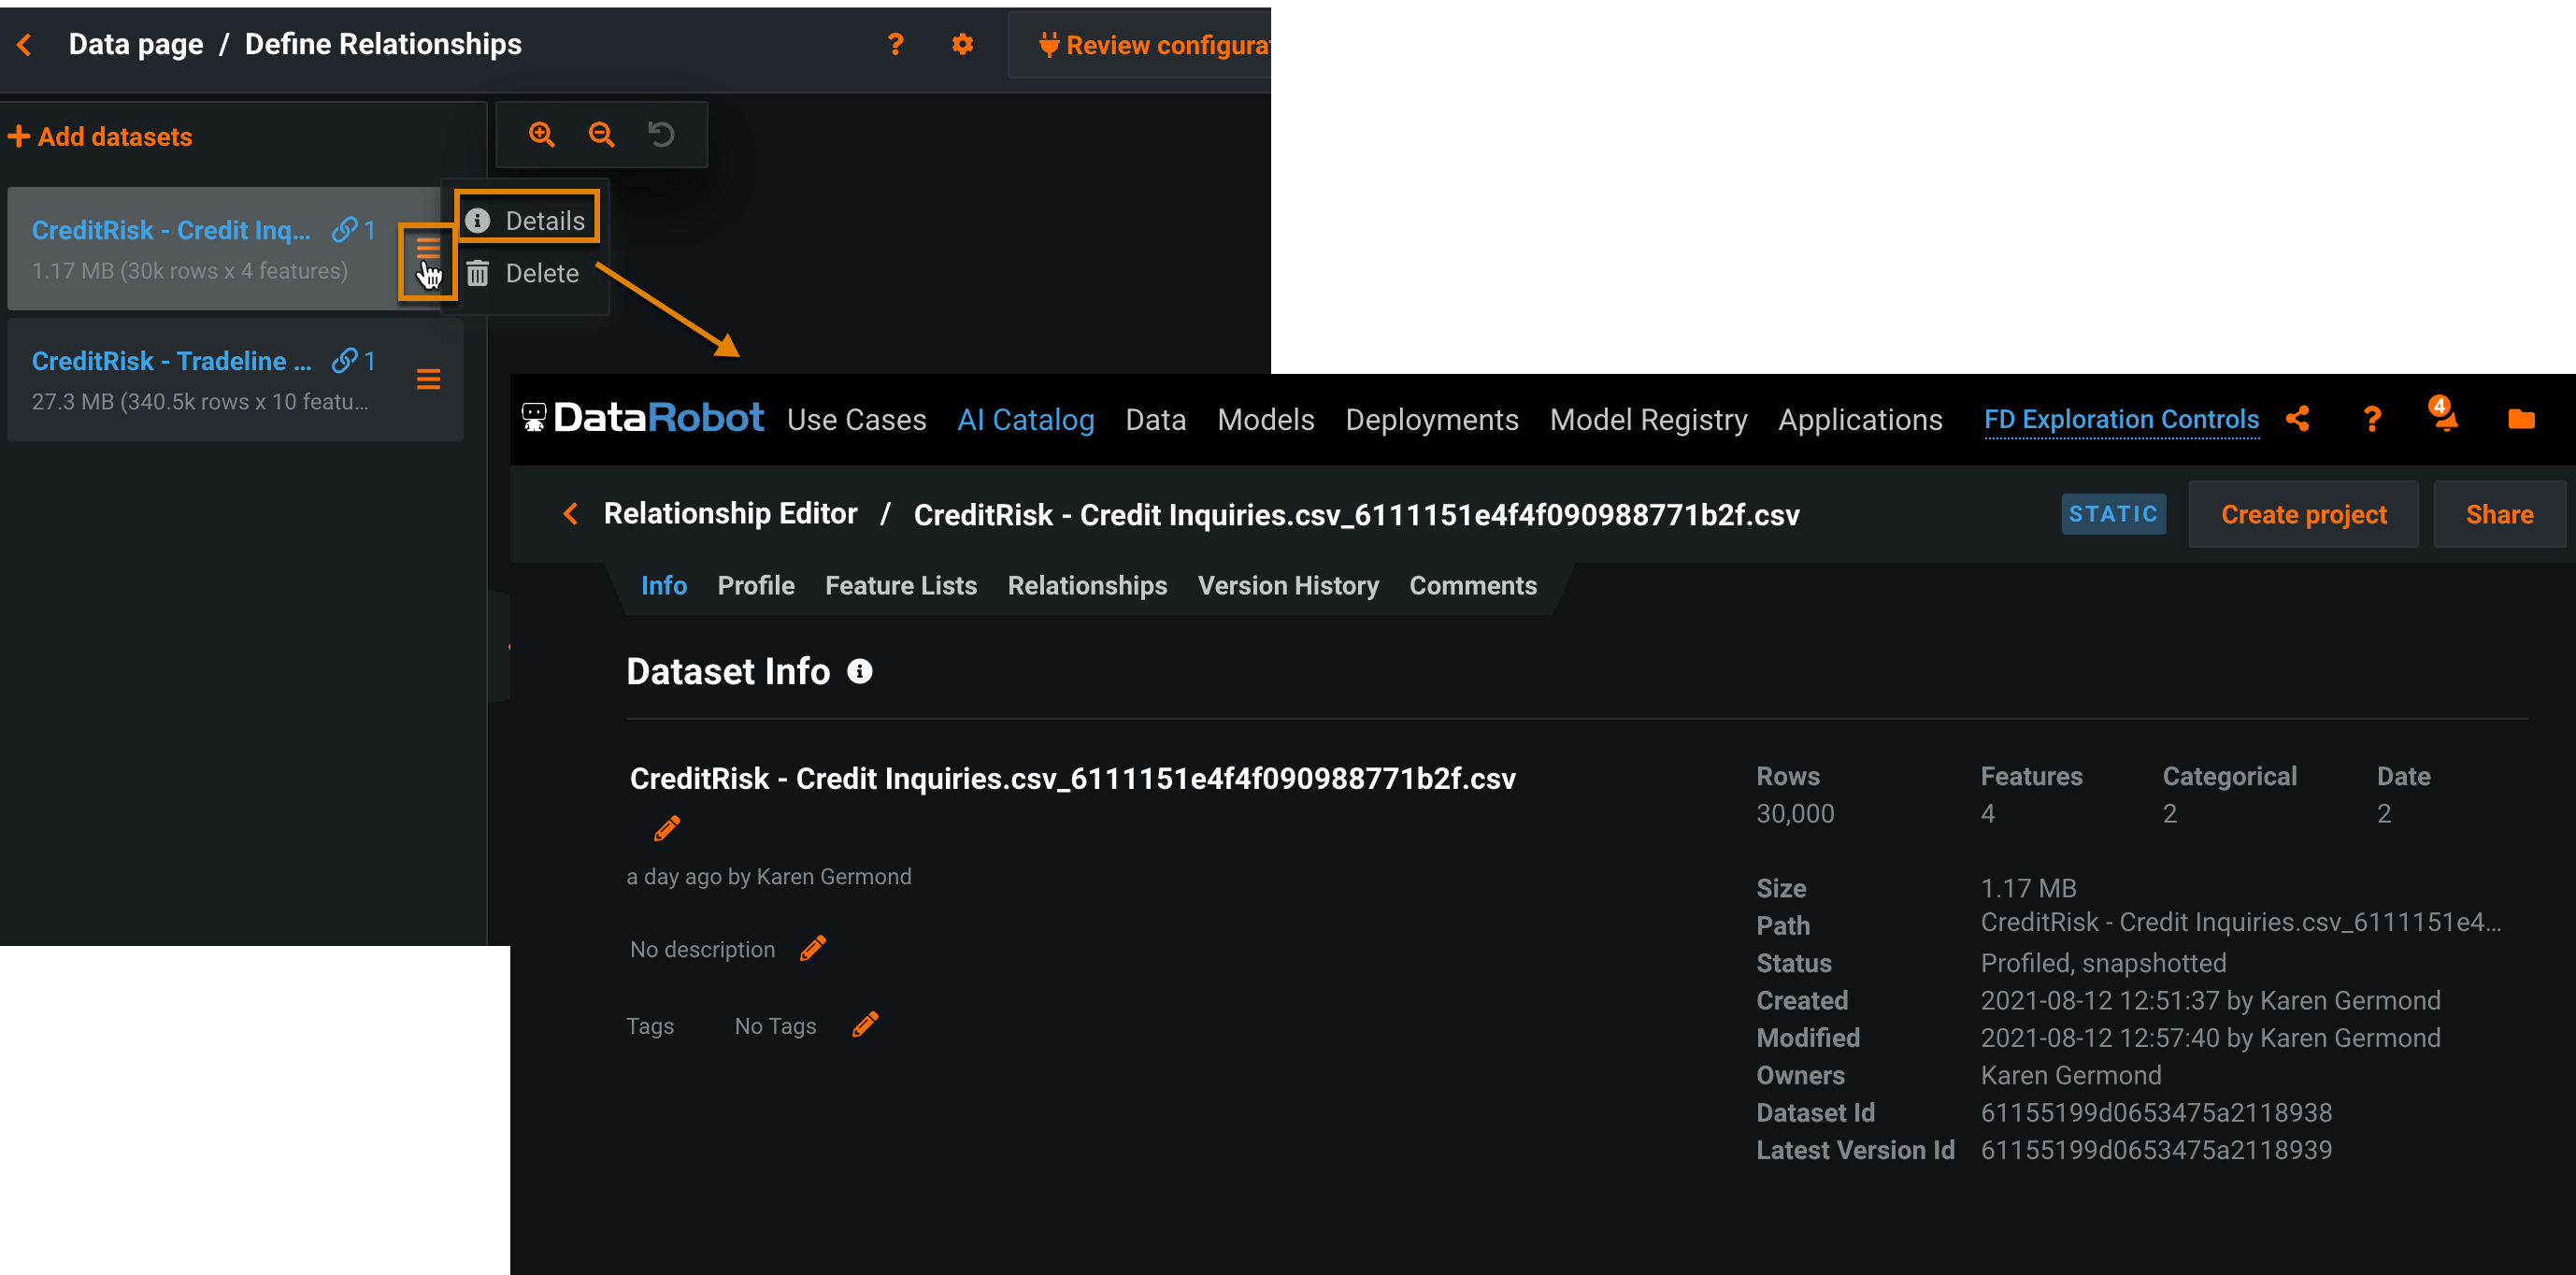
Click the menu icon on the top right of the dataset tile and select Details to open the Info page in the AI Catalog. From here you can access the profile, feature lists, relationships, version history, and comments associated with the dataset.
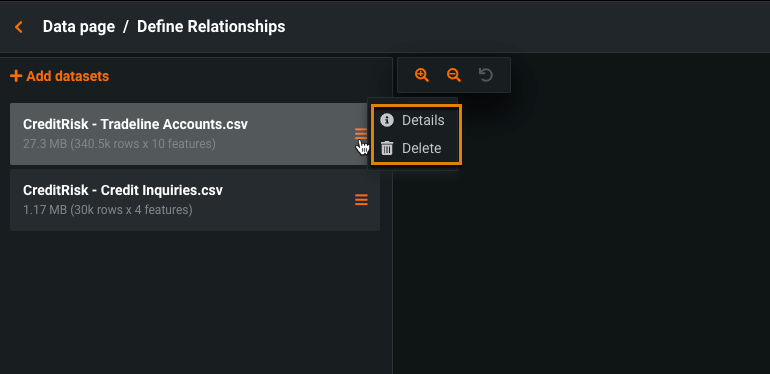
You can also delete the dataset from this menu.
Manually define relationships
Once all datasets are loaded, the next step is to define relationships on the Define Relationships page. The primary dataset is on the canvas while any secondary sets are listed in the left pane. After establishing a relationship between two datasets, you can define the relationship by setting join conditions and feature derivation windows (FDW) for time-aware feature engineering.
To define relationships:
-
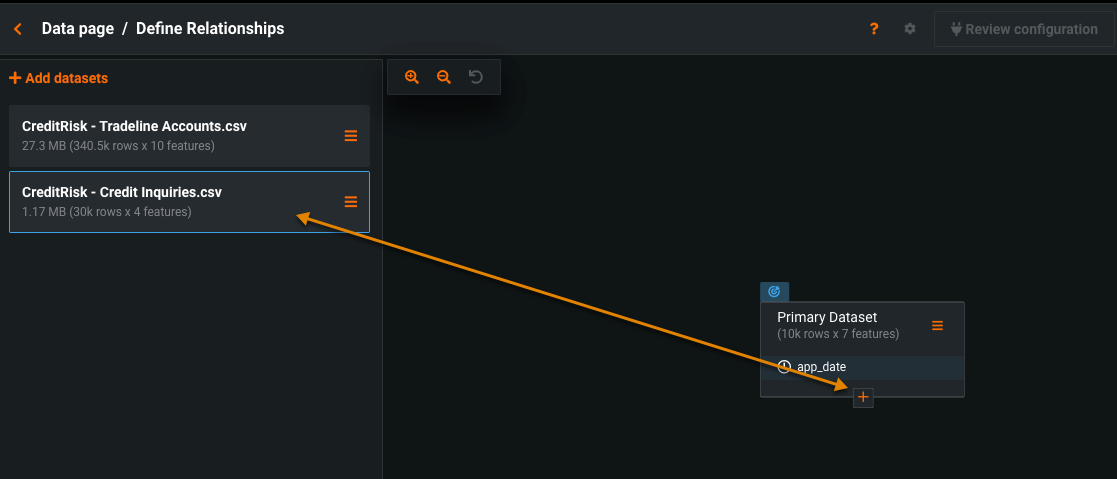
Click a secondary dataset to highlight it; notice the addition of a plus sign on the primary set.
-
Click the plus sign. DataRobot adds the selected secondary dataset to the canvas and opens the configuration editor.
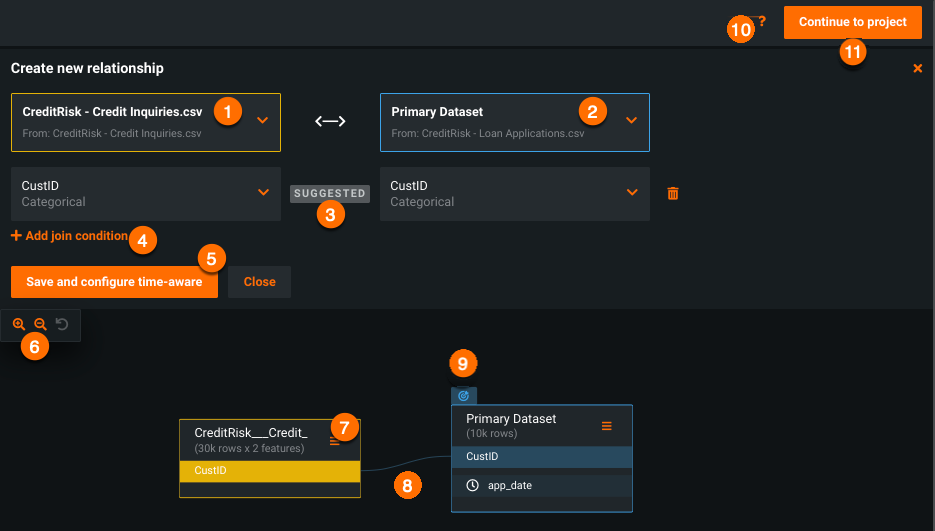
The following table describes the elements of the Create new relationship page:
Element Description 1 Secondary dataset for join Sets the secondary dataset used in the join. Change via the dropdown to any added dataset. Changes are reflected in the canvas below. 2 Primary dataset for join Sets the primary dataset used in the join. 3 Suggested join condition Sets the join condition (feature) for the corresponding dataset (listed above the condition). DataRobot suggests up to five conditions, each of which is editable. Use the dropdown to select a new feature; use the trash icon (  ) to delete the join.
4 Add join condition Provides a manual join configuration option. 5 Save or Save and configure time-aware Saves the relationship configuration. Save is the option if there is no date feature or you did not set a prediction point. If you did set a prediction point from the primary dataset, the Save and configure time-aware button displays. 6 Canvas display controls Zooms in or out, or resets the default display size. 7 Dataset menu options Provides access to a variety of actions that can be enacted on a primary or secondary dataset. 8 Join edit launch Opens the relationship editor, allowing you to define or modify the relationship between the datasets joined by the line you clicked. 9 Primary icon Indicates, with a bullseye icon, that this is the primary dataset. 10 Tour launch Opens a short tour that provides an overview of configuring Feature Discovery. 11 Continue to project Returns to the Start screen where you can revise your time-aware settings, set advanced options, set a modeling mode, and start the modeling process.
Set join conditions
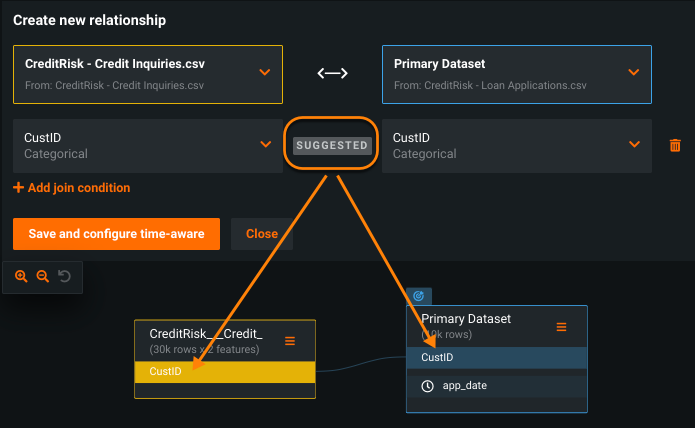
If tables in your datasets are well-formed, DataRobot automatically detects compatible features and creates up to five "suggested" joins. You can modify the suggested join using the dropdowns associated with each join key.
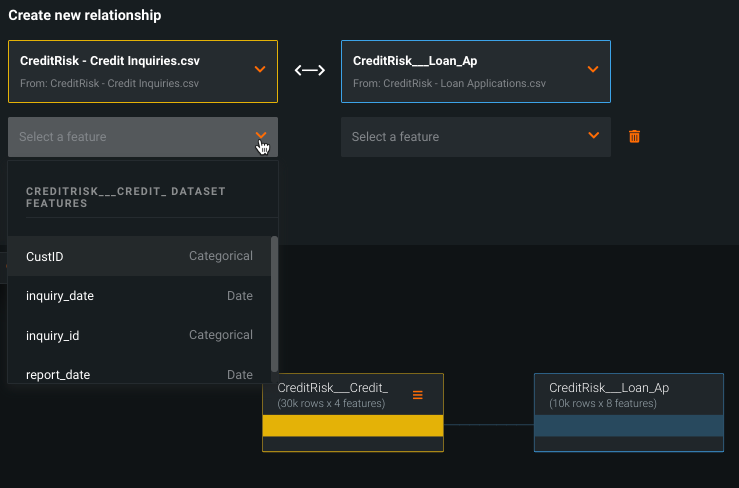
You can also manually create join keys by clicking Add join condition. In the resulting dialog, select a join feature from each dataset from the feature dropdown.
Join feature type compatibility and restrictions
See the table below for compatible join types when creating or modifying joins:
| Feature type | Compatible join types |
|---|---|
| Numeric | Numeric, Categorical |
| Categorical | Categorical, Numeric, Text |
| Text | Text, Categorical |
| Date | Date |
The following feature types cannot be used as join keys:
- Summarized categorical
- Length
- Currency
- Percentage
- Audio
- Image
- Document
Once you've added all of your secondary datasets and selected your relationship configuration settings, click Save and configure time-aware or Save for a non time-aware project.
- If the project is not time-aware, the Start page displays.
- If the project is time-aware, the Time-aware feature engineering page displays where you can configure FDWs.
Set feature derivation windows
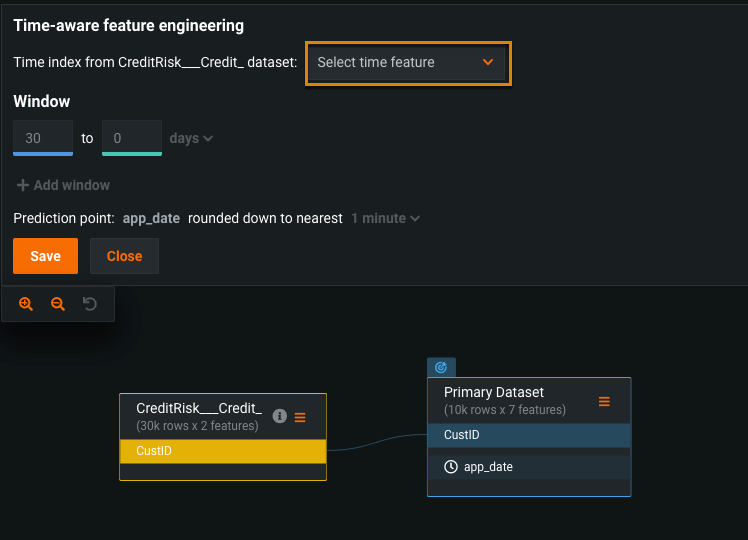
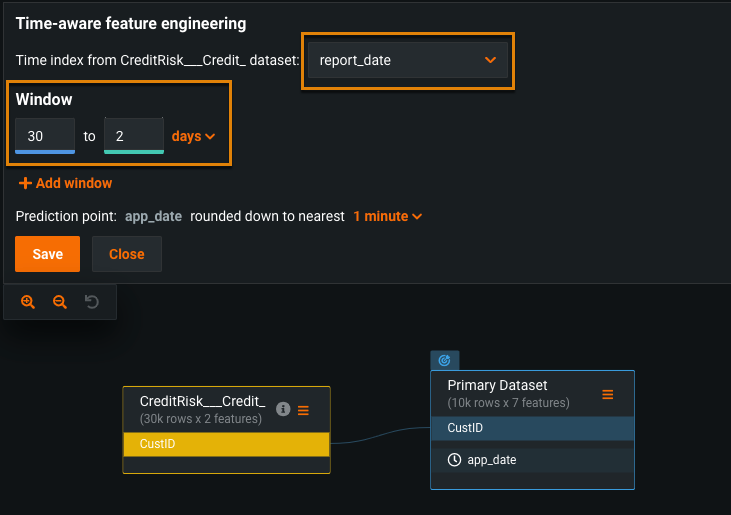
After adding secondary datasets to a time-aware project, you can define the FDWs—a rolling window of past values used to generate features before the prediction point. The FDW constrains the time history—in the example below, no further back than 30 days, no more recent than 2 days.
-
Click Select time feature to choose a time index feature for the secondary dataset.
-
Configure the FDWs. You can configure up to three FDWs for each dataset, but each window must be unique. To add a FDW, click Add window.
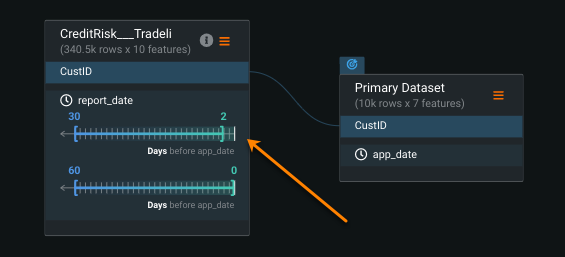
Once set, the FDW is reflected in the dataset's tile on the canvas:
These time-aware settings ensure that the generated features are based only on records that occur before the prediction point. For more details, see Time-aware feature engineering.
Automatically generate relationships
To automatically generate relationships in a Feature Discovery project, make sure all secondary datasets are added, and then click Generate Relationships at the top of the Define Relationships page.
Once ARD is complete, relationships are automatically added to the primary dataset.
Note
If you click Generate Relationships without adding any secondary datasets to the project, the button displays "Generating relationships" indefinitely.
Work with datasets
Once a dataset is added to the canvas, you can modify and refine its configuration. Primary datasets appear on the canvas by default, but all secondary datasets must be added.
Primary datasets
Note
Be sure to save your configuration before using the menu options. Unsaved changes are lost when you leave a page.
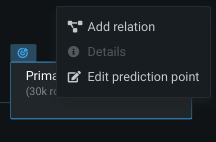
Working from the canvas, you can select the menu option on the dataset tile. The primary dataset allows you to add a relationship or edit the prediction point:
| Option | Description |
|---|---|
| Add relation | Choose Add relation when you don't have any previous relationships configured to open the Create new relationship page. This is the equivalent of selecting the dataset from the list on the left and clicking the plus sign on the primary's canvas tile. Once the page opens, select a secondary dataset from the dropdown and it is added to the canvas. |
| Edit prediction point | Select Edit prediction point to choose a different date feature to use as your prediction point. |
Secondary datasets
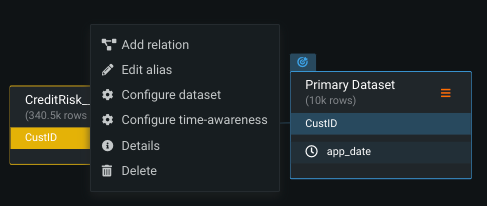
When a secondary dataset has been selected and moved to the canvas, a menu option becomes available on its tile. The table below describes the options available from the menu:
| Option | Description |
|---|---|
| Add relation | Opens the relationship editor and allows you to select a dataset (from any available in the left pane) to join with. |
| Edit alias | Allows you to set an alias for the dataset. The string displays on the canvas as the secondary dataset name. The alias does not change the display in the left-pane dataset list or the relationship editor pages. |
| Configure dataset | Opens the dataset configuration editor, where you can set dataset details. |
| Configure time-awareness | Opens the time-aware feature engineering configuration dialog, where you can select a time index for the secondary dataset or confirm that the correct date/time feature is selected. |
| Details | Click to open the Info window for the dataset in the AI Catalog. |
| Delete | Deletes the dataset, and all its relationships, from the current relationship configuration. The dataset is still available to the configuration and listed in the left panel. |
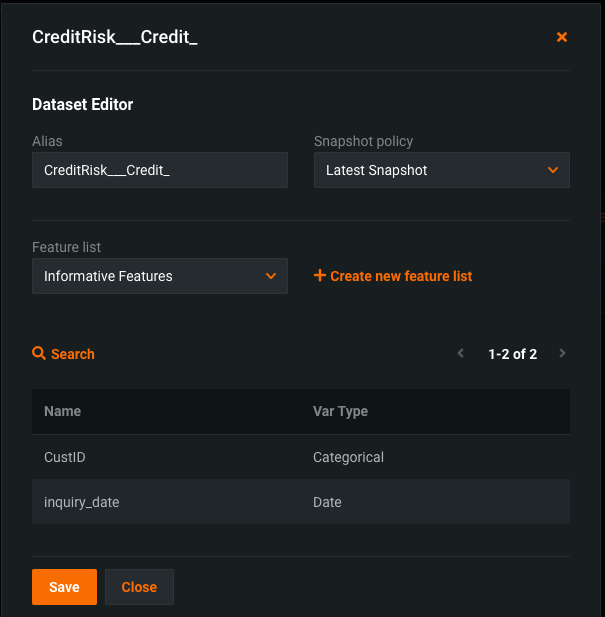
Selecting Configure dataset from a secondary dataset menu opens the Dataset Editor.
From here you can:
-
Change the dataset alias. If not manually set, DataRobot auto-generates an alias based on the file name. Click in the box to modify the alias; the alias for the primary dataset cannot be modified.
-
Choose a snapshot policy, either Latest, Fixed, or Dynamic, to use for this project. By default, the selected snapshot policy will apply at prediction time.
-
Choose a feature list to apply against the corresponding dataset. Use this option to limit the size of the table by selecting relevant features. You can create new feature lists from the AI Catalog.
Test relationship quality
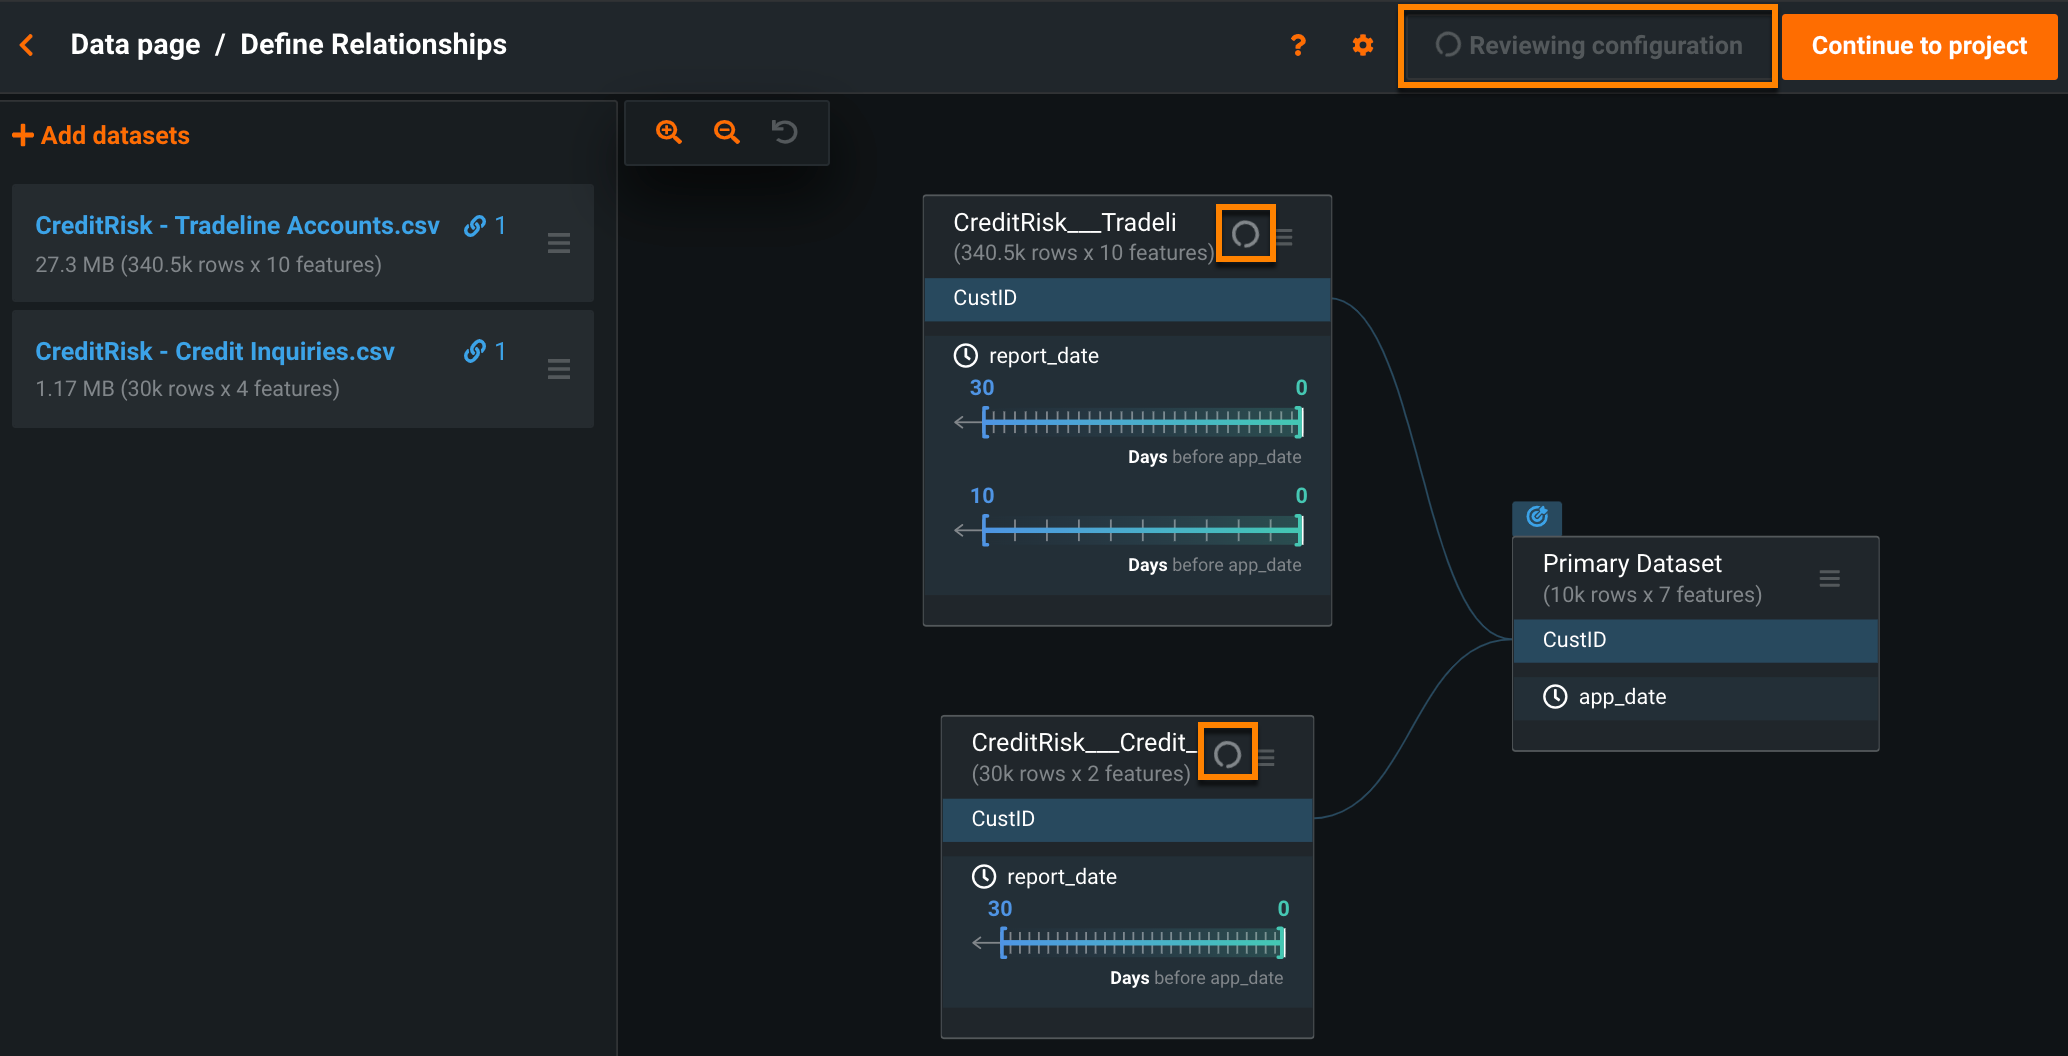
After configuring at least one secondary dataset, you can test the quality of those relationship configurations to identify and resolve potential problems early in the creation process. The Relationship Quality Assessment tool verifies join keys, dataset selection, and time-aware settings before EDA2 begins.
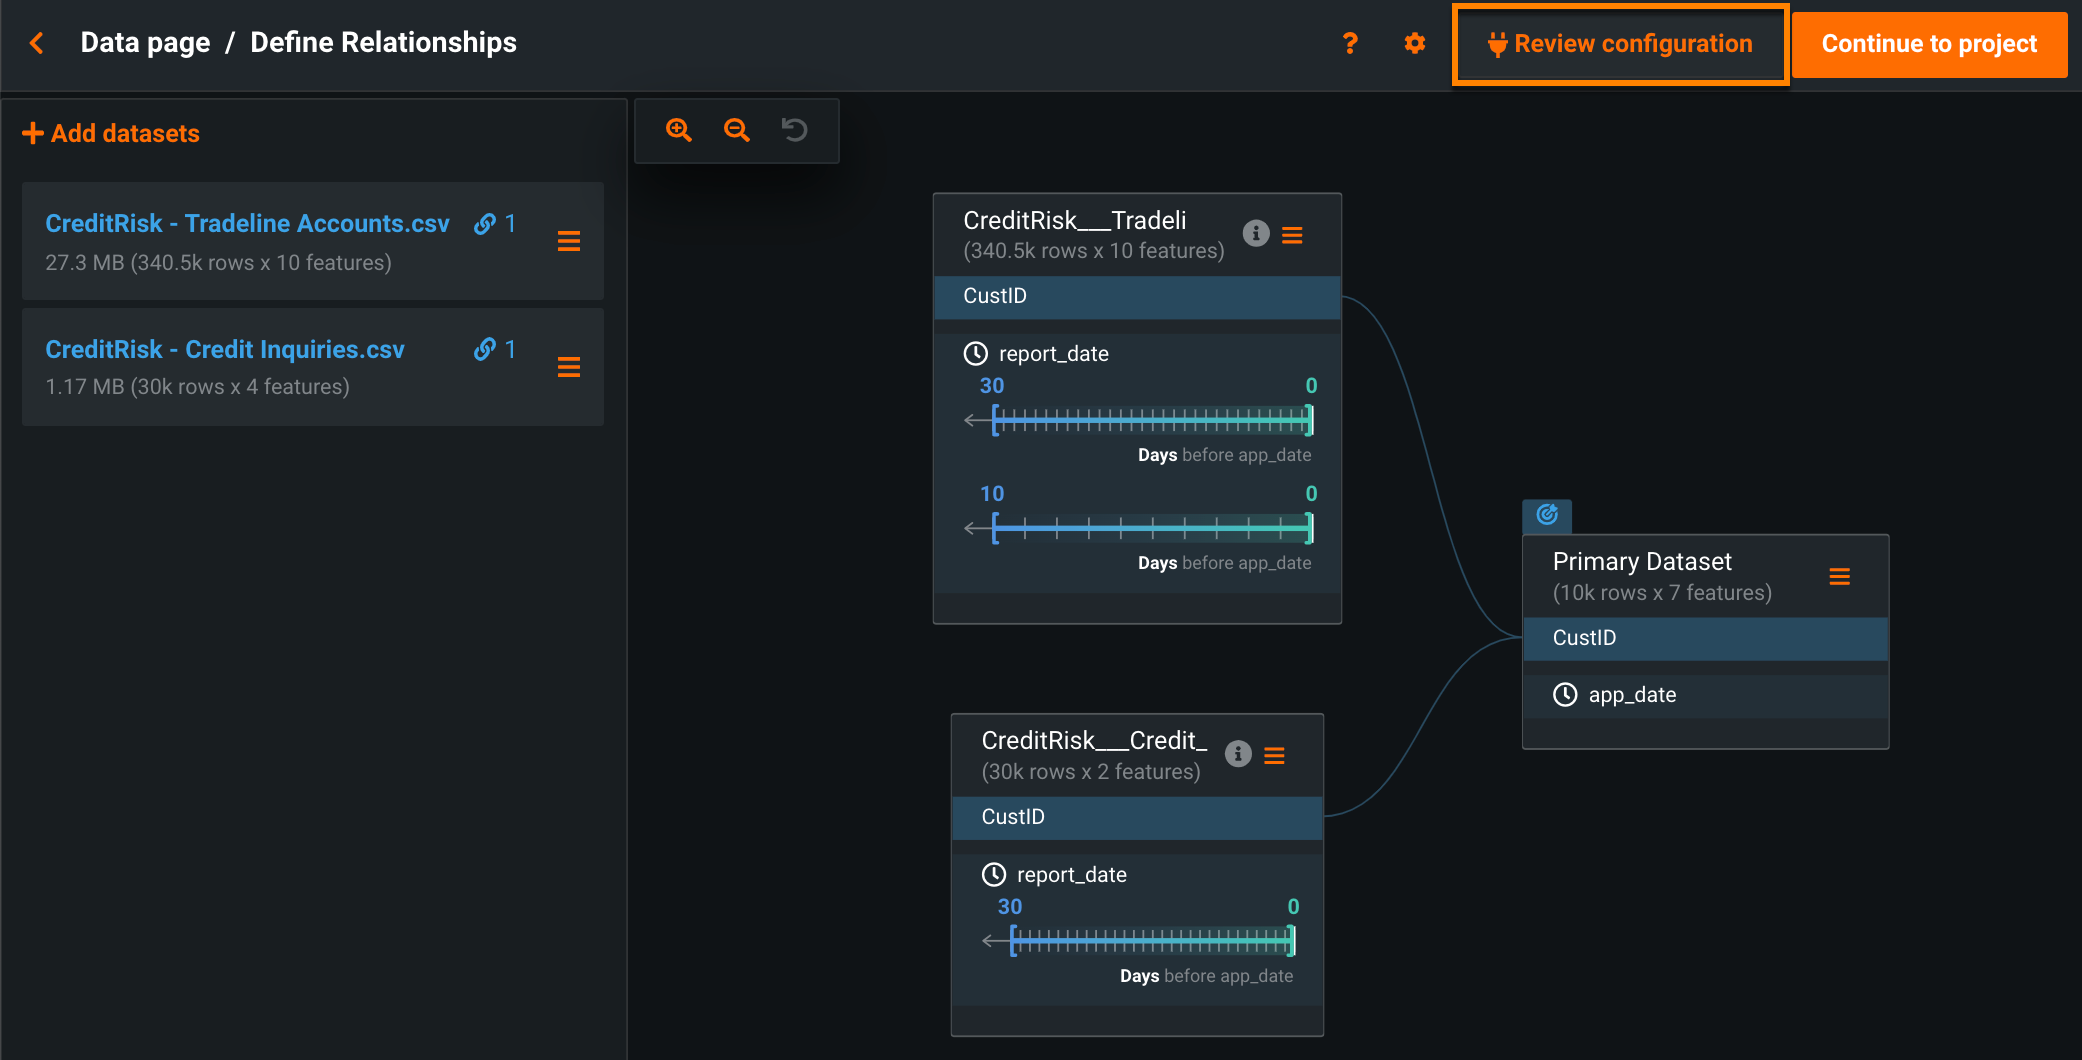
Click the Review configuration button to trigger the Relationship Quality Assessment.
A progress indicator (loading spinner) displays on each dataset and on the Review Configuration button, which is disabled, to indicate that an assessment is currently running.
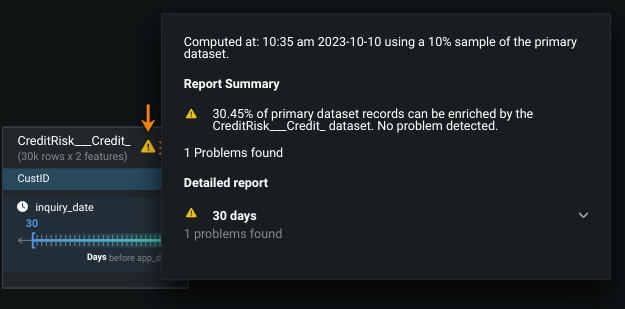
Once the assessment is complete, DataRobot marks all tested datasets. Those with identified issues display a yellow warning icon and those with no identified issues display a green tick.
Deep dive: Relationship assessments
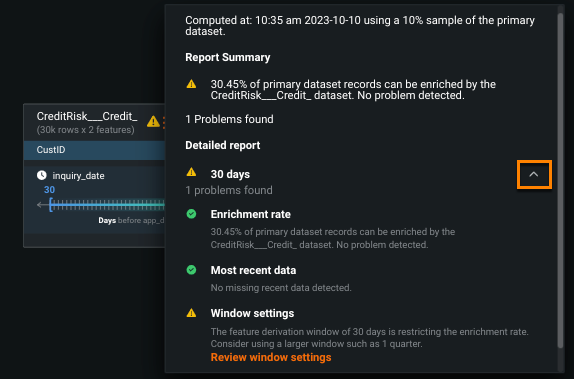
Depending on the project type, DataRobot assesses the relationship's enrichment rate, window settings, and most recent data—each of which is described in the table below:
| Category | Description | Solution | Project type |
|---|---|---|---|
| Enrichment rate | Quickly determines, as a percentage, how many rows in the secondary dataset map to rows in the primary table. | Review the dataset and relationship. | All |
| Window settings | Determines how many rows in the secondary dataset map to the primary dataset within the specified FDWs. | Expand the window settings to find more rows. | Time-aware |
| Most recent data | Compares the minimum and maximum time index of the secondary and primary datasets to determine if the secondary dataset is outdated. | Review the selected feature list and snapshot policy. | Time-aware |
Assessments are always updated for JDBC sources with dynamic snapshot policy.
DataRobot calculates enrichment rate using the following formula:
(rows_of_primary_that_can_be_mapped_to_secondary / total_rows_of_primary) x 100
Select the warning icon to view a summary of the issues with suggested potential fixes. A summary of the issues identified during the assessment is displayed at the top of the window.
Sampling percentage
To improve run times, DataRobot subsamples approximately 10% of the primary dataset, speeding up the computation without impacting the enrichment rate estimation accuracy or the results of the assessment. The sampling percentage is included at the top of the report.
To open the detailed report, click the orange arrow on the right. DataRobot breaks down the assessment by category, providing additional information to diagnose the issue. If a secondary dataset has multiple FDWs, a detailed report is created for each one.
To resolve warnings, click the orange link displayed below each warning— Review dataset, Review relationship, or Review window settings—and a pane appears at the top of the relationship editor allowing you to modify relationship configurations.
After EDA2 completes and model building begins, you can view the most recent Relationship Quality Assessment in the Data > Feature Discovery tab.
Start the project
-
Once you are happy with the definition of the relationship(s), click Continue to project to return to the Start screen.
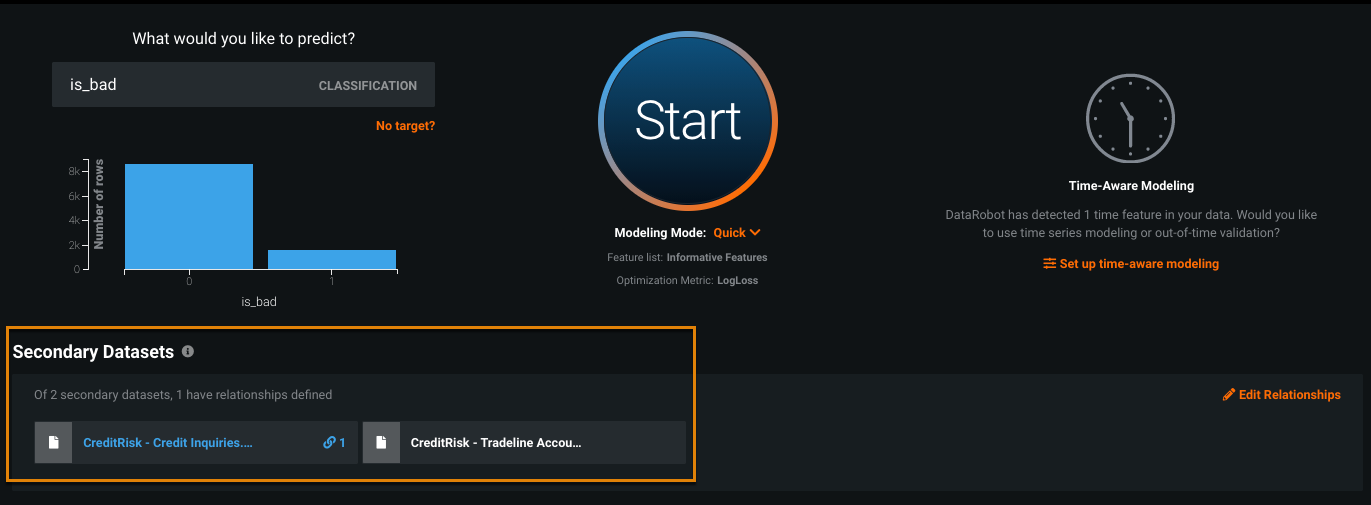
The Secondary Datasets section provides visual queues that provide details about the secondary datasets.
Visual queue Indicates 1 Datasets with blue text The dataset is in use and part of the project. 2 Datasets with white text The dataset is loaded but not part of the relationship definition. 3 Linked datasets The number of datasets linked with this dataset. 4 Number of datasets and relationships The number of secondary datasets and how many have relationships defined. -
Click Start.
DataRobot conducts feature engineering as part of EDA2 and begins generating model blueprints.
Share assets
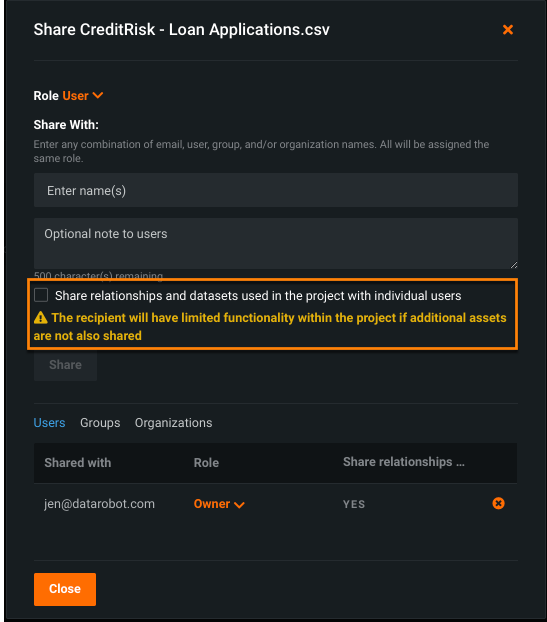
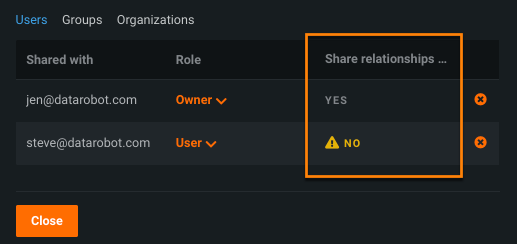
As with any DataRobot project, you can share Feature Discovery projects (depending on your permissions). The assignable roles provide different levels of permission for the recipient. Unique to Feature Discovery projects, however, is the ability to share engineering graphs and datasets as well.
To share a project, click the share icon ![]() . For the recipient to interact with the project, they must have access to the additional assets. By default, assets are not shared. Check to enable sharing relationships and datasets, or DataRobot provides a warning:
. For the recipient to interact with the project, they must have access to the additional assets. By default, assets are not shared. Check to enable sharing relationships and datasets, or DataRobot provides a warning:
Note that in addition to the assigned role, the listing of project users also indicates whether project assets have been shared.
