Management agent Helm installation for Kubernetes
This process provides an example of a management agent use case, using a Helm chart to aid in the installation and configuration of the management agent and the Kubernetes plugin.
Important
The Kubernetes plugin and Helm chart used in this process are examples; they may need to be modified to suit your needs.
Overview
The MLOps management agent provides a mechanism to automate model deployment to any infrastructure. Kubernetes is a popular solution for deploying and monitoring models outside DataRobot, orchestrated by the management and monitoring agents. To streamline the installation and configuration of the management agent and the Kubernetes plugin, you can use the contents of the /tools/charts/datarobot-management-agent directory in the agent tarball.
The /tools/charts/datarobot-management-agent directory contains the files required for a Helm chart that you can modify to install and configure the management agent and its Kubernetes plugin for your preferred cloud environment: Amazon Web Services, Azure, Google Cloud Platform, or OpenShift. It also supports standard Docker Hub installation and configuration. This directory includes the default values.yaml file (located at /tools/charts/datarobot-management-agent/values.yaml in the agent tarball) and customizable example values.yaml files for each environment (located in the /tools/charts/datarobot-management-agent/examples directory of the agent tarball). You can copy and update the environment-specific values.yaml file you need and use --values <filename> to overlay the default values.
Architecture overviews
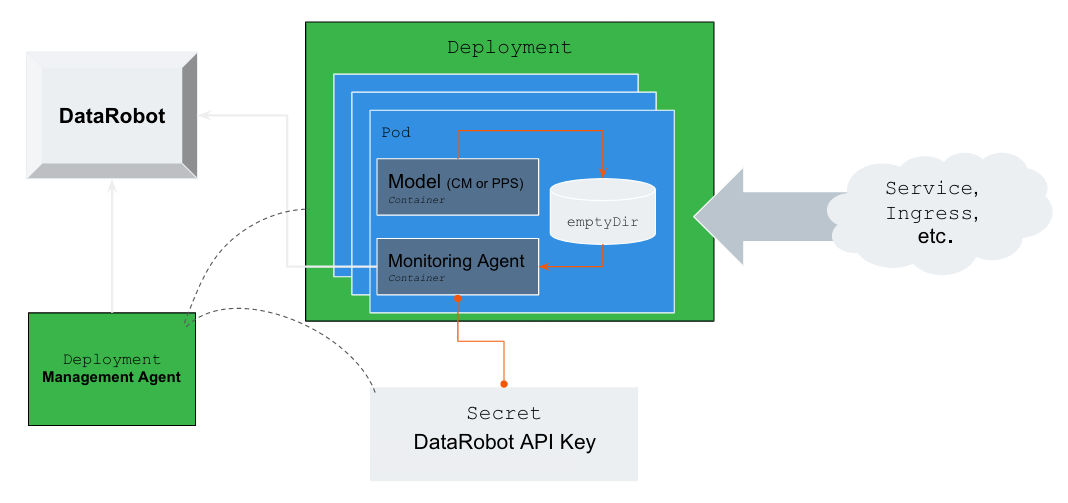
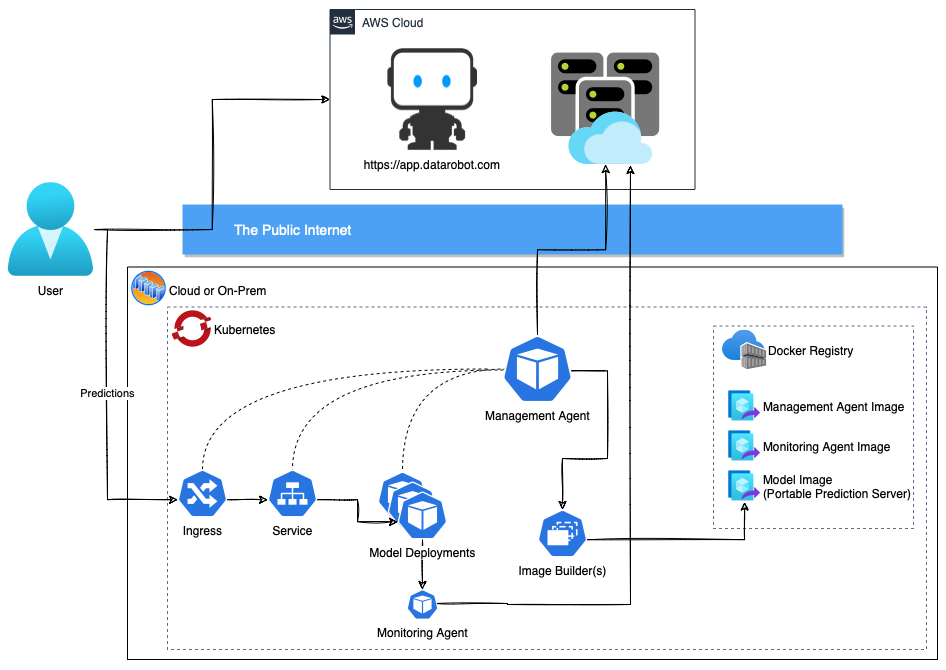
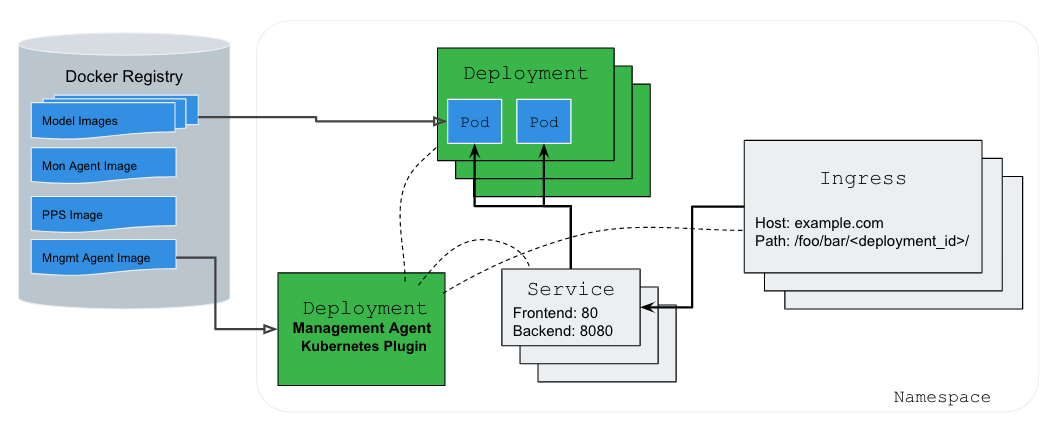
 The diagram above shows a detailed view of how the management agent deploys models into Kubernetes and enables model monitoring.
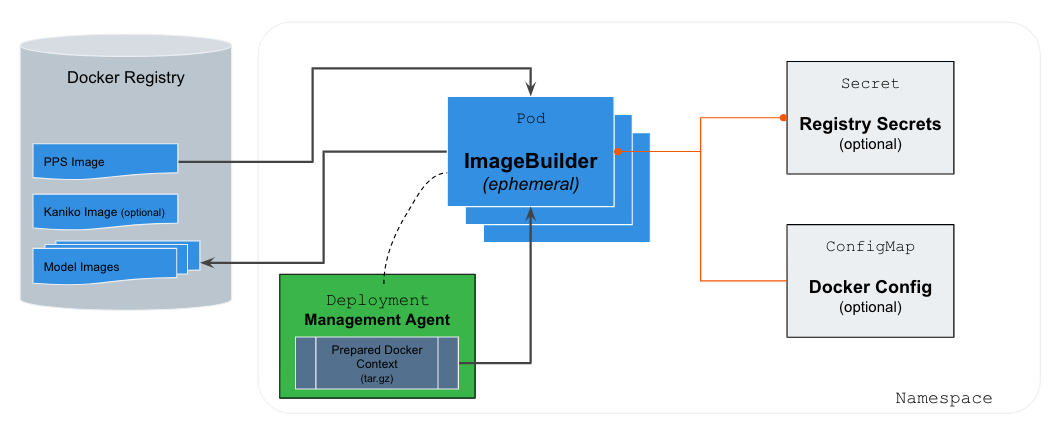
 The diagram above shows the specifics of how DataRobot models are packaged into a deployable image for Kubernetes. This architecture leverages an open-source tool maintained by Google called Kaniko, designed to build Docker images inside a Kubernetes cluster securely.
Prerequisites
Before you begin, you must build and push the management agent Docker image to a registry accessible by your Kubernetes cluster. If you haven't done this, see the MLOps management agent overview.
Once you have a management agent Docker image, set up a Kubernetes cluster with the following requirements:
- Kubernetes clusters (version v1.21+)
- Nginx Ingress
- Docker Registry
- 2+ CPUs
- 40+ GB of instance storage (image cache)
- 6+ GB of memory
Important
All requirements are for the latest version of the management agent.
Configure software requirements
To install and configure the required software resources, follow the processes outlined below:
Any Kubernetes cluster running version 1.21 or higher is supported. Follow the documentation for your chosen distribution to create a new cluster. This process also supports OpenShift version 4.8 and above.
Important
If you are using OpenShift, you should skip this prerequisite. OpenShift uses the built-in Ingress Controller.
Currently, the only supported ingress controller is the open-source Nginx-Ingress controller (>=4.0.0). To install Nginx Ingress in your environment, see the Nginx Ingress documentation or try the example script below:
# Create a namespace for your ingress resources
kubectl create namespace ingress-mlops

# Add the ingress-nginx repository
helm repo add ingress-nginx https://kubernetes.github.io/ingress-nginx
helm repo update

# Use Helm to deploy an NGINX ingress controller
#
# These settings should be considered sane defaults to help quickly get you started.
# You should consult the official documentation to determine the best settings for
# your expected prediction load. With Helm, it is trivial to change any of these
# settings down the road.
helm install nginx-ingress ingress-nginx/ingress-nginx \
    --namespace ingress-mlops \
    --set controller.ingressClassResource.name=mlops \
    --set controller.autoscaling.enabled=true \
    --set controller.autoscaling.minReplicas=2 \
    --set controller.autoscaling.maxReplicas=3 \
    --set controller.config.proxy-body-size=51m \
    --set controller.config.proxy-read-timeout=605s \
    --set controller.config.proxy-send-timeout=605s \
    --set controller.config.proxy-connect-timeout=65s \
    --set controller.metrics.enabled=true
This process supports the major cloud vendor's managed registries (ECR, ACR, GCR) in addition to Docker Hub or any standard V2 Docker registry. If your registry requires pre-created repositories (i.e., ECR), you should create the following repositories:
datarobot/mlops-management-agentdatarobot/mlops-tracking-agentdatarobot/datarobot-portable-prediction-apimlops/frozen-models
Important
You must provide the management agent push access to the mlops/frozen-model repo. Examples of several common registry types are provided below. If you are using GCR or OpenShift, the path for each Docker repository above must be modified to suit your environment.
Configure registry credentials
To configure the Docker Registry for your cloud solution, follow the relevant process outlined below. The section provides examples for the following registries:
- Amazon Elastic Container Registry (ECR)
- Microsoft Azure Container Registry (ACR)
- Google Cloud Platform Container Registry (GCR)
- OpenShift Integrated Registry
- Generic Registry (Docker Hub)
First, create all required repositories listed above using the ECR UI or using the following command:
repos="datarobot/mlops-management-agent
datarobot/mlops-tracking-agent
datarobot/datarobot-portable-prediction-api
mlops/frozen-model"
for repo in $repos; do
aws ecr create-repository --repository-name $repo
done
To provide push credentials to the agent, use an IAM role for the service account:
eksctl create iamserviceaccount --approve \
    --cluster <your-cluster-name> \
    --namespace datarobot-mlops \
    --name datarobot-management-agent-image-builder \
    --attach-policy-arn arn:aws:iam::aws:policy/AmazonEC2ContainerRegistryPowerUser
Next, create a file called config.json with the following contents:
{ "credsStore": "ecr-login" }
Use that JSON file to create a ConfigMap:
kubectl create configmap docker-config \
    --namespace datarobot-mlops \
    --from-file=<path to config.json>
Update the imageBuilder section of the values.yaml file (located at /tools/charts/datarobot-management-agent/values.yaml in the agent tarball) to use the configMap you created and to configure serviceAccount with the IAM role you created:
imageBuilder:
...
configMap: "docker-config"
serviceAccount:
    create: false
    name: "datarobot-management-agent-image-builder"
First, in your ACR registry, under Settings > Access keys, enable the Admin user setting. Then, use one of the generated passwords to create a new secret:
kubectl create secret docker-registry registry-creds \
    --namespace datarobot-mlops \
    --docker-server=<container-registry-name>.azurecr.io \
    --docker-username=<admin-username> \
    --docker-password=<admin-password>
Note
This process assumes you already created the datarobot-mlops namespace.
Next, update the imageBuilder section of the values.yaml file (located at /tools/charts/datarobot-management-agent/values.yaml in the agent tarball) to use the secretName for the secret you created:
imageBuilder:
...
secretName: "registry-creds"
You should use Workload Identity in your GKE cluster to provide GCR push credentials to the Docker image building service. This process consists of the following steps:
In this section, you can find the minimal configuration required to complete this guide.
First, enable Workload Identity on your cluster and all of your node groups:
# Enable workload identity on your existing cluster
gcloud container clusters update <CLUSTER-NAME> \
--workload-pool=<PROJECT-NAME>.svc.id.goog

# Enable workload identity on an existing node pool
gcloud container node-pools update <NODE-POOL-NAME> \
--cluster=<CLUSTER-NAME> \
--workload-metadata=GKE_METADATA
When the cluster is ready, create a new IAM Service Account and attach a role that provides all necessary permissions to the image builder service. The image builder service must be able to push new images into GCR, and the IAM Service Account must be able to bind to the GKE ServiceAccount created upon installation:
# Create Service Account
gcloud iam service-accounts create gcr-push-user

# Give user push access to GCR
gcloud projects add-iam-policy-binding <PROJECT-NAME> \
--member=serviceAccount:[gcr-push-user]@<PROJECT-NAME>.iam.gserviceaccount.com \
--role=roles/cloudbuild.builds.builder

# Link GKE ServiceAccount with the IAM Service Account
gcloud iam service-accounts add-iam-policy-binding \
--role roles/iam.workloadIdentityUser \
--member "serviceAccount:<PROJECT-NAME>.svc.id.goog[datarobot-mlops/datarobot-management-agent-image-builder]" \
gcr-push-user@<PROJECT-NAME>.iam.gserviceaccount.com
Finally, update the imageBuilder section of the values.yaml file (located at /tools/charts/datarobot-management-agent/values.yaml in the agent tarball) to create a serviceAccount with the annotations and name created in previous steps:
imageBuilder:
...
serviceAccount:
    create: true
    annotations: {
    iam.gke.io/gcp-service-account: gcr-push-user@<PROJECT-NAME>.iam.gserviceaccount.com
    }
    name: datarobot-management-agent-image-builder
OpenShift provides a built-in registry solution. This is the recommended container registry if you are using OpenShift.
Later in this guide, you are required to push images built locally into the registry. To make this easier, use the following command to expose the registry externally:
oc patch configs.imageregistry.operator.openshift.io/cluster --patch '{"spec":{"defaultRoute":true}}' --type=merge
See the OpenShift documentation to learn to log in to this registry to push images to it.
In addition, you should create a dedicated Image Builder service account with permission to run as root and to push to the integrated Docker registry:
oc new-project datarobot-mlops
oc create sa datarobot-management-agent-image-builder

# Allows the SA to push to the registry
oc policy add-role-to-user registry-editor -z datarobot-management-agent-image-builder

# Our Docker builds require the ability to run as `root` to build our images
oc adm policy add-scc-to-user anyuid -z datarobot-management-agent-image-builder
When OpenShift created a Docker registry authentication secret, it created it in the incorrect format (kubernetes.io/dockercfg instead of kubernetes.io/dockerconfigjson). To fix this, create a secret using the appropriate token. To do this, find the existing Image pull secrets assigned to the datarobot-management-agent-image-builder ServiceAccount:
$ oc describe sa/datarobot-management-agent-image-builder

Name:                datarobot-management-agent-image-builder
Namespace:           datarobot-mlops
Labels:              <none>
Annotations:         <none>
Image pull secrets:  datarobot-management-agent-image-builder-dockercfg-p6p5b
Mountable secrets:   datarobot-management-agent-image-builder-dockercfg-p6p5b
                    datarobot-management-agent-image-builder-token-pj9ks
Tokens:              datarobot-management-agent-image-builder-token-p6dnc
                    datarobot-management-agent-image-builder-token-pj9ks
Events:              <none>
Next, track back from the pull secret back to the raw token:
$ oc describe secret $(oc get secret/datarobot-management-agent-image-builder-dockercfg-p6p5b -o jsonpath='{.metadata.annotations.openshift\.io/token-secret\.name}')

Name:         datarobot-management-agent-image-builder-token-p6dnc
Namespace:    datarobot-mlops
Labels:       <none>
Annotations:  kubernetes.io/created-by: openshift.io/create-dockercfg-secrets
            kubernetes.io/service-account.name: datarobot-management-agent-image-builder
            kubernetes.io/service-account.uid: 34101931-d402-49bf-83df-7a60b31cdf44

Type:  kubernetes.io/service-account-token

Data
====
ca.crt:          11253 bytes
namespace:       10 bytes
service-ca.crt:  12466 bytes
token:           eyJhbGciOiJSUzI1NiIsImtpZCI6InJqcEx5LTFjOElpM2FKRzdOdDNMY...
oc create secret docker-registry registry-creds \
    --docker-server=image-registry.openshift-image-registry.svc:5000 \
    --docker-username=imagebuilder \
    --docker-password=eyJhbGciOiJSUzI1NiIsImtpZCI6InJqcEx5LTFjOElpM2FKRzdOdDNMY...
Update the imageBuilder section of the values.yaml file (located at /tools/charts/datarobot-management-agent/values.yaml in the agent tarball) to reference the serviceAccount created above:
imageBuilder:
...
secretName: registry-creds

rbac:
    create: false
serviceAccount:
    create: false
    name: datarobot-management-agent-image-builder
It's common for the internal registry to be signed by an internal CA. To avoid this, skip TLS verification in the values.yaml configuration:
imageBuilder:
...
skipSslVerifyRegistries:
    - image-registry.openshift-image-registry.svc:5000
If you have the CA certificate, a more secure option would be to mount it as a secret or a configMap and then configure the imageBuilder to use it. Below we will show a third option of how you can obtain the CA directly from the underlying node:
imageBuilder:
...
extraVolumes:
    - name: cacert
    hostPath:
        path: /etc/docker/certs.d

extraVolumeMounts:
    - name: cacert
    mountPath: /certs/
    readOnly: true

extraArguments:
    - --registry-certificate=image-registry.openshift-image-registry.svc:5000=/certs/image-registry.openshift-image-registry.svc:5000/ca.crt
Note
The example above requires elevated SCC privileges.
oc adm policy add-scc-to-user hostmount-anyuid -z datarobot-management-agent-image-builder
If you have a generic registry that uses a simple Docker username/password to log in, you can use the following procedure.
Create a secret containing your Docker registry credentials:
kubectl create secret docker-registry registry-creds \
    --namespace datarobot-mlops \
    --docker-server=<container-registry-name>.your-company.com \
    --docker-username=<push-username> \
    --docker-password=<push-password>
Update the imageBuilder section of the values.yaml file (located at /tools/charts/datarobot-management-agent/values.yaml in the agent tarball) to use the new secret you created:
imageBuilder:
...
secretName: "registry-creds"
If your registry is running on HTTP, you will need to add the following to the above example:
imageBuilder:
...
secretName: "registry-creds"
insecureRegistries:
    - <container-registry-name>.your-company.com
Install the management agent with Helm
After the prerequisites are configured, install the MLOps management agent. In these steps, you will be building and pushing large docker images up to your remote registry. DataRobot recommends running these steps in parallel while downloads or uploads are happening.
Fetch the Portable Prediction Server image
The first step is to download the latest version of the Portable Prediction Server Docker Image from DataRobot's Developer Tools. When the download completes, run the following commands:
-
Load the PPS Docker image:
docker load < datarobot-portable-prediction-api-<VERSION>.tar.gz -
Tag the PPS Docker image with an image name:
Note
Don't use
latestas the<VERSION>tag.docker tag datarobot/datarobot-portable-prediction-api:<VERSION> registry.your-company.com/datarobot/datarobot-portable-prediction-api:<VERSION> -
Push the PPS Docker image to your remote registry:
docker push your-company.com/datarobot/datarobot-portable-prediction-api:<VERSION>
Build the required Docker images
First, build the management agent image with a single command:
make -C tools/bosun_docker REGISTRY=registry.your-company.com push
Next, build the monitoring agent with a similar command:
Note
If you don't plan on enabling model monitoring, you can skip this step.
make -C tools/agent_docker REGISTRY=registry.your-company.com push
Create a new Prediction Environment
To create a new prediction environment, see the Prediction environments documentation. Record the Prediction Environment ID for later use.
Note
Only the DataRobot and Custom Model model formats are currently supported.
Install the Helm chart
DataRobot recommends installing the agent into its own namespace. To do so, pre-create it and install the MLOps API key in it.
# Create a namespace to contain the agent and all the models it deploys
kubectl create namespace datarobot-mlops

# You can use an existing key or we recommend creating a key dedicated to the agent
# by browsing here:
#   https://app.datarobot.com/account/developer-tools
kubectl -n datarobot-mlops create secret generic mlops-api-key --from-literal=secret=<YOUR-API-TOKEN>
You can modify one of several common examples for the various cloud environments (located in the /tools/charts/datarobot-management-agent/examples directory of the agent tarball) to suit your account; then you can install the agent with the appropriate version of the following command:
helm upgrade --install bosun . \
    --namespace datarobot-mlops \
    --values ./examples/AKE_values.yaml
If none of the provided examples suit your needs, the minimum command to install the agent is as follows:
helm upgrade --install bosun . \
    --namespace datarobot-mlops \
    --set predictionServer.ingressClassName=mlops \
    --set predictionServer.outfacingUrlRoot=http://your-company.com/deployments/ \
    --set datarobot.apiSecretName=mlops-api-key \
    --set datarobot.predictionEnvId=<PRED ENV ID> \
    --set managementAgent.repository=registry.your-company.com/datarobot/mlops-management-agent \
    --set trackingAgent.image=registry.your-company.com/datarobot/mlops-tracking-agent:latest \
    --set imageBuilder.ppsImage=registry.your-company.com/datarobot/datarobot-portable-prediction-api:<VERSION> \
    --set imageBuilder.generatedImageRepository=registry.your-company.com/mlops/frozen-models
There are several additional configurations to review in the values.yaml file (located at /tools/charts/datarobot-management-agent/values.yaml in the agent tarball) or using the following command:
helm show values .

