Create and execute cells
You can create and run code, text, and chart cells within your notebook. Before proceeding, be sure to review the guidelines for configuring and initializing a notebook environment.
Use the DataRobot API
Within DataRobot Notebooks you can easily use the DataRobot API. The environment images DataRobot provides come with the respective DataRobot Python and R clients preinstalled. DataRobot automatically fetches your endpoint and your API token and sets them as environment variables (DATAROBOT_ENDPOINT and DATAROBOT_API_TOKEN for Python and DATAROBOT_API_ENDPOINT and DATAROBOT_API_TOKEN for R) within your notebook container, so that when the session starts up it automatically handles client instantiation without requiring manual authentication.
Import the DataRobot package to start using the Python client:
import datarobot as dr
Import the DataRobot library to start using the R client:
library(datarobot)
Create code cells
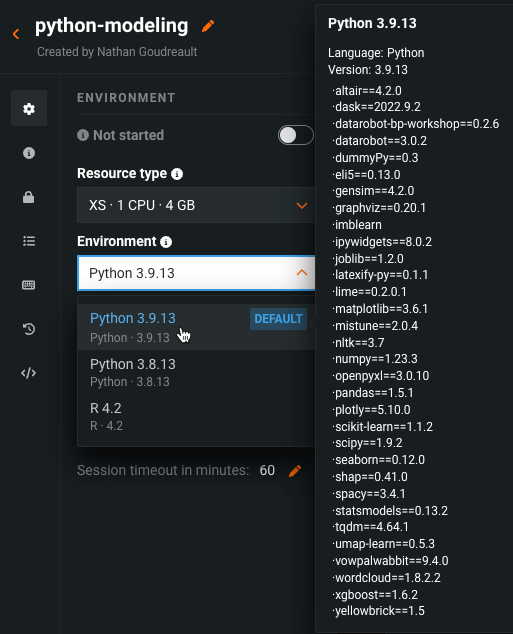
The default image for the notebooks is a pre-built Python image with all the dependencies and common open-source software (OSS) libraries preinstalled. To see the list of all packages available in the default image, hover over that image in the Environment tab:
Note
DataRobot notebooks are not polyglot; run Python code or R code in a notebook, but do not intermingle both. The language supported will depend on the image you’ve selected for the notebook’s environment configuration.
For more information about configuring a notebook's environment, read about environment management.
Add libraries
Follow the instructions below to ad-hoc install additional libraries in Python or R.
Note
Notebooks support rich outputs similar to Jupyter, so you can use plotting libraries of your choice (such as matplotlib, seaborn, etc.) and see the plotted charts inline within the cell output. You can run other shell commands for Python as well by using the ! notation.
You can install any additional packages you need into your environment at runtime during your notebook session. You can use Jupyter's magic commands (e.g., !pip install <package-name>) from a notebook cell; however, when your session shuts down, packages installed at runtime do not persist. You must reinstall them the next time you restart the session.
To install and use a Python package that is not included in the default image, run the following within a code cell:
!pip install <your-package>
You can work with the R language in a notebook instead of Python by selecting the pre-built R image from the Environment tab. You can then write and execute R code in the code cells of the notebook with the R kernel. To install and use additional R packages, use devtools from a code cell or the following code:
install.packages(<package_name>)
Create text cells
Markdown text cells support traditional Markdown syntax and GitHub-flavored Markdown syntax. Render Markdown cells by executing the cell. To edit a rendered Markdown cell, double click on the cell.
Create chart cells
DataRobot allows you to create built-in, code-free chart cells within DataRobot Notebooks, enabling you to quickly visualize your data without coding your own plotting logic.
Note
Note that chart cells are only supported for Python notebooks. They are unavailable for R notebooks.
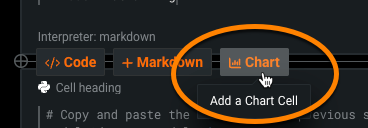
To add a code cell, hover your cursor outside of a cell in the notebook and select the Chart option.
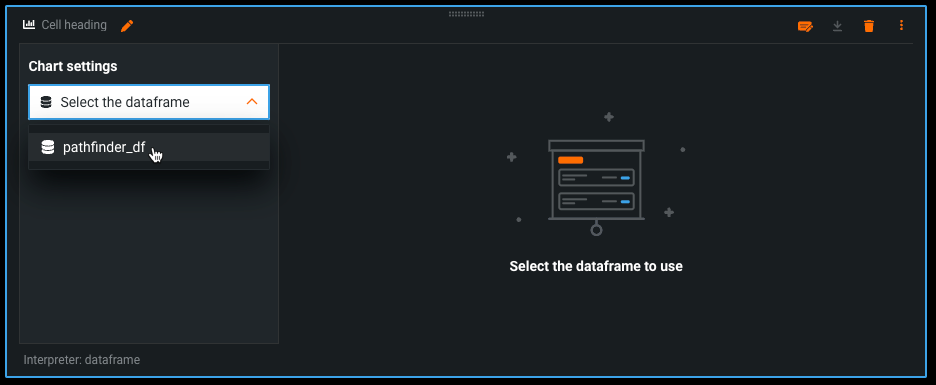
When you add a chart cell to a notebook, you first need to specify the data you want to visualize by selecting a DataFrame. Select the variable name corresponding to the DataFrame from the dropdown list in the chart cell. The cell lists all of the DataFrame objects that are currently in-memory.
Note
Note that DataRobot only plots the first 5,000 rows of the DataFrame.
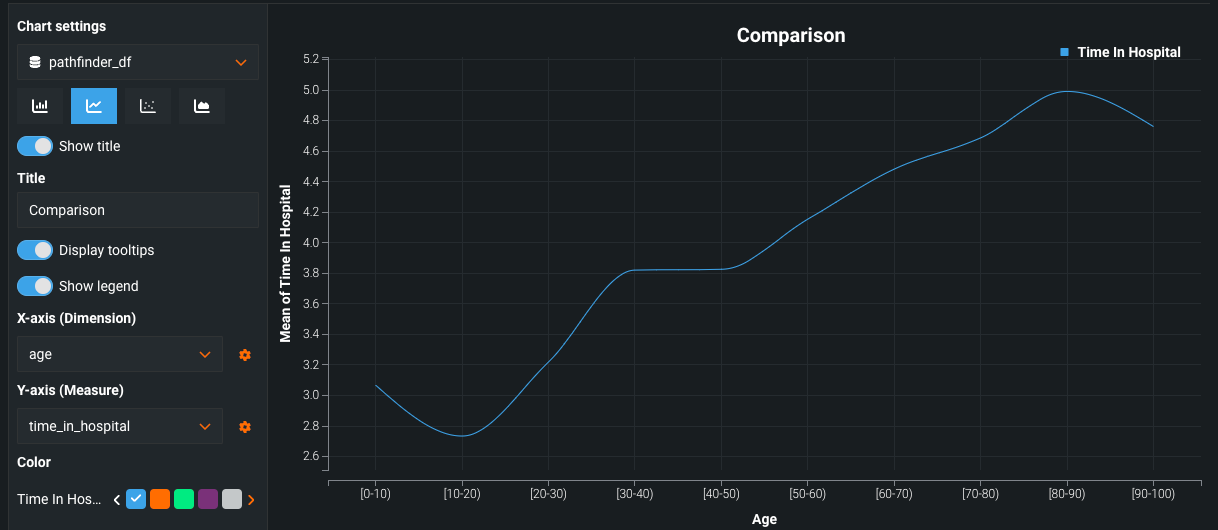
After selecting a DataFrame, pick the type of chart you want to create. DataRobot offers configurations for bar charts, line charts, scatter plots, and area charts. They all require the same configuration fields, detailed below.
| Field | Description |
|---|---|
| Show title | Displays a title for the chart. Once enabled, provide a name for the title. |
| Display tooltips | Shows tooltips with more details on the data when hovering over the chart. |
| Show legend | Displays legend mapping. |
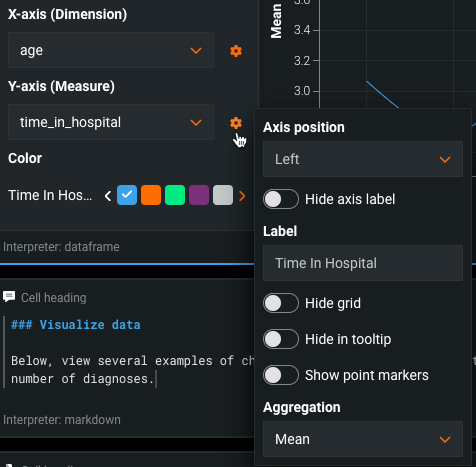
| X-axis (Dimension) | Select a column from the DataFrame (provided as a dropdown list) to encode as the X-axis. |
| Y-axis (Measure) | Select a column from the DataFrame (provided as a dropdown list) to encode as the Y-axis. |
| Color | Choose the color for the chart contents. |
In addition to the configuration above, you can modify aspects of the X- and Y-axes by selecting the settings wheel next to each field.
| Toggle | Description |
|---|---|
| Hide axis label | Hides the label for the axis from the chart display. |
| Hide grid | Removes the grid pattern in the background of the chart. |
| Hide in tooltip | Hides the value for the axis in the tooltip shown when hovering on points of the chart. |
| Show point markers | Displays point markers along the points for the axis in the chart. |
| Aggregation | Sets whether to aggregate values for the axis. You can aggregate by a variety of values, including the median, mean, sum, standard deviation, and more. |
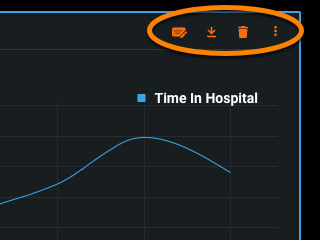
After configuring the chart, you can edit how the cell displays using the icons in the top-right corner.
- Select the pencil icon to hide the editor menu for the chart cell.
- Click the download icon to save a local copy of the chart as an SVG file.
- Select the trash can icon to delete the chart cell.
- Click the menu icon to access the actions available for the cell.
Table of contents
As you create and execute cells to develop your notebook, DataRobot automatically generates a table of contents for easier navigation. To access it, click the table of contents icon (![]() ) in the sidebar.
) in the sidebar.
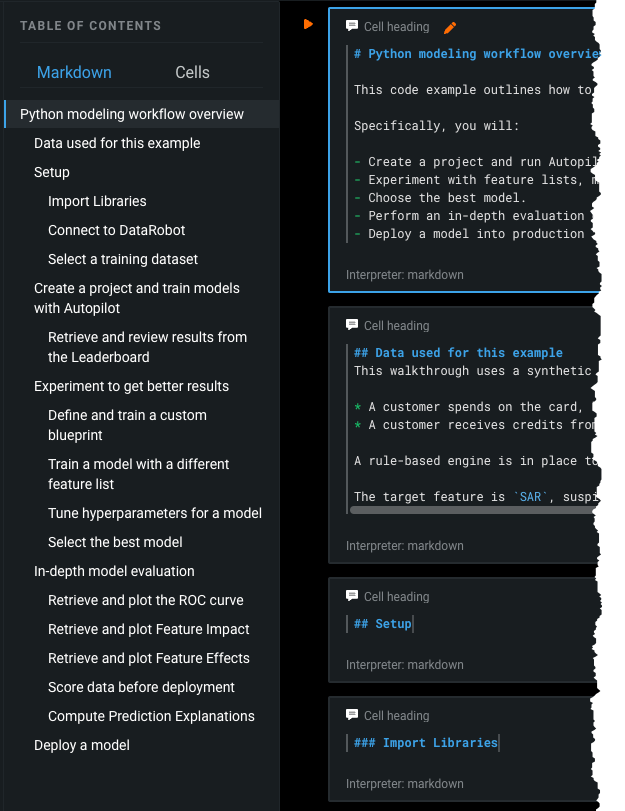
The Markdown tab provides an autogenerated table of contents. Each entry maps to headings in the notebook's Markdown cells, corresponding to the Markdown heading level (#, ##, ###, etc.). Entries are hyperlinked, so clicking on an entry navigates you to the corresponding cell in the notebook.
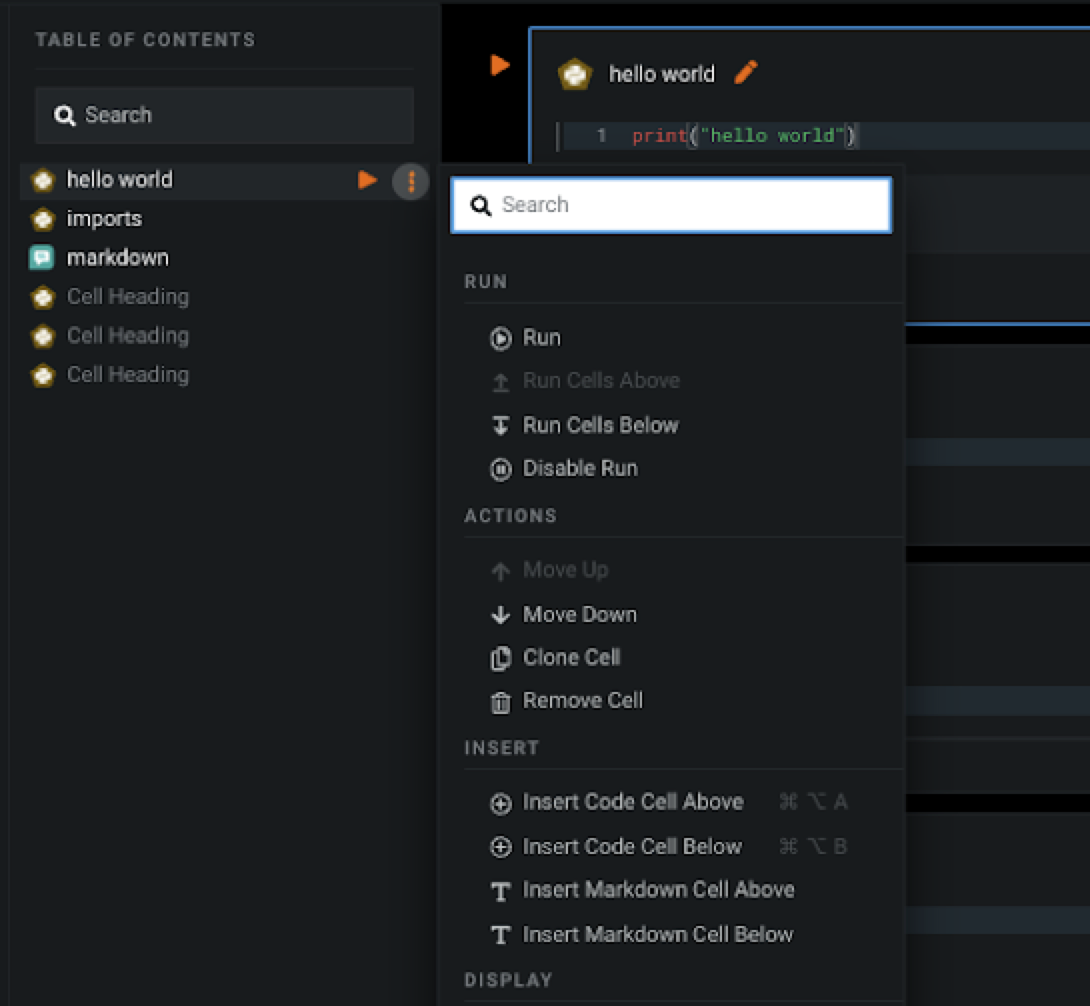
The Cells tab provides an overview of all cells within the notebook (both code and Markdown cells). You can perform cell actions (and move cells around via drag-and-drop) from the cell list in the table of contents.
Cell settings
You can configure notebook-wide cell settings by accessing the gear icon menu at the top right of the Notebook header.
Debug code
DataRobot Notebooks offer built-in support for Python debugger (pdb) and IPython debugger (ipdb) to interactively debug your Python code. ipdb uses the same debugging interface as pdb, but has some additional features such as syntax highlighting.
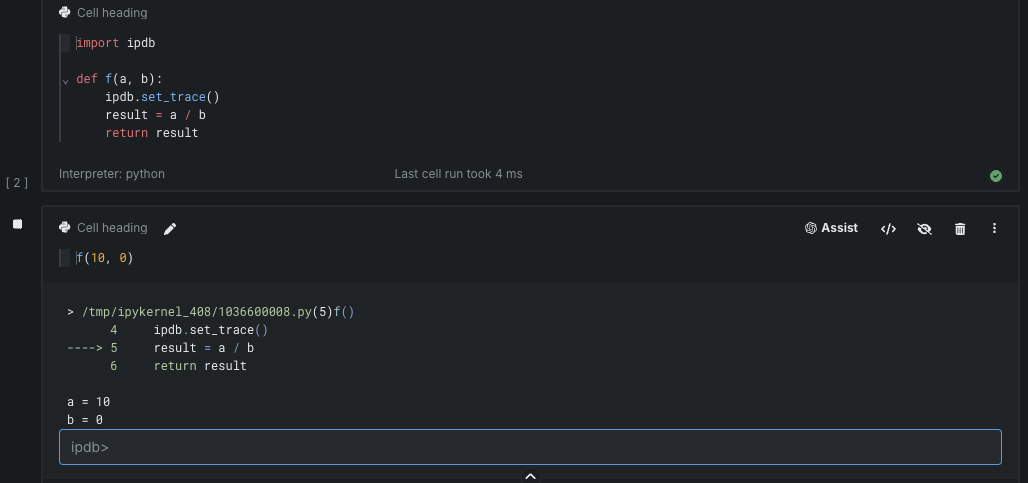
One common debugging method for notebooks is to activate the debugger before executing code. To do so, import ipdb and set breakpoints using ipdb.set_trace() (you can also use pdb to do this). When you execute a cell containing set_trace(), the interactive debugger launches in the cell output. You can then step through the code line-by-line and inspect variables using the supported debugger commands such as n(ext), s(tep), c(ontinue), and p in the input field.
Note that when debugging code, notebook code execution is blocked on the cell that activated the debugger. Use c(ontinue) to finish executing the cell, or q(uit) to exit the debugger before running other cells.
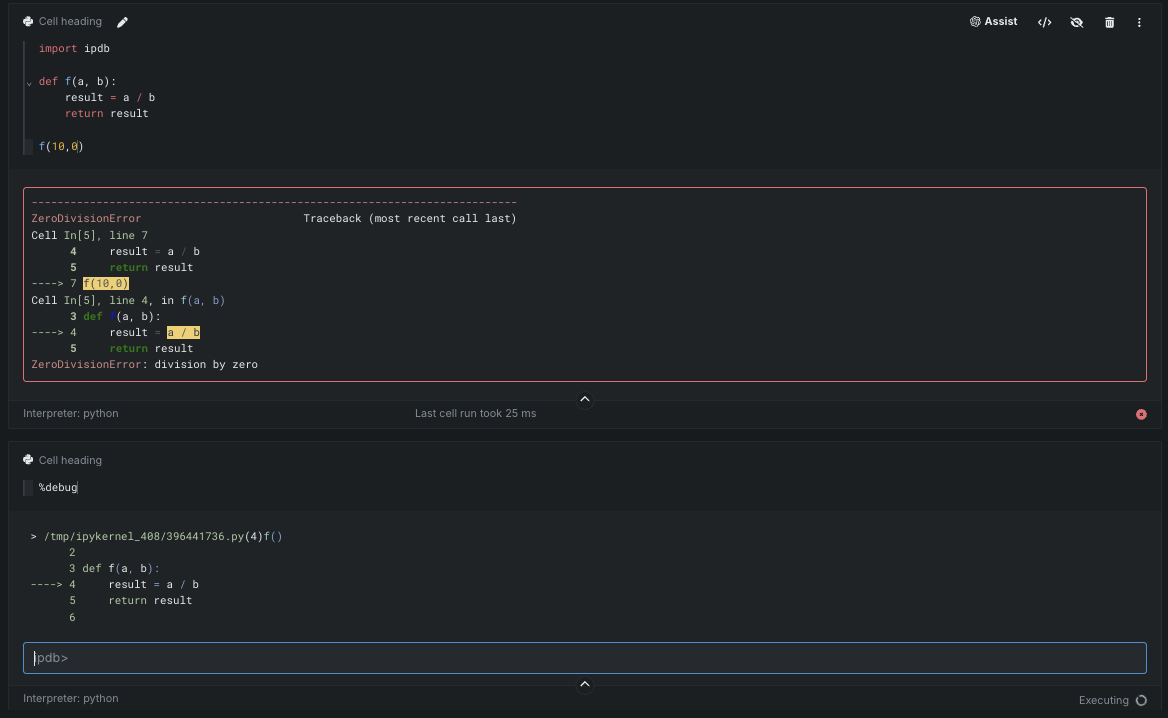
DataRobot also supports a retroactive debugging mode in cases where you want to launch the debugger after an exception occurs in the executed code. When code fails due to an error, run %debug magic from a new cell to start the interactive debugger from the context of the last exception. This feature enables you to debug your code without having to backtrack, explicitly set breakpoints, and rerun the code to launch the interactive debugger.
