Lift Chart
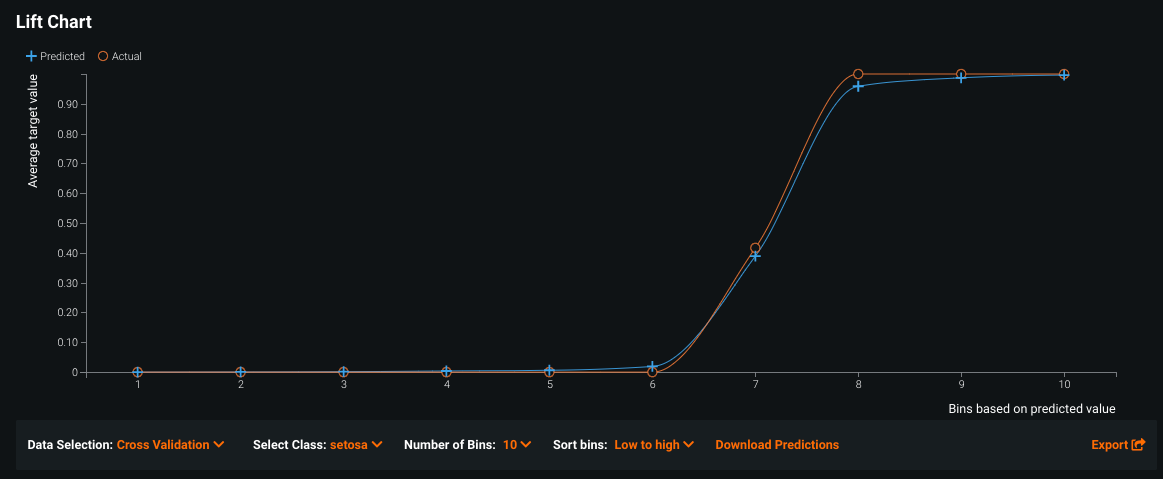
The Lift Chart depicts how well a model segments the target population and how capable it is of predicting the target, letting you visualize the model's effectiveness. The chart is sorted by predicted values—riskiest to least risky, for example—so you can see how well the model performs for different ranges of values of the target variable. Looking at the Lift Chart, the left side of the curve indicates where the model predicted a low score on one section of the population while the right side of the curve indicates where the model predicted a high score. In general, the steeper the actual line is, and the more closely the predicted line matches the actual line, the better the model is. A consistently increasing line is another good indicator. See the ELI5 generalized interpretation with examples.
An example
Let's say you're predicting the risk of loan defaults—your target variable is "did the loan default Yes or No?" In that use case, you're typically most interested in the loans that do default, i.e., the riskiest loans. So what you would like to see is how accurate your model is at predicting the riskiest X% of loans, not just how accurate it is overall.
The Lift Chart shows you how accurate the model is at predicting the risk of default from least to most risky. By default, the right side of the curve will be the most risky. A good model will be accurate across each level, or bin, of risk. You can adjust the number of bins, or levels of risk, that are displayed. If you use the default 10 bins, you are segmenting the loans into deciles by predicted risk level.
From the Leaderboard, the Lift Chart displays the actual and predicted values, described in more detail below. (By comparison, the Lift Chart and Dual Lift Chart available on the Model Comparison tab group numeric feature values into equal sized "bins," which DataRobot creates by sorting predictions in increasing order and then grouping them.)
If you used the Exposure parameter when building models for a regression project, the Lift Chart displays the graph adjusted to exposure (and the corresponding legend indicates the difference):
-
The orange line depicts the sum of the target divided by the sum of exposure for a specific value.
-
The blue line depicts the sum of predictions divided by the sum of exposure.
This adjustment is useful in insurance, for example, to understand the relationship between annualized cost of a policy and the predictors.
Change the display
Tip
This visualization supports sliced insights. Slices allow you to define a user-configured subpopulation of a model's data based on feature values, which helps to better understand how the model performs on different segments of data. See the full documentation for more information.
The Lift Chart offers several controls that impact the display:
| Element | Description |
|---|---|
| Data Selection | Changes the data source input. Changes affect the view of predicted versus actual results for the model in the specified run type. Options are dependent on the type(s) of validation completed—validation, cross-validation, or holdout, or you can access and use external test datasets. Time-aware modeling allows backtest-based selections. |
| Data slice | Binary classification and regression only. Selects the filter that defines the subpopulation to display within the insight. |
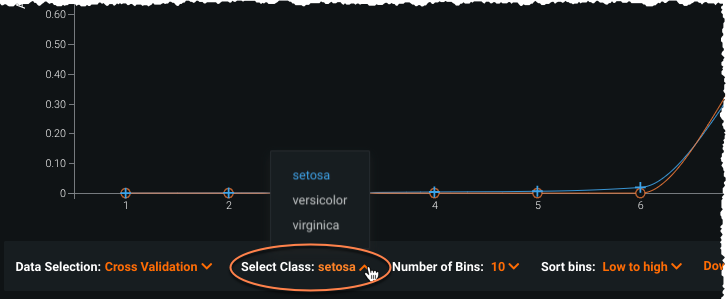
| Select Class | Multiclass only. Sets the class that the visualization displays results for. |
| Number of Bins | Adjusts the granularity of the displayed values. Set the number of bins you want predictions sorted into (10 bins by default); the more bins, the greater the detail. |
| Sort bins | Sets the bin sort order. |
| Enable Drill Down | Uses the predictions created during the model fit process. Drill down shows a total of 200 predictions—the top 100 and the bottom 100 predictions on the Lift Chart. Drill down is only supported on the All Data slice. |
| Download Predictions | When drill down is enabled, transfers to the Make Predictions tab. |
| Export | Downloads either a PNG of the chart, a CSV of the data, or a ZIP containing both. See the section on exporting for more details. |
| Indicates that the project was built with an optimization metric that lead to biased predictions. Hover on the icon for recommendations. | |
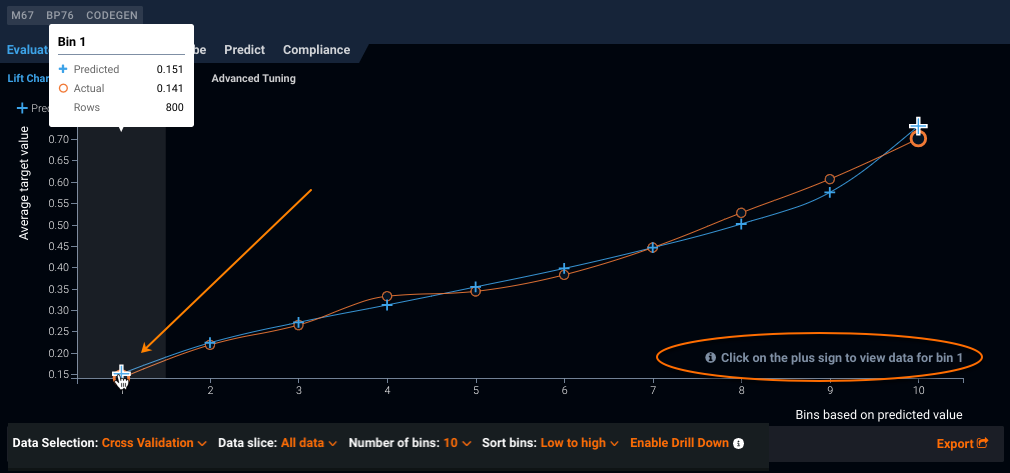
| Bin summary tooltip | Hover over a bin to view the number of member rows as well as the average actual and average predicted target values for those rows. |
Once you've set the data source and number of bins, you can:
- download the data for each bin by clicking the Enable Drill Down link.
- view an inline table for certain bins by hovering over links in the table.
Drill into the data
The Lift Chart only shows subsets of the data—just the predictions needed for the particular Lift Chart you are viewing based on the Data Source dropdown selection.
Click Enable Drill Down to set DataRobot to use the predictions created during the model fit process and append all of the columns of the dataset to those predictions. (This is the source of the raw data displayed when you click the bins in the Lift Chart.)
Once you enable drill down, DataRobot computes the data and when finished, the label changes to Download Predictions. Click Download Predictions and DataRobot transfers to the Make Predictions tab to compute or download predictions. The option to compute predictions with the Make Predictions tab is for the entire dataset, not the subset selected with the Data Source dropdown.
View raw data
After enabling drill down, you can display a table of the data available in a bin by clicking the plus sign in the graph. For those bins without a plus sign, you must download predictions to see the data for that bin.
If you used the Exposure parameter when building models for a regression project, the Prediction column in the inline table shows predictions adjusted with exposure (i.e., predictions divided by exposure). The Actual column in the inline table displays the column value adjusted with exposure (i.e., actual divided by exposure). Accordingly, the names of the Prediction and Actual columns change to Predicted/Exposure and Actual/Exposure.
Calculate raw data display
The drill-down shows only the 100 lowest and 100 highest ranked predictions. This corresponds to the far left and far right sides of the Lift Chart. Depending on the size of the data source being displayed, a varying number of highlighted bins are available to display that raw data, and the same number of bins display at each side of the chart. For large datasets, there may be only one highlighted bin on each side, as each bin can hold 100 predictions. (To test that, you can increase the number of bins and you most likely will see more highlighted segments.)
Consider the following example. The Validation subset contains 5000 rows. When you view the Lift Chart with 10 bins, each bin contains 500 rows. When you enable drill down, all 100 of the lowest predictions fall into bin 1. If you increase the number of bins to 60, each bin then contains 83 rows. Now, it takes two bins to contain 100 predictions and so the two left (and two rightmost) bins are highlighted.
Lift Chart with multiclass projects
Note
This feature is not backward compatible; you must retrain any model built before the feature was introduced to see its multiclass insights.
For multiclass projects, you can set the Lift Chart display to focus on individual target classes—in other words, to display a Lift Chart for each individual class. Use the Select Class dropdown below the chart to visualize how well a model segments the target population for a class and how capable it is of predicting the target. The dropdown offers the 20 most common classes for selection.
Use the Export button to export:
- a PNG of the selected class
- CSV data for the selected class
- a ZIP archive of data for all classes
Lift Chart binning example
Sometimes called a decile chart, DataRobot creates the Lift Chart by sorting predictions in increasing order and then grouping them into equal-sized bins. The results are plotted as the Lift Chart, where the x-axis plots the bin number and the y-axis plots the average value of predictions within each the bin. It's a two step process—first group rows by what the model thinks is the likelihood of your target and then calculate the number of actual occurrences. Both values are plotted on the Leaderboard Lift Chart.
For example, if your dataset of loan default information has 100 rows, DataRobot sorts by the predicted score and then chunks those scores into the number of bins you select. If you have 10 bins, each group contains 10 rows. The first bin (or decile) contains the lowest prediction scores and is the least likely to default while the 10th bin, with the highest scores, is the most likely. Regardless of the number of bins (and the resulting number of rows per bin), the concept is the same—what percentage of people in that bin actually defaulted?
In terms of what the points on the chart mean, using the default example, each bin point tells you:
- On the Leaderboard, the number of people DataRobot predicts will have defaulted (blue line) and number that actually defaulted (orange line). Use this chart to evaluate the accuracy of your model.
- In Model Comparison, the number of people that actually defaulted for each model.
So what is actual value? The actual value plotted on the Lift Chart is the number or percentage of rows, for the corresponding bin, in which the target value applies. This distinction is particularly important when considering models on the Model Comparison page. Because DataRobot sorts based on model scores, and then groups rows from that sorted list, the bin for each model contains different content. As a result, while the bins for each model contain the same number of entries, the actual value for each bin differs.
Exposure and weight details
If Exposure is set for regression projects, observations are sorted according to the "annualized" predictions adjusted with exposure (that is, predictions divided by exposure), and bin boundaries are determined based on these adjusted predictions. The y-axis plots the sum of adjusted predictions divided by the sum of exposure within the bin. Actuals are adjusted and plotted in the same way.
When exposure and sample weights are both specified, exposure is used to determine the bin boundaries as above, but sample weights are not. DataRobot uses a composite weight equal to the product of composite_weight = weight * exposure to calculate the weighted average of predictions and actuals in each bin. The y-axis then plots the weighted sum of adjusted predictions divided by the sum of the composite weights, and similarly for actuals.


