Accuracy Over Time
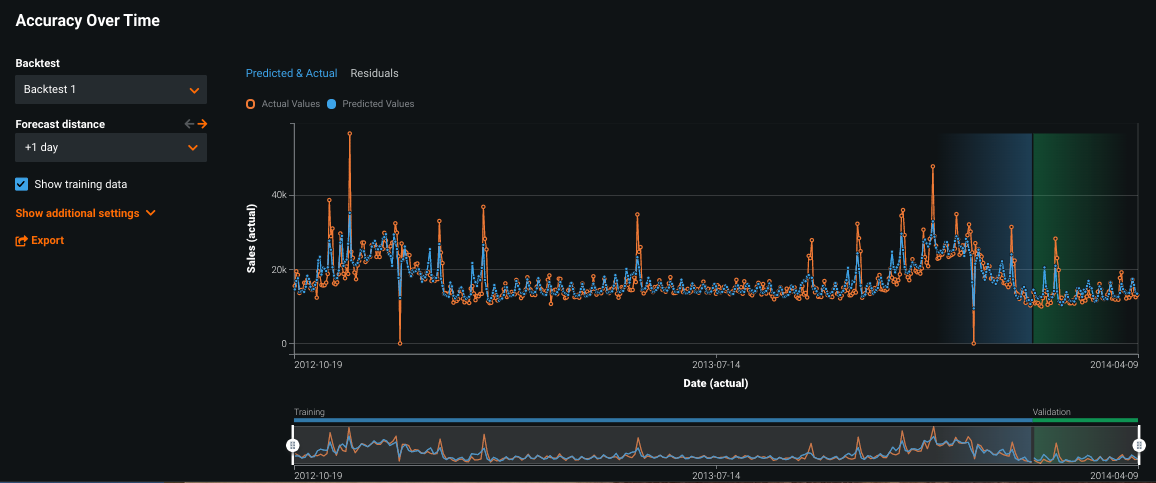
The Accuracy Over Time tab helps to visualize how predictions change over time. By default, the view shows predicted and actual vs. time values for the training and validation data of the most recent (first) backtest. This is the backtest model DataRobot uses to deploy and make predictions. (In other words, the model for the validation set.)
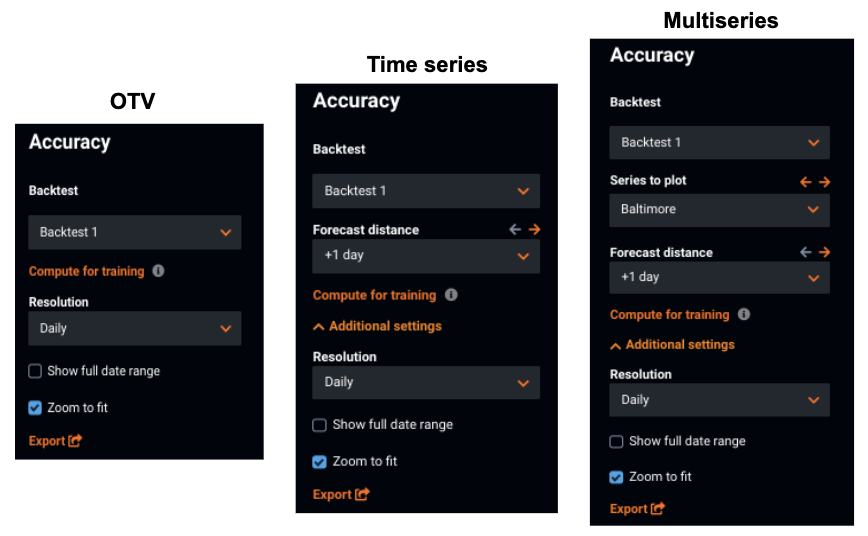
This visualization differs somewhat between OTV and time series modeling. With time series, in addition to the standard features of the tool, you can display based on forecast distances (the future values range you selected before running model building).
Note
If you are modeling a multiseries project, there is an additional dropdown that allows you to select which series to model. Also, the charts reflect the validation data until training data is explicitly requested. See the multiseries-specific details, below.
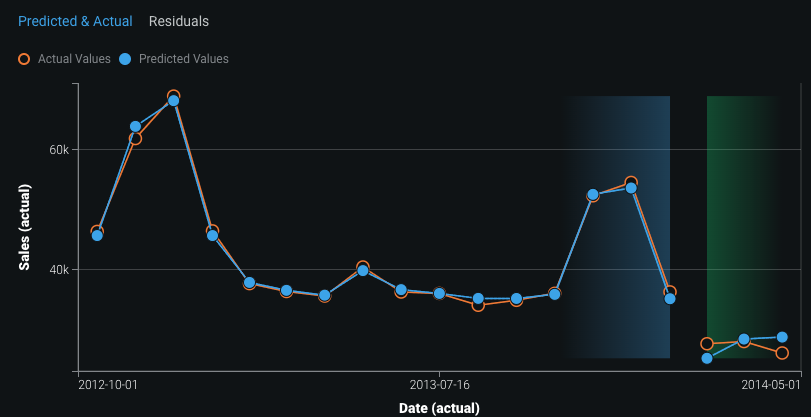
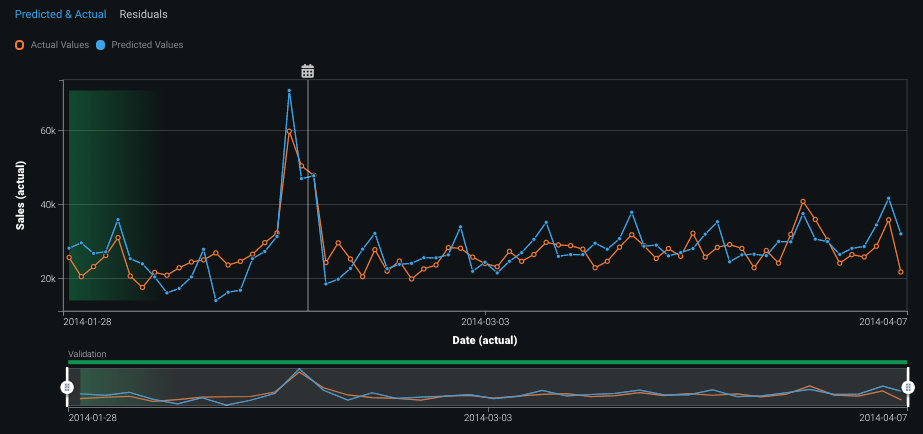
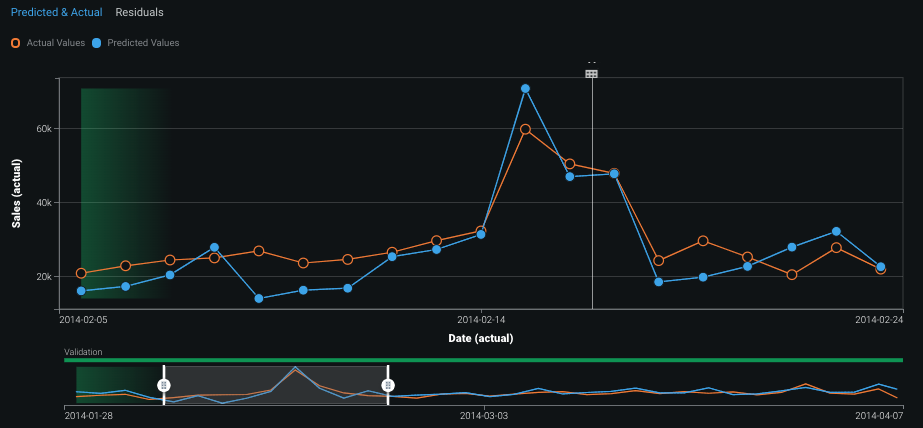
The default view of the graph, in all cases, displays the validation data's forecast—actual values marked by open orange circles connected by a line and the model's predicted values with connected blue solid circles. If you uploaded a calendar file when you created the project, the display also includes markers to indicate calendar events.
Click the Compute for training link to add results for training data to the display:
Note
Accuracy Over Time training computation is disabled if the dataset exceeds the configured threshold after creation of the modeling dataset. The default threshold is 5 million rows.
Accuracy Over Time charts values for the selected period, similar to (but also differently from) the information provided by Lift Charts. Both charts bin and then graph data. (Although the Accuracy Over Time bins are not displayed as a histogram beneath the chart, the binning information is available as hover help on the chart itself.) Bins within the Accuracy Over Time tab are equal width—that is, each bin spans the same time range—while bins in the Lift Chart are equal sized, such that each bin contains the same number of rows.
There are two plots available in the Accuracy Over Time tab—the Predicted & Actual and the Residuals plots.
Data used in the displays
The Accuracy Over Time tab and associated graphs are available for all models produced with date/time partitioning, although options differ for OTV vs. time series/multiseries modeling.
When you open the tab, the graph defaults to the Predicted & Actual plot for the validation set of the most recent (first) backtest. You can select a different, or all, backtests for display, although you must return to the Leaderboard Run button to compute the display for additional backtests. If holdout is unlocked, you can also click on the holdout partition to view holdout predictions. If it is locked, you can unlock it from the Leaderboard and return to this display to view the results.
With small amounts of data, the chart displays all data at once; use the date range slider in the preview below the chart to focus in on parts of the display.
For larger datasets (greater than approximately 500 rows), the preview renders all of the results but the chart itself displays only the selection encompassed by the slider. Slide the selector to see different regions of the data. By default, the selector covers the most recent 1000 time markers (dependent on the resolution you set).
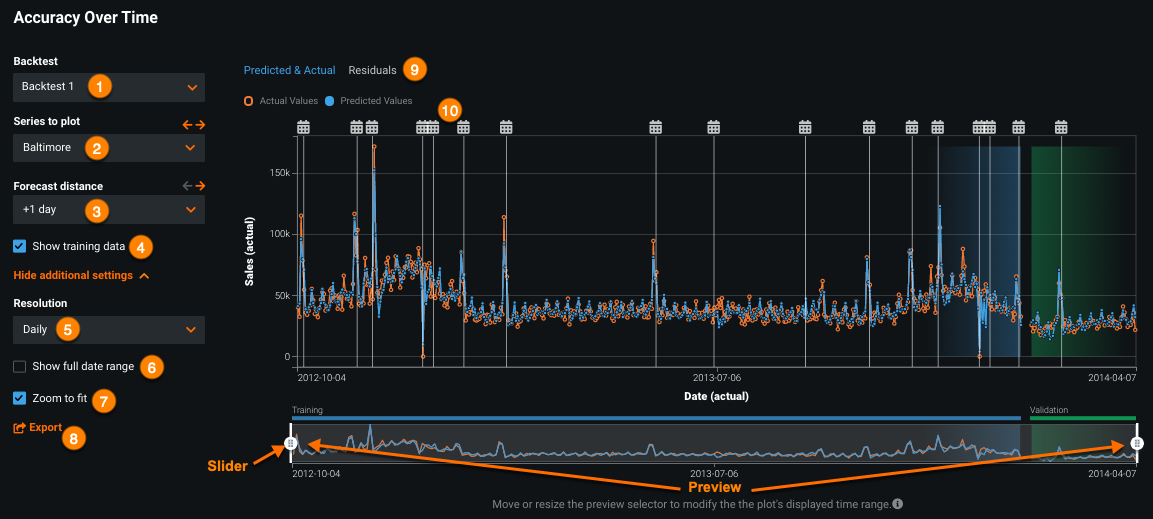
The tab provides several options to change the display. For all date/time-partitioned projects you can:
- Change the displayed backtest or display all backtests.
- Select the series to plot (multiseries only).
- Choose a forecast distance (time series and multiseries only).
- Compute and display training data.
- Expand Additional Settings, if necessary, to change the display resolution.
- Change the date range.
- Zoom to fit.
- Export the data.
- View the Residuals values chart.
- Identify calendar events.
Predicted & Actual Over Time
The Predicted & Actual Over Time chart provides useful information regarding each backtest in your project. By comparing backtests, you can more easily identify and select the model that best suits your data. The following describes some things to note when viewing the chart:
Understand line continuity
When viewing a single backtest, the lines may be discontinuous. This is because data may be missing in one of the binned time ranges. For example, There might be a lot of data in week 1, no data in week 2, and then more data in week 3. There is a discontinuity between week 1 and week 3, and it is reflected in the chart.
When viewing all backtests, there are basically three scenarios. Backtests can be perfectly contiguous: January 1-January 31, February 1-February 28, etc. Backtests can overlap: January 1-February 15, February 1-March 15, etc. And backtests can have one or more gaps (configured when you configured the date/time partition). These backtest configuration options are reflected in the "all backtests" view, so backtest lines on the chart may overlap, be separated by a gap, or be contiguous.
Understand line color indicators
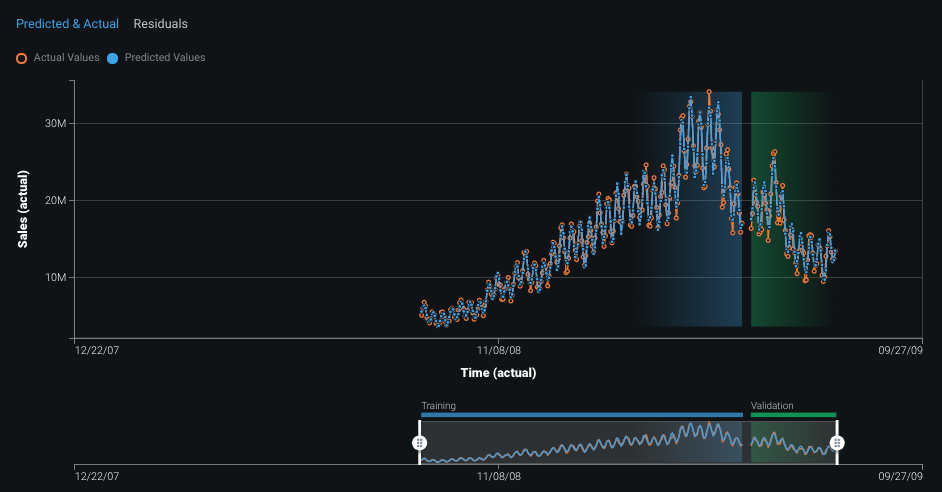
The Predicted & Actual Over Time chart represents the actual values by open orange circles. Predicted values based on the validation set are represented by blue solid circles, which corresponds to the blue in the backtest representation. You can additionally compute and include predictions on the training data for each backtest. The bar below the chart indicates the division between training and validation data.
Change the Predicted & Actuals display
There are several tips and toggles available to help you best evaluate your data.
Change the displayed backtest
While DataRobot defaults to the first backtest for display, you can change to a different backtest or even all backtests in the Backtest dropdown. DataRobot runs all backtests when building the project, but you must individually train a backtest's model and compute its validation predictions before viewing in the Accuracy Over Time chart. Until you do so, the backtest is grayed out and unavailable for display. To view the chart for a different backtest, first compute predictions:
All Backtests option
DataRobot initially computes and displays data for Backtest 1. To display values for all computed backtests, select All Backtests from the Backtest dropdown. You can either compute each backtest individually from the dropdown, or, to compute all backtests at once, click the Run button for the model on the Leaderboard.
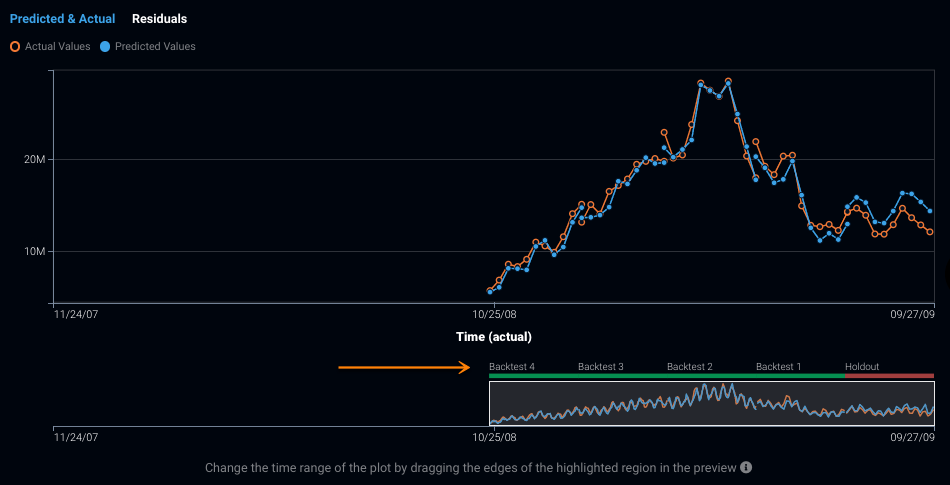
When subsequent backtest(s) are computed, the chart expands to support the larger date range, showing each computed backtest in the context of the total range of the data. (Make sure All Backtests is still selected.)
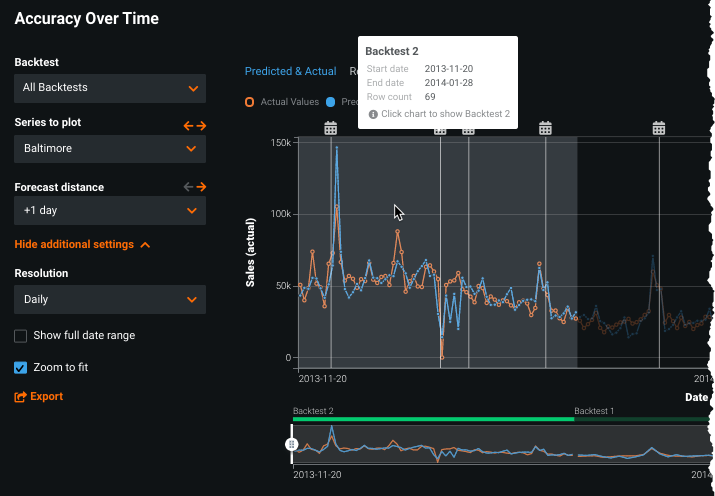
When you select All Backtests, the display only includes predicted vs. actual values for the validation (and holdout, if unlocked) partitions across all the backtests. Even if you computed training data, it does not display with this option.
Note that tooltips for the All Backtests view behave slightly differently than for an individual backtest. Instead of reporting on bin content, the tooltip highlights an individual backtest. Clicking focuses the chart on that backtest (which is the same as manually choosing the backtest via the dropdown).
Change the forecast distance
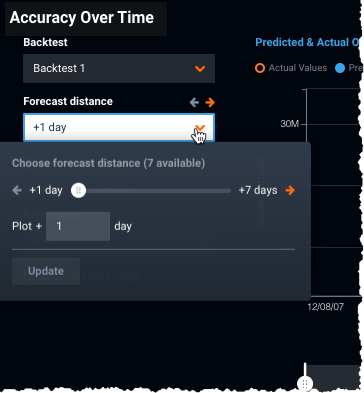
For time series and multiseries projects, you can base the display on forecast distance (the future values range you selected before running model building):
Setting a different forecast distance modifies the display to visualize predictions for that distance. For example, "show me the predicted vs. actual validation data when predicting each point two days in advance." Click the left or right arrow to change the distance by a single increment (day, week, etc.); click the down arrow to open a dialog for setting the distance.
When working with large (downsampled) datasets or projects with wide forecast windows, DataRobot computes Accuracy Over Time on-demand, allowing you to specify the forecast distance of interest. For each distance you navigate to on the chart, you are prompted to compute the results and view the insight. In this way, you can determine the number of distances to check in order to confidently deploy models into production, without overburdening compute resources.
Compute training data
Typically DataRobot models use only the validation predictions (and holdout, if unlocked) for model insights and assessing model performance. Because it can be helpful to view past history and trends, the date/time partitioning Predicted & Actual chart allows you to include training predictions in the display. Note, however, that training data predictions are not a reliable measure of the model's ability to predict future data.
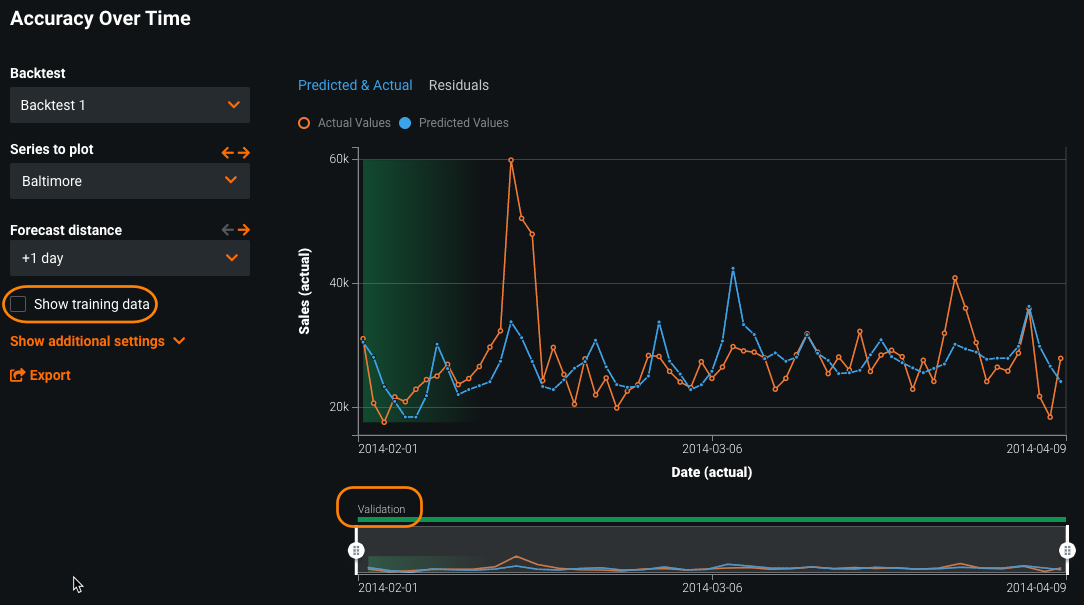
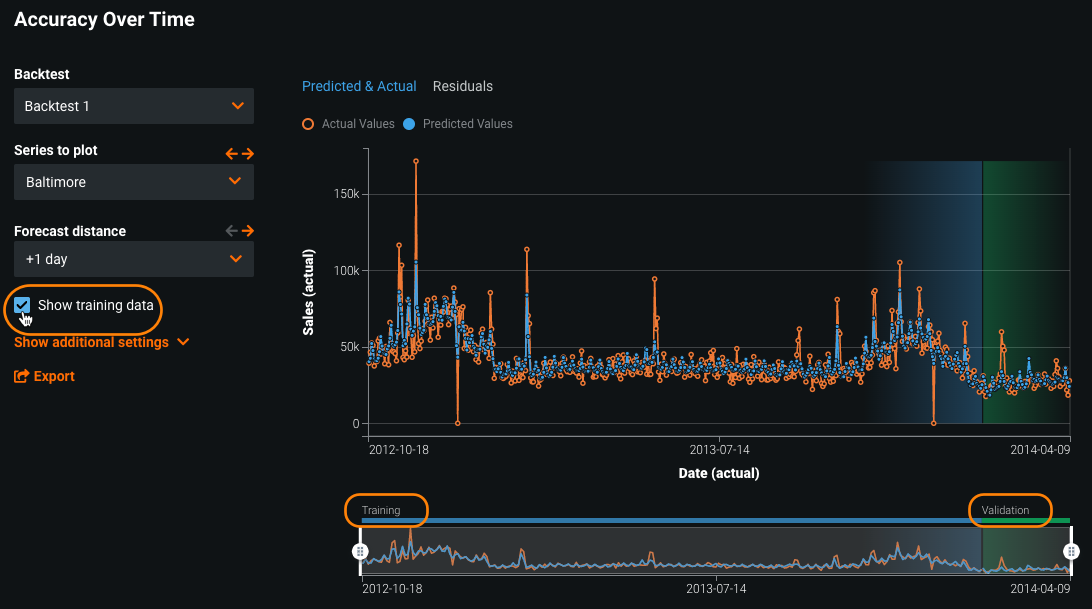
Check Show training data to see the full results using training and validation data. This option is only available when an individual backtest is selected, not when you have selected All Backtests from the Backtest dropdown. The visualization captures not only the weekly variation, but the overall trend. Often with time series datasets the predictions lag slightly, but the Accuracy Over Time tab shows that this model is predicting quite well.
Computing with no training data:
Computing with training data:
Identify calendar events
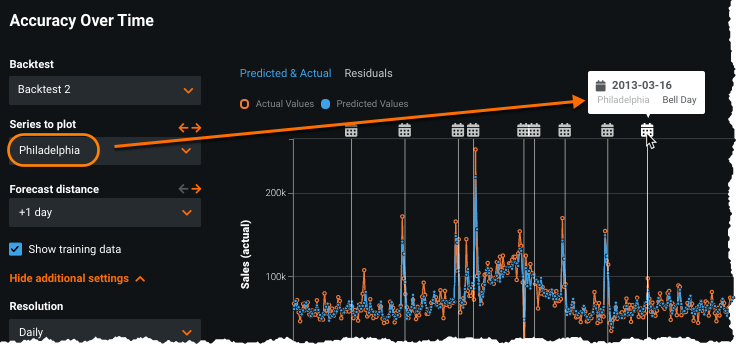
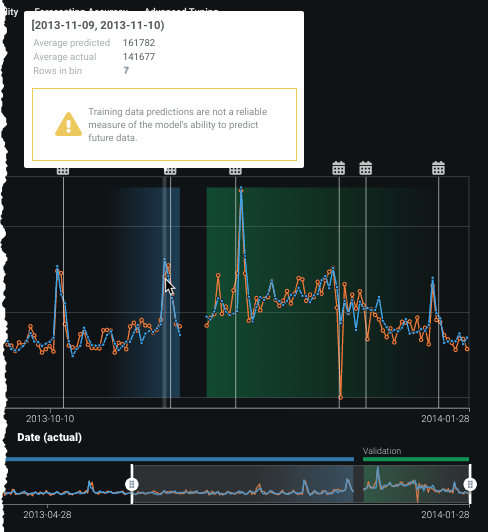
If you upload a calendar file when you create a project, the Accuracy Over Time graph displays indicators that specify where the events listed in the calendar occurred. These markers provide context for the actual and predicted values displayed in the chart. Hover on a marker to display event information.
For multiseries projects, events may be series-specific. To view those events, select the series to plot, locate the event on the timeline, and hover for information including the series ID and event name:
Identify the bin data
The Accuracy Over Time tab uses binning to segment and plot data. With date/time partitioning models, bins are equal width (same time range, defined by the resolution) and often contain different numbers of data points. You can hover over a bin to see a summary of the average actual and predicted values (or "missing" as appropriate), as well as a row count and timestamp:
Note
In cases where the amount of data is small enough, DataRobot plots each predicted and actual point individually on the chart.
Change the binning resolution
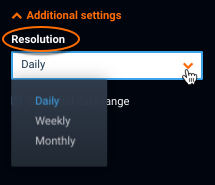
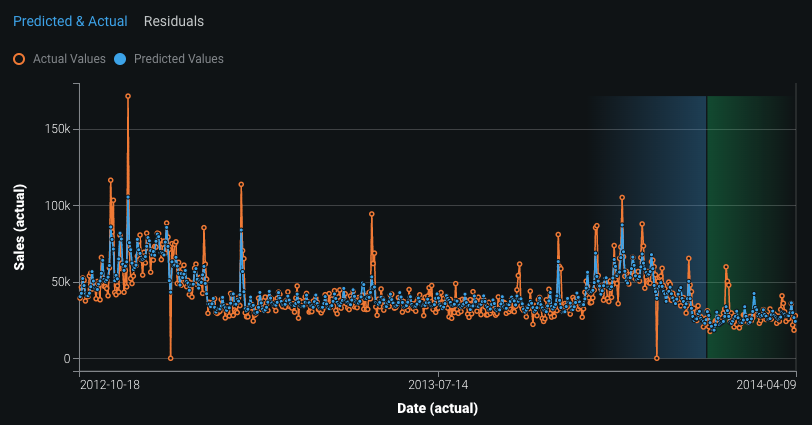
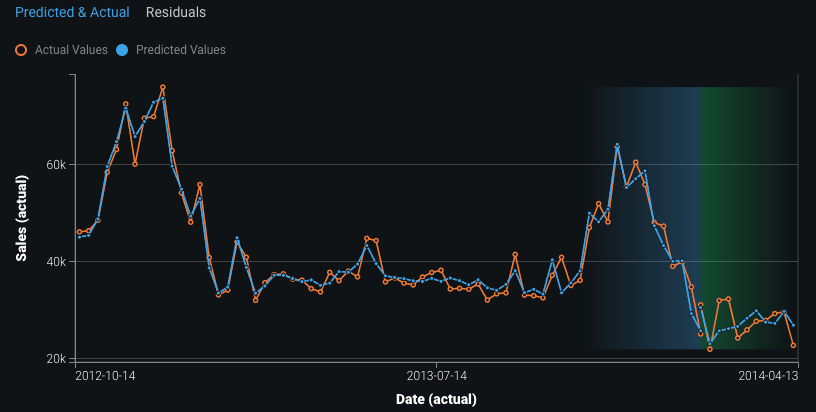
By default, DataRobot displays the most granular binning resolution. You can, however, change the resolution from the Resolution dropdown (in Additional Settings for time series and multiseries). Increasing the resolution allows you to further aggregate the data and see higher-level trends. This is useful if the data is not evenly distributed across time. For example, if your data has many points in one week and no points for the next two weeks, aggregating at a monthly resolution visually compresses gaps in the data. The resolution options available are determined by the data's detected time steps.
Backtest 1 daily:
Backtest 1 weekly:
Backtest 1 monthly:
Note, however, that the bin start dates might not be the same as the dataset dates (even if the dataset has a regular time step). This is because Accuracy Over Time bins are aligned to always include the end date of the dataset. This may mean that they are shifted by a single time unit length to ensure the final data point is included, even if this means that the bins no longer align with the periodicity in the dataset.
For example, consider a dataset based on weekly data (aggregation of data from Monday through Sunday) where Monday is always the start of the week. Even though the data is spaced every seven days on Monday, the Accuracy Over Time bins may span Tuesday to Tuesday (instead of Monday to Monday) to ensure that the final Monday is included.
Change the date range
Using the Show full date range toggle, you can change the chart scale to match the range of the entire dataset. In other words, rescaling to the full range contextualizes how much of your data you're using for validation and/or training. For example, let's say you upload a dataset covering January 1 2017 to December 30 2017. If you create backtests for October/November and November/December, the full range plot shows the size of those backtests relative to the complete dataset.
If you select All Backtests, the chart displays the validation data for the entire dataset, marking each backtest in the range:
Focus the display
Use the date range slider below the chart to highlight a specific region of the time plot, selecting a subset of the data. For smaller parts of displayed data (a backtest or a higher resolution, for example), you can move the slider to a selected portion—drag the edges of the box to resize and click within the box and drag to move—focusing in on parts of the display. The full display:
A focused display:
For larger amounts of data, the preview renders the full results for the selected backtest(s) while the chart reflects only the data contained within the slider selection. Drag the slider to select a subset of the data for further inspection. The slider selection, by default, contains up to 1000 bins. If your data results in more than 1000 bins, the display shows the most recent 1000 bins. You can make the slider smaller than 1000 by dragging the edges, but if you try to make it larger, the selection highlights the most recent 1000 (right-most in the preview) and the chart updates accordingly.
Zoom the display
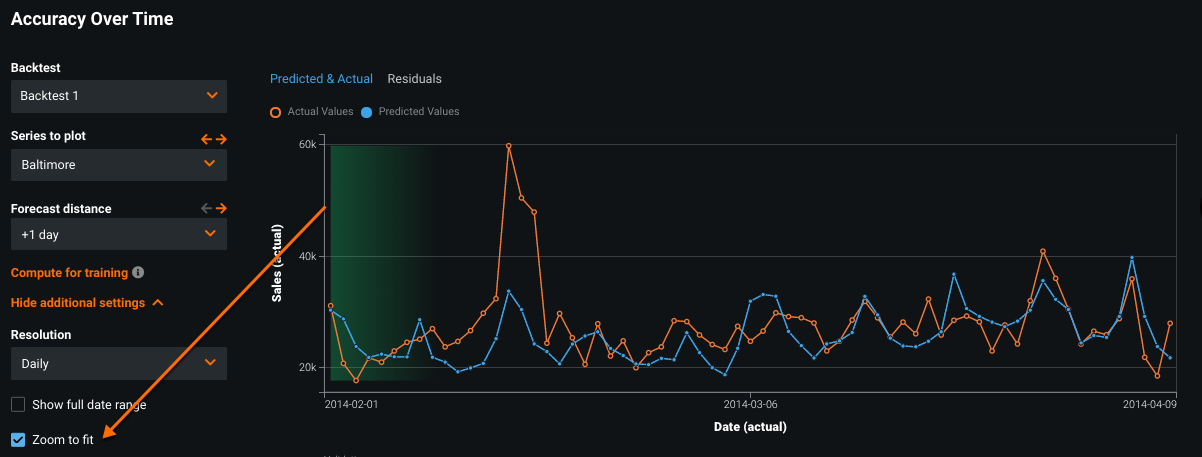
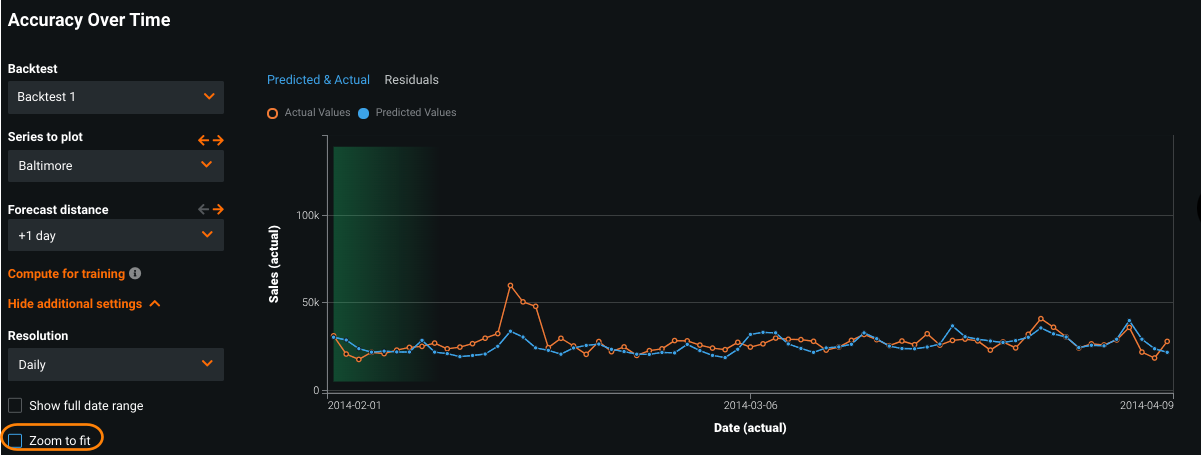
The Zoom to fit box (in Additional Settings for time series and multiseries projects), when checked, modifies the chart's Y-axis values to the minimum and maximum of the target values. When off, the chart scales to show the full possible range of target values. For binary classification projects, zoom is disabled by default, meaning the Y-axis range displays 0 to 1. Enabling Zoom to fit shows the chart within the range of both actual and predicted values for the backtest (and series, if multiseries) that is currently selected.
For example, suppose the target (sales) has possible values between 0 and 150,000. Maybe all the predicted and/or actual values, however, fall between roughly 15,000 and 60,000. When Zoom to fit is checked, the Y-axis display will plot from the low of approximately 15,000 to approximately 60,000, the highest known value.
When unchecked, the Y-axis spans from 0-150,000, with all data points grouped between roughly 15,0000 and 60,000.
Note that if the maximum and minimum of the prediction values are equal (or close to equal to) the maximum and minimum of the target, checking the box may not cause a change to the display. The preview slider below the plot always displays zoomed to fit (does not match the scaling used in the main chart).
Export data
Click the Export link to download the data behind the chart you are currently viewing. DataRobot presents a dialog box that allows you to copy or download CSV data for the selected backtest, forecast distance, and series (if applicable), as well as the average or absolute value residuals.
Display by series
If your project is multiseries, the plot controls are dependent on the number of series. Because projects can have up to 1 million series and up to 1000 forecast distances, calculating accuracy charts for all series data can be extremely compute-intensive and often unnecessary. To avoid this, DataRobot calculates either all or a portion of the series— the first x series, sorted by name—at a single forecast distance.
Note
Calculations apply to the validation data; training data calculations can also be run, but are done separately and for each series.
The number of series calculated is based on the projected space and memory requirements. As a result, the landing page for multiseries Accuracy Over Time can be one of three options:
-
If the dataset (number of series) at each configured forecast distance is relatively small and will not exceed a base threshold, DataRobot calculates Accuracy Over Time during model building. When you open the tab, the charts are available for each series at each distance.
-
If the dataset is large enough that the memory and storage requirements would cause a noticeable delay when building models, but not so large that bulk calculations are applicable, you are prompted to run select calculations from the landing page, similar to:
-
If calculations for all series would exceed an even higher threshold—one that prevents potential excessive compute time—the landing page adds an option allowing you to calculate per-series and also in bulk:
The methodology DataRobot uses for per-series calculations is applicable to the following functionality:
- Accuracy Over Time
- Forecast vs Actual
- Anomaly Over Time
- Model Comparison for Accuracy/Anomaly Over Time-based comparisons
Compute a selected series
Compute Accuracy Over Time on-demand in the following circumstances:
- The project exceeds the base threshold for calculation.
- You have changed the forecast distance for an on-demand calculated series.
- The project triggered bulk calculations but you want results for specific series (you do not want to consume the resources that running all series would require).
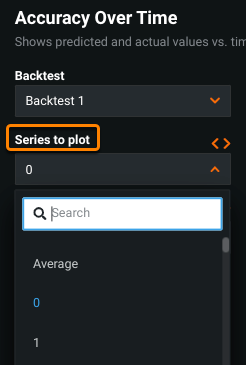
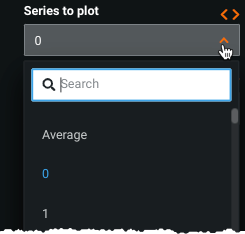
Note that you can search the desired series in the Series to plot dropdown, regardless of whether or not calculations have been run for the series.
To calculate for a selected series:
-
Select the series of interest to plot:
Or, plot the average across all calculated series:
Note
If the project triggered the bulk calculation option, selecting Average for Series to plot sets DataRobot to first calculate accuracy for the number of series identified in the bulk series limit value.
-
Change the forecast distance, if desired.
-
Click one of the buttons to initiate calculations; options are dependent on which backtests you want to compute. Calculations apply for all series, but only for the selected forecast distance. Select either:
Button Description Compute Forecast Distance X / All Backtests Computes insight data for all backtests with the selected settings (series, forecast distance). This may be compute-intensive, depending on the project configuration. Compute Forecast Distance X / Backtest X Computes insight data for the selected series, but only for the selected backtest at the selected forecast distance.
Compute multiple series
When a project exceeds the mid-range threshold, DataRobot provides an option to calculate series in bulk (Compute multiple series). Because these calculations can take significant time, DataRobot applies a storage threshold so even the bulk action may not compute all series. Help text above the activation button provides information on the total number of series as well as the number that will be calculated with each computation request:
In this example, DataRobot found 2300 series in the project but, in order to stay below the threshold, will only calculate the first 943 series (the series limit, ordered alphanumerically) in one computation. The bulk computation method does not allow calculation for more than one backtest at a time.
Note
The number of series available for calculation is different in the Forecast vs Actual tab. This is because Accuracy Over Time calculates for a single forecast distance, while Forecast vs Actual calculates for a range of distances. As a result, the series limit for Forecast vs Actual is the number shown here divided by the number of steps in the forecast range.
To work with bulk calculations, select the series, backtest, and forecast distance to plot. Computation options differ depending on your selection.
If you want insights for all or a selected backtest for a single series:
If you choose Average as the series to plot, DataRobot runs calculations for the maximum series limit, and allows for a selected backtest. Be aware that this can be extremely compute-intensive:
If you want accuracy calculations for the maximum number of series, use the bulk option:
Once bulk calculations complete, Accuracy Over Time results are available for the number of series, processed in alphanumeric order, indicated in the help text. If you search a series that has not yet been calculated, the option to compute that series and the next x series, displays.
To view accuracy charts for any series beyond the identified limit, run the calculation for the first batch and select a series outside of that range. Once selected, the bulk activation button returns, with an option to calculate the next x series.
Interpret the Residuals chart
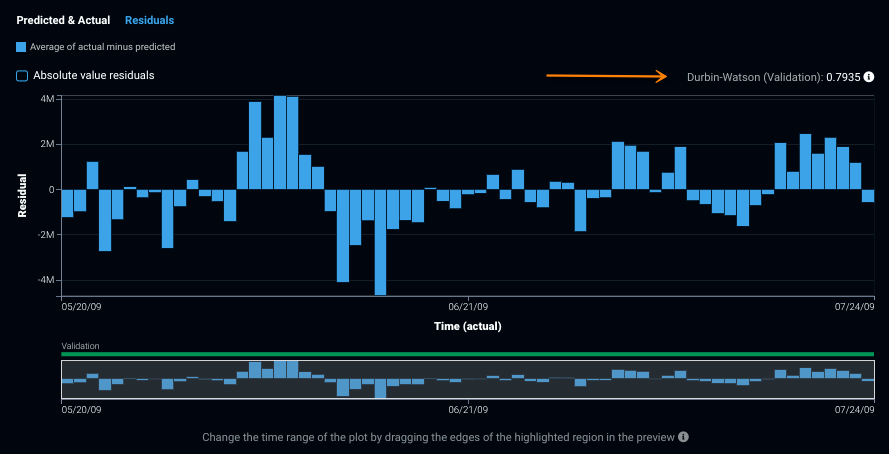
The Residuals chart plots the difference between actual and predicted values. It helps to visualize whether there is an unexplained trend in your data that the model did not account for and how the model errors change over time. Using the same controls as those available for the Predicted & Actual tab, you can modify the display to investigate specific areas of your data.
The chart also reports the Durbin-Watson statistic, a numerical way of evaluating residual charts. Calculated against validation data, Durbin-Watson is a test statistic used for detecting autocorrelation in the residuals from a statistical regression analysis. The value of the statistic is always between 0 and 4, where 2 indicates no autocorrelation in the sample.
By default the chart plots the average residual error (Y-axis) against the primary date/time feature (X-axis):
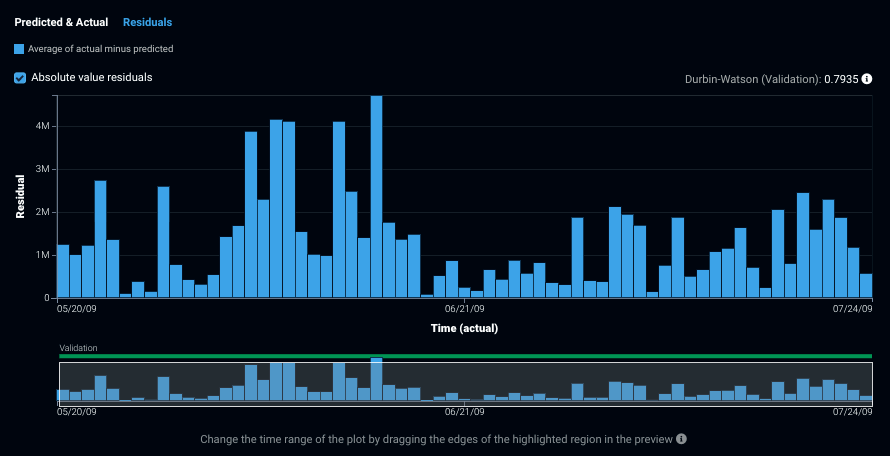
Check the Absolute value residuals box to view the residuals as absolute values:
Some things to consider when evaluating the Residuals chart:
- When the residual is positive (and Absolute value residuals is unchecked), it means the actual value is greater than the predicted value.
- If you see unexpected variation, consider adding features to your model that may do a better job of accounting for the trend.
- Look for trends that may be easily explained, such as "we always under-predict holidays and over-predict summer sales."
- Consider adding known in advance features that may help account for the trend.
