Bias and Fairness
Bias and Fairness testing provides methods to calculate fairness for a binary classification model and attempt to identify any biases in the model's predictive behavior. In DataRobot, bias represents the difference between a model's predictions for different populations (or groups) while fairness is the measure of the model's bias.
Select protected features in the dataset and choose fairness metrics and mitigation techniques either before model building or from the Leaderboard once models are built. Bias and Fairness insights help identify bias in a model and visualize the root-cause analysis, explaining why the model is learning bias from the training data and from where.
Bias mitigation in DataRobot is a technique for reducing (“mitigating”) model bias for an identified protected feature—by producing predictions with higher scores on a selected fairness metric for one or more groups (classes) in a protected feature. It is available for binary classification projects, and typically results in a small reduction in accuracy in exchange for greater fairness.
See the Bias and Fairness resource page for more complete information on the generally available bias and fairness testing and mitigation capabilities.
Configure metrics and mitigation pre-Autopilot
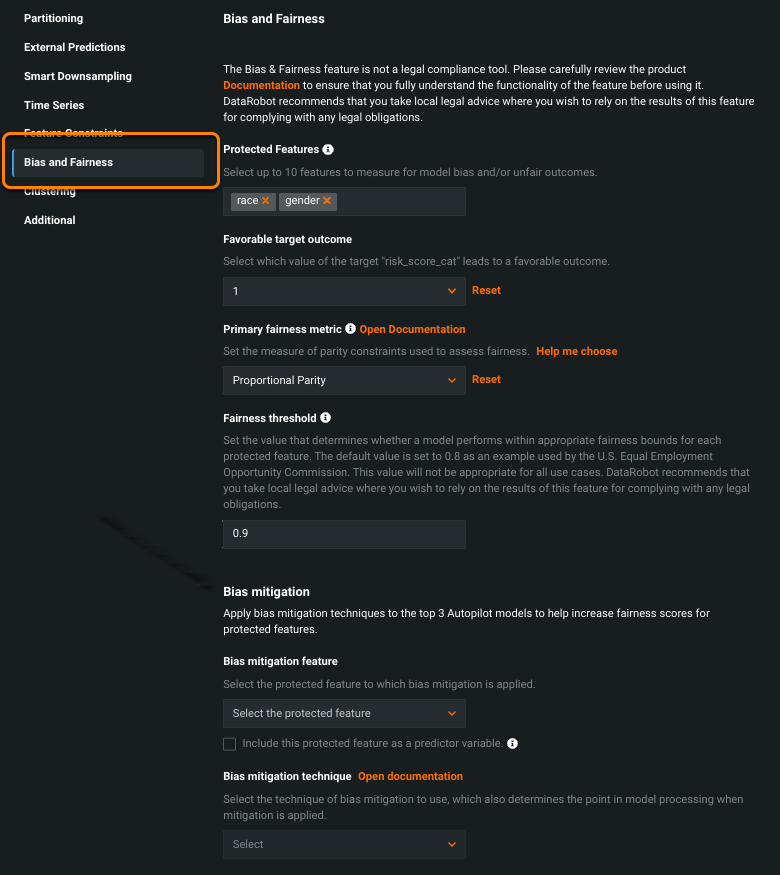
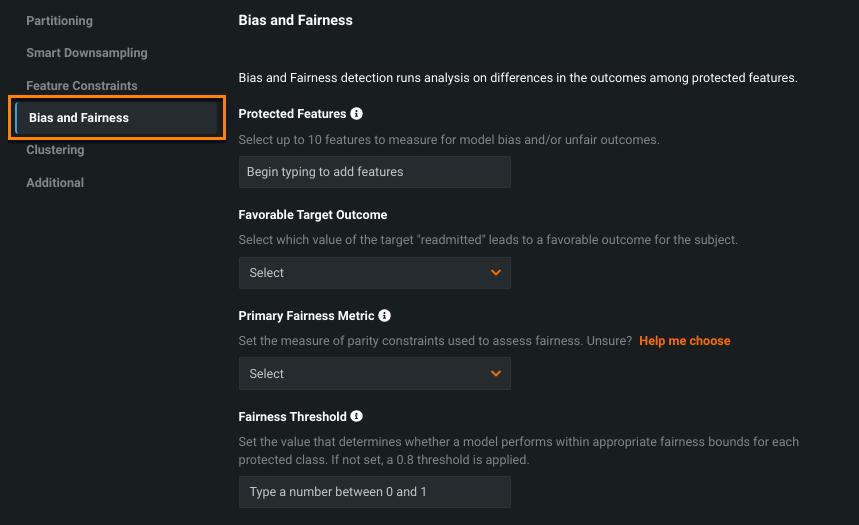
Once you select a target, click Show advanced options and select the Bias and Fairness tab. From the tab you can set fairness metrics and mitigation techniques.
Set fairness metrics
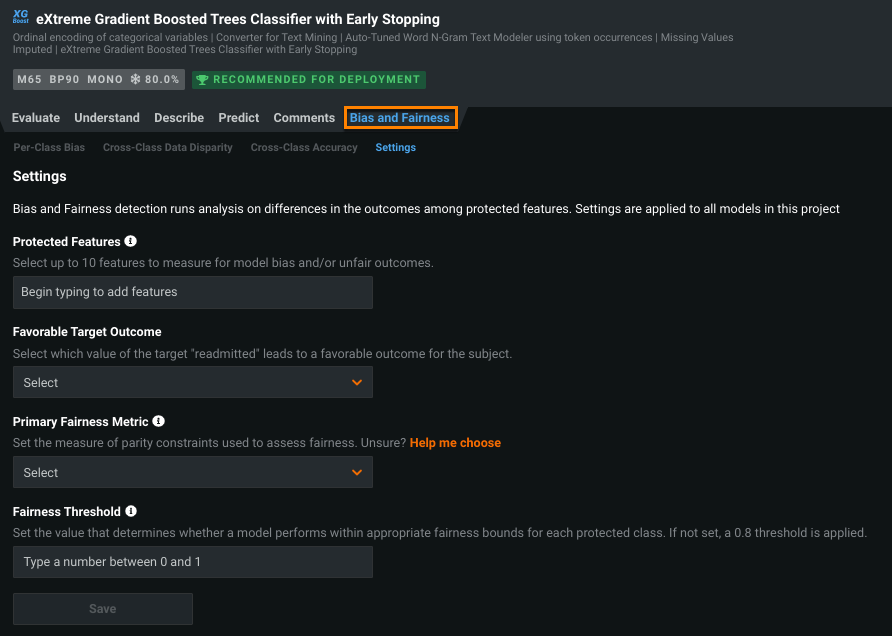
To configure Bias and Fairness, set the values that define your use case. For additional detail, refer to the bias and fairness reference for common terms and metric definitions.
-
Identify up to 10 Protected Features in the dataset. Protected features must be categorical. The model's fairness is calculated against the protected features selected from the dataset.
-
Define the Favorable Target Outcome, i.e., the outcome perceived as favorable for the protected class relative to the target. In the below example, the target is "salary" so annual salaries are listed under Favorable Target Outcome, and a favorable outcome is earning greater than 50K.
-
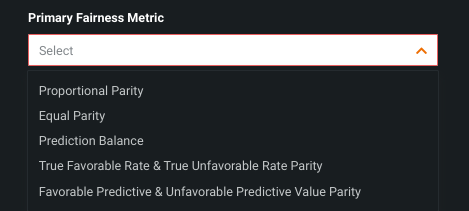
Choose the Primary Fairness Metric most appropriate for your use case from the five options below.
Help me choose
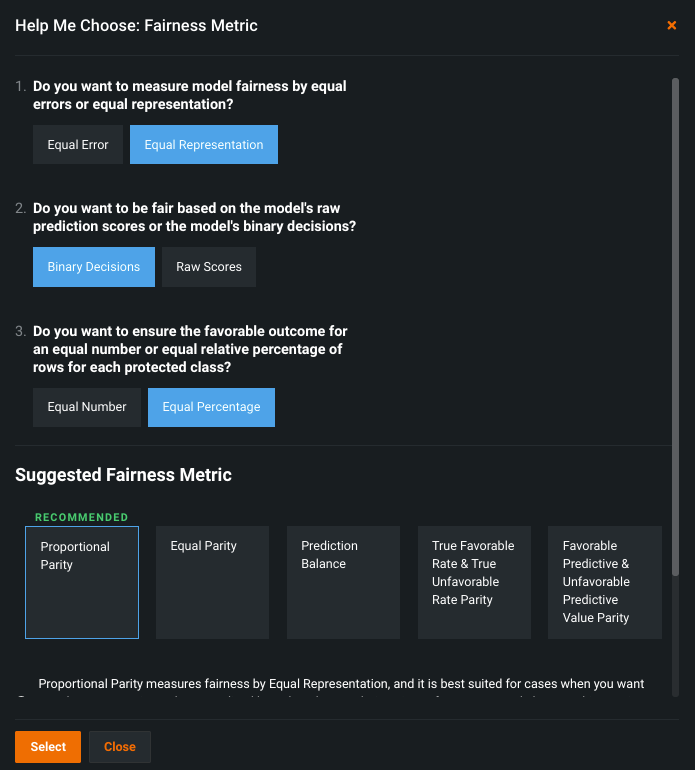
If you are unsure of the best metric for your model, click Help me choose.
DataRobot presents a questionnaire where each question is determined by your answer to the previous one. Once completed, DataRobot recommends a metric based on your answers.
Because bias and fairness are ethically complex, DataRobot's questions cannot capture every detail of each use case. Use the recommended metric as a guidepost; it is not necessarily the correct (or only) metric appropriate for your use case. Select different metrics to observe how answering the questions differently would affect the recommendation.
Click Select to add the highlighted option to the Primary Fairness Metric field.
Metric Description Proportional Parity For each protected class, what is the probability of receiving favorable predictions from the model? This metric (also known as "Statistical Parity" or "Demographic Parity") is based on equal representation of the model's target across protected classes. Equal Parity For each protected class, what is the total number of records with favorable predictions from the model? This metric is based on equal representation of the model's target across protected classes. Prediction Balance (Favorable Class Balance and Unfavorable Class Balance) For all actuals that were favorable/unfavorable outcomes, what is the average predicted probability for each protected class? This metric is based on equal representation of the model's average raw scores across each protected class and is part of the set of Prediction Balance fairness metrics. True Favorable Rate Parity and True Unfavorable Rate Parity For each protected class, what is the probability of the model predicting the favorable/unfavorable outcome for all actuals of the favorable/unfavorable outcome? This metric is based on equal error. Favorable Predictive Value Parity and Unfavorable Predictive Value Parity What is the probability of the model being correct (i.e., the actual results being favorable/unfavorable)? This metric (also known as "Positive Predictive Value Parity") is based on equal error. The fairness metric serves as the foundation for the calculated fairness score; a numerical computation of the model's fairness against the protected class.
-
Set a Fairness Threshold for the project. The threshold serves as a benchmark for the model's fairness score. That is, it measures if a model performs within appropriate fairness bounds for each protected class. It does not affect the fairness score or performance of any protected class. (See the reference section for more information.)
Set mitigation techniques
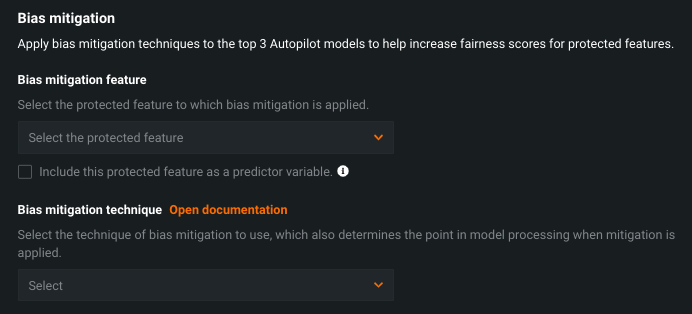
Select a bias mitigation technique for DataRobot to apply automatically. DataRobot uses the selected technique to automatically attempt bias mitigation for the top three full or Comprehensive Autopilot Leaderboard models (based on accuracy). You can also initiate bias mitigation manually after Autopilot completes. (If you used Quick Autopilot mode, for example, manual mode allows you to apply mitigation to selected models). With either method, once applied, you can compare mitigated versus unmitigated models.
How does mitigation work?
Specifically, mitigation copies an affected blueprint and then adds either a pre- or post-processing task, depending on the Mitigation technique selected.
The table below summarizes the fields:
| Field | Description |
|---|---|
| Bias mitigation feature | Lists the protected feature(s); select one from which to reduce the model's bias towards. |
| Include as a predictor variable | Sets whether to include the mitigation feature as an input to model training. |
| Bias mitigation technique | Sets the mitigation technique and the point in model processing when mitigation is applied. |
The steps below provide greater detail for each field:
-
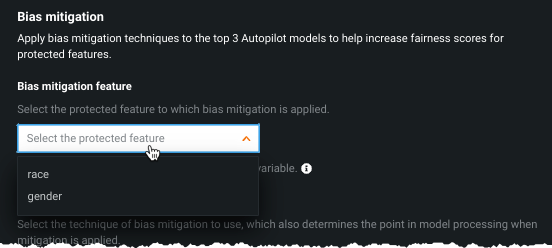
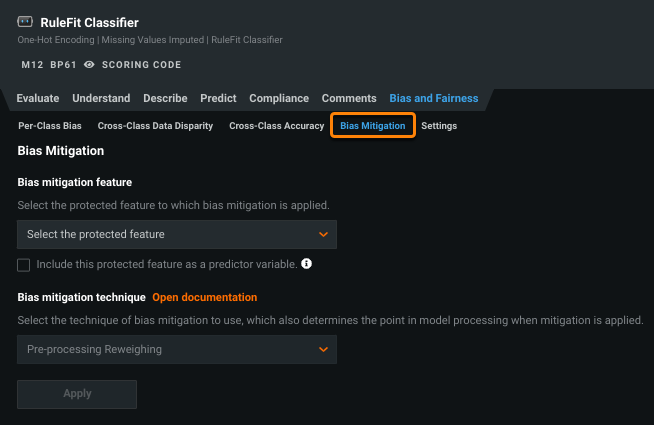
Select a feature from the Bias mitigation feature dropdown, which lists the feature(s) that you set as protected in the Protected features field for general Bias and Fairness settings. This is the feature you would like to reduce the model’s bias towards.
-
Once the mitigation feature is set, DataRobot computes data quality for the feature. When the check is successful, the option to include the protected feature as a predictor variable becomes available. Check the box to use the feature to attempt mitigation and to include the mitigation feature as an input into model training. Leave it unchecked to use the feature for mitigation only, not as a training input. This can be useful when you are legally prohibited from, or don't want to, include sensitive data as a model input but you would like to attempt mitigation based on it.
What does the data quality check identify?
During the data quality check, there are three basic questions answered for the chosen mitigation feature and the chosen target:
- Does the mitigation feature have too many rows where the value is completely missing?
- Are there any values of the mitigation feature that are too rare to allow drawing firm conclusions? For example, consider a dataset with 10,000 rows where the mitigated feature is
race. One of the values,Inuit, occurs only seven times, making the sample too small to be representative. - Are there any combinations of class plus target that are rare or absent? For example, consider a mitigation feature of
gender. The categoriesMaleandFemaleare both numerous, but the positive target label never occurs inFemalerows.
If the quality check does not pass, a warning appears. Address the issues in the dataset, then re-upload and try again.
-
Set the Mitigation technique, either:
- Preprocessing Reweighing: Assigns row-level weights and uses those as a special model input during training to attempt to make the predictions more fair.
- Postprocessing with Rejection Option-based Classification (ROBC): Changes the predicted label for rows that are close to the prediction threshold (model predictions with the highest uncertainty). Read a general ROBC description here and see a coding example in this Google Colab notebook. However, for detailed explanations of the applied algorithms, open the model documentation by clicking on the mitigation method task in the model blueprin.
Which fairness metrics does each mitigation techniques use?
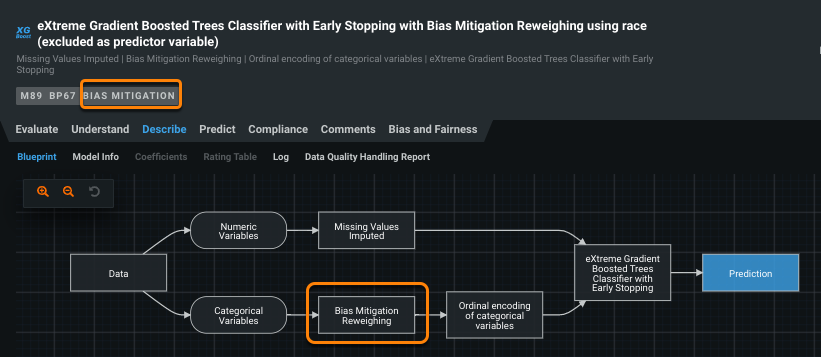
The mitigation technique names, "pre" and "post," refer to the point in the workflow (as illustrated in the blueprint) where the technique is applied. For example, reweighing is called "preprocessing" because it happens before the model is trained. Rejection Option-based Classification is called post-processing because it happens after the model has been trained. The techniques use the following metrics.
Technique Metric Preprocessing Reweighing Primarily Proportional Parity (but may, tangentially, improve other fairness metrics). Postprocessing with Rejection Option-based Classification Proportional Parity and True Favorable and True Unfavorable Rate Parity -
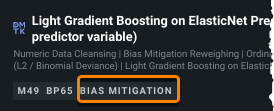
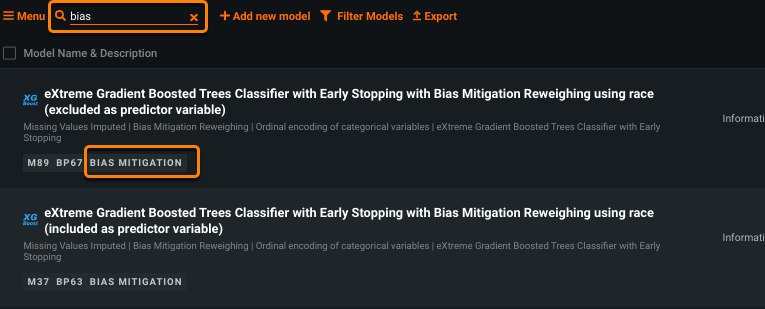
Start the model building process. DataRobot automatically attempts mitigation on the top three eligible models produced by Autopilot against the Bias mitigation feature. Mitigated models can be identified by the BIAS MITIGATION badge on the Leaderboard. See the explanation of what makes a model eligible for mitigation, as well as a table listing ineligible models.
-
Compare bias and accuracy of mitigated vs. unmitigated models.
Configure metrics and mitigation post-Autopilot
If you did not configure Bias and Fairness prior to model building, you can configure fairness tests and mitigation techniques from the Leaderboard.
Retrain with fairness tests
The following describes applying fairness metrics to models after Autopilot completes.
-
Select a model and click Bias and Fairness > Settings.
-
Follow the advanced options instructions on configuring bias and fairness.
-
Click Save. DataRobot then configures fairness testing for all models in your project based on these settings.
Retrain with mitigation
After Autopilot has finished, you can apply mitigation to any models that have not already been mitigated. To do so, select one or multiple model(s) from the Leaderboard and retrain them with bias mitigation settings applied.
Note
While you cannot retrain an already mitigated model, even on a different protected feature, you can return to the parent and select a different feature or technique for mitigation.
From the parent model, you can view the Models with Mitigation Applied table. This table lists relationships between the parent model and any child models with mitigation applied. Note the parent model does not have mitigation applied (1). All child mitigated models are listed by model ID (2), including their mitigation settings.
Single-model retraining
Note
If you haven't previously completed the Bias and Fairness configuration in advanced options prior to model building, you must first set those fields via the Bias and Fairness > Settings tab.
To apply mitigation to a single Leaderboard model after Autopilot completes:
-
Expand any eligible Leaderboard model and open Bias and Fairness > Bias Mitigation.
-
Configure the fields for bias mitigation.
-
Click Apply to start building a new, mitigated version of the model. When training is complete, the model can be identified on the Leaderboard by the BIAS MITIGATION badge.
-
Compare bias and accuracy of mitigated vs. unmitigated models.
Multiple-model retraining
To apply mitigation to multiple Leaderboard models after Autopilot completes:
-
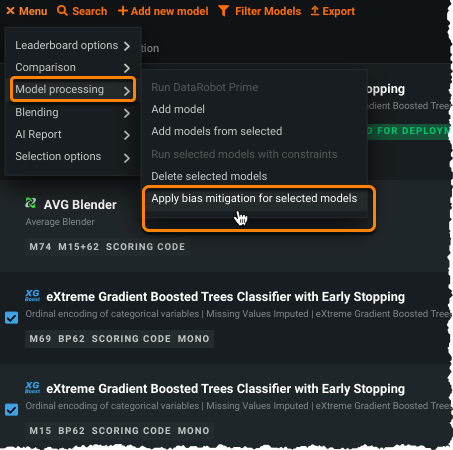
Use the checkboxes to the left of any eligible models that have not already been mitigated.
-
From the menu, select Model processing > Apply bias mitigation for selected models.
-
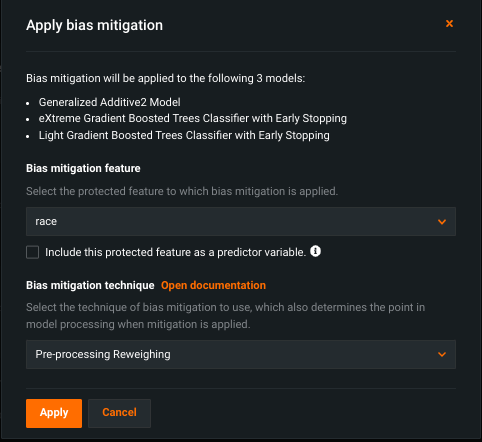
In the resulting window, configure the fields for bias mitigation.
-
Click Apply to start building new, mitigated versions of the models. When training is complete, the models can be identified on the Leaderboard by the BIAS MITIGATION badge.
-
Compare bias and accuracy of mitigated vs. unmitigated models.
Identify mitigated models
The Leaderboard provides several indicators for mitigated and parent (unmitigated versions) models:
-
A BIAS MITIGATION badge. Use the Leaderboard search to easily identify all mitigated models.
-
Model naming reflects mitigation settings (technique, protected feature, and predictor variable status).
-
The Bias Mitigation tab includes a link to the original, unmitigated parent model.
Compare models
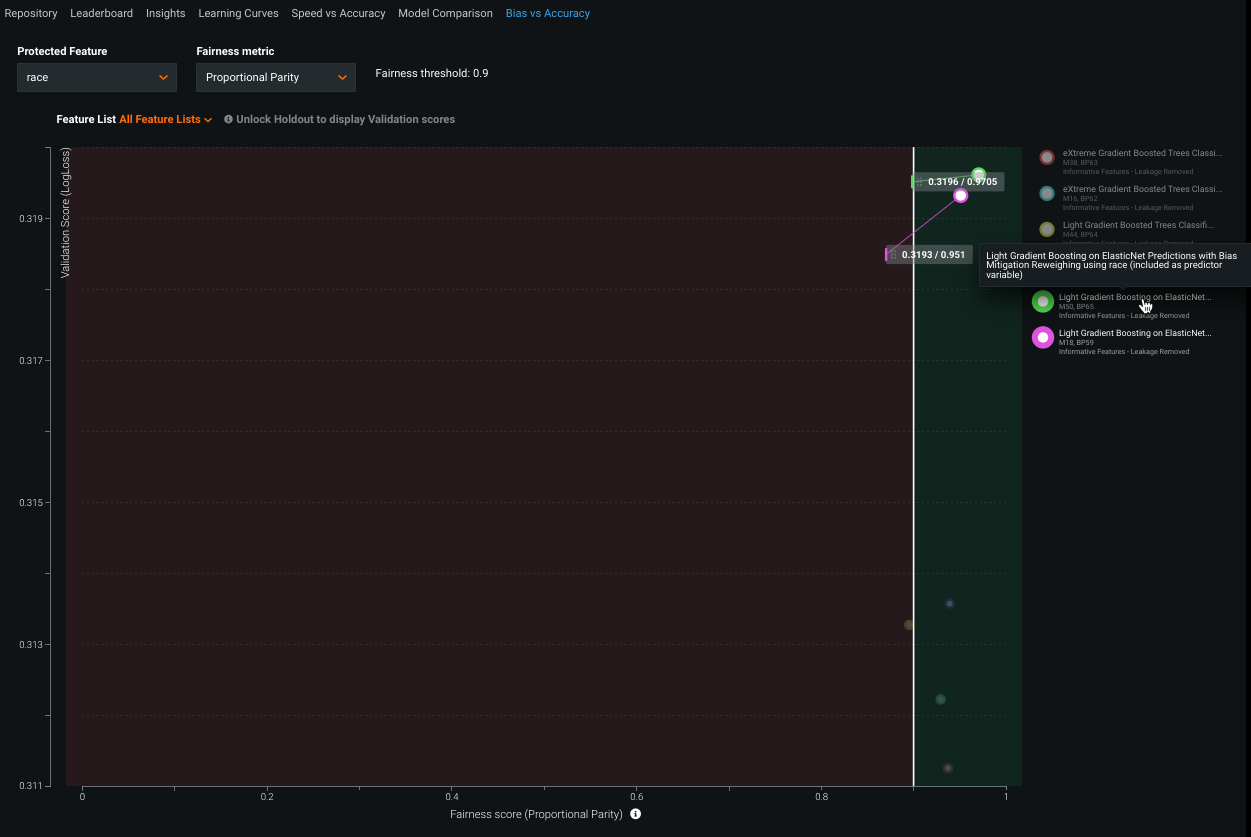
Use the Bias vs Accuracy tab to compare the bias and accuracy of mitigated vs. unmitigated models. The chart will likely show that mitigated models have higher fairness scores (less bias) than their unmitigated version, but with lower accuracy.
Before a model (mitigated or unmitigated) becomes available on the chart, you must first calculate its fairness scores. To compare mitigated or unmitigated:
-
Open a model displaying the BIAS MITIGATION badge and navigate to Bias and Fairness > Per-Class Bias. The fairness score is calculated automatically once you open the tab.
-
Navigate to the Bias and Fairness > Bias Mitigation tab to retrieve a link to the parent model. Click the link to open the parent.
-
From the parent model, visit the Bias and Fairness > Per-Class Bias tab to automatically calculate the fairness score.
-
Open the Bias vs Accuracy tab and compare the results. In this example, you can see that the mitigated model (shown in green) has higher accuracy (Y-axis) and fairness (X-axis) scores than the parent (shown in magenta).
Mitigation eligibility
DataRobot selects the top three eligible models for mitigation, and as a result, those labeled with the BIAS MITIGATION badge may not be the top three models on the Leaderboard after Autopilot runs. Other models may be in a higher position on the Leaderboard but will not have mitigation applied because they were ineligible.
If you select Preprocessing Reweighing as the mitigation technique, the following models are ineligible for reweighing because the models don’t use weights:
- Nystroem Kernel SVM Classifier
- Gaussian Process Classifier
- K-nearest Neighbors Classifier
- Naive Bayes Classifier
- Partial Least Squares Classifier
- Legacy Neural Net models: "vanilla" Neural Net Classifier, Dropout Input Neural Net Classifier, "vanilla" Two Layer Neural Net Classifier, Two Hidden Layer Dropout Rectified Linear Neural Net Classifier, (but note that contemporary Keras models can be mitigated)
- Certain basic linear models: Logistic Regression, Regularized Logistic Regression (but note that ElasticNet models can be mitigated)
- Eureqa and Eureqa GAM Classifiers
- Two-stage Logistic Regression
- SVM Classifier, with any kernel
If you select either mitigation technique, the following models and/or projects are ineligible for mitigation:
- Models that have already had bias mitigation applied.
- Majority Class Classifier (predicts a constant value).
- External Predictions models (uses a special column uploaded with the training data, cannot make new predictions).
- Blender models.
- Projects using Smart Downsampling.
- Projects using custom weights.
- Projects where the Mitigation Feature is missing over 50% of its data.
- Time series or OTV projects (i.e., any project with time-based partitioning).
- Projects run with SHAP value support.
- Single-column, standalone text converter models: Auto-Tuned Word N-Gram Text Modeler, Auto-Tuned Char N-Gram Modeler, and Auto-Tuned Summarized Categorical Modeler.
Bias mitigation considerations
Consider the following when working with bias mitigation:
-
Mitigation applies to a single, categorical protected feature.
-
For the ROBC mitigation technique, the mitigation feature must have at least two classes that each have at least 100 rows in the training data. For the Preprocessing Reweighing technique, there is no explicit minimum row count, but mitigation effectiveness may be unpredictable with very small row counts.
