Set up accuracy monitoring
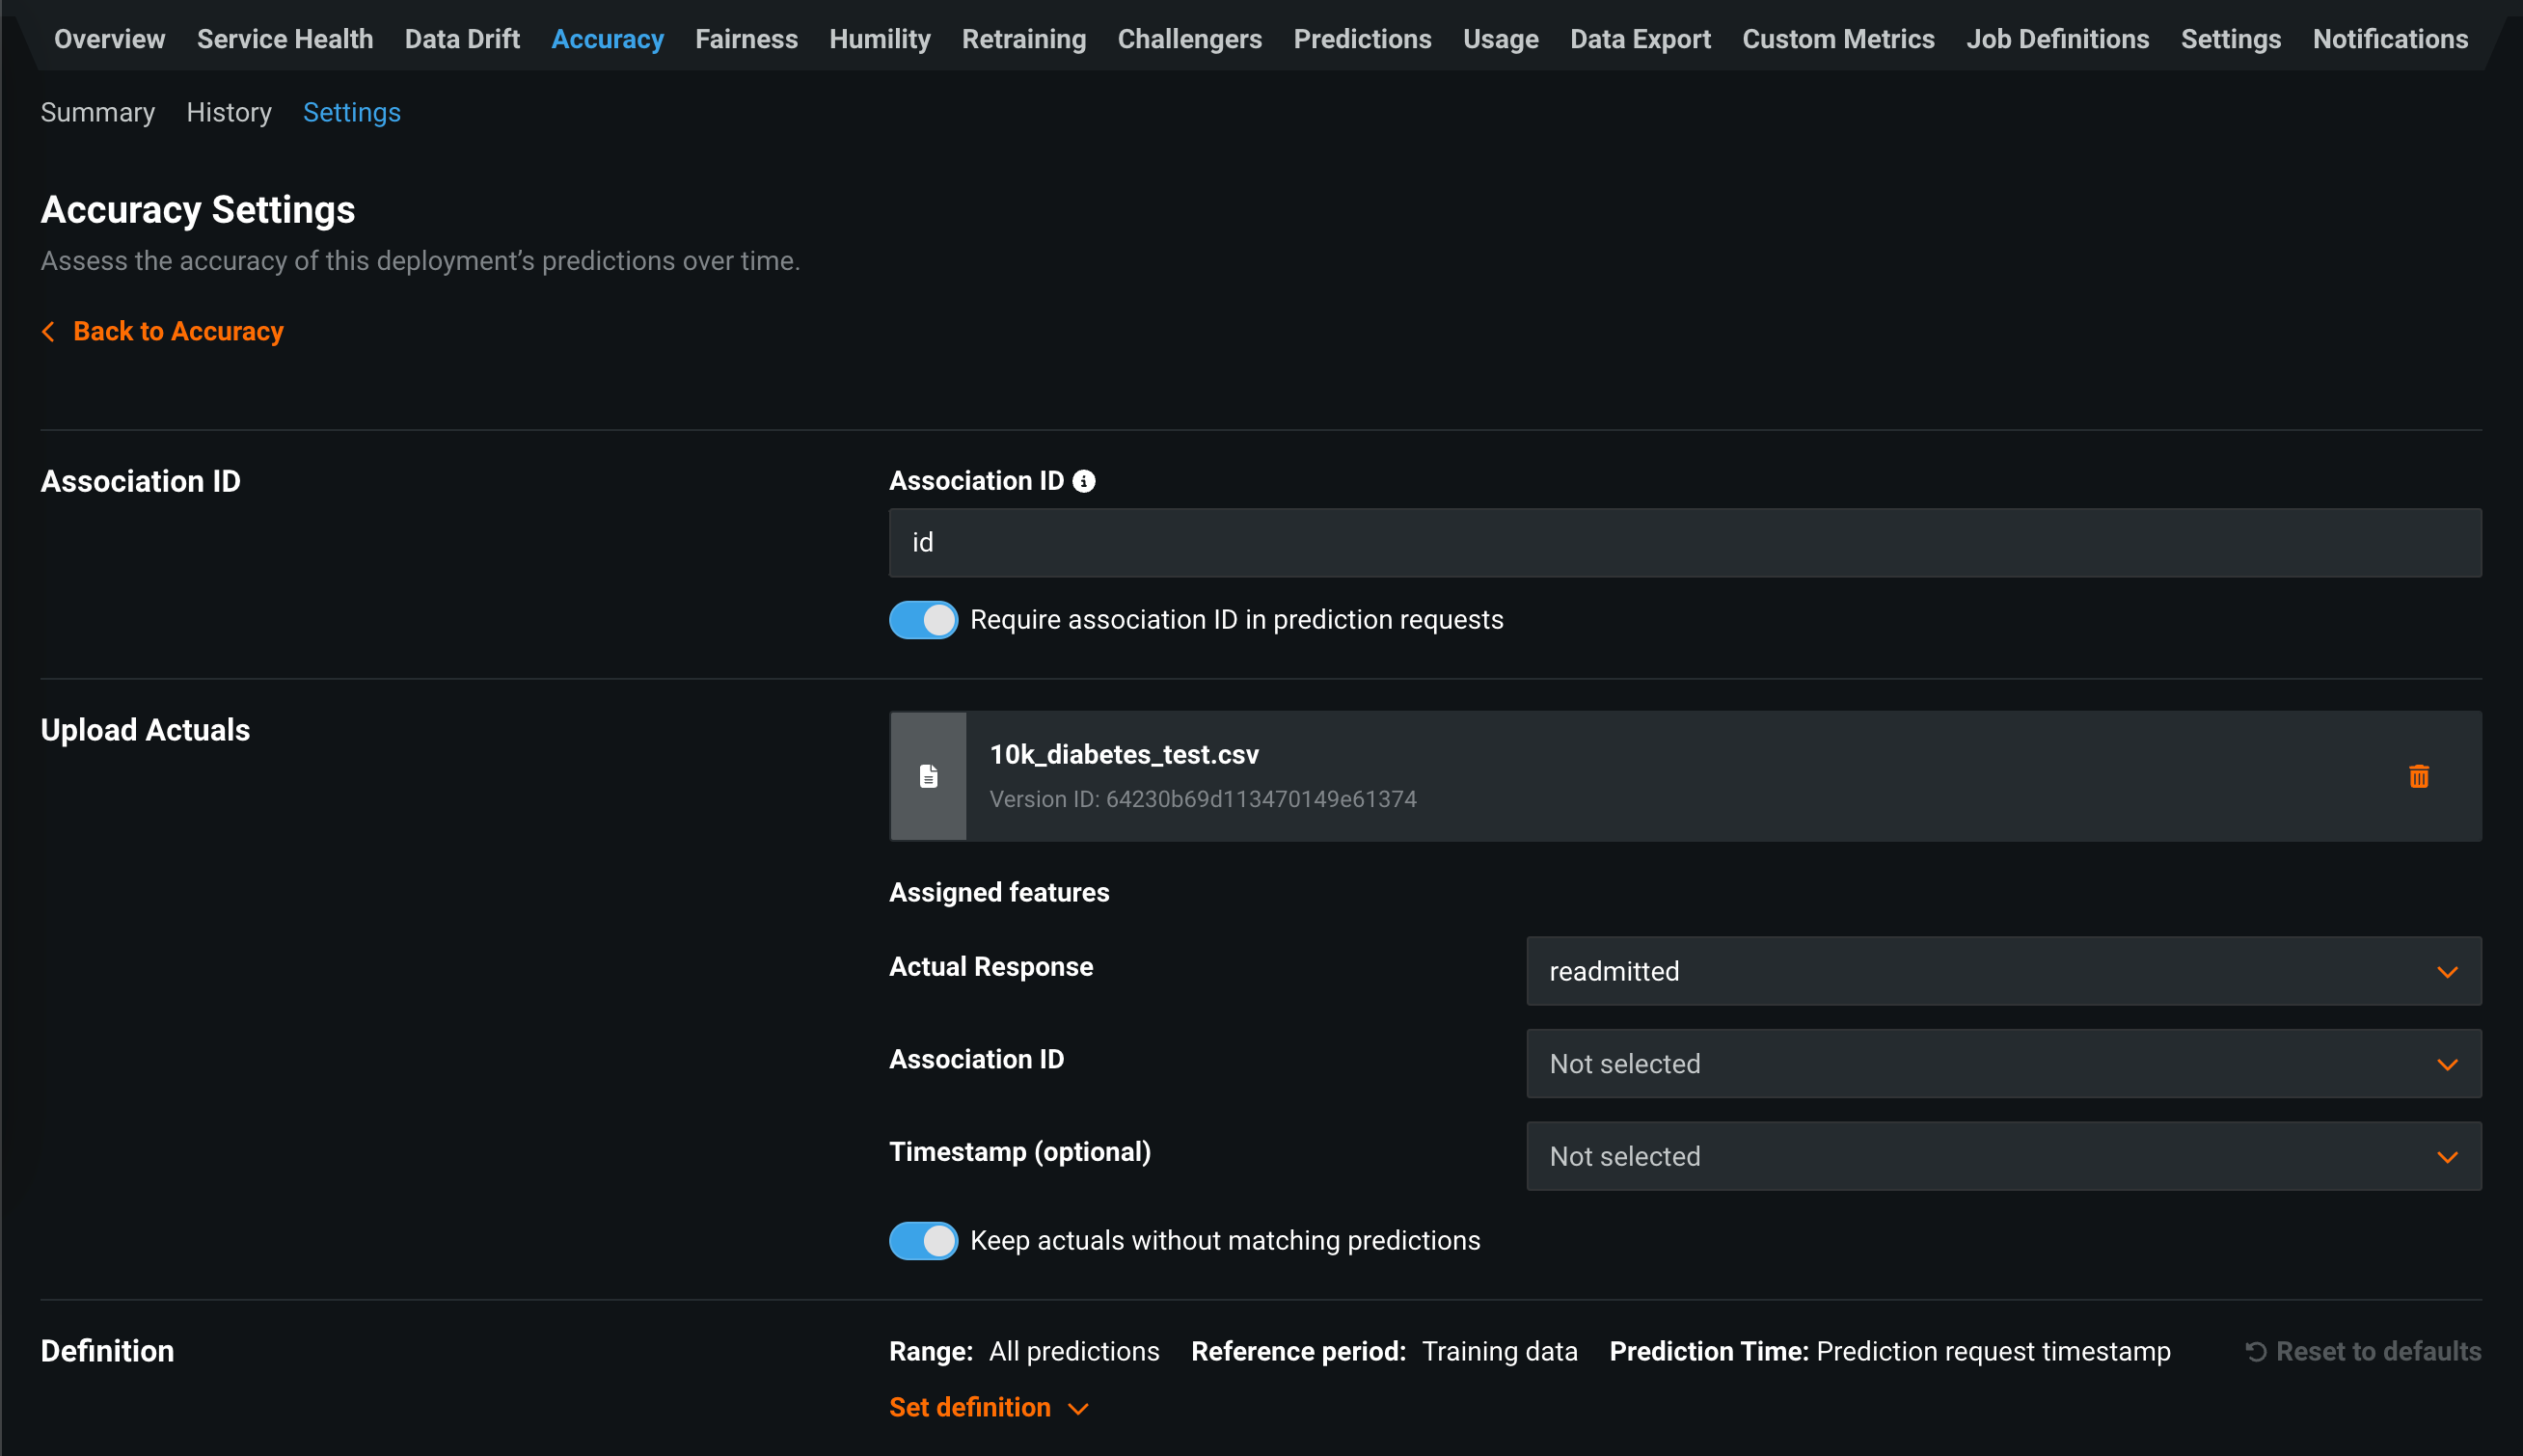
You can monitor a deployment for accuracy using the Accuracy tab, which lets you analyze the performance of the model deployment over time using standard statistical measures and exportable visualizations. You can enable accuracy monitoring on the Accuracy > Settings tab. To configure accuracy monitoring, you must:
-
Select an association ID in the Accuracy Settings
-
Add actuals in the Accuracy Settings
On a deployment's Accuracy Settings page, you can configure the Association ID and Upload Actuals settings and the accuracy monitoring Definition and Notifications settings:
| Field | Description |
|---|---|
| Association ID | |
| Association ID | Defines the name of the column that contains the association ID in the prediction dataset for your model. Association IDs are required for setting up accuracy monitoring in a deployment. The association ID functions as an identifier for your prediction dataset so you can later match up outcome data (also called "actuals") with those predictions. |
| Require association ID in prediction requests | Requires your prediction dataset to have a column name that matches the name you entered in the Association ID field. When enabled, you will get an error if the column is missing. This cannot be enabled with Enable automatic association ID generation for prediction rows. |
| Enable automatic association ID generation for prediction rows | With an association ID column name defined, allows DataRobot to automatically populate the association ID values. This cannot be enabled with Require association ID in prediction requests. |
| Enable automatic actuals feedback for time series models | For time series deployments that have indicated an association ID. Enables the automatic submission of actuals, so that you do not need to submit them manually via the UI or API. Once enabled, actuals can be extracted from the data used to generate predictions. As each prediction request is sent, DataRobot can extract an actual value for a given date. This is because when you send prediction rows to forecast, historical data is included. This historical data serves as the actual values for the previous prediction request. |
| Upload Actuals | |
| Drop file(s) here or choose file | Uploads a file with actuals to monitor accuracy by matching the model's predictions with actual values. Actuals are required to enable the Accuracy tab. |
| Assigned features | Configures the Assigned features settings after you upload actuals. |
| Definition | |
| Set definition | Configures the metric, measurement, and threshold definitions for accuracy monitoring. |
Enable target monitoring
In order to enable accuracy monitoring, you must also enable target monitoring in the Data Drift section of the Data Drift Settings tab.
If target monitoring is turned off, a message displays on the Accuracy tab to remind you to enable target monitoring.
Select an association ID
To activate the Accuracy tab for a deployment, first designate an association ID in the prediction dataset. The association ID is a foreign key, linking predictions with future results (or actuals). It corresponds to an event for which you want to track the outcome; For example, you may want to track a series of loans to see if any of them have defaulted or not.
Important: Association ID for monitoring agent and monitoring jobs
You must set an association ID before making predictions to include those predictions in accuracy tracking. For agent-monitored external model deployments with challengers (and monitoring jobs for challengers), the association ID should be __DataRobot_Internal_Association_ID__ to report accuracy for the model and its challengers.
On the Accuracy > Settings tab of a deployment, the Association ID section has a field for the column name containing the association IDs. The column name you define in the Association ID field must match the name of the column containing the association IDs in the prediction dataset for your model. Each cell for this column in your prediction dataset should contain a unique ID that pairs with a corresponding unique ID that occurs in the actuals payload.
In addition, you can enable Require association ID in prediction requests to throw an error if the column is missing from your prediction dataset when you make a prediction request.
Association IDs for chat requests
For DataRobot-deployed text generation and agentic workflow custom models that use the Bolt-on Governance API (chat completions), an association ID can be specified directly in the chat request using the extra_body field. Set datarobot_association_id in extra_body to use a custom association ID instead of the auto-generated one. For more information, see the chat() hook documentation.
You can set the column name containing the association IDs on a deployment at any time, whether predictions have been made against that deployment or not. Once set, you can only update the association ID if you have not yet made predictions that include that ID. Once predictions have been made using that ID, you cannot change it.
Association IDs (the contents in each row for the designated column name) must be shorter than 128 characters, or they will be truncated to that size. If truncated, uploaded actuals will require the truncated association IDs for your actuals in order to properly generate accuracy statistics.
How does an association ID work?
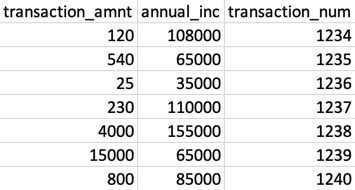
For an example of an association ID, look at this sample dataset of transactions:
The third column, transaction_num, is the column containing the association IDs. A row's unique ID (transaction_num in this example) groups together the other features in that row (transaction_amnt and annual_inc in this example), creating an "association" between the related feature values. Defining transaction_num as the column containing association IDs allows DataRobot to use these unique IDs to associate each row of prediction data and predicted outcome with the actual outcome later. Therefore, transaction_num is what you would enter in the Association ID field when setting up accuracy.
Association IDs for time series deployments
For time series deployments, prediction requests already contain the data needed to uniquely identify individual predictions. Therefore, it is important to consider the feature used as an association ID, depending on the deployment type, consider the following guidelines:
-
Single-series deployments: DataRobot recommends using the
Forecast Datecolumn as the association ID because it is the date you are making predictions for. For example, if today is June 15th, 2022, and you are forecasting daily total sales for a store, you may wish to know what the sales will be on July 15th, 2022. You will have a single actual total sales figure for this date, so you can use “2022-07-15” as the association ID (the forecast date). -
Multiseries deployments: DataRobot recommends using a custom column containing
Forecast Date + Series IDas the association ID. If a single model can predict daily total sales for a number of stores, then you can use, for example, the association ID “2022-07-15 1234” for sales on July 15th, 2022 for store #1234. -
All time series deployments: You may want to forecast the same date multiple times as the date approaches. For example, you might forecast daily sales 30 days in advance, then again 14 days in advance, and again 7 days in advance. These forecasts all have the same forecast date, and therefore the same association ID.
Important
Be aware that models may produce different forecasts when predicting closer to the forecast date. Predictions for multiple forecast distances are each tracked individually so that accuracy can be properly calculated for each forecast distance.
After you designate an association ID, you can toggle Enable automatic actuals feedback for time series models to on. This setting automatically submits actuals so that you do not need to submit them manually via the UI or API. Once enabled, actuals can be extracted from the data used to generate predictions. As each prediction request is sent, DataRobot can extract an actual value for a given date. This is because when you send prediction rows to forecast, historical data is included. This historical data serves as the actual values for the previous prediction request.
Add actuals
You can directly upload datasets containing actuals to a deployment from the Accuracy > Settings tab (described here) or through the API. The deployment's prediction data must correspond to the actuals data you upload. Review the row limits for uploading actuals before proceeding.
-
To use actuals with your deployment, in the Upload Actuals section, click Choose file. Either upload a file directly or select a file from the AI Catalog. If you upload a local file, it is added to the AI Catalog after successful upload. Actuals must be snapshotted in the AI Catalog to use them with a deployment.
-
Once uploaded, complete the fields that populate in the Actuals section. Under Assigned features, each field has a dropdown menu that allows you to select any of the columns from your dataset:
Field Description Actual Response Defines the column in your dataset that contains the actual values. Association ID Defines the column that contains the association IDs. Timestamp (optional) Defines the column that contains the date/time when the actual values were obtained, formatted according to RFC 3339 (for example, 2018-04-12T23:20:50.52Z). Keep actuals without matching predictions Determines if DataRobot stores uploaded actuals that don't match any existing predictions by association ID. Column name matching
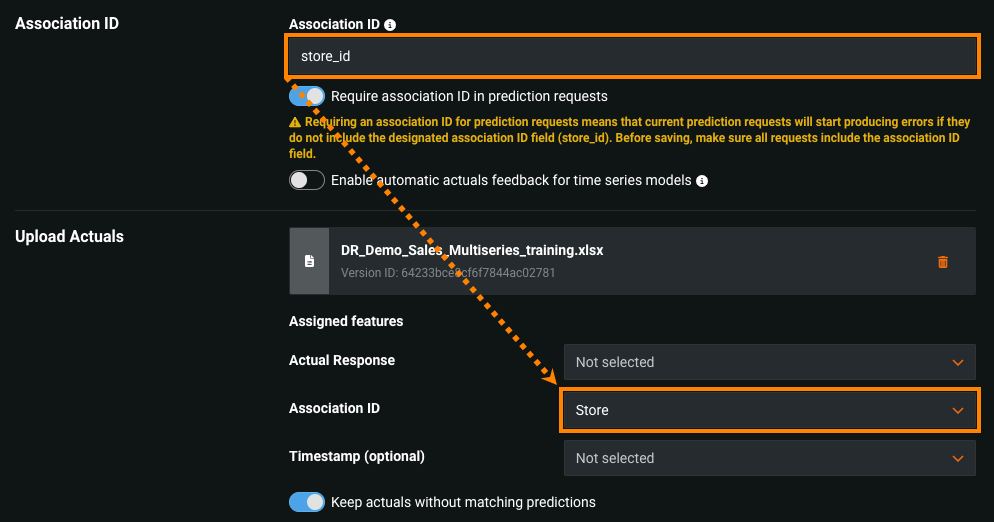
The column names for the association ID in the prediction and the actuals datasets do not need to match. The only requirement is that each dataset contains a column that includes an identifier that does match the other dataset. For example, if the column
store_idcontains the association ID in the prediction dataset that you will use to identify a row and match it to the actual result, enterstore_idin the Association ID section. In the Upload Actuals section under Assigned fields, in the Association ID field, enter the name of the column in the actuals dataset that contains the identifiers associated with the identifiers in the prediction dataset. -
After you configure the Assigned fields, click Save.
When you complete this configuration process and make predictions with a dataset containing the defined Association ID, the Accuracy page is enabled for your deployment.
Upload actuals with the API
This workflow outlines how to enable the Accuracy tab for deployments using the DataRobot API.
-
From the Accuracy > Settings tab, locate the Association ID section.
-
In the Association ID field, enter the column name containing the association IDs in your prediction dataset.
-
Enable Require association ID in prediction requests. This requires your prediction dataset to have a column name that matches the name you entered in the Association ID field. You will get an error if the column is missing.
Note
You can set an association ID and not toggle on this setting if you are sending prediction requests that do not include the association ID and you do not want them to error; however, until it is enabled, you cannot monitor accuracy for your deployment.
-
Make predictions using a dataset that includes the association ID.
-
Submit the actual values via the DataRobot API (for details, refer to the API documentation by signing in to DataRobot, clicking the question mark on the upper right, and selecting API Documentation; in the API documentation, select Deployments > Submit Actuals - JSON). You should review the row limits for uploading actuals before proceeding.
Note
The actuals payload must contain the
associationIdandactualValue, with the column names for those values in the dataset defined during the upload process. If you submit multiple actuals with the same association ID value, either in the same request or a subsequent request, DataRobot updates the actuals value; however, this update doesn't recalculate the metrics previously calculated using that initial actuals value. To recalculate metrics, you can clear the deployment statistics and reupload the actuals (or create a new deployment).Use the following snippet in the API to submit the actual values:
import requests


API_TOKEN = ''
USERNAME = 'johndoe@datarobot.com'
DEPLOYMENT_ID = '5cb314xxxxxxxxxxxa755'
LOCATION = 'https://app.datarobot.com'


def submit_actuals(data, deployment_id):
    headers = {'Content-Type': 'application/json', 'Authorization': 'Token {}'.format(API_TOKEN)}
    url = '{location}/api/v2/deployments/{deployment_id}/actuals/fromJSON/'.format(
        deployment_id=deployment_id, location=LOCATION
    )
    resp = requests.post(url, json=data, headers=headers)
    if resp.status_code >= 400:
        raise RuntimeError(resp.content)
    return resp.content


def main():
    deployment_id = DEPLOYMENT_ID
    payload = {
        'data': [
            {
                'actualValue': 1,
                'associationId': '5d8138fb9600000000000000',  # str
            },
            {
                'actualValue': 0,
                'associationId': '5d8138fb9600000000000001',
            },
        ]
    }
    submit_actuals(payload, deployment_id)
    print('Done')


if __name__ == "__main__":
    main()
After submitting at least 100 actuals for a non-time series deployment (there is no minimum for time series deployments) and making predictions with corresponding association IDs, the Accuracy tab becomes available for your deployment.
Actuals upload limit
The number of actuals you can upload to a deployment is limited per request and per hour. These limits vary depending on the endpoint used:
| Endpoint | Upload limit |
|---|---|
fromJSON |
|
fromDataset |
|
Define accuracy monitoring notifications
For accuracy, the notification conditions relate to a performance optimization metric for the underlying model in the deployment. Select from the same set of metrics that are available on the Leaderboard. You can visualize accuracy using the Accuracy over Time graph and the Predicted & Actual graph. Accuracy monitoring is defined by a single accuracy rule. Every 30 seconds, the rule evaluates the deployment's accuracy. Notifications trigger when this rule is violated.
Before configuring accuracy notifications and monitoring for a deployment, set an association ID. If not set, DataRobot displays the following message when you try to modify accuracy notification settings:
Note
Only deployment Owners can modify accuracy monitoring settings. They can set no more than one accuracy rule per deployment. Consumers cannot modify monitoring or notification settings. Users can configure the conditions under which notifications are sent to them and see explained status information by hovering over the accuracy status icon:
To set up accuracy monitoring:
-
On the Accuracy Settings page, in the Definition section, configure the settings for monitoring accuracy:
Element Description 1 Metric Defines the metric used to evaluate the accuracy of your deployment. The metrics available from the dropdown menu are the same as those supported by the Accuracy tab. 2 Measurement Defines the unit of measurement for the accuracy metric and its thresholds. You can select value or percent from the dropdown. The value option measures the metric and thresholds by specific values, and the percent option measures by percent changed. The percent option is unavailable for model deployments that don't have training data. 3 "At Risk" / "Failing" thresholds Sets the values or percentages that, when exceeded, trigger notifications. Two thresholds are supported: when the deployment's accuracy is "At Risk" and when it is "Failing." DataRobot provides default values for the thresholds of the first accuracy metric provided (LogLoss for classification and RMSE for regression deployments) based on the deployment's training data. Deployments without training data populate default threshold values based on their prediction data instead. If you change metrics, default values are not provided. Note
Changes to thresholds affect the periods in which predictions are made across the entire history of a deployment. These updated thresholds are reflected in the performance monitoring visualizations on the Accuracy tab.
-
After updating the accuracy monitoring settings, click Save.
Examples of accuracy monitoring settings
Each combination of metric and measurement determines the expression of the rule. For example, if you use the LogLoss metric measured by value, the rule triggers notifications when accuracy "is greater than" the values of 5 or 10:
However, if you change the metric to AUC and the measurement to percent, the rule triggers notifications when accuracy "decreases by" the values set for the threshold:


