Manage groups
Availability information
Required permission: Org Admin
Availability information
Required permission: Can manage users
Create a group
Follow these steps to create a group:
-
Expand the profile icon located in the upper right and click APP ADMIN > Groups. The displayed page lists all existing groups. From here you create, search, delete, and perform actions on one or more groups.
-
Click Create a group.
-
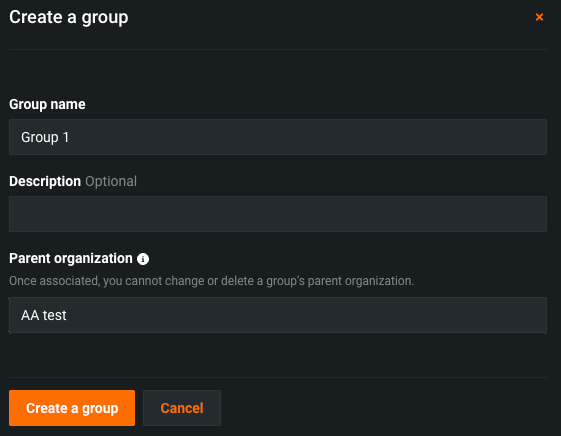
On the resulting page, enter a name and, optionally, description for the group.
-
When the information is complete, click Create a group. The new group appears in the Manage Groups listing, including parent organization (enterprise only), number of members, and group description.
-
Expand the profile icon located in the upper right and click APP ADMIN > Groups. The displayed page lists all existing groups. From here you create, search, delete, and perform actions on one or more groups.
-
Click Create a group.
-
In the resulting modal, enter a name and, optionally, description for the group. If you want to associate this group with an organization, select that organization. This will be the "parent organization" for the group.
Note
If a group is assigned a parent organization, the assignment cannot be removed.
-
When the information is complete, click Create a group. The new group appears in the groups listing, including parent organization (enterprise only), number of members, and group description.
Add users to a group
Once a group is created, you add and remove one or more users from the Groups page. (After you configure a user's profile, you can also add or remove individuals from groups through their profile Membership tab.)
Once a group is created, you add and remove one or more users from the Groups page. (After you configure a user's profile, you can also add or remove individuals from groups through their profile Membership tab.)
In LDAP-authenticated deployments, users can be added to LDAP groups. When a user logs into DataRobot, if there is a DataRobot user group whose name matches the LDAP group they are a part of, that user is automatically added to the DataRobot user group.
Note
If the group has a parent organization, you are restricted to adding only users already associated with that organization.
To add users through Manage Groups:
-
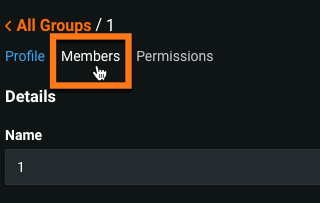
Open the Manage Groups > All Groups page. From the list of configured groups, click to select the group to add the user to.
-
When the profile opens, select Members to see all members in this group.
-
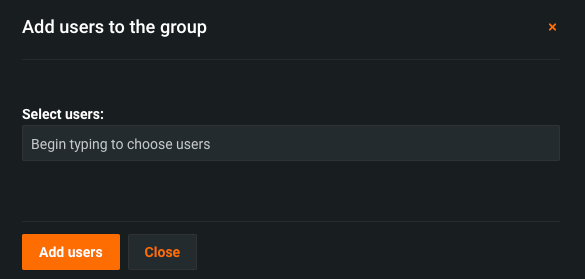
Click Add a user.
-
From the displayed page, type any part of the name of a user to add. As you type, DataRobot shows usernames containing those characters:
-
Select one or more users to add to the group. When done, click Add users.
The Members list for the group updates to show all members and information for each, including first name, last name, organization (if any), and status (active/inactive in DataRobot).
Delete groups
You can delete one or more groups at a time. This removes the group profile only; members of that group continue to have access to DataRobot. Any projects shared with the deleted group are no longer shared with any users for that group. (If needed, re-share projects with individual users.)
-
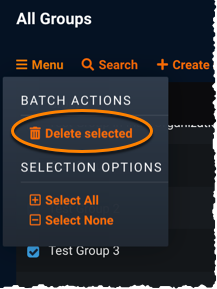
View the Groups page and do one of the following:
- If you want to delete a single group—locate the group, select the Actions menu, and click Delete.
-
If you want to delete multiple groups—select the check boxes for those groups (or select the check box next to the Groups heading), click Menu, and then select Delete selected.
-
In the displayed Confirm Delete window, click Delete group(s). Deleted groups are removed from the list of groups.
Configure group permissions
You can configure permissions and apply them to all users in an existing group in addition to managing each user individually. This allows for easier tracking and management of permissions for larger groups.
Note
Note that a user's effective permissions are the union of those granted to their organization, any user groups they are a member of, and permissions granted to the user directly. A user who is added to a group obtains all permissions of that group. A user who is removed from a group does not maintain any permissions that were granted to them by that group. However, a user may still have the permissions granted by that group if the organization they belong to also grants those permissions.
-
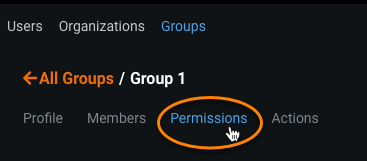
To configure permissions for a group, select it from the Groups page and navigate to the Permissions tab.
-
The Permissions tab displays the premium products, optional products, preview features, and admin settings available for configuration for your group. Select the desired permissions to grant your group from the list.
-
When you have finished selecting the desired permissions for your group, click Save Changes.
Once saved, all existing users in your group and those added to it in the future are granted the configured permissions. A user can view their permissions on the Settings page. Hover over a permission to see what group(s) or organization(s) enabled it.

RBAC for groups
Role-based access (RBAC) controls access to the DataRobot application by assigning users roles with designated privileges. The assigned role controls both what the user sees when using the application and which objects they have access to. RBAC is additive, so a user's permissions will be the sum of all permissions set at the user and group level.
Assign a default role for group members in a group's Group Permissions page:
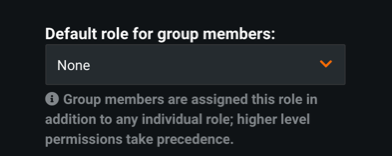
Review the role and access definitions to understand the permissions enabled for each role.
Note
RBAC overrides sharing-based role permissions. For example, consider a group member is assigned the Viewer role via RBAC, which only has Read access to objects. If this group member has a project shared with them that grants Owner permissions (which offers Read and Write access), the Viewer role takes priority and denies the user Write access.
Manage execution environment limits
The execution environment limit allows you to control how many custom model environments a user can add to the Custom Model Workshop. In addition, the execution environment version limit allows you to control how many versions a user can add to each of those environments. These limits can be:
-
Directly applied to the user: Set in a user's permissions. Overrides the limits set in the group and organization permissions.
-
Inherited from a user group: Set in the permissions of the group a user belongs to. Overrides the limits set in organization permissions.
-
Inherited from an organization: Set in the permissions of the organization a user belongs to.
If the environment or environment version limits are defined for an organization or a group, the users within that organization or group inherit the defined limits. However, a more specific definition of those limits at a lower level takes precedence. For example, an organization may have the environment limits set to 5, a group to 4, and the user to 3; in this scenario, the final limit for the individual user is 3.
For more information on adding custom model execution environments, see the Custom model environments documentation.
To manage the execution environment limits in the platform settings:
-
Click your profile avatar (or the default avatar
 ) in the upper-right corner of DataRobot, and then, under APP ADMIN, click Groups.
 -
To configure permissions for a group, select it from the Groups page and then click Permissions.
Important
If you access the Members tab to set these permissions, you are setting the permissions on an individual user level, not the group level.
-
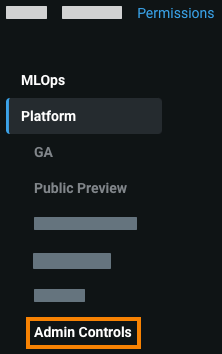
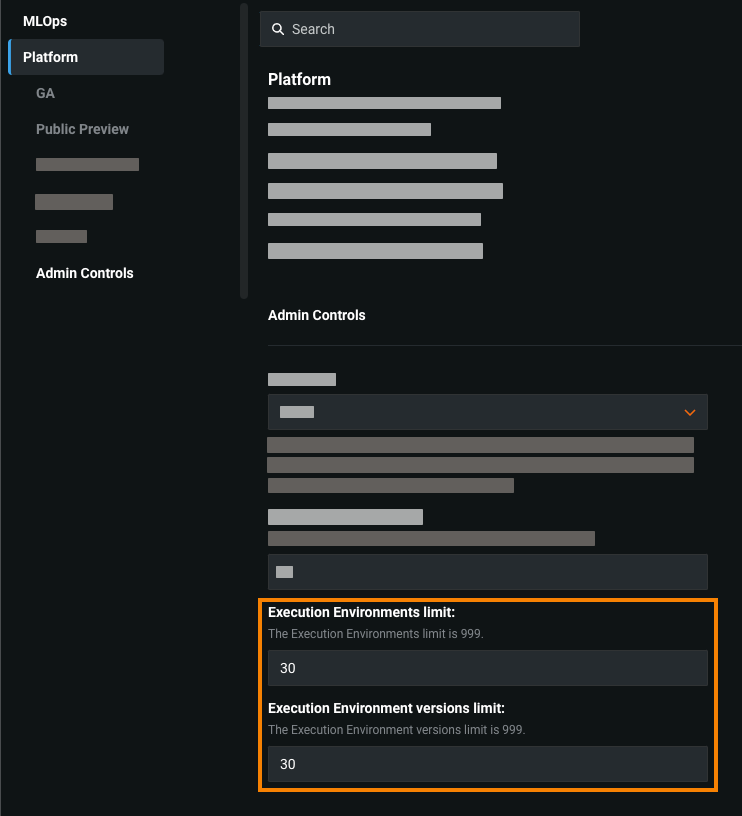
On the Permissions tab, click Platform, and then click Admin Controls.
-
Under Admin Controls, set either or both of the following settings:
-
Execution Environments limit: The maximum number of custom model execution environments users in this group can add. This limit setting can't exceed 999.
-
Execution Environments versions limit: The maximum number of versions users in this group can add to each custom model execution environment. This limit setting can't exceed 999.
-
-
Click Save changes.