Deploy and monitor Spark models with DataRobot MLOps
This page shows how to use DataRobot's Monitoring Agent (MLOps agent) to manage and monitor models from a central dashboard without deploying them within MLOps.
You will explore how to manage and monitor remote models—models that are not running within DataRobot MLOps—deployed on your own infrastructure. Common examples are serverless deployments (AWS Lambda, Azure Functions) or deployments on Spark clusters (Hadoop, Databricks, AWS EMR).

The sections below show how to take a DataRobot model to be deployed on a Databricks cluster and monitor this model with DataRobot MLOps in a central dashboard. This dashboard covers all of your models, regardless of where they were developed or deployed. This approach works for any model that runs within a Spark cluster.
Create a model
In this section, you are creating a model with DataRobot AutoML, then importing it into your Databricks cluster, using the Lending Club dataset.
Note
If you already have a regression model that runs in your Spark cluster, you can skip this step and proceed to Install the MLOps monitoring agent and library.
-
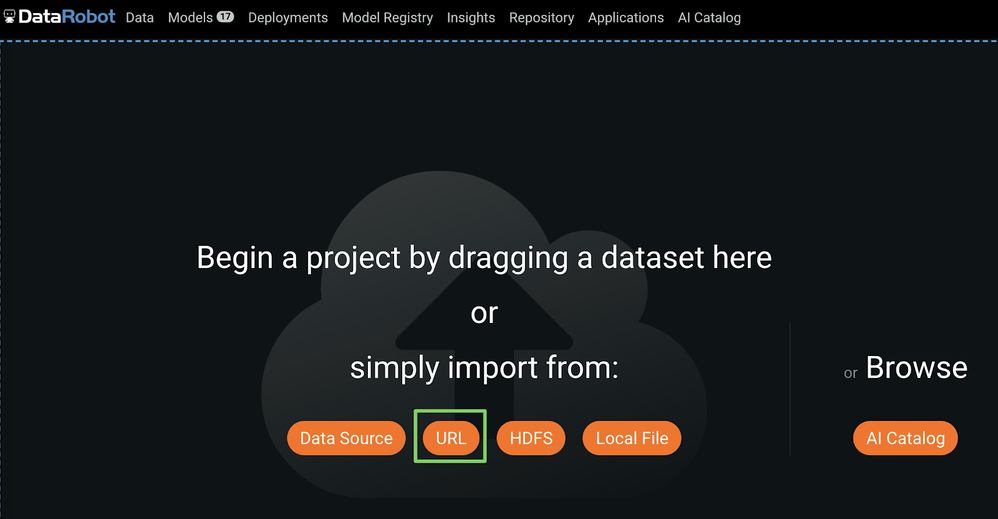
To upload the training data to DataRobot, do either of the following:
-
Click Local File, and then select the LendingClub dataset CSV file from your local filesystem.
-
Click URL to open the Import URL dialog box and copy the LendingClub dataset URL above:
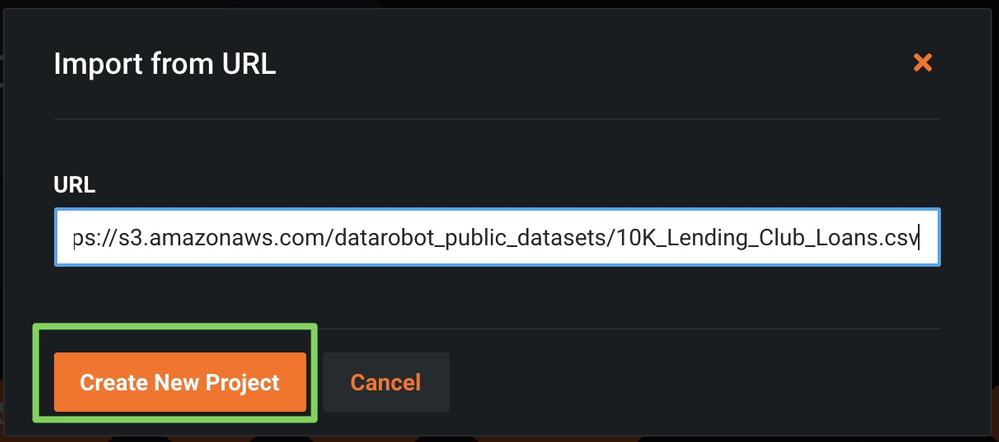
In the Import URL dialog box, paste the LendingClub dataset URL and click Import from URL:
-
-
Enter
loan_amtas your target (1) (what you want to predict) and click Start (2) to run Autopilot.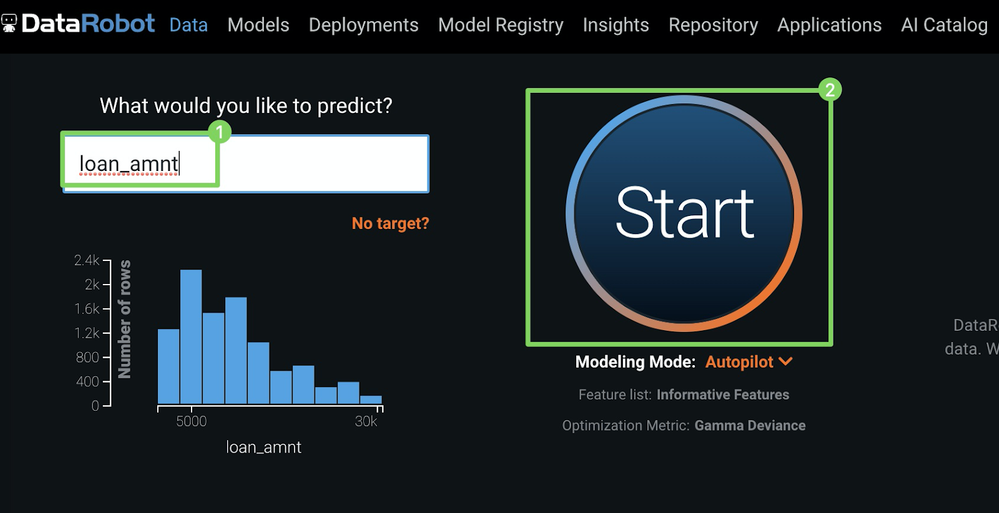
-
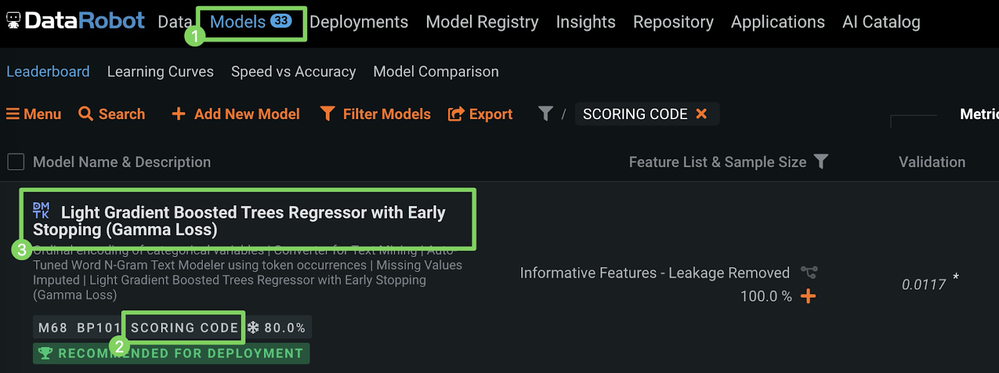
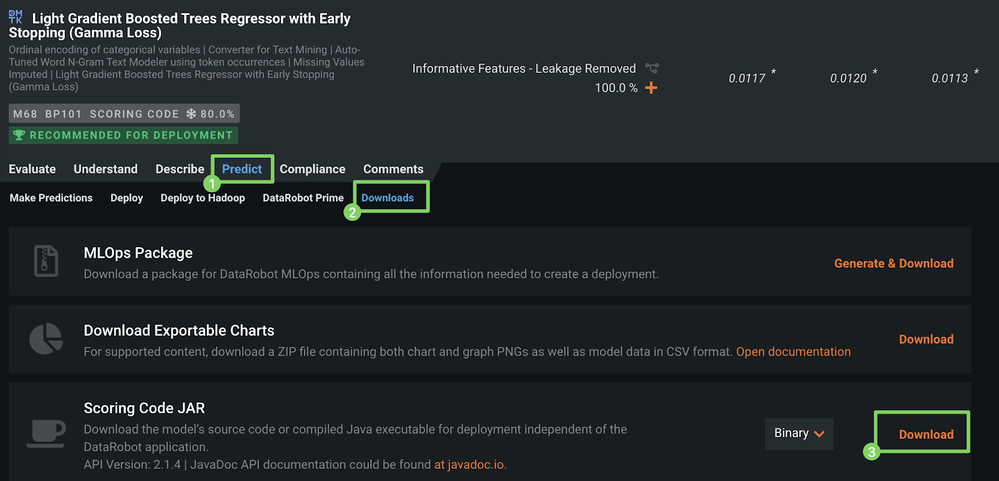
After Autopilot finishes, click Models (1) and select a model with the SCORING CODE label (2) at the top of the Leaderboard (3).
-
Under the model you selected, click Predict (1) and click Downloads (2) to access the Scoring Code JAR download.
Note
The ability to download Scoring Code for a model from the Leaderboard depends on the MLOps configuration for your organization.
-
Click Download (3) to start the JAR file download.
For more information, see the documentation on Scoring Code.
Deploy a model
To install Scoring Code, you can install the previously downloaded JAR file, along with Spark Wrapper, on the Databricks cluster as shown below.
-
Click Clusters to open the cluster settings.
-
Select the cluster to which you'd like to deploy the DataRobot model.
-
Click the Libraries tab.
-
Click Install New.
-
In the Install Library dialog box, with the Library Source set to Upload and the Library Type set to JAR, drag-and-drop the Scoring Code JAR file (e.g.,
5ed68d70455df33366ce0508.jar), -
Click Install.
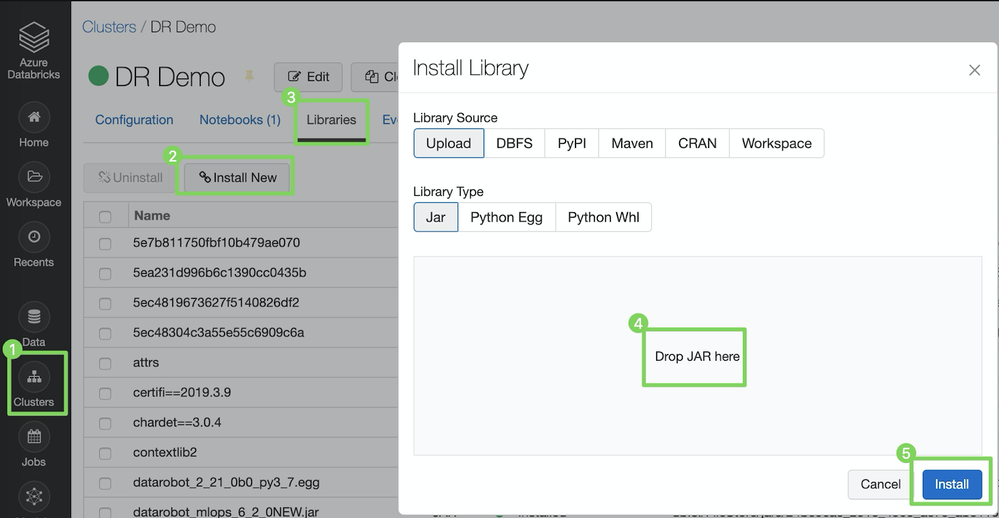
Once the install is complete, repeat the same steps and install Spark Wrapper, which you can download here, or pull the latest version of it directly from Maven.
Install the MLOps monitoring agent and library
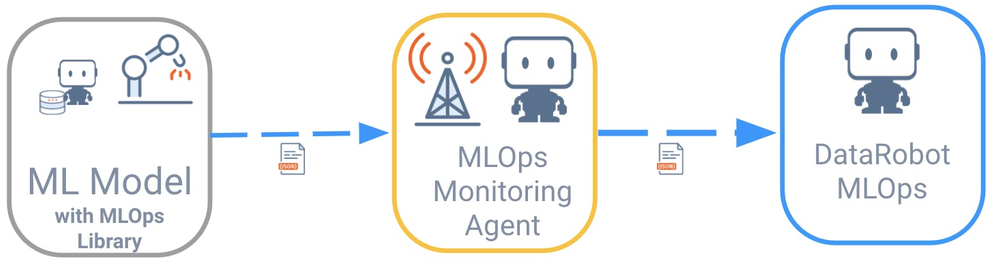
Remote models do not directly communicate with DataRobot MLOps. Instead, the communication is handled via DataRobot MLOps monitoring agents, which support many spooling mechanisms (e.g., flat files, AWS SQS, RabbitMQ). These agents are typically deployed in the external environment where the model is running.
Libraries are available for all common programming languages to simplify communication with the DataRobot MLOps monitoring agent. The model is instructed to talk to the agent with the help of the MLOps library. The agent then collects all metrics from the model and relays them to the MLOps server and dashboards.
In this example, the runtime environment is Spark. Therefore, you will install the MLOps library to your Spark cluster (Databricks) in the same way you installed the model itself previously (in Deploy a Model). You will also install the MLOps monitoring agent in an Azure Kubernetes Service (AKS) cluster alongside RabbitMQ, which is used as your queuing system.
This process assumes that you are familiar with Azure Kubernetes Service and the Azure CLI. For more information, see Microsoft's Quick Start Tutorial.
Create an AKS cluster
-
If you don't have a running AKS cluster, create one, as shown below:
RESOURCE_GROUP=ai_success_eng CLUSTER_NAME=AIEngineeringDemo az aks create \ --resource-group $RESOURCE_GROUP \ --name $CLUSTER_NAME \ -s Standard_B2s \ --node-count 1 \ --generate-ssh-keys \ --service-principal XXXXXX \ --client-secret XXXX \ --enable-cluster-autoscaler \ --min-count 1 \ --max-count 2 -
Start the Kubernetes dashboard:
az aks browse --resource-group $RESOURCE_GROUP --name $CLUSTER_NAME
Install RabbitMQ
There are many ways to deploy applications. The most direct way is via the Kubernetes dashboard.
To install RabbitMQ:
-
Click CREATE > CREATE AN APP (1).
-
On the CREATE AN APP page (2), specify the following:
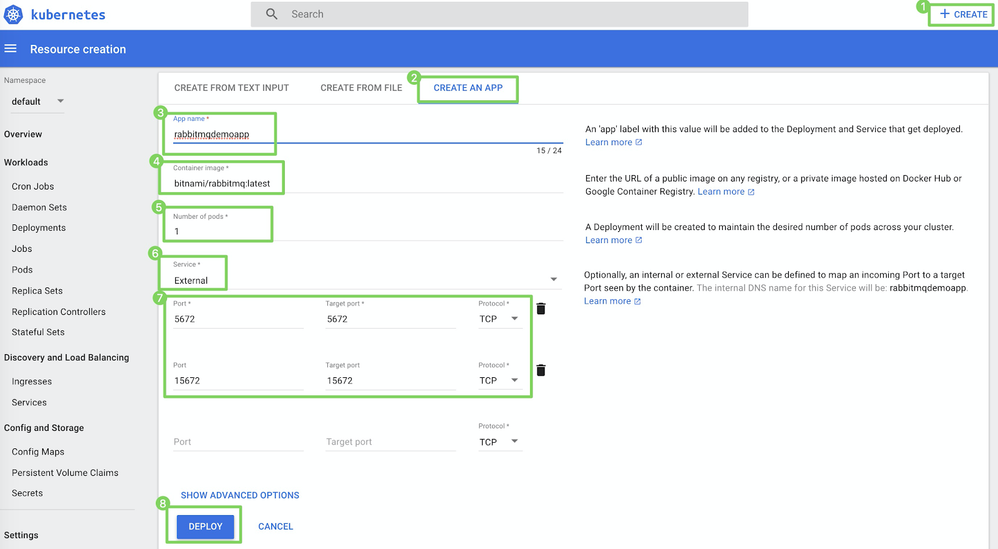
Field Value 3 App name e.g., rabbitmqdemo4 Container image e.g., rabbitmq:latest5 Number of pods e.g., 16 Service External7 Port and Target port 5672and5672
15672and15672 -
Click DEPLOY (8).
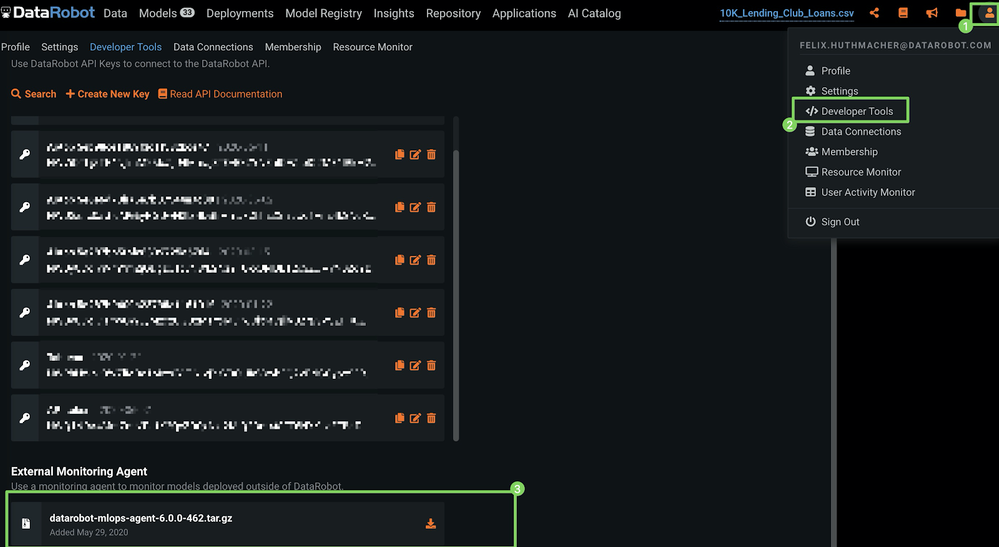
Download the MLOps monitoring agent
To download the MLOps monitoring agent directly from your DataRobot cluster:
-
In the upper-right corner of DataRobot, click your profile icon (or the default avatar
 ).
). -
Click Developer Tools.
-
Under External Monitoring Agent, click the download icon.
Install the MLOps monitoring agent
You can install the agent anywhere; however, for this process, you will install it alongside RabbitMQ.
-
Copy the monitoring agent tarball you downloaded in the previous section to the container where RabbitMQ is running. To do this, run the following command:
Note
You may need to replace the filename of the tarball in the example below.
kubectl cp datarobot-mlops-agent-6.1.0.tar.gz default/rabbitmq-649ccbd8cb-qjb4l:/opt -
Click Pods (1) and click the container Name (2) to connect to the CLI of the container.
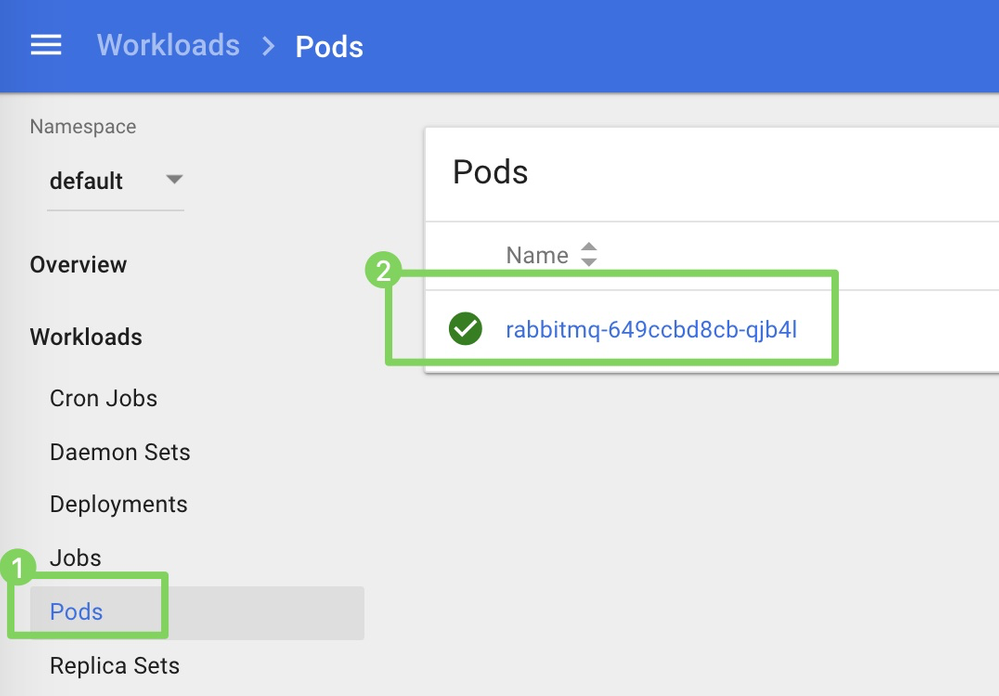
-
Click Exec (3) to start the container.

-
In the container's CLI, begin to configure the agent. Review the tarball name and, if necessary, update the filename in the following commands, and then run them:
cd /opt && tar -xvzf mlops-agent-6.1.0.tar && cd mlops-agent-6.1.0/conf -
In the directory, update the
mlops.agent.conf.yamlconfiguration file to point to your DataRobot MLOps instance and message queue. -
To update the configuration and run the agent, you must install Vim and Java with the following commands:
apt-get update && apt-get install vim && apt-get install default-jdk -
In this example, you are using RabbitMQ and the DataRobot managed AI Platform solution, so you must configure the
mlopsURLandapiToken(1) and thechannelConfigs(2) as shown below.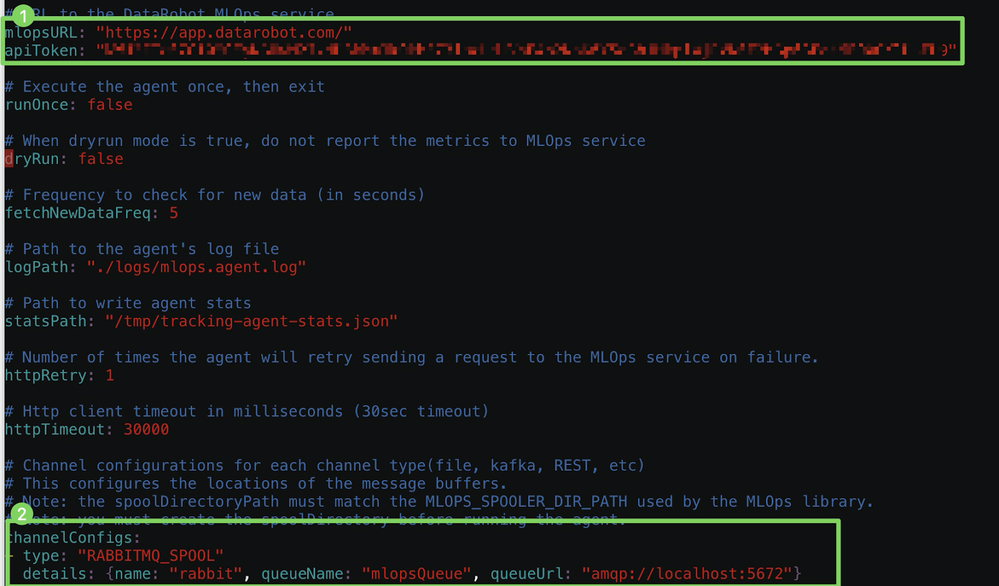
Note
You can obtain your
apiTokenfrom the Developer Tools. -
Before starting the agent, you can enable the RabbitMQ Management UI and create a new user to monitor queues:
### Enable the RabbitMQ UI rabbitmq-plugins enable rabbitmq_management && ### Add a user via the CLI rabbitmqctl add_user <username> <your password> && rabbitmqctl set_user_tags <username> administrator && rabbitmqctl set_permissions -p / <username> ".*" ".*" ".*" -
Now that RabbitMQ is configured and the updated configuration is saved, switch to the
/bindirectory and start the agent:cd ../bin && ./start-agent.sh -
Confirm that the agent is running correctly by checking its status:
./status-agent.sh -
To ensure that everything is running as expected, check the logs located in the
/logsdirectory.
Install the MLOps library in a Spark cluster
First, Download the library from here.
To install the library in a Spark cluster (Databricks):
-
Click Clusters to open the cluster settings.
-
Select the cluster to which you'd like to deploy the DataRobot model.
-
Click the Libraries tab.
-
In the Install Library dialog box, with the Library Source set to Upload and the Library Type set to JAR, drag-and-drop the MLOps JAR file (e.g.,
MLOps.jar). -
Click Install.

Run your Model
Now that all the prerequisites are in place, run your model to make predictions:
// Scala example (see also PySpark example in notebook references at the bottom)

// 1) Use local DataRobot Model for Scoring
import com.datarobot.prediction.spark.Predictors

// referencing model_id, which is the same as the generated filename of the JAR file
val DataRobotModel = com.datarobot.prediction.spark.Predictors.getPredictor("5ed68d70455df33366ce0508")

// 2) read the scoring data
val scoringDF = sql("select * from 10k_lending_club_loans_with_id_csv")

// 3) Score the data and save results to spark dataframe
val output = DataRobotModel.transform(scoringDF)

// 4) Review/consume scoring results
output.show(1,false)
To track the actual scoring time, wrap the scoring command, so the updated code would look like the following:
// to track the actual scoring time

def time[A](f: => A): Double = {
  val s = System.nanoTime
  val ret = f
  val scoreTime = (System.nanoTime-s)/1e6 * 0.001
  println("time: "+ scoreTime+"s")
  return scoreTime
}

// 1) Use local DataRobot Model for Scoring
import com.datarobot.prediction.spark.Predictors

// referencing model_id, which is the same as the generated filename of the JAR file
val DataRobotModel = com.datarobot.prediction.spark.Predictors.getPredictor("5ed708a8fca6a1433abddbcb")

// 2) read the scoring data
val scoringDF = sql("select * from 10k_lending_club_loans_with_id_csv")

val scoreTime = time {

  // Score the data and save results to spark dataframe
  val scoring_output = DataRobotModel.transform(scoringDF)
  scoring_output.show(1,false)
  scoring_output.createOrReplaceTempView("scoring_output")
}
Report usage to MLOps via monitoring agents
After using the model to predict the loan amount of an application, you can report the telemetrics around these predictions to your DataRobot MLOps server and dashboards. To do this, see the commands in the following sections.
Create an external deployment
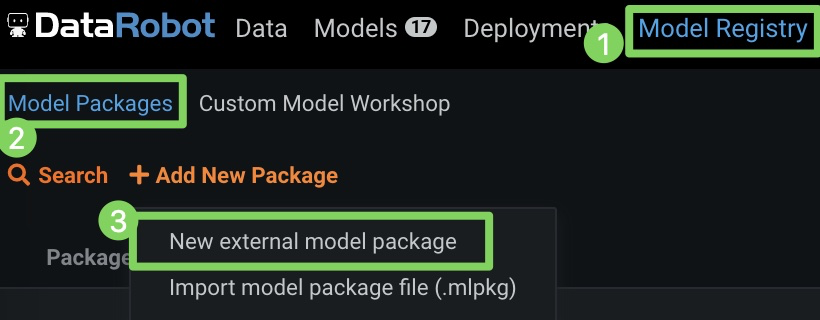
Before you can report scoring details, you must create an external deployment within DataRobot MLOps. This only has to be done once and can be done via the UI in DataRobot MLOps:
-
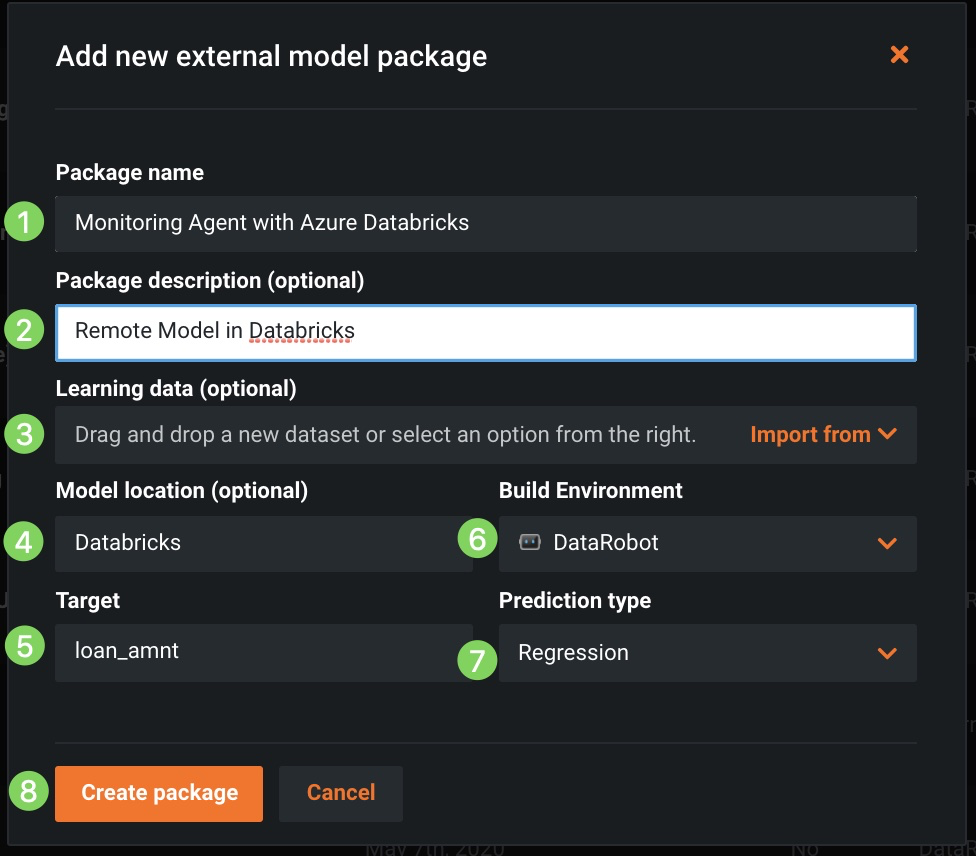
Click Model Registry (1), click Model Packages (2), and then click New external model package (3).
-
Specify a package name and description (1 and 2), upload the corresponding training data for drift tracking (3), and identify the model location (4), target (5), environment (6), and prediction type (7), then click Create package (8).
-
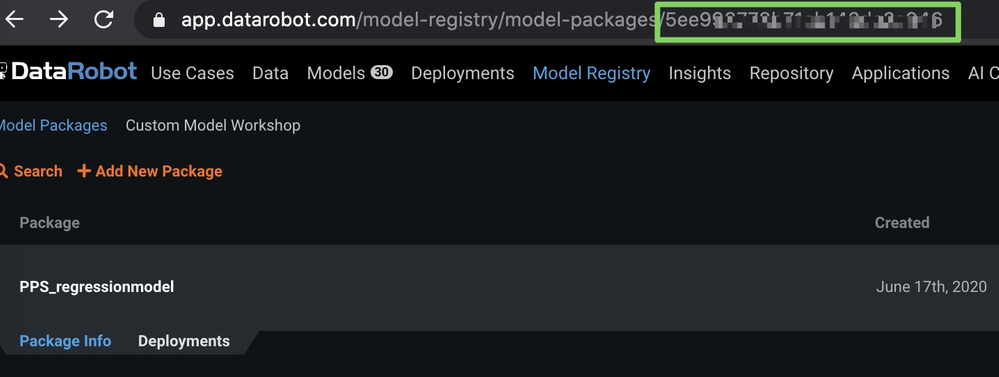
After creating the external model package, note the model ID in the URL, as shown below (blurred in the image for security purposes).
-
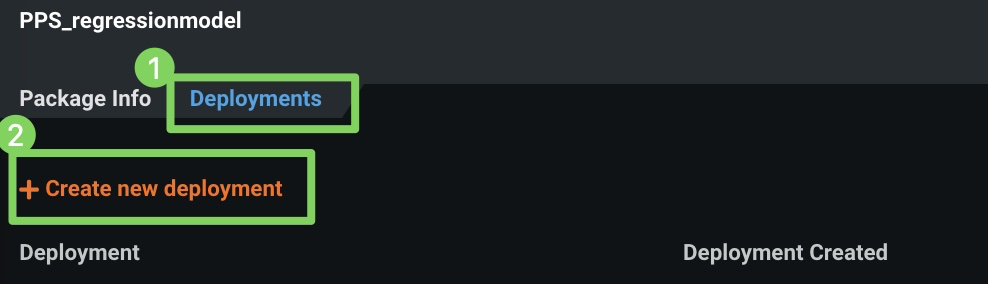
Click Deployments (1) and click Create new deployment (2).
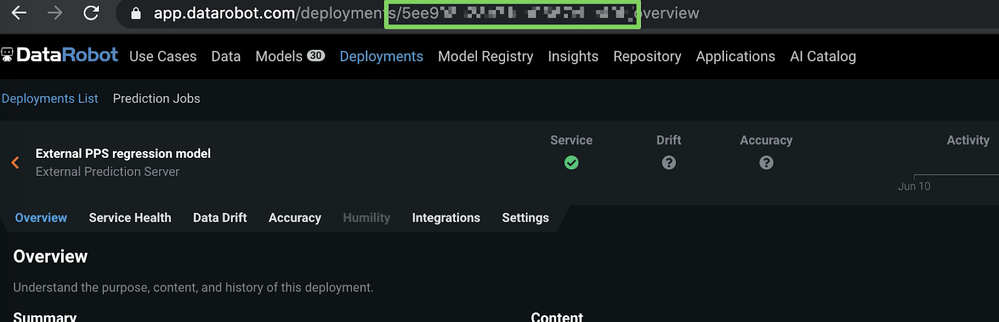
Once the deployment is created, the Deployments > Overview page is shown.
-
On the Overview page, copy the deployment ID (from the URL).
Now that you have your model ID and deployment ID, you can report the predictions in the next section.
Report prediction details
To report prediction details to DataRobot, run the following code in your Spark environment. Make sure you update the input parameters.
import com.datarobot.mlops.spark.MLOpsSparkUtils
val channelConfig = "OUTPUT_TYPE=RABBITMQ;RABBITMQ_URL=amqp://<<RABBIT HOSTNAME>>:5672;RABBITMQ_QUEUE_NAME=mlopsQueue"

MLOpsSparkUtils.reportPredictions(

                scoringDF, // spark dataframe with actual scoring data
                "5ec3313XXXXXXXXX", // external DeploymentId
                "5ec3313XXXXXXXXX", // external ModelId
                channelConfig, // rabbitMQ config
                scoringTime, // actual scoring time
                Array("PREDICTION"), //target column
                "id" // AssociationId
                )
Report actuals
When you get actual values, you can report them to track accuracy over time.
Report actuals using the function below:
import com.datarobot.mlops.spark.MLOpsSparkUtils

val actualsDF = spark.sql("select id as associationId, loan_amnt as actualValue, null as timestamp from actuals")

MLOpsSparkUtils.reportActuals(
      actualsDF,
      deploymentId,
      ModelId,
      channelConfig
    )
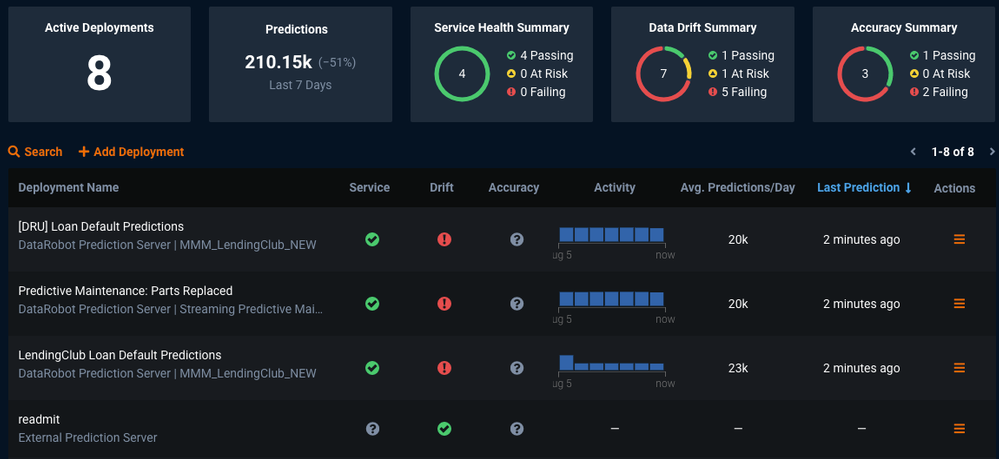
Even though you deployed a model outside of DataRobot on a Spark cluster (Databricks), you can monitor it like any other model to track service health, data drift, and actuals in one central dashboard.
For complete sample notebooks with code snippets for Scala and PySpark, go to the DataRobot Community GitHub.