Snowflake external functions and streams
With Snowflake, you can call out to external APIs from user-defined functions (UDFs). Using a Snowflake scoring pipeline allows you to take advantage of these external API functions—leveraging Snowflake streams and tasks to create a streaming micro-batch ingestion flow that incorporates a DataRobot-hosted model.
There are several requirements and considerations when exploring this approach:
- Any API must be fronted by the trusted cloud native API service (in the case of AWS, the AWS API Gateway).
- There are scaling, concurrency, and reliability considerations.
- Max payload size for synchronous requests is 10MB for the API gateway and 6MB for Lambda (other cloud providers have different limitations).
When deciding how to score your models, consider these questions. How does the total infrastructure react when scoring 10 rows vs. 10,000 rows vs. 10 million rows? What kind of load is sent when a small 2-node cluster is vertically scaled to a large 8-node cluster or when it is scaled horizontally to 2 or 3 instances? What happens if a request times out or a resource is unavailable?
Alternatives for executing large batch scoring jobs on Snowflake simply and efficiently are described in the client-request and server-side) scoring examples. Generally speaking, this type of scoring is best done as part of ETL or ELT pipelines. Low-volume streaming ingest using internal Snowflake streaming is a suitable application for leveraging external functions with a UDF.
The following demonstrates an ETL pipeline using Snowpipe, Streams, and Tasks within Snowflake. The example scores records through a DataRobot-hosted model using Kaggle's Titanic dataset. It ingests data via a streaming pipeline with objects in an STG schema, scores it against the model, and then loads it to the PUBLIC schema presentation layer.
Technologies used
The examples uses the following technologies:
Snowflake:
- Storage Integration
- Stage
- Snowpipe
- Streams
- Tasks, Tables, and External Function UDF objects (to assemble a streaming scoring pipeline for data as it is ingested)
AWS:
- Lambda, as a serverless compute service that acts as the intermediary between Snowflake and DataRobot (which is currently a requirement for using an external function).
- API Gateway, to provide an endpoint to front the Lambda function.
- IAM policies to grant roles and privileges to necessary components.
- Incoming data, which is placed in an S3 object store bucket.
- An SQS queue.
DataRobot:
- The model was built and deployed on the AutoML platform and is available for scoring requests via the DataRobot Prediction API. In this case, the model is served on horizontally scalable DataRobot cluster member hardware, dedicated solely to serving these requests.
External UDF architecture
The following illustrates the Snowflake external API UDF architecture:
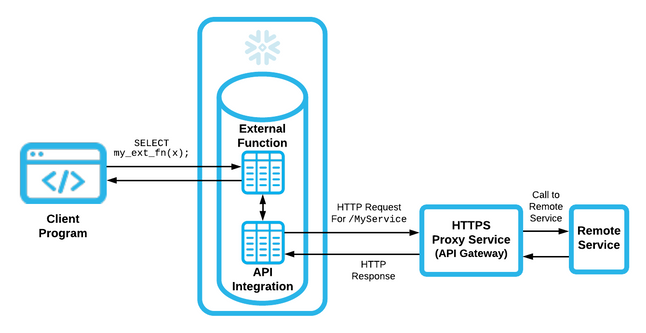
Although a native UDF in Snowflake is written in JavaScript, the external function is executed remotely and can be coded in any language the remote infrastructure supports. It is then coupled with an API integration in Snowflake to expose it as an external UDF. This integration sends the payload to be operated on to an API proxy service (an AWS API Gateway in this case). The Gateway then satisfies this request through the remote service behind it—a microservice backed by a container or by a Lambda piece of code.
Create the remote service (AWS Lambda)
Hosting DataRobot models inside AWS Lambda takes advantage of AWS scalability features. For examples, see:
- [Using DataRobot Prime with AWS Lambda] (prime-lambda)
- [Using Scoring Code with AWS Lambda] (sc-lambda)
- [Exporting a model outside of DataRobot as a Docker container] (aks-deploy-and-monitor)
This section provides an example of treating the gateway as a proxy for a complete passthrough and sending the scoring request to a DataRobot-hosted prediction engine. Note that in this approach, scalability also includes horizontally scaling prediction engines on the DataRobot cluster.
See the articles mentioned above for additional Lambda-creation workflows to gain familiarity with the environment and process. Create a Lambda named proxy_titanic with a Python 3.7 runtime environment. Leverage an existing IAM role or create a new one with default execution permissions.

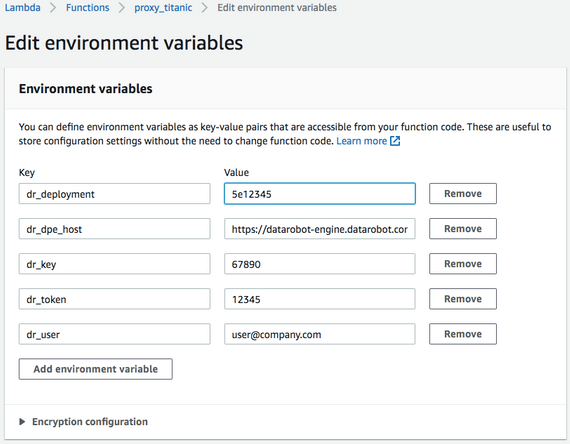
Connecting to the DataRobot cluster requires some sensitive information:
- The load balancing hostname in front of the DataRobot Prediction Engine (DPE) cluster.
- The user's API token.
- The deployment for the model to be scored.
- The DataRobot key (managed AI Platform users only).
These values can be stored in the Lambda Environment variables section.
Lambda layers let you build Lambda code on top of libraries and separate that code from the delivery package. You don't have to separate the libraries, although using layers simplifies the process of bringing in necessary packages and maintaining code. This example requires the requests and pandas libraries, which are not part of the base Amazon Linux image, and must be added via a layer (by creating a virtual environment). In this example, the environment used is an Amazon Linux EC2 box. Instructions to install Python 3 on Amazon Linux are here.
Create a ZIP file for a layer as follows:
python3 -m venv my_app/env
source ~/my_app/env/bin/activate
pip install requests
pip install pandas
deactivate
Per the Amazon documentation, this must be placed in the python or site-packages directory and is expanded under /opt.
cd ~/my_app/env
mkdir -p python/lib/python3.7/site-packages
cp -r lib/python3.7/site-packages/* python/lib/python3.7/site-packages/.
zip -r9 ~/layer.zip python
Copy the layer.zip file to a location on S3; this is required if the Lambda layer is > 10MB.
aws s3 cp layer.zip s3://datarobot-bucket/layers/layer.zip
Navigate to the Lambda service > Layers > Create Layer tab. Provide a name and link to the file in S3; note that this will be the Object URL of the uploaded ZIP. It is recommended, but not necessary, to set compatible environments, which makes them more easily accessible in a dropdown menu when adding them to a Lambda. Select to save the layer and its Amazon Resource Name (ARN).

Navigate back to the Lambda and click Layers under the Lambda title; add a layer and provide the ARN from the previous step.
Navigate back to the Lambda code. The following Python code will:
- Accept a payload from Snowflake.
- Pass the payload to DataRobot's Prediction API for scoring.
- Return a Snowflake-compatible response.
import os
import json
#from pandas.io.json import json_normalize
import requests
import pandas as pd
import csv

def lambda_handler(event, context):

    # set default status to OK, no DR API error
    status_code = 200
    dr_error = ""

    # The return value will contain an array of arrays (one inner array per input row).
    array_of_rows_to_return = [ ]

    try:
        # obtain secure environment variables to reach out to DataRobot API
        DR_DPE_HOST = os.environ['dr_dpe_host']
        DR_USER = os.environ['dr_user']
        DR_TOKEN = os.environ['dr_token']
        DR_DEPLOYMENT = os.environ['dr_deployment']
        DR_KEY = os.environ['dr_key']

        # retrieve body containing input rows
        event_body = event["body"]

        # retrieve payload from body
        payload = json.loads(event_body)

        # retrieve row data from payload
        payload_data = payload["data"]

        # map list of lists to expected inputs
        cols = ['row', 'NAME', 'SEX', 'PCLASS', 'FARE', 'CABIN', 'SIBSP', 'EMBARKED', 'PARCH', 'AGE']
        df = pd.DataFrame(payload_data, columns=cols)

        print("record count is: " + str(len(df.index)))

        # assemble and send scoring request
        headers = {'Content-Type': 'text/csv; charset=UTF-8', 'Accept': 'text/csv', 'datarobot-key': DR_KEY}
        response = requests.post(DR_DPE_HOST + '/predApi/v1.0/deployments/%s/predictions' % (DR_DEPLOYMENT),
            auth=(DR_USER, DR_TOKEN), data=df.to_csv(), headers=headers)

        # bail if anything other than a successful response occurred
        if response.status_code != 200:
            dr_error = str(response.status_code) + " - " + str(response.content)
            print("dr_error: " + dr_error)
            raise

        array_of_rows_to_return = []

        row = 0
        wrapper = csv.reader(response.text.strip().split('\n'))
        header = next(wrapper)
        idx = header.index('SURVIVED_1_PREDICTION')
        for record in wrapper:
            array_of_rows_to_return.append([row, record[idx]])
            row += 1

        # send data back in required snowflake format
        json_compatible_string_to_return = json.dumps({"data" : array_of_rows_to_return})

    except Exception as err:
        # 400 implies some type of error.
        status_code = 400
        # Tell caller what this function could not handle.
        json_compatible_string_to_return = 'failed'

        # if the API call failed, update the error message with what happened
        if len(dr_error) > 0:
            print("error")
            json_compatible_string_to_return = 'failed; DataRobot API call request error: ' + dr_error

    # Return the return value and HTTP status code.
    return {
        'statusCode': status_code,
        'body': json_compatible_string_to_return
    }
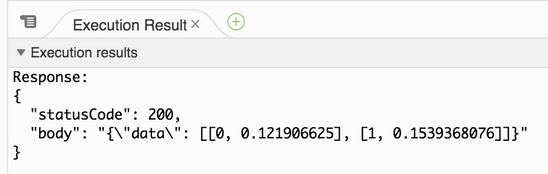
Lambda code for this example is available in GitHub. You can configure a test event to make sure the Lambda acts as expected. A DataRobot payload can be represented for this model with a few JSON records in the following format:
  {
  "body": "{\"data\": [[0, \"test one\", \"male\", 3, 7.8292, null, 0, \"Q\", 0, 34.5 ], [1, \"test two\", \"female\",
3, 7, null, 1, \"S\", 0, 47 ] ] }"
  }
Once this event is created, select it from the test dropdown and click Test. The test returns a 200-level success response with a JSON-encapsulated list of lists, containing the 0-based row number and the returned model value. In this case, that model value is a score towards the positive class of label 1 (e.g., Titanic passenger survivability from a binary classifier model).
You can set additional Lambda configuration under Basic Settings. Lambda serverless costs are based on RAM "used seconds" duration. The more RAM allowed, the more virtual CPU is allocated. This allows handling and manipulating larger-sized input loads and for processing inside the Lambda to occur more quickly. Note that this Lambda defers to DataRobot for the heavier work; it just needs to accommodate for the data movement. If a Lambda exits prematurely due to exceeding resources, these values may need to be edited. The timeout default is 3 seconds; if the response from DataRobot for the micro-batch of records the Lambda is responsible for takes longer to process than the default value, the Lambda does not detect activity and shuts down. DataRobot tested and recommends the following values: 256 MB and a 10-second timeout. Actual usage for each executed Lambda can be found in the associated CloudWatch logs, available under the Monitoring tab of the Lambda.
Configure the proxy service
The following creates the AWS API Gateway proxy service.
Create IAM role
For a Snowflake-owned IAM user to be granted permission, you must create a role that the user can then assume within the AWS account. In the console, navigate to IAM > Roles > Create role. When asked to Select type of trusted entity, choose Another AWS account and fill in the Account ID box with the AWS Account ID for the currently logged-in account. This can be found in the ARN of other roles, from the My Account menu or from various other places. A Snowflake external ID for the account is applied later.
Proceed through the next screens and save this role as snowflake_external_function_role. Save the role as Amazon Resource Name (ARN).
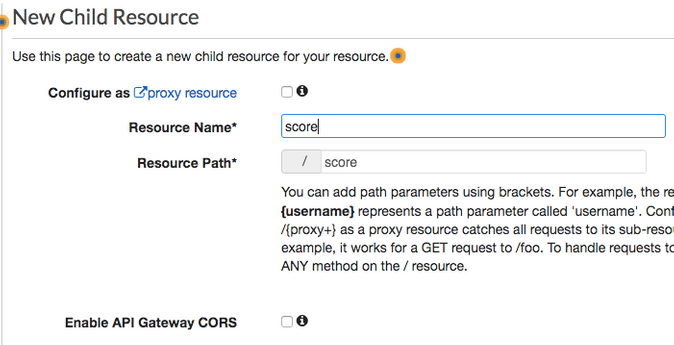
Create API Gateway entry
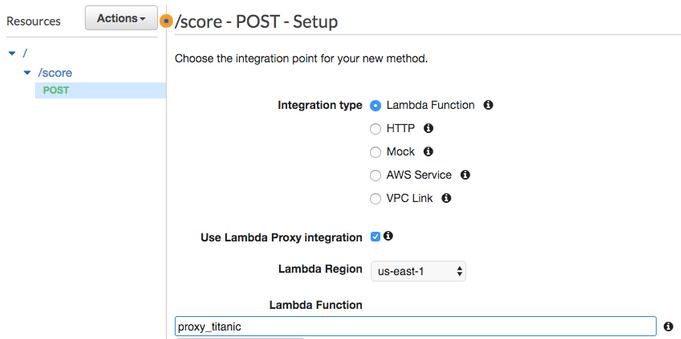
Navigate to the API Gateway service console and click Create API. Choose to build a REST API and select the REST protocol. Select to Create a New API. Create a friendly, readable name and click Create API. On the next screen, choose Actions > Create Resource. Set the resource name and path to score.
Next, choose Actions> Create Method. In the dropdown menu under the endpoint, choose POST. Select the checkbox next to Use Lambda Proxy Integration, select the previously created Lambda, and save.
Lastly, choose Actions > Deploy API. You must create a stage, such as test, and then click Deploy once you complete the form.
Note
The Invoke URL field on the subsequent editor page will later be used in creating an integration with Snowflake.
Secure the API Gateway endpoint
Navigate back to the Resources of the created API (in the left menu above Stages). Click on POST under the endpoint to bring up the Method Execution. Click the Method Request, toggle the Authorization dropdown to AWS_IAM, and then click the checkmark to save. Navigate back to the Method Execution and note the ARN within the Method Request.
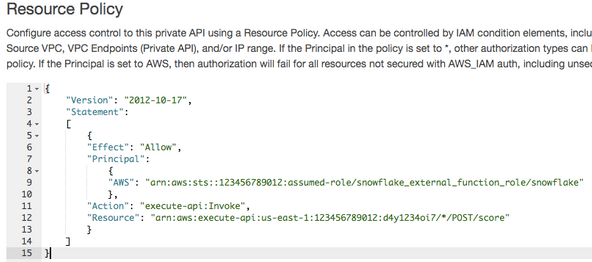
Navigate to Resource Policy in the left menu. Add a policy that is populated with the AWS account number and the name of the previously created IAM role above (described in the Snowflake documentation).
Create an API Integration object in Snowflake
The API Integration object will map Snowflake to the AWS Account role. Provide the role ARN and set the allowed prefixes to include the Invoke URL from the stage referenced above (a privilege level of accountadmin is required to create an API Integration).
use role accountadmin;

create or replace api integration titanic_external_api_integration
    api_provider=aws_api_gateway
    api_aws_role_arn='arn:aws:iam::123456789012:role/snowflake_external_function_role'
    api_allowed_prefixes=('https://76abcdefg.execute-api.us-east-1.amazonaws.com/test/')
    enabled=true;
Describe the integration:
describe integration titanic_external_api_integration;
Copy out the values for:
API_AWS_IAM_USER_ARN and API_AWS_EXTERNAL_ID
Configure the Snowflake-to-IAM role trust relationship
Navigate back to the AWS IAM service > Roles , and to the snowflake_external_function_role role.
At the bottom of the Summary page, choose the Trust relationships tab and click the Edit trust relationship button. This opens a policy document to edit. As per the Snowflake documentation, edit the Principal attribute AWS key by replacing the existing value with the API_AWS_IAM_USER_ARN from Snowflake. Next to the sts:AssumeRole action, there will be a Condition key with an empty value between curly braces. Inside the braces, paste the following, replacing the API_AWS_EXTERNAL_ID with the value from Snowflake:
"StringEquals": { "sts:ExternalId": "API_AWS_EXTERNAL_ID" }
Create the external function
You can now create the external function inside Snowflake. It will reference the trusted endpoint to invoke via the previously built API integration. Be sure to match the expected parameter value in the function definition to the function the Lambda is expecting.
create or replace external function
udf_titanic_score(name string, sex string, pclass int, fare numeric(10,5),
   cabin string, sibsp int, embarked string, parch int, age numeric(5,2))
   returns variant
   api_integration = titanic_external_api_integration
   as 'https://76abcdefg.execute-api.us-east-1.amazonaws.com/test/score';
The function is now ready for use.
Call the external function
You can call the function as expected. This code scores 100,000 Titanic passenger records:
select passengerid
, udf_titanic_score(name, sex, pclass, fare, cabin, sibsp, embarked, parch, age) as score
from passengers_100k;
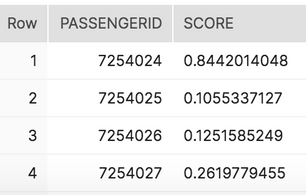
In the above prediction, Passenger 7254024 has an 84.4% chance of Titanic survivability.
External function performance considerations
Some observations:
- Full received payloads in this case contained ~1860 records. Payloads were roughly 0.029 MB in size (perhaps Snowflake is limiting them to 0.03 MB).
- Whether scoring from an extra small-, small-, or medium-sized compute warehouse on Snowflake, the Lambda concurrency CloudWatch metrics dashboard always showed a concurrent execution peak of 8. Overall, this represents a rather gentle load on scoring infrastructure.
- Performance should be satisfactory whether the model is run in the Lambda itself or offset to a DataRobot Prediction Engine. Note that for larger batch jobs and maximum throughput, other methods are still more efficient with time and resources.
- Testing against an r4.xlarge Dedicated Prediction Engine on DataRobot produced a rate of roughly 13,800 records for this particular dataset and model.
- Snowflake determines payload size and concurrency based on a number of factors. A controllable payload ceiling can be specified with a
MAX_BATCH_ROWSvalue during external function creation. Future options may allow greater control over payload size, concurrency, and scaling with warehouse upsizing.
Streaming ingest with streams and tasks
There are multiple options to bring data into Snowflake using streaming. One option is to use Snowflake's native periodic data-loading capabilities with Snowpipe. By using Snowflake streams and tasks, you can handle new records upon arrival without an external driving ETL/ELT.
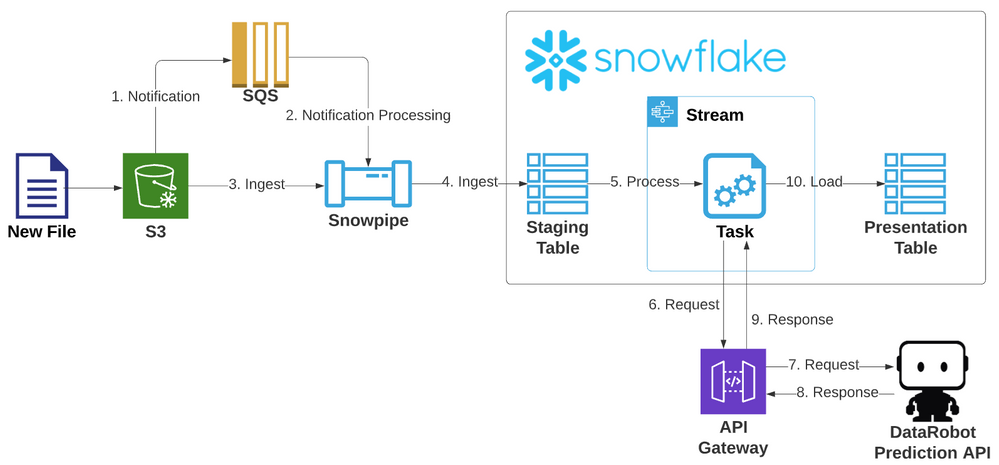
Ingest pipeline architecture
The following illustrates this ingest architecture:
Create staging and presentation tables
You must create tables to hold the newly arrived records loaded from Snowpipe and to hold the processed and scored records for reporting. In this example, a raw passengers table is created in an STG schema and a scored passengers table is presented in the PUBLIC schema.
create or replace TABLE TITANIC.STG.PASSENGERS (
    PASSENGERID int,
    PCLASS int,
    NAME VARCHAR(100),
    SEX VARCHAR(10),
    AGE NUMBER(5,2),
    SIBSP int,
    PARCH int,
    TICKET VARCHAR(30),
    FARE NUMBER(10,5),
    CABIN VARCHAR(25),
    EMBARKED VARCHAR(5)
);

create or replace TABLE TITANIC.PUBLIC.PASSENGERS_SCORED (
    PASSENGERID int,
    PCLASS int,
    NAME VARCHAR(100),
    SEX VARCHAR(10),
    AGE NUMBER(5,2),
    SIBSP int,
    PARCH int,
    TICKET VARCHAR(30),
    FARE NUMBER(10,5),
    CABIN VARCHAR(25),
    EMBARKED VARCHAR(5),
    SURVIVAL_SCORE NUMBER(11,10)
);
Create the Snowpipe
Snowflake needs to be connected to an external stage object. Use the Snowflake documentation to set up a storage integration with AWS and IAM.
use role accountadmin;

--note a replace will break all existing associated stage objects!
create or replace storage integration SNOWPIPE_INTEGRATION
type = EXTERNAL_STAGE
STORAGE_PROVIDER = S3
STORAGE_AWS_ROLE_ARN = 'arn:aws:iam::123456789:role/snowflake_lc_role'
enabled = true
STORAGE_ALLOWED_LOCATIONS = ('s3://bucket');
Once the integration is available, you can use it to create a stage that maps to S3 and uses the integration to apply security.
CREATE or replace STAGE titanic.stg.snowpipe_passengers
URL = 's3://bucket/snowpipe/input/passengers'
storage_integration = SNOWPIPE_INTEGRATION;
Lastly, create the Snowpipe to map this stage to a table. A file format is created for it below as well.
CREATE OR REPLACE FILE FORMAT TITANIC.STG.DEFAULT_CSV TYPE = 'CSV' COMPRESSION = 'AUTO' FIELD_DELIMITER = ','
RECORD_DELIMITER = '\n' SKIP_HEADER = 1 FIELD_OPTIONALLY_ENCLOSED_BY = '\042' TRIM_SPACE = FALSE
ERROR_ON_COLUMN_COUNT_MISMATCH = TRUE ESCAPE = 'NONE' ESCAPE_UNENCLOSED_FIELD = '\134' DATE_FORMAT = 'AUTO'
TIMESTAMP_FORMAT = 'AUTO' NULL_IF = ('');

create or replace pipe titanic.stg.snowpipe auto_ingest=true as
copy into titanic.stg.passengers
from @titanic.stg.snowpipe_passengers
file_format = TITANIC.STG.DEFAULT_CSV;
Automate the Snowpipe loading
Snowflake provides options for loading new data as it arrives. This example applies option 1 (described in the Snowflake documentation) to use a Snowflake SQS queue directly. Note that step 4 to create new file event notifications is required.
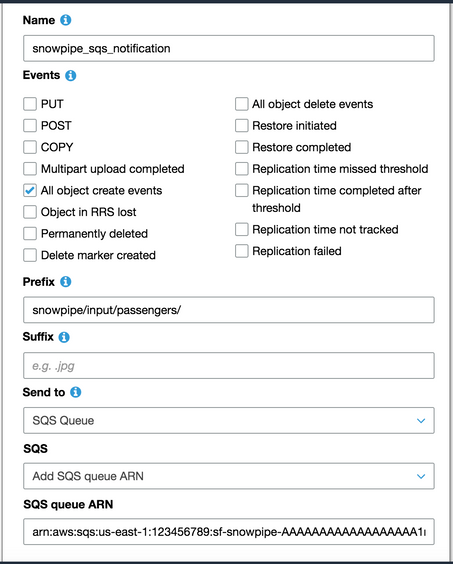
To enable Snowpipe, navigate to the S3 bucket, click the Properties tab > Events tile, and then click Add notification. Create a notification to add a message to the specified SQS queue retrieved from the Snowflake pipe for every new file arrival.
The pipe is now ready to accept and load data.
Create the stream
You can create two types of stream objects in Snowflake—standard and append-only. Standard stream objects capture any type of change to a table; append-only stream objects capture inserted rows. Use the former for general Change Data Capture (CDC) processing. Use the latter (used in this example) for simple new row ingest processing.
In the append-only approach, think of the stream as a table that contains only records that are new since the last time any data was selected from it. Once a DML query that sources a stream is made, the rows returned are considered consumed and the stream becomes empty. In programming terms, this is similar to a queue.
create or replace stream TITANIC.STG.new_passengers_stream
on table TITANIC.STG.PASSENGERS append_only=true;
Create the task
A task is a step or series of cascading steps that can be constructed to perform an ELT operation. Tasks can be scheduled—similar to cron jobs— and set to run by days, times, or periodic intervals.
The following basic task scores the Titanic passengers through the UDF and loads the scored data to the presentation layer. It checks to see if new records exist in the stream every 5 minutes; if records are found, the task runs. The task is created in a suspended state; enable the task by resuming it. Note that many timing options are available for scheduling based on days, times, or periods.
CREATE or replace TASK TITANIC.STG.score_passengers_task
    WAREHOUSE = COMPUTE_WH
    SCHEDULE = '5 minute'
WHEN
    SYSTEM$STREAM_HAS_DATA('TITANIC.STG.NEW_PASSENGERS_STREAM')
AS
    INSERT INTO TITANIC.PUBLIC.PASSENGERS_SCORED
    select passengerid, pclass, name, sex, age, sibsp, parch, ticket, fare, cabin, embarked,
    udf_titanic_score(name, sex, pclass, fare, cabin, sibsp, embarked, parch, age) as score
    from TITANIC.STG.new_passengers_stream;

ALTER TASK score_passengers_task RESUME;
Ingest and scoring pipeline complete
The end-to-end pipeline is now complete. A PASSENGERS.csv file (available in GitHub) can run the pipeline, copying it into the watched bucket. The file prefix results in the data being ingested into a staging schema, scored through a DataRobot model, and then loaded into the presentation schema—all without any external ETL tooling.
aws s3 cp PASSENGERS.csv s3://bucket/snowpipe/input/passengers/PASSENGERS.csv