Deploy the MLOps agent on GKE
The following steps describe how to deploy the MLOps agent on Google Kubernetes Engine (GKE) with Pub/Sub as a spooler. This allows you to monitor a custom Python model developed outside DataRobot. The custom model will be scored at the local machine and will send the statistics to Google Cloud Platform (GCP) Pub/Sub. Finally, the agent (deployed on GKE) will consume this data and send it back to the DataRobot MLOps dashboard.
Overview
DataRobot MLOps offers the ability to monitor all your ML models (trained in DataRobot or outside) in a centralized dashboard with the DataRobot MLOps agent. The agent, a Java utility running in parallel with the deployed model, can monitor models developed in Java, Python, and R programming languages.
The MLOps agent communicates with the model via a spooler (i.e., file system, GCP Pub/Sub, AWS SQS, or RabbitMQ) and sends model statistics back to the MLOps dashboard. These can include the number of scored records, number of features, scoring time, data drift, and more. You can embed the agent can into a Docker image and deploy it on a Kubernetes cluster for scalability and robustness.
Prerequisites
You must complete the following steps before creating the main configuration.
-
Install the Google Cloud SDK specific to your operating system.
-
Run the following at a command prompt:
gcloud initYou will be asked to choose an existing project or create a new one, as well as to select the compute zone.
-
Install the Kubernetes command-line tool:
gcloud components install kubectl -
Retrieve your Google Cloud service account credentials to call Google Cloud APIs. If you don’t have a default service account, you can create it by following this procedure.
-
Once credentials are in place, download the JSON file that contains them. Later, when it is time to pass your credentials to the application that will call Google Cloud APIs, you can use one of these methods:
- Via the GOOGLE_APPLICATION_CREDENTIALS environment variable.
- With code.
Procedure
The following sections, each a step in the process, describe the procedure for deploying the MLOps agent on GKE with the Pub/Sub.
Create an external deployment
First, create an external deployment. You will use the resulting model ID and deployment ID to configure communications with the agent (described in the instructions for running Docker locally).
Create a Pub/Sub topic and subscription
Second, create a Pub/Sub topic and subscription:
-
Go to your Google Cloud console Pub/Sub service and create a topic (i.e., a named resource where publishers can send messages).

-
Create a subscription—a named resource representing the stream of messages from a single, specific topic, to be delivered to the subscribing application. Use the Pub/Sub topic from the previous step and set Delivery type to Pull. This provides a Subscription ID.
Additionally, you can configure message retention duration and other parameters.
Embed MLOps agent in Docker
To create a Docker image that embeds the agent:
-
Create the working directory on the machine where you will prepare the necessary files.
-
Create a directory named conf.
-
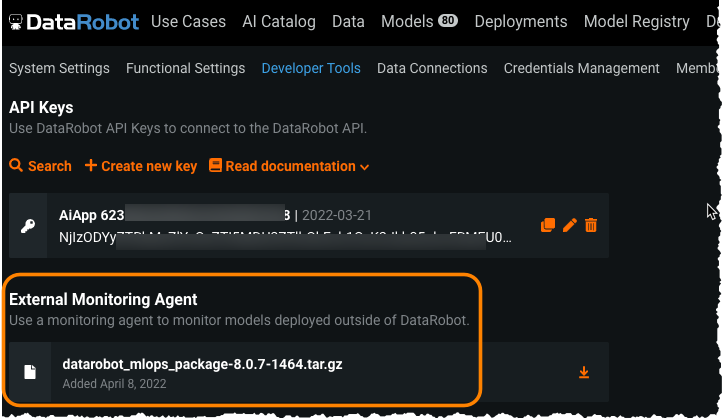
Download and unzip the tarball file with the MLOps agent from Developer Tools.
-
Copy the
mlops.log4j2.propertiesfile from<unzipped directory>/confto your<working directory/conf>. -
Copy the file
mlops.agent.conf.yamlto the working directory. Provide the following parameters (the example uses defaults for all other parameters):Parameter Definition mlopsUrlInstallation URL for Self-Managed AI Platform; app.datarobot.comfor managed AI PlatformapiTokenDataRobot key projectIdGCP ProjectId topicNameCreated in the Pub/Sub section For example:
mlopsUrl: "MLOPS-URL" apiToken: "YOUR-DR-API-TOKEN" channelConfigs: - type: "PUBSUB_SPOOL" details: {name: "pubsub", projectId: "YOUR-GOOGLE-PROJECT-ID", topicName: "YOUR-PUBSUB-TOPIC-ID-DEFINED-AT-STEP-2"} -
Copy the
<unzipped directory>/lib/mlops-agent-X.X.X.jarfile to your working directory. -
In the working directory, create the Dockerfile using the following content:
FROM openjdk:8 ENV AGENT_BASE_LOC=/opt/datarobot/ma ENV AGENT_LOG_PROPERTIES=mlops.log4j2.properties ENV AGENT_CONF_LOC=$AGENT_BASE_LOC/conf/mlops.agent.conf.yaml COPY mlops-agent-*.jar ${AGENT_BASE_LOC}/mlops-agent.jar COPY conf $AGENT_BASE_LOC/conf COPY entrypoint.sh / RUN chmod +x /entrypoint.sh ENTRYPOINT ["./entrypoint.sh"] -
Create
entrypoint.shwith the following content:#!/bin/sh echo "######## STARTING MLOPS-AGENT ########" echo exec java -Dlog.file=$AGENT_BASE_LOC/logs/mlops.agent.log -Dlog4j.configurationFile=file:$AGENT_BASE_LOC/conf/$AGENT_LOG_PROPERTIES -cp $AGENT_BASE_LOC/mlops-agent.jar com.datarobot.mlops.agent.Agent --config $ AGENT_CONF_LOC -
Create the Docker image, ensuring you include the period (
.) at the end of the Docker build command.export PROJECT_ID=ai-XXXXXXX-111111 docker build -t gcr.io/${PROJECT_ID}/monitoring-agents:v1 . -
Run the
docker imagescommand to verify a successful build.
Run Docker locally
Note
While technically an optional step, best practice advises always testing your image locally to save time and network bandwidth.
The monitoring agent tarball includes the necessary library (along with Java and R libraries) for sending statistics from the custom Python model back to MLOps. You can find the libraries in the lib directory.
To run locally:
-
Install the
DataRobot_MLOpslibrary for Python:pip install datarobot_mlops_package-<VERSION>/lib/datarobot_mlops-<VERSION>-py2.py3-none-any.whl -
Run your Docker container image.
Note
You will need the JSON file with credentials that you downloaded in the prerequisites (the step that describes downloading Google Cloud account credentials).
docker run -it --rm --name ma -v /path-to-you-directory/mlops.agent.conf.yaml:/ opt/datarobot/ma/conf/mlops.agent.conf.yaml -v /path-to-your-directory/your-google-application-credentials.json:/opt/datarobot/ma/conf/gac.json -e GOOGLE_APPLICATION_CREDENTIALS="/opt/datarobot/ma/conf/gac.json" gcr.io/${PROJECT_ID}/monitoring-agents:v1
The following is the example of the Python code where your model is scored (all package import statements are omitted from this example):
from datarobot_mlops.mlops import MLOps DEPLOYMENT_ID = "EXTERNAL-DEPLOYMENT-ID-DEFINED-AT-STEP-1" MODEL_ID = "EXTERNAL-MODEL-ID-DEFINED-AT-STEP-1" PROJECT_ID = "YOUR-GOOGLE-PROJECT-ID" TOPIC_ID = "YOUR-PUBSUB-TOPIC-ID-DEFINED-AT-STEP-2" # MLOPS: initialize the MLOps instance mlops = MLOps() \ .set_deployment_id(DEPLOYMENT_ID) \ .set_model_id(MODEL_ID) \ .set_pubsub_spooler(PROJECT_ID, TOPIC_ID) \ .init() # Read your custom model pickle file (model has been trained outside DataRobot) model = pd.read_pickle('custom_model.pickle') # Read scoring data features_df_scoring = pd.read_csv('features.csv') # Get predictions start_time = time.time() predictions = model.predict_proba(features_df_scoring) predictions = predictions.tolist() num_predictions = len(predictions) end_time = time.time() # MLOPS: report the number of predictions in the request and the execution time mlops.report_deployment_stats(num_predictions, end_time - start_time) # MLOPS: report the features and predictions mlops.report_predictions_data(features_df=features_df_scoring, predictions=predictions) # MLOPS: release MLOps resources when finished mlops.shutdown() -
Set the
GOOGLE_APPLICATION_CREDENTIALSenvironment variable:export GOOGLE_APPLICATION_CREDENTIALS="<your-google-application-credentials.json>" -
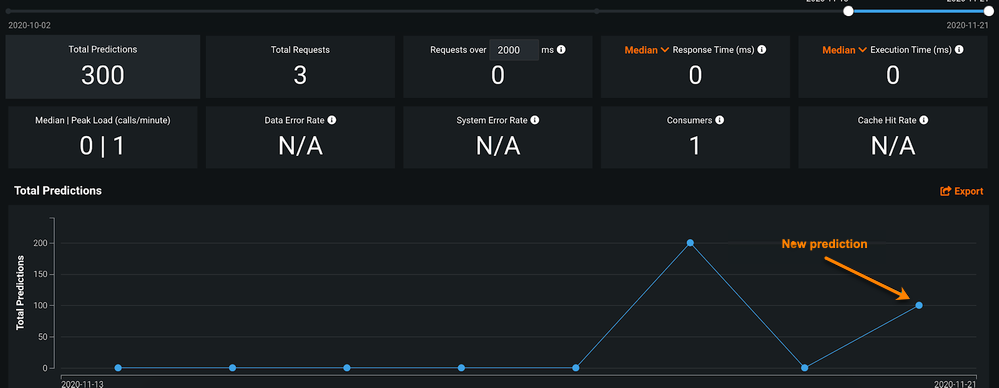
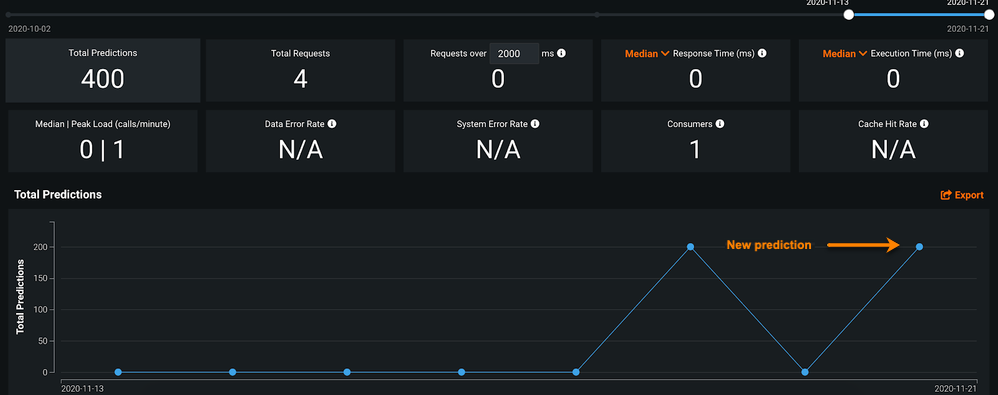
Score your data locally to test if the model works as expected. You will then be able to see a new record in monitoring agent log:
python score-your-model.pyThe statistics in the MLOps dashboard are updated as well:
Push Docker image to the Container Registry
After you have tested and validated the container image locally, upload it to a registry so that your Google Kubernetes Engine (GKE) cluster can download and run it.
-
Configure the Docker command-line tool to authenticate to Container Registry:
gcloud auth configure-docker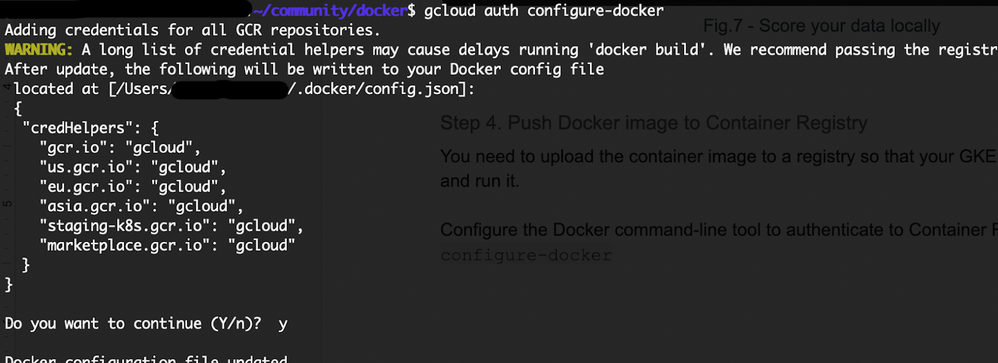
-
Push the Docker image you built to the Container Registry:
docker push gcr.io/${PROJECT_ID}/monitoring-agents:v1
Create the GKE cluster
After storing the Docker image in the Container Registry, you next create a GKE cluster, as follows:
-
Set your project ID and Compute Engine zone options for the
gcloudtool:gcloud config set project $PROJECT_IDgcloud config set compute/zone europe-west1-b -
Create a cluster.
Note
This example, for simplicity, creates a private cluster with unrestricted access to the public endpoint. For security, be sure to restrict access to the control plane for your production environment. Find detailed information about configuring different GKE private clusters here.
gcloud container clusters create monitoring-agents-cluster \
    --network default \
    --create-subnetwork name=my-subnet-0 \
    --no-enable-master-authorized-networks \
    --enable-ip-alias \
    --enable-private-nodes \
    --master-ipv4-cidr 172.16.0.32/28 \
    --no-enable-basic-auth \
    --no-issue-client-certificate
Where:
Parameter Result --create-subnetwork name=my-subnet-0Causes GKE to automatically create a subnet named my-subnet-0.--no-enable-master-authorized-networksDisables authorized networks for the cluster. --enable-ip-aliasMakes the cluster VPC-native. --enable-private-nodesIndicates that the cluster's nodes do not have external IP addresses. --master-ipv4-cidr 172.16.0.32/28Specifies an internal address range for the control plane. This setting is permanent for this cluster. --no-enable-basic-authDisables basic auth for the cluster. --no-issue-client-certificateDisables issuing a client certificate. -
Run the following command to see the cluster worker instances:
gcloud compute instances list
Create a cloud router
The MLOps agent running on a GKE private cluster needs access to the DataRobot MLOps service. To do this, you must give the private nodes outbound access to the internet, which you can achieve using a NAT cloud router (Google documentation here).
-
Create a cloud router:
gcloud compute routers create nat-router \ --network default \ --region europe-west1 -
Add configuration to the router.
gcloud compute routers nats create nat-config \ --router-region europe-west1 \ --router nat-router \ --nat-all-subnet-ip-ranges \ --auto-allocate-nat-external-ips
Create K8s ConfigMaps
With the cloud router configured, you can now create K8s ConfigMaps to contain the MLOps agent configuration and Google credentials. You will need the downloaded JSON credentials file created during the prerequisites stage.
Note
Use K8s Secrets to save your configuration files for production usage.
Use the following code to create ConfigMaps:
kubectl create configmap ma-configmap --from-file=mlops.agent.conf.yaml=your-path/mlops.agent.conf.yaml

kubectl create configmap gac-configmap --from-file=gac.json=your-google-application-credentials.json
Create the K8s Deployment
To create the deployment, create the ma-deployment.yaml file with the following content:
Note
This example uses three always-running replicas; for autoscaling, use kubectl autoscale deployment.
apiVersion: apps/v1
kind: Deployment
metadata:
  name: ma-deployment
  labels:
    app: ma
spec:
  replicas: 3
  selector:
    matchLabels:
      app: ma
  template:
    metadata:
      labels:
        app: ma
    spec:
      containers:
      - name: ma
        image: gcr.io/${PROJECT_ID}/monitoring-agents:v1
        volumeMounts:
        - name:  agent-conf-volume
          mountPath: /opt/datarobot/ma/conf/mlops.agent.conf.yaml
          subPath: mlops.agent.conf.yaml
        - name:  gac-conf-volume
          mountPath: /opt/datarobot/ma/conf/gac.json
          subPath: gac.json
        env:
        - name: GOOGLE_APPLICATION_CREDENTIALS
          value: /opt/datarobot/ma/conf/gac.json
        ports:
        - containerPort: 80
      volumes:
      - name:  agent-conf-volume
        configMap:
          items:
          - key: mlops.agent.conf.yaml
            path: mlops.agent.conf.yaml
          name: ma-configmap
      - name:  gac-conf-volume
        configMap:
          items:
          - key: gac.json
            path: gac.json
          name: gac-configmap
Next, create the deployment with the following command:
kubectl apply -f ma-deployment.yaml
Finally, check the running pods:
kubectl get pods

Score the model
Score your local model and verify the output.
-
Score your local model:
python score-your-model.py -
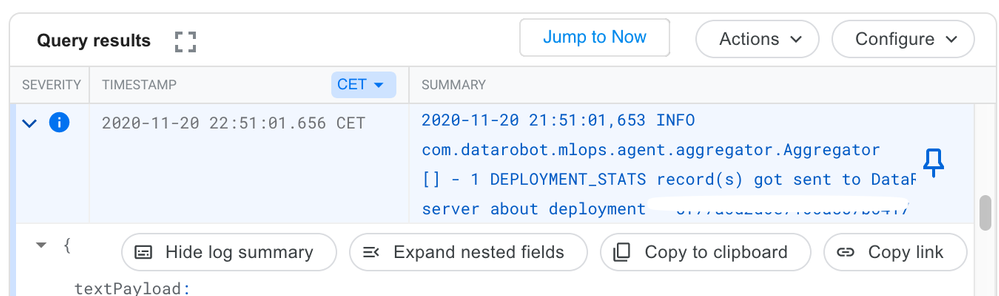
Check the GKE Pod log; it shows that one record has been sent to DataRobot.
-
Check the Pub/Sub log.
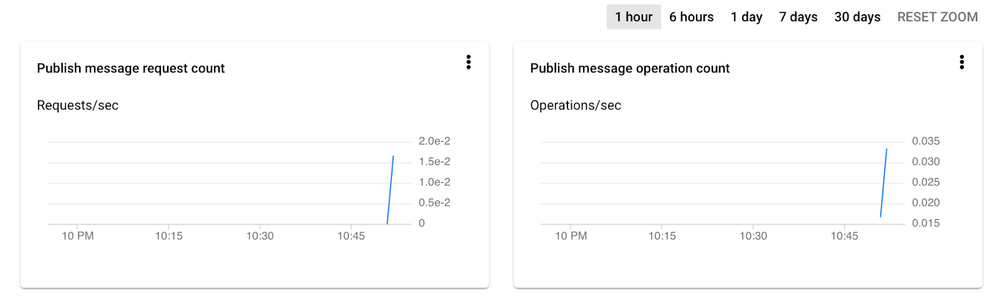
-
Check the DataRobot MLOps dashboard.
Clean up
-
Delete the NAT in the cloud router:
gcloud compute routers nats delete nat-config --router=nat-router --router-region=europe-west1 -
Delete the cloud router:
gcloud compute routers delete nat-router --region=europe-west1 -
Delete the cluster:
gcloud container clusters delete monitoring-agents-cluster