Deploy and monitor models on GCP
Availability information
The MLOps model package export feature used in this procedure is off by default. Contact your DataRobot representative or administrator for information on enabling it.
Feature flag: Enable MMM model package export
The following describes the process of deploying a DataRobot model on the Google Cloud Platform (GCP) using the Google Kubernetes Engine (GKE).
Overview
DataRobot MLOps provides a central hub to deploy, monitor, manage, and govern all your models in production. With MLOps, you aren't limited to serving DataRobot models on the dedicated scalable prediction servers inside the DataRobot cluster. You can also deploy DataRobot models into Kubernetes (K8s) clusters while maintaining the advantages of DataRobot's model monitoring capabilities.
This exportable DataRobot model is called a Portable Prediction Server (PPS) and is similar to Docker containers in the flexibility and portability it provides. A PPS is based on Docker containers and contains a DataRobot model with embedded monitoring agents. Using this approach, a DataRobot model is made available via a scalable deployment environment for usage, and associated data can be tracked in the centralized DataRobot MLOps dashboard with all of its monitoring and governance advantages.
Unifying the portability of DataRobot model Docker images with the scalability of a K8s platform results in a powerful ML solution ready for production usage.
Prerequisites
You must complete the following steps before creating the main configuration.
-
Install Google Cloud SDK appropriate for your operating system (see Google's documentation).
-
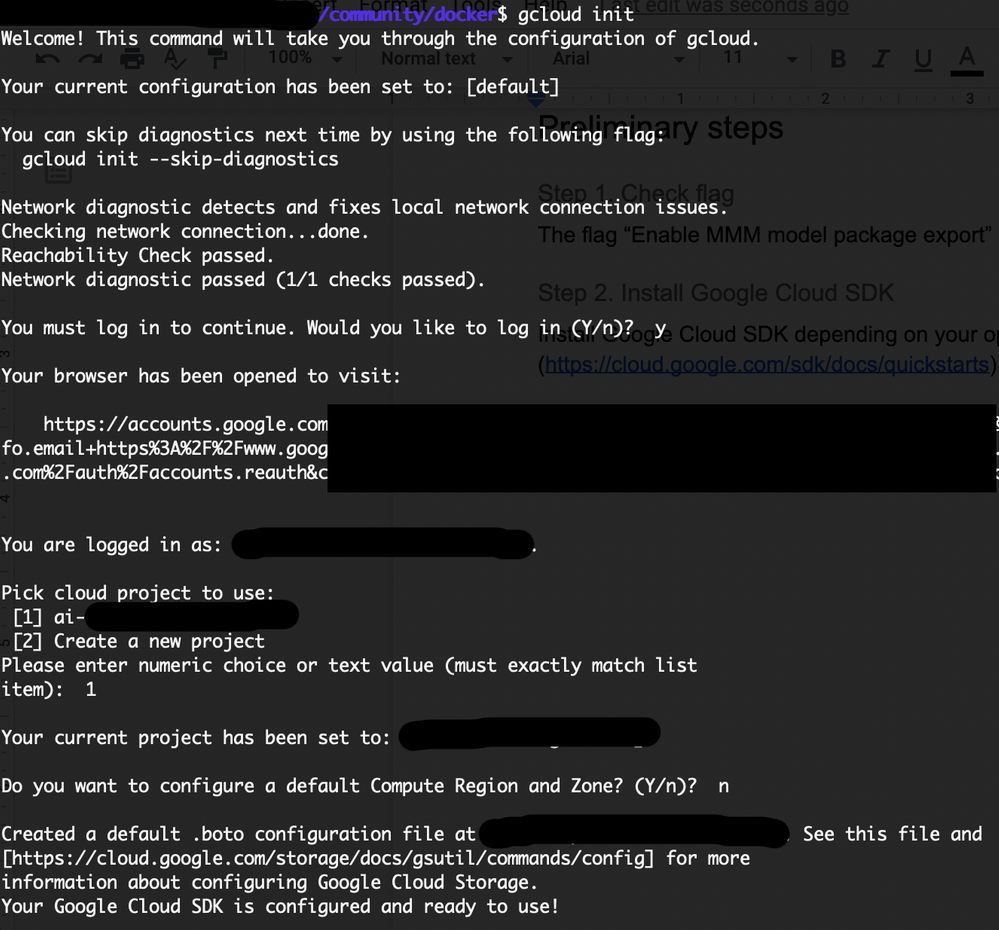
Run the following at a command prompt:
gcloud initYou will be asked to choose the existing project or to create a new one and also to select the compute zone. For example:
-
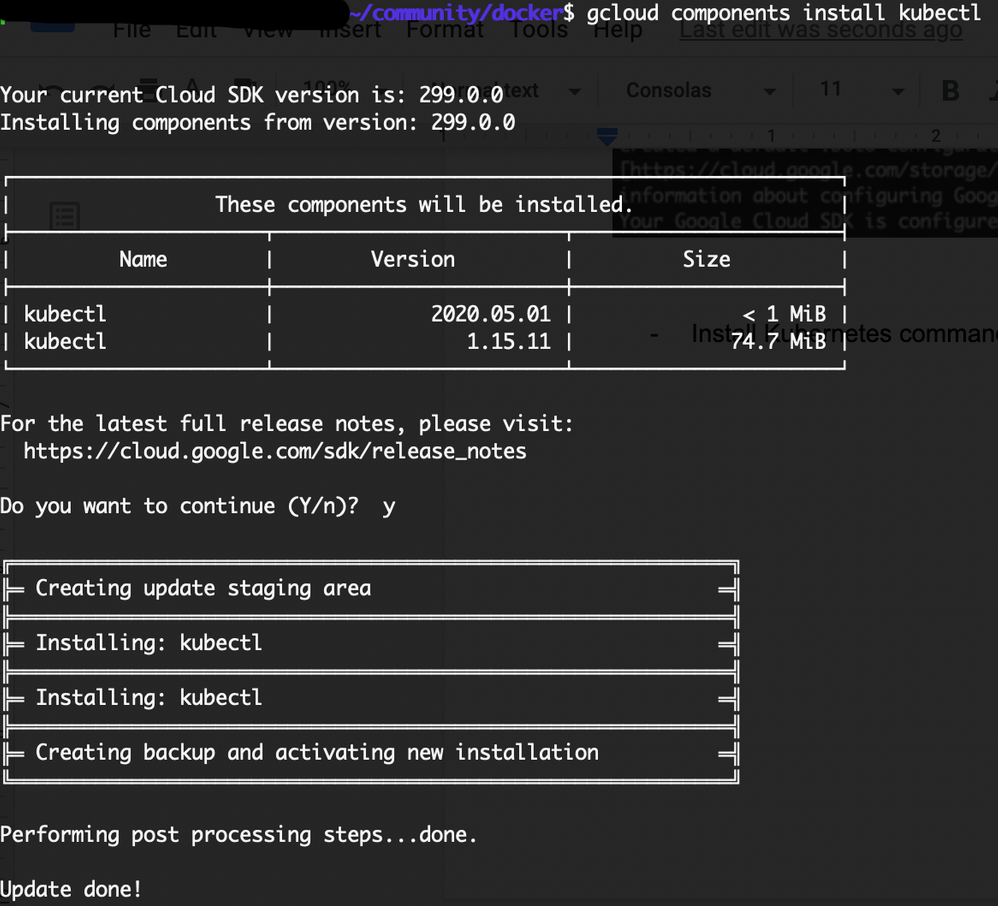
Install the Kubernetes command-line tool:
gcloud components install kubectlThe output will be similar to:
Procedure
The following sections, each a step in the process, describe the procedure for deploying and monitoring DataRobot models on the GCP platform via a PPS. The examples use the Kaggle housing prices dataset.
Download a model package
Build models using the housing prices dataset. Once Autopilot finishes, you can create and download the MLOps model package. To do this, navigate to the Models tab to select a model and click Predict > Deploy. In the MLOps Package section, select Generate & Download.
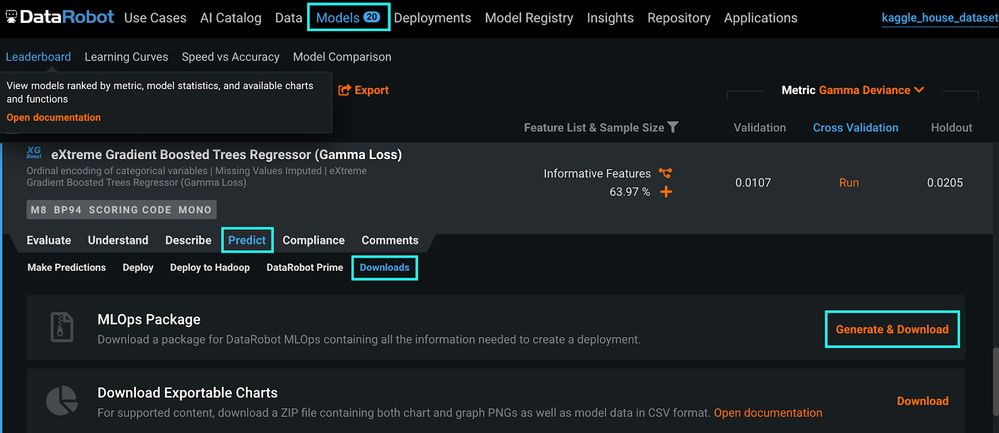
DataRobot generates a model package (.mlpkg file) containing all the necessary information about the model.
Create a Docker container image
To create a Docker container image with the MLOps package:
-
After the model package download (started in the previous step) completes, download the PPS base image.
-
Once you have the PPS base image, use the following Dockerfile to generate an image that includes the DataRobot model package:
Note
To copy the
.mlpkgfile into the Docker image, make sure the Dockerfile and the.mlpkgfile are in the same folder.FROM datarobot/datarobot-portable-prediction-api:<TAG> COPY <MLPKG_FILE_NAME>.mlpkg /opt/ml/model -
Set the
PROJECT_IDenvironment variable to your Google Cloud project ID (the project ID you defined during the Google Cloud SDK installation). ThePROJECT_IDassociates the container image with your project's Container Registry:export PROJECT_ID= ai-XXXXXX-XXXXXX -
Build and tag the Docker image. For example:
docker build -t gcr.io/${PROJECT_ID}/house-regression-model:v1 -
Run the
docker imagescommand to verify that the build was successful:
The generated image contains the DataRobot model and the monitoring agent used to transfer the service and model health metrics back to the DataRobot MLOps platform.
Run Docker locally
While technically an optional step, best practice advises always testing your image locally to save time and network bandwidth.
To run locally:
-
Run your Docker container image:
docker run --rm --name house-regression -p 8080:8080 -it gcr.io/${PROJECT_ID}/house-regression-model:v1 -
Score the data locally to test if the model works as expected:
curl -X POST http://localhost:8080/predictions -H "Content-Type: text/csv" --data-binary @/Users/X.X/community/docker/kaggle_house_test_dataset.csvNote
Update the path to the
kaggle_house_test_dataset.csvdataset to match the path locally on your workstation.
Push Docker image to the Container Registry
Once you have tested and validated the container image locally, upload it to a registry so that your Google Kubernetes Engine (GKE) cluster can download and run it.
-
Configure the Docker command-line tool to authenticate to Container Registry:
gcloud auth configure-docker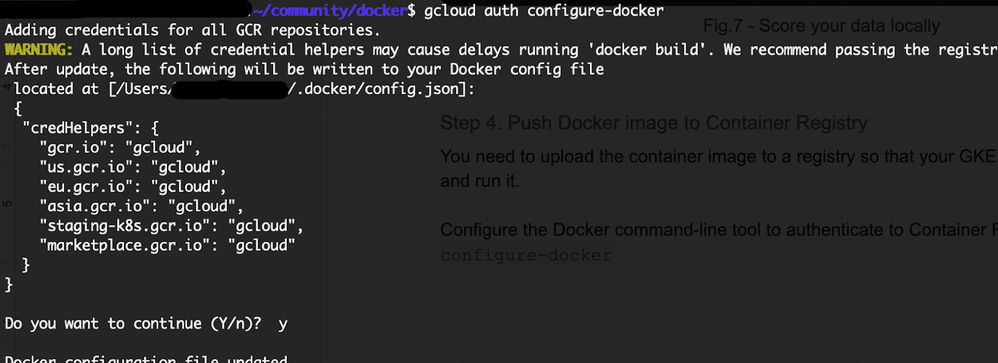
-
Push the Docker image you built to the Container Registry:
docker push gcr.io/${PROJECT_ID}/house-regression-model:v1
Note
Pushing to the Container Registry may result in the storage.buckets.create permission issue. If you receive this error, contact the administrator of your GCP account.
Create the GKE cluster
After storing the Docker image in the Container Registry, you next create a GKE cluster, as follows:
-
Set your project ID and Compute Engine zone options for the
gcloudtool:gcloud config set project $PROJECT_IDgcloud config set compute/zone europe-west1-b -
Create the cluster:
gcloud container clusters create house-regression-clusterThis command finishes as follows:

-
After the command completes, run the following command to see the cluster worker instances:
gcloud compute instances listThe output is similar to:

Note
Pushing to the Container Registry may result in the gcloud.container.clusters.create permission issue. If you receive this error, contact the administrator of your GCP account.
Deploy the Docker image to GKE
To deploy your image to GKE:
-
Create a Kubernetes deployment for your Docker image:
kubectl create deployment house-regression-app --image=gcr.io/${PROJECT_ID}/house-regression-model:v1 -
Set the baseline number of deployment replicas to 3 (i.e., the deployment will always have 3 running pods).
kubectl scale deployment house-regression-app --replicas=3 -
K8s provides the ability to manage resources in a flexible, automatic manner. For example, you can create a HorizontalPodAutoscaler resource for your deployment:
kubectl autoscale deployment house-regression-app --cpu-percent=80 --min=1 --max=5 -
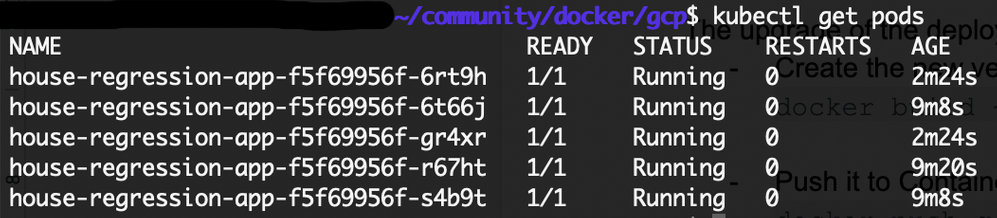
Run the following command to check that the pods you created are all operational and in a running state (e.g., you may to see up to 5 running pods as requested in the previous autoscale step):
kubectl get podsThe output is similar to:
Expose your model
The default service type in GKE is called ClusterIP, where the service gets an IP address reachable only from inside the cluster. To expose a Kubernetes service outside of the cluster, you must create a service of type LoadBalancer. This type of service spawns an External Load Balancer IP for a set of pods, reachable via the internet.
-
Use the
kubectl exposecommand to generate a Kubernetes service for the house-regression-app deployment:kubectl expose deployment house-regression-app --name=house-regression-app-service --type=LoadBalancer --port 80 --target-port 8080
Where:
- --port is the port number configured on the Load Balancer
-
--target-port is the port number that the house-regression-app container is listening on.
-
Run the following command to view service details:
kubectl get serviceThe output is similar to:

-
Copy the
EXTERNAL-IPaddress from the service details. -
Score your model using the
EXTERNAL-IPaddress.curl -X POST http://XX.XX.XX.XX/predictions -H "Content-Type: text/csv" --data- binary @/Users/X.X/community/docker/kaggle_house_test_dataset.csvNote
Update the IP address placeholder above with the
EXTERNAL-IPaddress you copied and update the path to thekaggle_house_test_dataset.csvdataset to match the path locally on your workstation.
Note
The cluster is open to all incoming requests at this point. See the Google documentation to apply more fine-grained role-based access control (RBAC).
Create an external deployment
To create an external deployment in MLOps:
-
Navigate to the Model Registry > Model Packages > Add New Package and follow the instructions in the documentation.
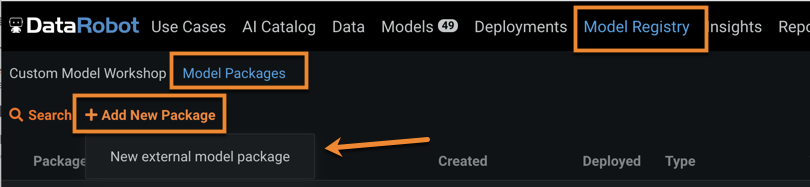
Click Add new external model package.
-
Make a note of the MLOps model ID found in the URL. You will use this when linking PPS and MLops.
While still on the Model Registry page and within the expanded new package, select the Deployments tab and click Create new deployment.
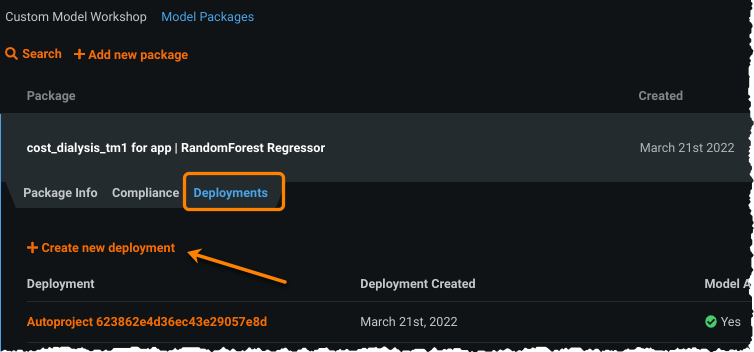
The deployment page loads prefilled with information from the model package you created.
-
Make a note of the MLOps deployment ID (earlier, you copied the model ID). You will use this when linking PPS and MLOps.
Link PPS on K8s to MLOps
Finally, update the K8s deployment configuration with the PPS and monitoring agent configuration. Add the following environment variables into the K8s Deployment configuration (see the complete configuration file here):
PORTABLE_PREDICTION_API_WORKERS_NUMBER=2

PORTABLE_PREDICTION_API_MONITORING_ACTIVE=True

PORTABLE_PREDICTION_API_MONITORING_SETTINGS=output_type=output_dir;path=/tmp;max_files=50;file_max_size=10240
000;model_id=<mlops_model_id>;deployment_id=<mlops_deployment_id>

MONITORING_AGENT=True

MONITORING_AGENT_DATAROBOT_APP_URL= <https://app.datarobot.com/>

MONITORING_AGENT_DATAROBOT_APP_TOKEN=<your token>
Note
You can obtain the MONITORING_AGENT_DATAROBOT_APP_TOKEN from the Developer Tools.
Deploy new Docker image (optional)
To upgrade the deployed Docker image, simply:
-
Create a new version of your Docker image:
docker build -t gcr.io/${PROJECT_ID}/house-regression-model:v2 -
Push the new image to the Container Registry:
docker push gcr.io/${PROJECT_ID}/house-regression-model:v2`
-
Apply a rolling update to the existing deployment with an image update:
kubectl set image deployment/house-regression-app house-regression-model=gcr.io/${PROJECT_ID}/house-regression-model:v2 -
Watch the pods running the v1 image terminate, and new pods running the v2 image spin up:
kubectl get pods
Clean up
To finish the process of setting up using the GCP platform via a Portable Prediction Server (PPS) for deployments, do the following.
-
Delete the service:
kubectl delete service house-regression-app-service -
Delete the cluster:
gcloud container clusters delete house-regression-cluster
K8s configuration files
The following sections provide deployment and service configuration files for reference.
Deployment configuration file
apiVersion: apps/v1
kind: Deployment
metadata:
  annotations:
    deployment.kubernetes.io/revision: "2"
  creationTimestamp: "2020-07-08T12:47:27Z"
  generation: 8
  labels:
    app: house-regression-app
  name: house-regression-app
  namespace: default
  resourceVersion: "14171"
  selfLink: /apis/apps/v1/namespaces/default/deployments/house-regression-app
  uid: 2de869fc-c119-11ea-8156-42010a840053
spec:
  progressDeadlineSeconds: 600
  replicas: 5
  revisionHistoryLimit: 10
  selector:
    matchLabels:
      app: house-regression-app
  strategy:
    rollingUpdate:
      maxSurge: 25%
      maxUnavailable: 25%
    type: RollingUpdate
  template:
    metadata:
      creationTimestamp: null
      labels:
        app: house-regression-app
    spec:
      containers:
      - env:
        - name: PORTABLE_PREDICTION_API_WORKERS_NUMBER
          value: "2"
        - name: PORTABLE_PREDICTION_API_MONITORING_ACTIVE
          value: "True"
        - name: PORTABLE_PREDICTION_API_MONITORING_SETTINGS
          value: output_type=output_dir;path=/tmp;max_files=50;file_max_size=10240000;model_id=<your_mlops_model_id>;deployment_id=<your_mlops_deployment_id>
        - name: MONITORING_AGENT
          value: "True"
        - name: MONITORING_AGENT_DATAROBOT_APP_URL
          value: https://app.datarobot.com/
        - name: MONITORING_AGENT_DATAROBOT_APP_TOKEN
          value: <your_datarobot_api_token>
        image: gcr.io/${PROJECT_ID}/house-regression-model:v1
        imagePullPolicy: IfNotPresent
        name: house-regression-model
        resources: {}
        terminationMessagePath: /dev/termination-log
        terminationMessagePolicy: File
      dnsPolicy: ClusterFirst
      restartPolicy: Always
      schedulerName: default-scheduler
      securityContext: {}
      terminationGracePeriodSeconds: 30
status:
  availableReplicas: 5
  conditions:
  - lastTransitionTime: "2020-07-08T12:47:27Z"
    lastUpdateTime: "2020-07-08T13:40:47Z"
    message: ReplicaSet "house-regression-app-855b44f748" has successfully progressed.
    reason: NewReplicaSetAvailable
    status: "True"
    type: Progressing
  - lastTransitionTime: "2020-07-08T13:41:39Z"
    lastUpdateTime: "2020-07-08T13:41:39Z"
    message: Deployment has minimum availability.
    reason: MinimumReplicasAvailable
    status: "True"
    type: Available
  observedGeneration: 8
  readyReplicas: 5
  replicas: 5
  updatedReplicas: 5
Service configuration file
apiVersion: v1
kind: Service
metadata:
  creationTimestamp: "2020-07-08T12:58:13Z"
  labels:
    app: house-regression-app
  name: house-regression-app-service
  namespace: default
  resourceVersion: "5055"
  selfLink: /api/v1/namespaces/default/services/house-regression-app-service
  uid: aeb836cd-c11a-11ea-8156-42010a840053
spec:
  clusterIP: 10.31.242.132
  externalTrafficPolicy: Cluster
  ports:
  - nodePort: 30654
    port: 80
    protocol: TCP
    targetPort: 8080
  selector:
    app: house-regression-app
  sessionAffinity: None
  type: LoadBalancer
status:
  loadBalancer:
    ingress:
    - ip: XX.XX.XXX.XXX