Deploy models on AWS EKS
With DataRobot MLOps, you can deploy DataRobot models into your own AWS Elastic Kubernetes Service (EKS) clusters and still have the advantages of using the monitoring and governance capabilities of MLOps.
These exportable DataRobot models are known as Portable Prediction Servers (PPSs). The models are embedded into Docker containers, providing flexibility and portability, and making them suitable for container orchestration tools such as Kubernetes.
The following steps show how to deploy a DataRobot model on EKS.
Before you start
Availability information
To deploy a DataRobot model on EKS, you need to export a model package which requires the "Enable MMM model package export" flag. Contact your DataRobot representative for more information about enabling this feature.
Before deploying to Amazon EKS, you need to create an EKS cluster. There are two approaches to spin up the cluster:
-
Using the eksctl tool (CLI for Amazon EKS). This is the simplest and fastest way to create an EKS cluster.
-
Using AWS Management Console. This method provides more fine-grained tuning (for example, IAM role and VPC creation).
This topic shows how to install using the eksctl tool. See Getting started with Amazon EKS – eksctl for detailed instructions.
If any of the tools are already installed and configured, you can skip the corresponding steps.
Install and configure AWS and EKS
Follow the steps described below to install and configure Amazon Web Services CLI, EKS, and Kubernetes CLI.
-
Install the AWS CLI, version 2.
aws --version -
Configure your AWS CLI credentials.
-
Install eksctl.
eksctl version -
Install and configure kubectl (CLI for Kubernetes clusters).
kubectl version --short --client
Deploy models to EKS
Deploying DataRobot models on a Kubernetes infrastructure consists of three main activities:
- Preparing and pushing the Docker container with the MLOps package to the container registry
- Creating the external deployment in DataRobot
- Creating the Kubernetes cluster
Configure and run the PPS Docker image
To complete the following steps, you need to first generate your model and create an MLOps model package.
DataRobot provides a UI to help you configure the Portable Prediction Server and create the Docker image. Follow these steps:
- Configure the Portable Prediction Server (PPS).
- Obtain the PPS Docker image.
- Load the image to Docker.
- Download the model package.
- Run your Docker image.
- Monitor your model.
- Create an external deployment. When you create the deployment, make note of the MLOps model ID and the MLOps deployment ID. You’re going to need these IDs when you deploy the MLOps package to Kubernetes.
Push the Docker image to Amazon ECR
You need to upload the container image to Amazon Elastic Container Registry (ECR) so that your Amazon EKS cluster can download and run it.
-
Configure the Docker CLI tool to authenticate to Elastic Container Registry:
aws ecr get-login-password --region us-east-1 | docker login --username XXX --password-stdin 00000000000.xxx.ecr.us-east-1.amazonaws.com -
Push the Docker image you just built to ECR:
docker push 00000000000.xxx.ecr.us-east-1.amazonaws.com/house-regression-model:latest
Create an Amazon EKS cluster
Now that the Docker image is stored in ECR and the external deployment is created, you can spin up an Amazon EKS cluster. The EKS cluster needs VPC with either of the following:
- Two public subnets and two private subnets
- A VPC with three public subnets
The Amazon EKS requires subnets in at least two Availability Zones. A VPC with public and private subnets is recommended so that Kubernetes can create public load balancers in the public subnets to control traffic to the pods that run on nodes in private subnets.
To create the Amazon EKS cluster:
-
(Optional) Create or choose two public and two private subnets in your VPC. Make sure that “Auto-assign public IPv4 address” is enabled for the public subnets.
Note
The eksctl tool creates all necessary subnets behind the scenes if you don’t provide the corresponding
--vpc-private-subnetsand--vpc-public-subnetsparameters. -
Create the cluster:
eksctl create cluster \
--name house-regression \
--ssh-access \
--ssh-public-key my-public-key.pub \
--managed
Notes
* Usage of the `--managed` parameter enables [Amazon EKS-managed nodegroups](https://docs.aws.amazon.com/eks/latest/userguide/managed-node-groups.html){ target=_blank }. This feature automates the provisioning and lifecycle management of nodes (EC2 instances) for Amazon EKS Kubernetes clusters. You can provision optimized groups of nodes for their clusters. EKS will keep their nodes up-to-date with the latest Kubernetes and host OS versions. The **eksctl** tool makes it possible to choose the specific size and instance type family via command line flags or config files.
* Although `--ssh-public-key` is optional, it is highly recommended that you specify it when you create your node group with a cluster. This option enables SSH access to the nodes in your managed node group. Enabling SSH access allows you to connect to your instances and gather diagnostic information if there are issues. You cannot enable remote access after the node group is created.
Cluster provisioning usually takes between 10 and 15 minutes and results in the following:
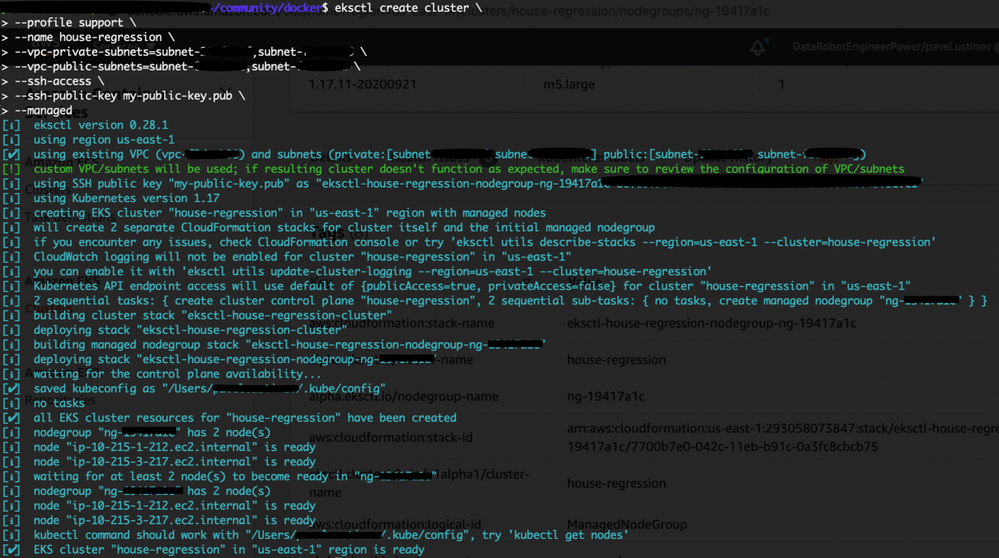
-
When your cluster is ready, test that your kubectl configuration is correct:
kubectl get svc
Deploy the MLOps package to Kubernetes
To deploy the MLOps package to Kubernetes:
-
Create a Kubernetes namespace, for example:
kubectl create namespace house-regression-namespace -
Save the following contents to a
yamlfile on your local machine (in this case,house-regression-service.yaml), replacing the values for your project. Provide the values of image, DataRobot API token, model ID, and deployment ID. (You should have saved the IDs when you created the external deployment in MLOps.)apiVersion: v1 kind: Service metadata: name: house-regression-service namespace: house-regression-namespace labels: app: house-regression-app spec: selector: app: house-regression-app ports: - protocol: TCP port: 80 targetPort: 8080 --- apiVersion: apps/v1 kind: Deployment metadata: name: house-regression-deployment namespace: house-regression-namespace labels: app: house-regression-app spec: replicas: 3 selector: matchLabels: app: house-regression-app template: metadata: labels: app: house-regression-app spec: affinity: nodeAffinity: requiredDuringSchedulingIgnoredDuringExecution: nodeSelectorTerms: - matchExpressions: - key: beta.kubernetes.io/arch operator: In values: - amd64 containers: - name: house-regression-model image: <your_aws_account_endpoint>.ecr.us-east-1.amazonaws.com/house-regression-model:latest env: - name: PORTABLE_PREDICTION_API_WORKERS_NUMBER value: "2" - name: PORTABLE_PREDICTION_API_MONITORING_ACTIVE value: "True" - name: PORTABLE_PREDICTION_API_MONITORING_SETTINGS value: output_type=spooler_type=filesystem;directory=/tmp;max_files=50;file_max_size=10240000;model_id=<your mlops_model_id_obtained_at_step_5>;deployment_id=<your mlops_deployment_id_obtained_at_step_5> - name: MONITORING_AGENT value: "True" - name: MONITORING_AGENT_DATAROBOT_APP_URL value: https://app.datarobot.com/ - name: MONITORING_AGENT_DATAROBOT_APP_TOKEN value: <your_datarobot_api_token> ports: - containerPort: 80 -
Create a Kubernetes service and deployment:
kubectl apply -f house-regression-service.yaml -
View all resources that exist in the namespace:
kubectl get all -n house-regression-namespace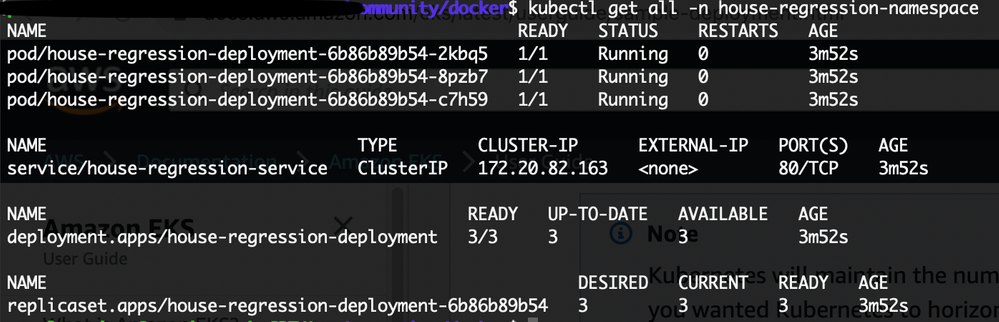
Set up horizontal pod autoscaling
The Kubernetes Horizontal Pod Autoscaler automatically scales the number of pods in a deployment, replication controller, or replica set based on that resource's CPU utilization. This can help your applications scale up to meet increased demand or scale back when resources are not needed, thus freeing up your nodes for other applications. When you set a target CPU utilization percentage, the Horizontal Pod Autoscaler scales your application up or back to try to meet that target.
-
Create a Horizontal Pod Autoscaler resource for the php-apache deployment.
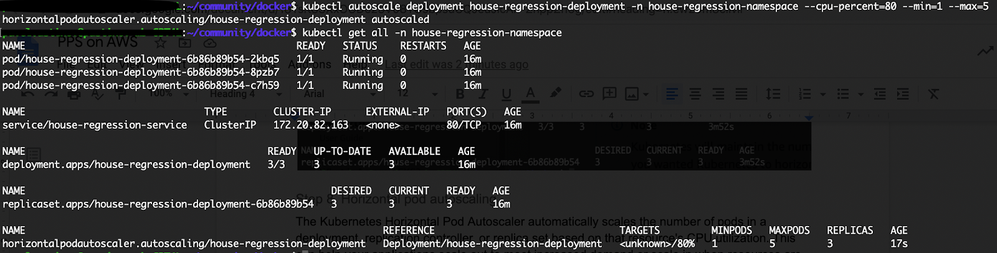
kubectl autoscale deployment house-regression-deployment -n house-regression-namespace --cpu-percent=80 --min=1 --max=5 -
View all resources that exist in the namespace.
kubectl get all -n house-regression-namespaceHorizontal Pod Autoscaler appears in the resources list.
Expose your model to the world (load balancing)
Amazon EKS supports the Network Load Balancer and the Classic Load Balancer for pods running on Amazon EC2 instance nodes through the Kubernetes service of type LoadBalancer.
-
Tag the public subnets in your VPC so that Kubernetes knows to use only those subnets for external load balancers instead of choosing a public subnet in each Availability Zone (in lexicographical order by subnet ID):
kubernetes.io/role/elb = 1 -
Tag the private subnets in the following way so that Kubernetes knows it can use the subnets for internal load balancers.
kubernetes.io/role/internal-elb = 1Important
If you use an Amazon EKS AWS CloudFormation template to create your VPC after March 26, 2020, then the subnets created by the template are tagged when they're created as explained here.
-
Use the kubectl
exposecommand to generate a Kubernetes service for the deployment.kubectl expose deployment house-regression-deployment -n house-regression-namespace --name=house-regression-external --type=LoadBalancer --port 80 --target-port 8080--portis the port number configured on the Load Balancer.--target-portis the port number that the deployment container is listening on.
-
Run the following command to get the service details:
kubectl get service -n house-regression-namespace
-
Copy the
EXTERNAL_IPaddress. -
Score your model using the
EXTERNAL_IPaddress:curl -X POST http://<EXTERNAL_IP>/predictions -H "Content-Type: text/csv" --data-binary @kaggle_house_test_dataset.csv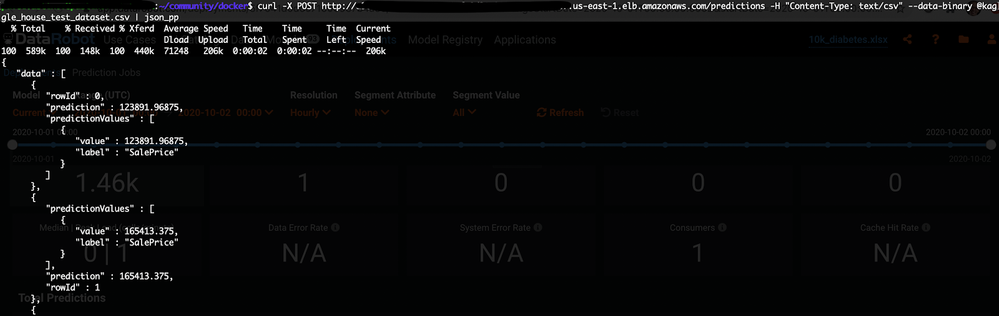
-
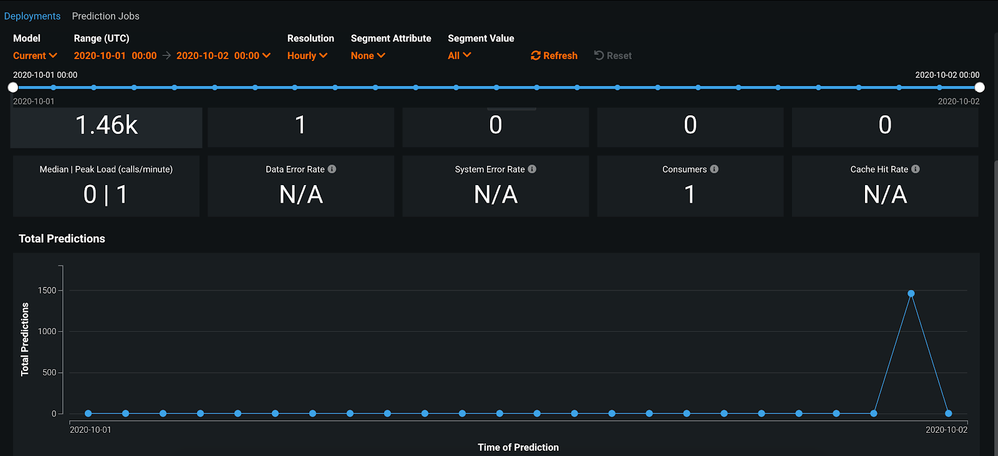
Check the service health of the external deployment you created. The scoring request is now included in the statistics.
Clean up
-
Remove the sample service, deployment, pods, and namespace:
kubectl delete namespace house-regression-namespace -
Delete the cluster:
eksctl delete cluster --name house-regression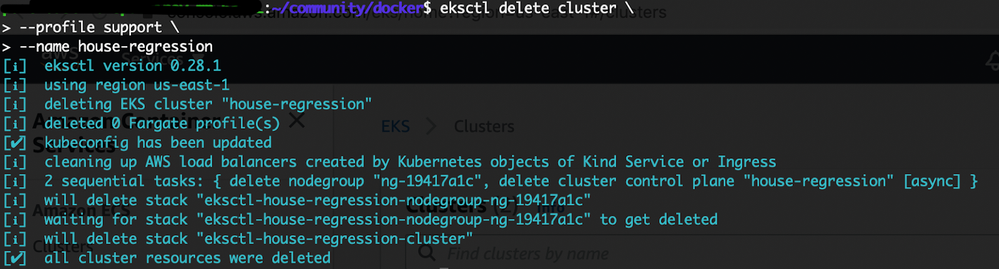
Wrap-up
This walkthrough described how to deploy and monitor DataRobot models on the Amazon EKS platform via a Portable Prediction Server (PPS). A PPS is embedded into Docker containers alongside the MLOps agents, making it possible to acquire the principal IT (service health, number of requests, etc.) and ML (accuracy, data drift etc.) metrics in the cloud and monitor them on the centralized DataRobot MLOps dashboard.
Using DataRobot PPSs allows you to avoid vendor lock-in and easily migrate between cloud environments or deploy models across them simultaneously.