Server-side scoring
The following describes advanced scoring options with Snowflake as a cloud-native database, leveraging the DataRobot Batch Prediction API from the UI or directly. The UI approach is good for ad-hoc use cases and smaller table sandbox scoring jobs. As complexity grows, the API offers flexibility to run more complex, multistep pipeline jobs. As data volumes grow, using S3 as an intermediate layer is one option for keeping strict control over resource usage and optimizing for cost efficiency.
- DataRobot UI: Table scoring (JDBC supported by the API "behind the scenes")
- DataRobot API: Query-as-source (JDBC, API)
- DataRobot API: S3 Scoring with pre- or post-SQL (S3, API)
Each option has trade-offs between simplicity and performance to meet business requirements. Following is a brief overview of the Batch Prediction API and prerequisites universal to all scoring approaches.
Batch Prediction API
The Batch Prediction API allows a dataset of any size to be sent to DataRobot for scoring. This data is sliced up into individual HTTP requests and sent in parallel threads to saturate the Dedicated Prediction Servers (DPSs) available to maximize scoring throughput. Source data and target data can be local files, S3/object storage, or JDBC data connections, and can be mixed and matched as well.
See the batch prediction documentation for additional information.
Considerations
Note
Access and privileges for deployments vs. projects may differ. For example, an account may have the ability to score a model, but not be able to see the project or data that went into creating it. As a best practice, associate production workflows with a service account instead of a specific employee to abstract employees from your production scoring pipeline.
- DataRobot Self-Managed AI Platform users may already have connectivity between their Snowflake account and their DataRobot environment. If additional network access is required, your infrastructure teams can fully control network connectivity.
- DataRobot managed AI Platform users who want DataRobot to access their Snowflake instance may require additional infrastructure configuration; contact DataRobot support for assistance. Snowflake is, by default, publicly accessible. Customers may have set up easy/vanity local DNS entries (customer.snowflakecomputing.com) which DataRobot cannot resolve, or be leveraging AWS PrivateLink with the option to block public IPs.
- The Snowflake write-back account requires
CREATE TABLE,INSERT, andUPDATEprivileges, depending on use case and workflow. Additionally, the JDBC driver requires theCREATE STAGEprivilege to perform faster stage bulk inserts vs. regular array binding inserts. This creates a temporary stage object that can be used for the duration of the JDBC session.
DataRobot UI
Table scoring
You can configure quick and simple batch scoring jobs directly within the DataRobot application. Jobs can be run ad-hoc or can be scheduled. Generally speaking, this scoring approach is the best option for use cases that only require scoring for reasonably small-sized tables. It enables you to perform some scoring and write back to the database, for example to sandbox/analysis area.
See the documentation on Snowflake prediction job examples for detailed workflows on setting up batch prediction job definitions for Snowflake using either a JDBC connector with Snowflake as an external data source or the Snowflake adapter with an external stage.
DataRobot API

DataRobot's Batch Prediction API can also be used programmatically. Benefits of using the API over the UI include:
- The request code can be inserted into any production pipeline to sit between pre-and post-scoring steps.
- The code can be triggered by an existing scheduler or in response to events as they take place.
- It is not necessary to create an AI Catalog entry—the API will accept a table, view, or query.
Query as source
Consider the following when working with the API:
- Batch prediction jobs must be initialized and then added to a job queue.
- Jobs from local files do not begin until data is uploaded.
- For a Snowflake-to-Snowflake job, both ends of the pipeline must be set with Snowflake source and target.
Additional details about the job (deployment, prediction host, columns to be passed through) can be specified as well (see the Batch Prediction API documentation for a full list of available options).
Below is an example of how DataRobot's Batch Prediction API can be used to score Snowflake data via a basic JDBC connection.
import pandas as pd
import requests
import time
from pandas.io.json import json_normalize
import json

import my_creds

# datarobot parameters
API_KEY = my_creds.API_KEY
USERNAME = my_creds.USERNAME
DEPLOYMENT_ID = my_creds.DEPLOYMENT_ID
DATAROBOT_KEY = my_creds.DATAROBOT_KEY
# replace with the load balancer for your prediction instance(s)
DR_PREDICTION_HOST = my_creds.DR_PREDICTION_HOST
DR_APP_HOST = 'https://app.datarobot.com'

DR_MODELING_HEADERS = {'Content-Type': 'application/json', 'Authorization': 'token %s' % API_KEY}

headers = {'Content-Type': 'text/plain; charset=UTF-8', 'datarobot-key': DATAROBOT_KEY}

url = '{dr_prediction_host}/predApi/v1.0/deployments/{deployment_id}/'\
          'predictions'.format(dr_prediction_host=DR_PREDICTION_HOST, deployment_id=DEPLOYMENT_ID)

# snowflake parameters
SNOW_USER = my_creds.SNOW_USER
SNOW_PASS = my_creds.SNOW_PASS
You can leverage an existing data connection to connect to a database (see the data ingest page for an example using the UI). In the example below, the data connection uses a name lookup.
"""
 get a data connection by name, return None if not found
"""
def dr_get_data_connection(name):

    data_connection_id = None

    response = requests.get(
            DR_APP_HOST + '/api/v2/externalDataStores/',
            headers=DR_MODELING_HEADERS,
        )

    if response.status_code == 200:

        df = pd.io.json.json_normalize(response.json()['data'])[['id', 'canonicalName']]

        if df[df['canonicalName'] == name]['id'].size > 0:
            data_connection_id = df[df['canonicalName'] == name]['id'].iloc[0]

    else:

        print('Request failed; http error {code}: {content}'.format(code=response.status_code, content=response.content))

    return data_connection_id

data_connection_id = dr_get_data_connection('snow_3_12_0_titanic')
A Batch Prediction job needs credentials specified; Snowflake user credentials can be saved securely to the server to run the job. Note that applied DataRobot privileges are established via the DataRobot API token in the header level of the request or session. These privileges will "own" the prediction job created and must be able to access the deployed model. You can create or look up credentials for the database with the following code snippets.
# get a saved credential set, return None if not found
def dr_get_catalog_credentials(name, cred_type):
    if cred_type not in ['basic', 's3']:
        print('credentials type must be: basic, s3 - value passed was {ct}'.format(ct=cred_type))
        return None

    credentials_id = None

    response = requests.get(
            DR_APP_HOST + '/api/v2/credentials/',
            headers=DR_MODELING_HEADERS,
        )

    if response.status_code == 200:

        df = pd.io.json.json_normalize(response.json()['data'])[['credentialId', 'name', 'credentialType']]

        if df[(df['name'] == name) & (df['credentialType'] == cred_type)]['credentialId'].size > 0:
            credentials_id = df[(df['name'] == name) & (df['credentialType'] == cred_type)]['credentialId'].iloc[0]

    else:

        print('Request failed; http error {code}: {content}'.format(code=response.status_code, content=response.content))

    return credentials_id

# create credentials set
def dr_create_catalog_credentials(name, cred_type, user, password, token=None):
    if cred_type not in ['basic', 's3']:
        print('credentials type must be: basic, s3 - value passed was {ct}'.format(ct=cred_type))
        return None

    if cred_type == 'basic':
        json = {
            "credentialType": cred_type,
            "user": user,
            "password": password,
            "name": name
        }
    elif cred_type == 's3' and token != None:
        json = {
            "credentialType": cred_type,
            "awsAccessKeyId": user,
            "awsSecretAccessKey": password,
            "awsSessionToken": token,
            "name": name
        }
    elif cred_type == 's3' and token == None:
        json = {
            "credentialType": cred_type,
            "awsAccessKeyId": user,
            "awsSecretAccessKey": password,
            "name": name
        }

    response = requests.post(
        url = DR_APP_HOST + '/api/v2/credentials/',
        headers=DR_MODELING_HEADERS,
        json=json
    )

    if response.status_code == 201:

        return response.json()['credentialId']

    else:

        print('Request failed; http error {code}: {content}'.format(code=response.status_code, content=response.content))

# get or create a credential set
def dr_get_or_create_catalog_credentials(name, cred_type, user, password, token=None):
    cred_id = dr_get_catalog_credentials(name, cred_type)

    if cred_id == None:
        return dr_create_catalog_credentials(name, cred_type, user, password, token=None)
    else:
        return cred_id

credentials_id = dr_get_or_create_catalog_credentials('snow_community_credentials',
                                                      'basic', my_creds.SNOW_USER, my_creds.SNOW_PASS)
Create a session to define the job, which then submits the job and slots it to run asynchronously. DataRobot returns an HTTP 202 status code upon successful submission. You can retrieve the job state by querying the API for the current state of the job.
session = requests.Session()
session.headers = {
    'Authorization': 'Bearer {}'.format(API_KEY)
}
A table to hold the results is created in Snowflake with the following SQL statement, reflecting the structure below:
create or replace TABLE PASSENGERS_SCORED_BATCH_API (
    SURVIVED_1_PREDICTION NUMBER(10,9),
    SURVIVED_0_PREDICTION NUMBER(10,9),
    SURVIVED_PREDICTION NUMBER(38,0),
    THRESHOLD NUMBER(6,5),
    POSITIVE_CLASS NUMBER(38,0),
    PASSENGERID NUMBER(38,0)
);
The job specifies the following parameters:
| Name | Description |
|---|---|
| Source | Snowflake JDBC |
| Source data | Query results (simple select from passengers) |
| Source fetch size | 100,000 (max fetch data size) |
| Job concurrency | 4 prediction core threads requested |
| Passthrough columns | Keep the surrogate key PASSENGERID |
| Target table | PUBLIC.PASSENGERS_SCORED_BATCH_API |
statementType |
insert (data will be inserted into the table) |
job_details = {
    "deploymentId": DEPLOYMENT_ID,
    "numConcurrent": 4,
    "passthroughColumns": ["PASSENGERID"],
    "includeProbabilities": True,
    "predictionInstance" : {
        "hostName": DR_PREDICTION_HOST,
        "sslEnabled": false,
        "apiKey": API_KEY,
        "datarobotKey": DATAROBOT_KEY,
    },
    "intakeSettings": {
        "type": "jdbc",
        "fetchSize": 100000,
        "dataStoreId": data_connection_id,
        "credentialId": credentials_id,
        #"table": "PASSENGERS_500K",
        #"schema": "PUBLIC",
        "query": "select * from PASSENGERS"
    },
    'outputSettings': {
        "type": "jdbc",
        "table": "PASSENGERS_SCORED_BATCH_API",
        "schema": "PUBLIC",
        "statementType": "insert",
        "dataStoreId": data_connection_id,
        "credentialId": credentials_id
    }
}
Upon successful job submission, the DataRobot response provides a link to check job state and details.
response = session.post(
        DR_APP_HOST + '/api/v2/batchPredictions',
        json=job_details
    )
The job may or may not be in the queue, depending on whether other jobs are in front of it. Once launched, it proceeds to initialization and then runs through stages until aborted or completed. You can create a loop to repetitively check the state of the asynchronous job and hold control of a process until the job completes with an ABORTED or COMPLETED status.
if response.status_code == 202:

    job = response.json()
    print('queued batch job: {}'.format(job['links']['self']))

    while job['status'] == 'INITIALIZING':
        time.sleep(3)
        response = session.get(job['links']['self'])
        response.raise_for_status()
        job = response.json()

    print('completed INITIALIZING')

    if job['status'] == 'RUNNING':

        while job['status'] == 'RUNNING':
            time.sleep(3)
            response = session.get(job['links']['self'])
            response.raise_for_status()
            job = response.json()

    print('completed RUNNING')
    print('status is now {status}'.format(status=job['status']))

    if job['status'] != 'COMPLETED':
        for i in job['logs']:
            print(i)

else:

    print('Job submission failed; http error {code}: {content}'.format(code=response.status_code, content=response.content))
Code for this exercise is available in GitHub.
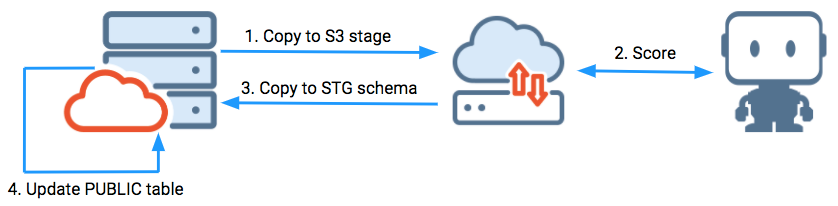
S3 scoring with pre/post SQL (new records)
This example highlights using an S3 pipeline between Snowflake sources and targets. Pre- or post-processing in SQL is not required.
This example shows:
-
Scoring changes of new records based on pre-scoring retrieval of the last successful scoring run.
-
A post-scoring process that populates a target table and updates the successful ETL run history.
In the example, data is loaded into an STG schema on Snowflake that exists to support an ETL/ELT pipeline. It is then updated into the target presentation table in the PUBLIC schema via a bulk update. It uses bulk updates because individual update statements would be very slow on Snowflake and other analytic databases vs. traditional row-store operational databases.
The target presentation table contains a single field for reporting purposes from the scored results table (the SURVIVAL field). Using S3 allows using stage objects on data extract and load. Using discrete operations separate from scoring can minimize the time an ETL compute warehouse is up and running during the pipeline operations.
Considerations that may result in S3 being part of a scoring pipeline include:
- Leveraging Snowflake's native design to write to S3 (and possibly shred the data into multiple files).
- Using the native bulk insert capability.
- Currently, Snowflake compute warehouses charge based on the first 60 seconds of spin-up for a cluster, then each second after that. The prior methods (above) stream data out and in via JDBC and will keep a cluster active throughout the scoring process. Discretely separating out extract, scoring, and ingest steps may reduce the time the compute warehouse is actually running, which can result in cost reductions.
- S3 inputs and scored sets could easily be used to create a point-in-time archive of data.
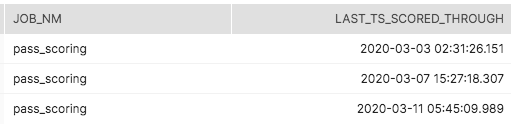
In this example, a simple ETL_HISTORY table shows the scoring job history. The name of the job is pass_scoring, and the last three times it ran were March 3rd, 7th, and 11th.
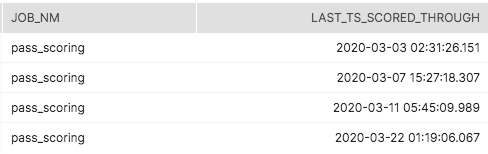
The next job scores any changed records greater than or equal to the last run, but before the current job run timestamp. Upon successful completion of the job, a new record will be placed into this table.

Of the 500k records in this table that were scored:
- Row 1 in this example will not be scored; it has not changed since the prior successful ETL run on the 11th.
- Row 2 will be re-scored, as it was updated on the 20th.
- Row 3 will be scored for the first time, as it was newly created on the 19th.
Following are initial imports and various environment variables for DataRobot, Snowflake, and AWS S3:
import pandas as pd
import requests
import time
from pandas.io.json import json_normalize
import snowflake.connector

import my_creds

# datarobot parameters
API_KEY = my_creds.API_KEY
USERNAME = my_creds.USERNAME
DEPLOYMENT_ID = my_creds.DEPLOYMENT_ID
DATAROBOT_KEY = my_creds.DATAROBOT_KEY
# replace with the load balancer for your prediction instance(s)
DR_PREDICTION_HOST = my_creds.DR_PREDICTION_HOST
DR_APP_HOST = 'https://app.datarobot.com'

DR_MODELING_HEADERS = {'Content-Type': 'application/json', 'Authorization': 'token %s' % API_KEY}

# snowflake parameters
SNOW_ACCOUNT = my_creds.SNOW_ACCOUNT
SNOW_USER = my_creds.SNOW_USER
SNOW_PASS = my_creds.SNOW_PASS
SNOW_DB = 'TITANIC'
SNOW_SCHEMA = 'PUBLIC'

# ETL parameters
JOB_NAME = 'pass_scoring'
Similar to the previous example, you must specify credentials to leverage S3. You can create, save, or look up credentials for S3 access with the following code snippets. The account must have privileges to access the same area that the Snowflake Stage object is using to read/write data from (see Snowflake's Creating the Stage article for more information).
# get a saved credential set, return None if not found
def dr_get_catalog_credentials(name, cred_type):
    if cred_type not in ['basic', 's3']:
        print('credentials type must be: basic, s3 - value passed was {ct}'.format(ct=cred_type))
        return None

    credentials_id = None

    response = requests.get(
            DR_APP_HOST + '/api/v2/credentials/',
            headers=DR_MODELING_HEADERS,
        )

    if response.status_code == 200:

        df = pd.io.json.json_normalize(response.json()['data'])[['credentialId', 'name', 'credentialType']]

        if df[(df['name'] == name) & (df['credentialType'] == cred_type)]['credentialId'].size > 0:
            credentials_id = df[(df['name'] == name) & (df['credentialType'] == cred_type)]['credentialId'].iloc[0]

    else:

        print('Request failed; http error {code}: {content}'.format(code=response.status_code, content=response.content))

    return credentials_id

# create credentials set
def dr_create_catalog_credentials(name, cred_type, user, password, token=None):
    if cred_type not in ['basic', 's3']:
        print('credentials type must be: basic, s3 - value passed was {ct}'.format(ct=cred_type))
        return None

    if cred_type == 'basic':
        json = {
            "credentialType": cred_type,
            "user": user,
            "password": password,
            "name": name
        }
    elif cred_type == 's3' and token != None:
        json = {
            "credentialType": cred_type,
            "awsAccessKeyId": user,
            "awsSecretAccessKey": password,
            "awsSessionToken": token,
            "name": name
        }
    elif cred_type == 's3' and token == None:
        json = {
            "credentialType": cred_type,
            "awsAccessKeyId": user,
            "awsSecretAccessKey": password,
            "name": name
        }

    response = requests.post(
        url = DR_APP_HOST + '/api/v2/credentials/',
        headers=DR_MODELING_HEADERS,
        json=json
    )

    if response.status_code == 201:

        return response.json()['credentialId']

    else:

        print('Request failed; http error {code}: {content}'.format(code=response.status_code, content=response.content))

# get or create a credential set
def dr_get_or_create_catalog_credentials(name, cred_type, user, password, token=None):
    cred_id = dr_get_catalog_credentials(name, cred_type)

    if cred_id == None:
        return dr_create_catalog_credentials(name, cred_type, user, password, token=None)
    else:
        return cred_id

credentials_id = dr_get_or_create_catalog_credentials('s3_community',
                                                      's3', my_creds.SNOW_USER, my_creds.SNOW_PASS)
Next, create a connection to Snowflake and use the last successful run time and current time to create the bounds for determining which newly created or recently updated rows must be scored:
# create a connection
ctx = snowflake.connector.connect(
    user=SNOW_USER,
    password=SNOW_PASS,
    account=SNOW_ACCOUNT,
    database=SNOW_DB,
    schema=SNOW_SCHEMA,
    protocol='https',
        application='DATAROBOT',
)

# create a cursor
cur = ctx.cursor()

# execute sql to get start/end timestamps to use
sql = "select last_ts_scored_through, current_timestamp::TIMESTAMP_NTZ cur_ts " \
    "from etl_history " \
    "where job_nm = '{job}' " \
    "order by last_ts_scored_through desc " \
    "limit 1 ".format(job=JOB_NAME)
cur.execute(sql)

# fetch results into dataframe
df = cur.fetch_pandas_all()
start_ts = df['LAST_TS_SCORED_THROUGH'][0]
end_ts = df['CUR_TS'][0]
Dump the data out to S3.
# execute sql to dump data into a single file in S3 stage bucket
# AWS single file snowflake limit 5 GB
sql = "COPY INTO @S3_SUPPORT/titanic/community/" + JOB_NAME + ".csv " \
    "from " \
    "( " \
    " select passengerid, pclass, name, sex, age, sibsp, parch, ticket, fare, cabin, embarked " \
    " from passengers_500k_ts " \
    " where nvl(updt_ts, crt_ts) >= '{start}' " \
    " and nvl(updt_ts, crt_ts) < '{end}' " \
    ") " \
    "file_format = (format_name='default_csv' compression='none') header=true overwrite=true single=true;".format(start=start_ts, end=end_ts)
cur.execute(sql)
Next, create a session to perform the DataRobot Batch Prediction API scoring job submission and monitor its progress.
session = requests.Session()
session.headers = {
    'Authorization': 'Bearer {}'.format(API_KEY)
}
The job is defined to take the file dump from Snowflake as input and then create a file with _scored appended in the same S3 path. The example specifies a concurrency of 4 prediction cores with passthrough of the surrogate key PASSENGERID to be joined on later.
INPUT_FILE = 's3://'+ my_creds.S3_BUCKET + '/titanic/community/' + JOB_NAME + '.csv'
OUTPUT_FILE = 's3://'+ my_creds.S3_BUCKET + '/titanic/community/' + JOB_NAME + '_scored.csv'

job_details = {
    'deploymentId': DEPLOYMENT_ID,
    'passthroughColumns': ['PASSENGERID'],
    'numConcurrent': 4,
    "predictionInstance" : {
        "hostName": DR_PREDICTION_HOST,
        "datarobotKey": DATAROBOT_KEY
    },
    'intakeSettings': {
        'type': 's3',
        'url': INPUT_FILE,
        'credentialId': credentials_id
    },
    'outputSettings': {
        'type': 's3',
        'url': OUTPUT_FILE,
        'credentialId': credentials_id
    }
}
Submit the job for processing and retrieve a URL for monitoring.
response = session.post(
        DR_APP_HOST + '/api/v2/batchPredictions',
        json=job_details
    )
Hold control until the job completes.
if response.status_code == 202:

    job = response.json()
    print('queued batch job: {}'.format(job['links']['self']))

    while job['status'] == 'INITIALIZING':
        time.sleep(3)
        response = session.get(job['links']['self'])
        response.raise_for_status()
        job = response.json()

    print('completed INITIALIZING')

    if job['status'] == 'RUNNING':

        while job['status'] == 'RUNNING':
            time.sleep(3)
            response = session.get(job['links']['self'])
            response.raise_for_status()
            job = response.json()

    print('completed RUNNING')
    print('status is now {status}'.format(status=job['status']))

    if job['status'] != 'COMPLETED':
        for log in job['logs']:
            print(log)

else:

    print('Job submission failed; http error {code}: {content}'.format(code=response.status_code, content=response.content))
Upon completion, load the staging table into the STG schema table PASSENGERS_SCORED_BATCH_API with the prediction results via a truncate and bulk load operation.
# multi-statement executions
# https://docs.snowflake.com/en/user-guide/python-connector-api.html#execute_string

# truncate and load STG schema table with scored results
sql = "truncate titanic.stg.PASSENGERS_SCORED_BATCH_API; " \
    " copy into titanic.stg.PASSENGERS_SCORED_BATCH_API from @S3_SUPPORT/titanic/community/" + JOB_NAME + "_scored.csv" \
    " FILE_FORMAT = 'DEFAULT_CSV' ON_ERROR = 'ABORT_STATEMENT' PURGE = FALSE;"
ctx.execute_string(sql)
Finally, create a transaction to update the presentation table with the latest survivability scores towards the positive class label 1 of survival. The ETL history is updated upon successful completion of all tasks.
# update target presentation table and ETL history table in transaction

sql = \
    "begin; " \
    "update titanic.public.passengers_500k_ts trg " \
    "set trg.survival = src.survived_1_prediction " \
    "from titanic.stg.PASSENGERS_SCORED_BATCH_API src " \
    "where src.passengerid = trg.passengerid; " \
    "insert into etl_history values ('{job}', '{run_through_ts}'); " \
    "commit; ".format(job=JOB_NAME, run_through_ts=end_ts)
ctx.execute_string(sql)
Rows 2 and 3 are updated with new survival scores as expected.

ETL history is updated and subsequent runs are now based on the (most recent) successful timestamp.
Code for this example is available in GitHub.
Enhancements to consider:
- Add error handling, scoring or otherwise, that suits your workflow and toolset.
- Incorporate serverless technology, like AWS Lambda, into scoring workflows to kick off a job based on an event, like S3 object creation.
- As data volumes grow, consider the following. Snowflake single statement dumps and ingests seem to perform best around 8 threads per cluster node, e.g., a 2-node Small will not ingest a single file any faster than 1-node XSmall instance. An XSmall would likely perform best with 8 or more file shreds.