Deploy and monitor ML.NET models with DataRobot MLOps
This page explores how models built with ML.NET can be deployed and monitored with DataRobot MLOps. ML.NET is an open-source machine learning framework created by Microsoft for the .NET developer platform. To learn more, see What is ML.NET?.
The examples on this page use the public LendingClub dataset.
You want to predict the likelihood of a loan applicant defaulting; in machine learning, this is referred to as a "binary classification problem." You can solve this with DataRobot AutoML, but in this case, you will create the model with ML.NET, deploy it into production, and monitor it with DataRobot MLOps. DataRobot MLOps allows you to monitor all of your models in one central dashboard, regardless of the source or programming language.
Before deploying a model to DataRobot MLOps, you must create a new ML.NET model, and then create an ML.NET environment for DataRobot MLOps.
Note
This DataRobot MLOps ML.NET environment only has to be created once, and if you only require support for binary classification and regression models, you can skip this step and use the existing "DataRobot ML.NET Drop-In" environment from the DataRobot Community GitHub.
Prerequisites
To start building .NET apps, download and install the .NET software development kit (SDK). To install the SDK, follow the steps outlined in the .NET intro.
-
Once you've installed the .NET SDK, open a new terminal and run the following command:
dotnet -
If the previous command runs without error, you can proceed with the next step and install the ML.NET framework with the following command:
dotnet tool install -g mlnet
Create the ML.NET model
If the installation of the ML.NET framework is successful, create the ML.NET model:
mkdir DefaultMLApp
cd DefaultMLApp
dotnet new console -o consumeModelApp

dotnet classification --dataset "10K_Lending_Club_Loans.csv" --label-col "is_bad" --train-time 1000
Evaluate your model
After the ML.NET CLI selects the best model, it displays the experiment results—a summary of the exploration process—including how many models were explored in the given training time.
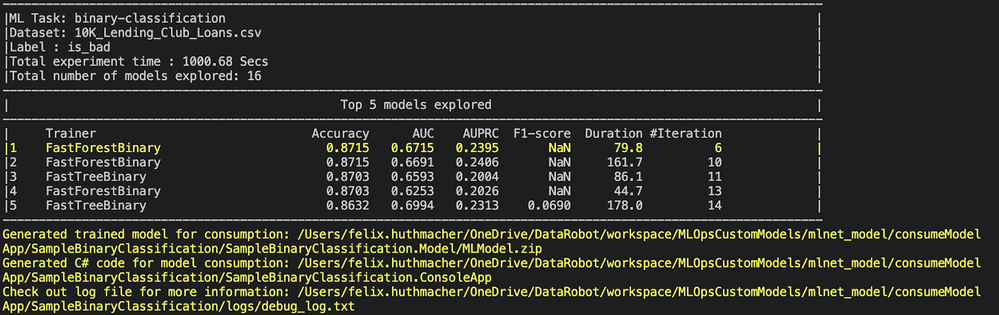
While the ML.NET CLI generates code for the highest performing model, it also displays up to five models with the highest accuracy found during the given exploration time. It displays several evaluation metrics for those top models, including AUC, AUPRC, and F1-score.
Test your model
The ML.NET command-line interface (CLI) generates the machine learning model and adds the .NET apps and libraries needed to train and consume the model. The files created include the following:
-
A .NET console app (
SampleBinaryClassification.ConsoleApp), which containsModelBuilder.cs(builds and trains the model) andProgram.cs(runs the model). -
A .NET Standard class library (
SampleBinaryClassification.Model), which containsModelInput.csandModelOutput.cs(the input and output classes for model training and consumption) andMLModel.zip(a generated serialized ML model).
To test the model, run the console app (SampleBinaryClassification.ConsoleApp), which predicts the likelihood of default for a single applicant:
cd SampleClassification/SampleClassification.ConsoleApp
dotnet run
Create a DataRobot MLOps environment package
While DataRobot provides many environment templates out of the box (including R, Python, Java, PyTorch, etc.), this section shows how to create your own runtime environment, from start to finish, using ML.NET.
To make an easy-to-use, reusable environment, follow the below guidelines:
-
Your environment package must include a Dockerfile to install dependencies and an executable
start_server.shscript to start the model server. -
Your custom models require a simple webserver to make predictions. The model server script can be co-located within the model package or separated into an environment package; however, it should be in a separate environment package, which allows you to use it for multiple models leveraging the same programming language.
-
A Dockerfile that copies all code and the
start_server.shscript to/opt/code/. You can download the code for the MLOps environment package from the DataRobot Community GitHub. -
The web server must be listening on port
8080and implement the following routes:-
GET /{URL_PREFIX}/: Checks if the model's server is running. -
POST /{URL_PREFIX}/predict/: Makes predictions. The{URL_PREFIX}is passed as an environment variable to the container and must be handled by your webserver accordingly. The data itself is expected in a multiform request.Request format:
Binary Classification Regression 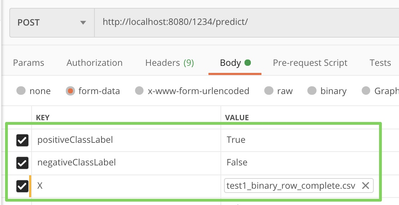
Response format:
Binary Classification Regression {"predictions":[{"True": 0.0, "False": 1.0}]}{"predictions": [12.3]}
-
DataRobot MLOps runs extensive tests before deploying a custom model to ensure reliability; therefore, it is essential that your webserver handles missing values and returns results in the expected response format as outlined above.
As previously mentioned, you need to use port 8080 so that DataRobot can correctly identify the webserver. Therefore, in appsettings.json, specify port 8080 for the Kestrel web server, as shown below:
    {
      "Kestrel": {
        "EndPoints": {
          "Http": {
            "Url": "http://0.0.0.0:8080"
          }
        }
      }
    }
Initialize the model code (mlContext, mlModel, and predEngine) in the Startup.cs class. This allows .NET to recognize file changes whenever you create a new model package.
// Initialize MLContext
MLContext ctx = new MLContext();
// Load the model
DataViewSchema modelInputSchema;
ITransformer mlModel = ctx.Model.Load(modelPath, out modelInputSchema);
// Create a prediction engine & pass it to our controller
predictionEngine = ctx.Model.CreatePredictionEngine<ModelInput,ModelOutput>(mlModel);
The start_server.sh shell script is responsible for starting the model server in the container. If you packaged the model and server together, you only need the compiled version, and the shell script runs dotnet consumeModelApp.dll. Since you have the model code and the server environment code separated for reusability, recompile from the source at container startup, as in the command below:
    #!/bin/sh
    export DOTNET_CLI_HOME="/tmp/DOTNET_CLI_HOME"
    export DOTNET_CLI_TELEMETRY_OPTOUT="1"
    export TMPDIR=/tmp/NuGetScratch/
    mkdir -p ${TMPDIR}
    rm -rf obj/ bin/
    dotnet clean
    dotnet build
    dotnet run
    # to ensure Docker container keeps running
    tail -f /dev/null
Before uploading your custom environment to DataRobot MLOps, compress your custom environment code to a tarball, as shown below:
tar -czvf mlnetenvironment.tar.gz -C DRMLOps_MLNET_environment/.
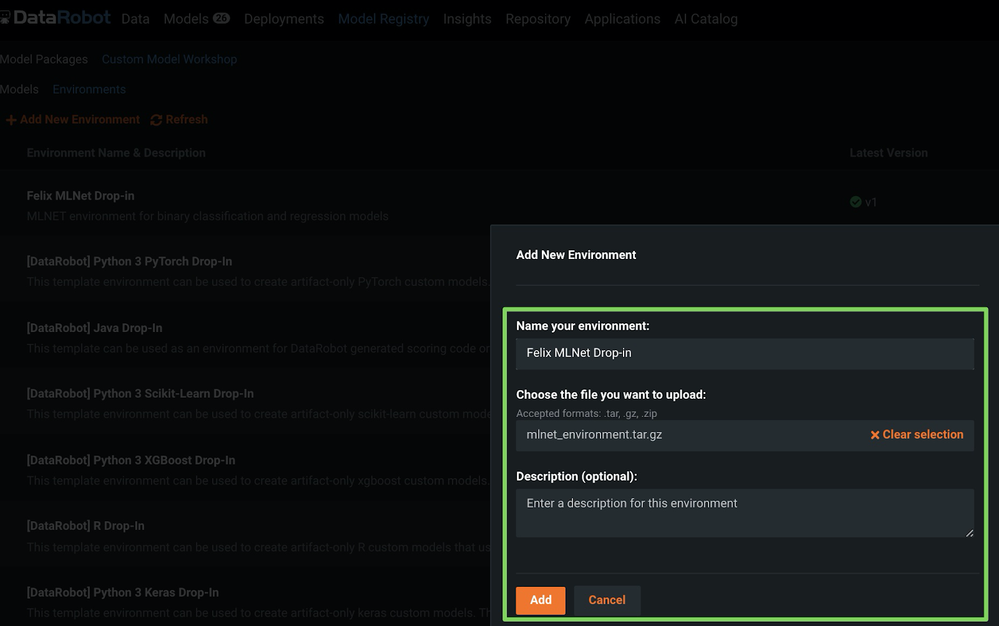
Upload the DataRobot MLOps environment package
To upload the new MLOps ML.NET environment, refer to the instructions on creating a new custom model environment (see the screenshot below).
Upload and test the ML.NET model in DataRobot MLOps
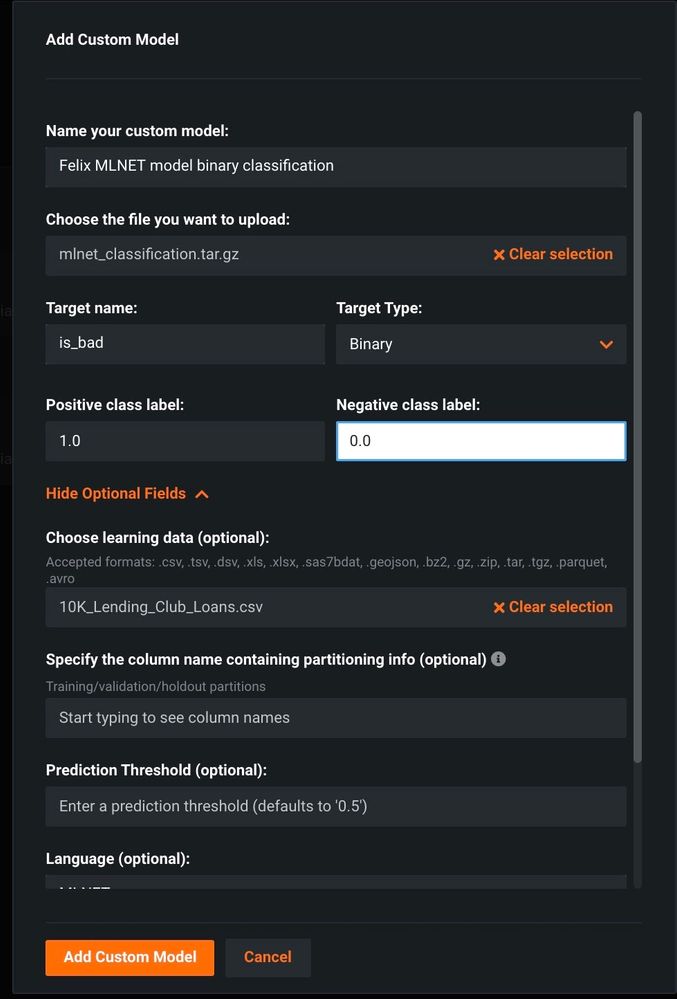
Once the environment is created, create a new custom model entity and upload the actual model (MLModel.zip and ModelInput.cs).
To upload the new ML.NET model, refer to the instructions on creating a new custom inference model.
After creating the environment and model within DataRobot MLOps, upload test data to confirm it works as expected (as shown in the following screenshot).
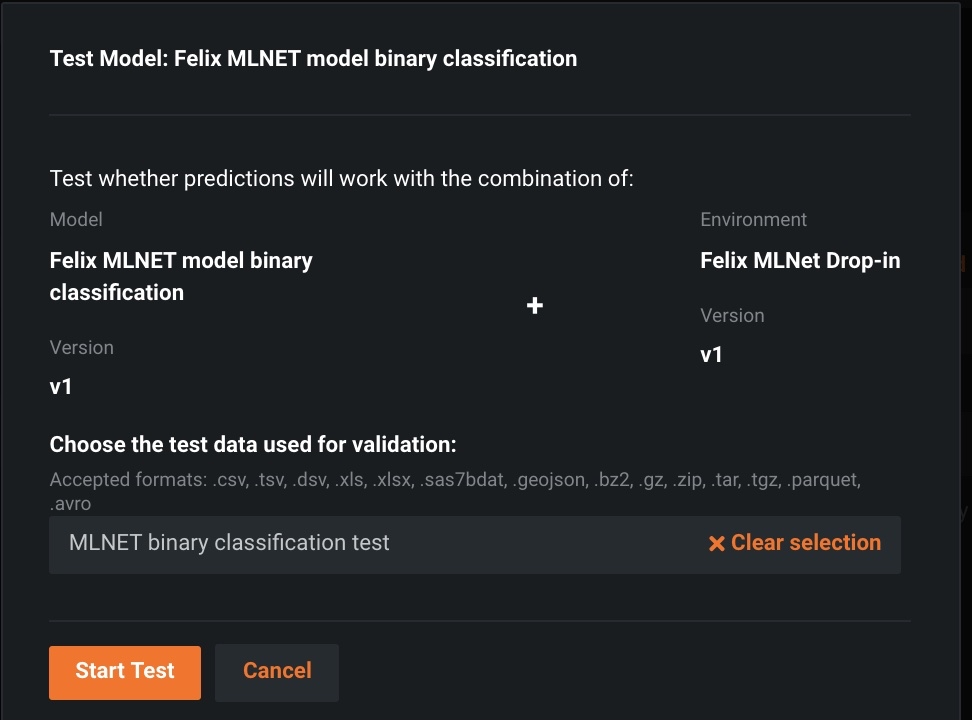
During this phase, DataRobot runs a test to determine how the model handles missing values and whether or not the internal webserver adheres to the response format.
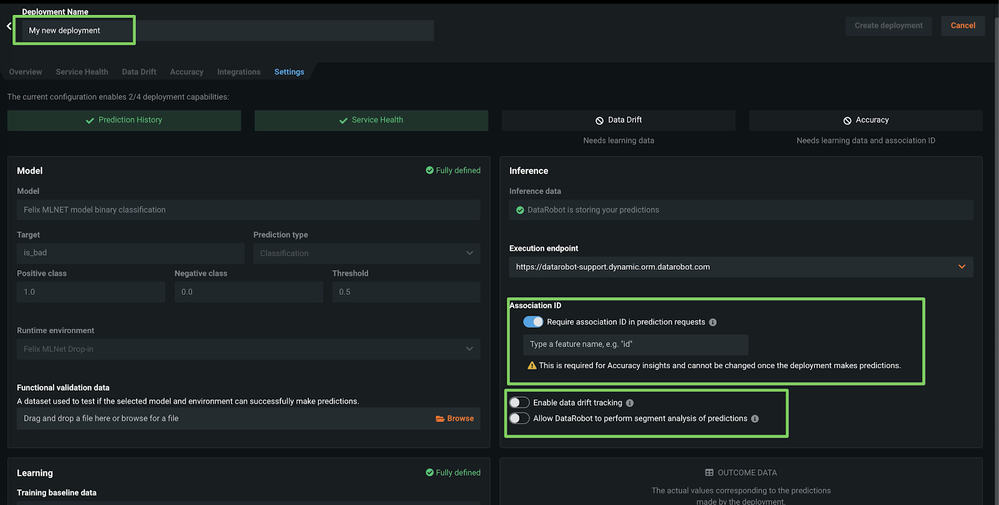
Make predictions with the new ML.NET model
Once the tests are complete, deploy the custom model using the settings below:
When this step is complete, you can make predictions with your new custom model as with any other DataRobot model (see also Postman collection):
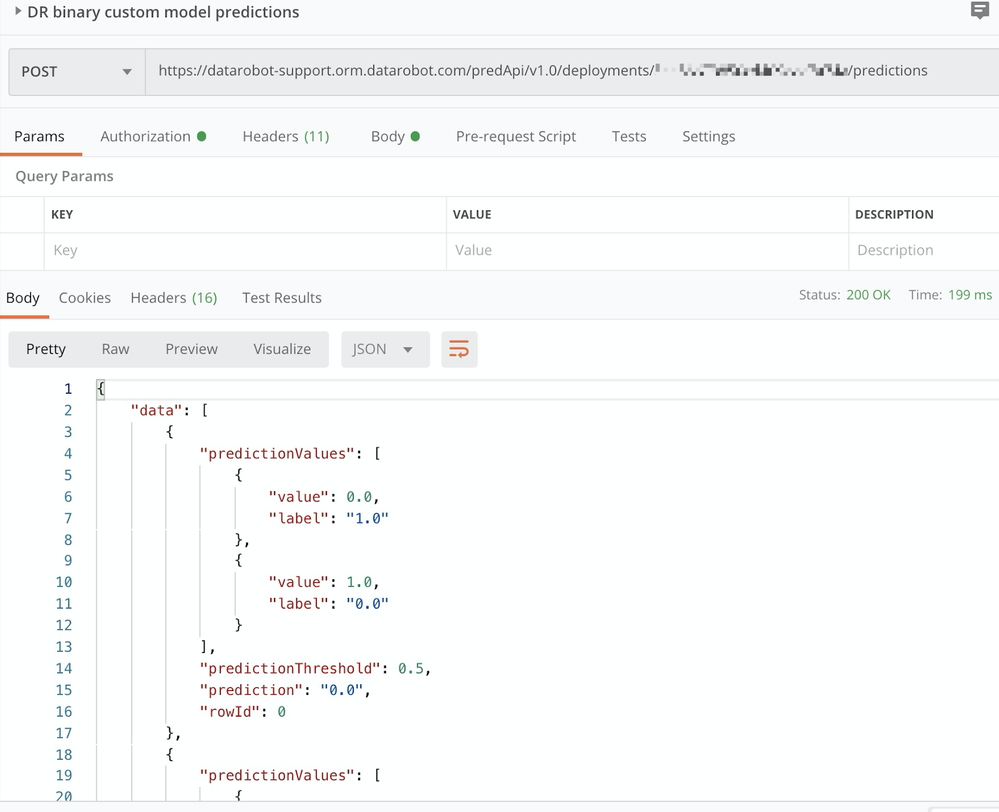
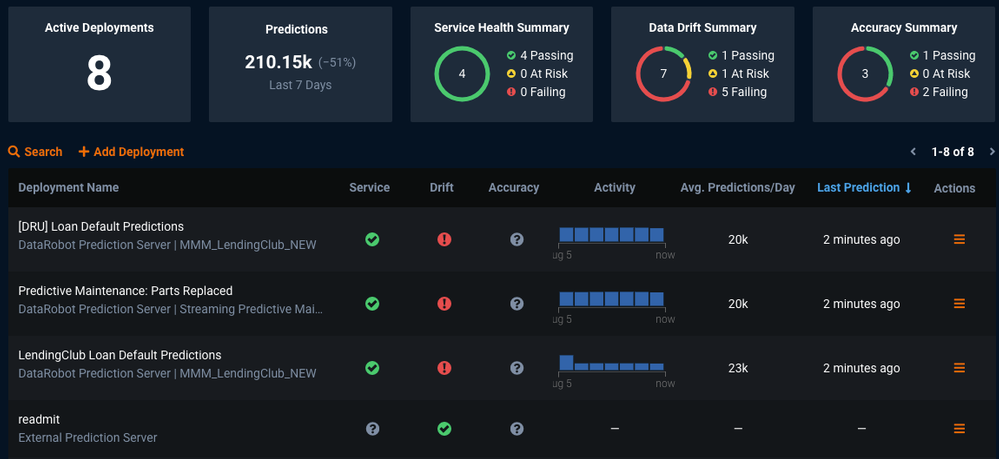
Even though you built the model outside of DataRobot with ML.NET, you can use it like any other DataRobot model and track service health and data drift in one central dashboard, shown below: