BigQuery & Google Drive
DataRobot supports using Google's BigQuery and Google Drive as a source for data ingestion. Connections can be configured using a GCP Service Account or using OAuth.
設定
The configuration is carried out in two locations: the customer's Google Console and DataRobot.
Google OAuth application
An OAuth application must be created in the Google Cloud Console if it's being used. Google provides documentation on how to set up an app to use their OAuth Consent Screen here: https://developers.google.com/workspace/guides/configure-oauth-consent
To support BigQuery ingestion, the following scopes must be added to the OAuth application:
https://www.googleapis.com/auth/devstorage.read_writehttps://www.googleapis.com/auth/bigquery
To support Google Drive ingestion, the following scopes must be added to the OAuth application:
https://www.googleapis.com/auth/drive
You also need to create the OAuth application credentials. Google provides documentation on how to set up OAuth Client ID credentials here: https://developers.google.com/workspace/guides/create-credentials
The Authorized JavaScript origins URI should be the base URL of the DataRobot cluster, looking something like this:
https://my.datarobot.net
For BigQuery and Google Drive, the Authorized redirect URIs should be the DataRobot path. It should look like this:
https://my.datarobot.net/account/google/google_authz_return
Note for existing BigQuery OAuth users
If you were previously using redirect URI
https://my.datarobot.net/account/google/bigquery_authz_return, it's recommended to update to new redirect URIhttps://my.datarobot.net/account/google/google_authz_return.The old redirect URI
https://my.datarobot.net/account/google/bigquery_authz_returnis deprecated soon. If you need to continue using the old redirect URI, please set the EngConfigBIGQUERY_OAUTH_USE_OLD_REDIRECT_URItoTrue
Once you've created the Client ID, download the JSON file containing the client_id and client_secret needed for the DataRobot settings below. You can find this file in the details screen of the OAuth Client ID just created. Steps for setting these credentials in the DataRobot app are detailed later in this document.
Note: The OAuth Client app need to be either Internal or External. If it's External, then user emails need to be listed in the Users section of the Consent Screen page.
Google service account
Google provides Service Accounts that can connect to their APIs. Google also provides documentation on how to set up a service account here: https://cloud.google.com/iam/docs/creating-managing-service-accounts
When creating the service account, the following pre-made roles provide the necessary permissions for DataRobot to ingest data from BigQuery tables:
BigQuery UserBigQuery Data Editor
After creating the Service Account, you need to create an API Key. Google provides documentation on how to set up service account keys here: https://cloud.google.com/iam/docs/creating-managing-service-account-keys
The key needs to be JSON type. It should looks something like this:
{
  "type": "service_account",
  "project_id": "PROJECT_ID",
  "private_key_id": "KEY_ID",
  "private_key": "-----BEGIN PRIVATE KEY-----\nPRIVATE_KEY\n-----END PRIVATE KEY-----\n",
  "client_email": "SERVICE_ACCOUNT_EMAIL",
  "client_id": "CLIENT_ID",
  "auth_uri": "https://accounts.google.com/o/oauth2/auth",
  "token_uri": "https://accounts.google.com/o/oauth2/token",
  "auth_provider_x509_cert_url": "https://www.googleapis.com/oauth2/v1/certs",
  "client_x509_cert_url": "https://www.googleapis.com/robot/v1/metadata/x509/SERVICE_ACCOUNT_EMAIL"
}
Download that JSON file. Steps for using the credentials here are detailed later in this document.
DataRobot settings
Config settings for OAuth method
The following configuration allows DataRobot to acquire the customer’s Google credentials and enables an on-prem installation to use the OAuth settings. This uses the credentials set up in the Google OAuth Application section above.
You need to inject the OAuth credentials as part of the umbrella configuration using the following configuration as part of the core chart.
core:
  config_env_vars:
    GOOGLE_AUTH_CLIENT_ID: 'client-id-string-from-google-configuration.apps.googleusercontent.com'
    GOOGLE_AUTH_CLIENT_SECRET: 'client-secret-string-from-google-configuration'

  config_secrets_vars:
    GOOGLE_AUTH_CLIENT_ID:
      env: GOOGLE_AUTH_CLIENT_ID
    GOOGLE_AUTH_CLIENT_SECRET:
      env: GOOGLE_AUTH_CLIENT_SECRET
This is configured into the secret datarobot-secrets/50-dbs.json and inject those variables into all Pods.
JDBC Driver – scripted
Note: The BigQuery JDBC driver is deprecated. The Google BigQuery connector is recommended instead. For details, please see
Supported Data Storesin the DataRobot documentation.
DataRobot interacts with BigQuery via JDBC. To facilitate this, you need to create a driver in DataRobot. This can be done manually or via a Python script. The Python script method is recommended.
To do this, a user need to enable the following permission in DataRobot:
Can manage JDBC database drivers
The user needs a valid API Key, which can be created in the user's Developer Tools section of the DataRobot UI.
Finally, the user need to create a Python script that can be used to upload Google's JDBC driver to DataRobot. An example script is included below. You need to run this from a machine where the user can install the DataRobot Python Package. This can be done from the cluster provisioner node or a workstation, as long as access to the cluster's API endpoint is available.
API Endpoint example:
https://my.datarobot.net/api/v2
You can find the Google drivers at this location: https://cloud.google.com/bigquery/docs/reference/odbc-jdbc-drivers#current_jdbc_driver
The JDBC 4.2-compatible link is what you want. You just want the link address though, as the Python script downloads the zip file and uploads the jars for the driver to DataRobot.
Example Python script
This script downloads a JDBC driver zip file from Google, unzips it, then uploads it to the cluster. It has defaults for the driver URL, the driver friendly name, and the Java class name. You can override these on the command-line.
#! /usr/bin/env python3

# ----- imports -----
import datarobot as dr
import argparse
import sys
import requests
import zipfile
import os


# ----- variables -----
gcp_default_url = 'https://storage.googleapis.com/simba-bq-release/jdbc/SimbaJDBCDriverforGoogleBigQuery42_1.2.23.1027.zip'
dest_file = '/tmp/big_query_driver_bundle.zip'
dest_folder = '/tmp/bigqueryjars'

# ----- functions -----

def check_arg(args=None):
    parser = argparse.ArgumentParser(description='A tool to build the GCP BigQuery driver')
    parser.add_argument('--endpoint', help='DataRobot cluster API endpoint.', required='True')
    parser.add_argument('--api-token', help='DataRobot cluster user API Token', required='True')
    parser.add_argument('--gcp-driver-url', help='URL for the GCP BigQuery driver', default=f'{gcp_default_url}')
    parser.add_argument('--canonical-name', help='User friendly name for the driver', default='GCP_BigQuery_Driver')
    parser.add_argument('--class-name', help='Class name for the driver', default='com.simba.googlebigquery.jdbc.Driver')

    return parser.parse_args(args)

def download_zip(url):
    # download the file and store in /tmp
    response = requests.get(url)
    with open(dest_file, 'wb') as f:
        f.write(response.content)

def unzip_driver_bundle(path):
    # os.mkdir(dest_folder)
    with zipfile.ZipFile(dest_file, 'r') as zip_ref:
        zip_ref.extractall(dest_folder)

def get_jar_list(path):
    jar_list = []
    for file in os.listdir(path):
        if file.endswith(".jar"):
            jar_list.append(f'{path}/{file}')
    return jar_list

def create_datadriver(jarlist, args):
    dr.Client(token=args.api_token, endpoint=args.endpoint)
    dr.DataDriver.create(
       class_name=args.class_name,
       canonical_name=args.canonical_name,
       files=jarlist
    )


# ----- main ----
def main(arguments):
    print(arguments)
    download_zip(arguments.gcp_driver_url)
    unzip_driver_bundle(dest_folder)
    jars = get_jar_list(dest_folder)
    create_datadriver(jars, arguments)


if __name__ == '__main__':
    args = check_arg(sys.argv[1:])
    main(args)
Create this script as bigquery_driver.py. It can then be executed like this:
$ python3 bigquery_driver.py --endpoint https://my.datarobot.net/api/v2 --api-token <put the user's API key here>
The script has a default driver it downloads, but to specify a particular one, invoke the script like this:
$ python3 bigquery_driver.py --endpoint https://my.datarobot.net/api/v2 --api-token <put the user's API key here> --gcp-driver-url GCP_DRIVER_URL
Once complete, you can find the new JDBC driver in the JDBC Drivers tab of the user's DataRobot UI. It looks something like this:
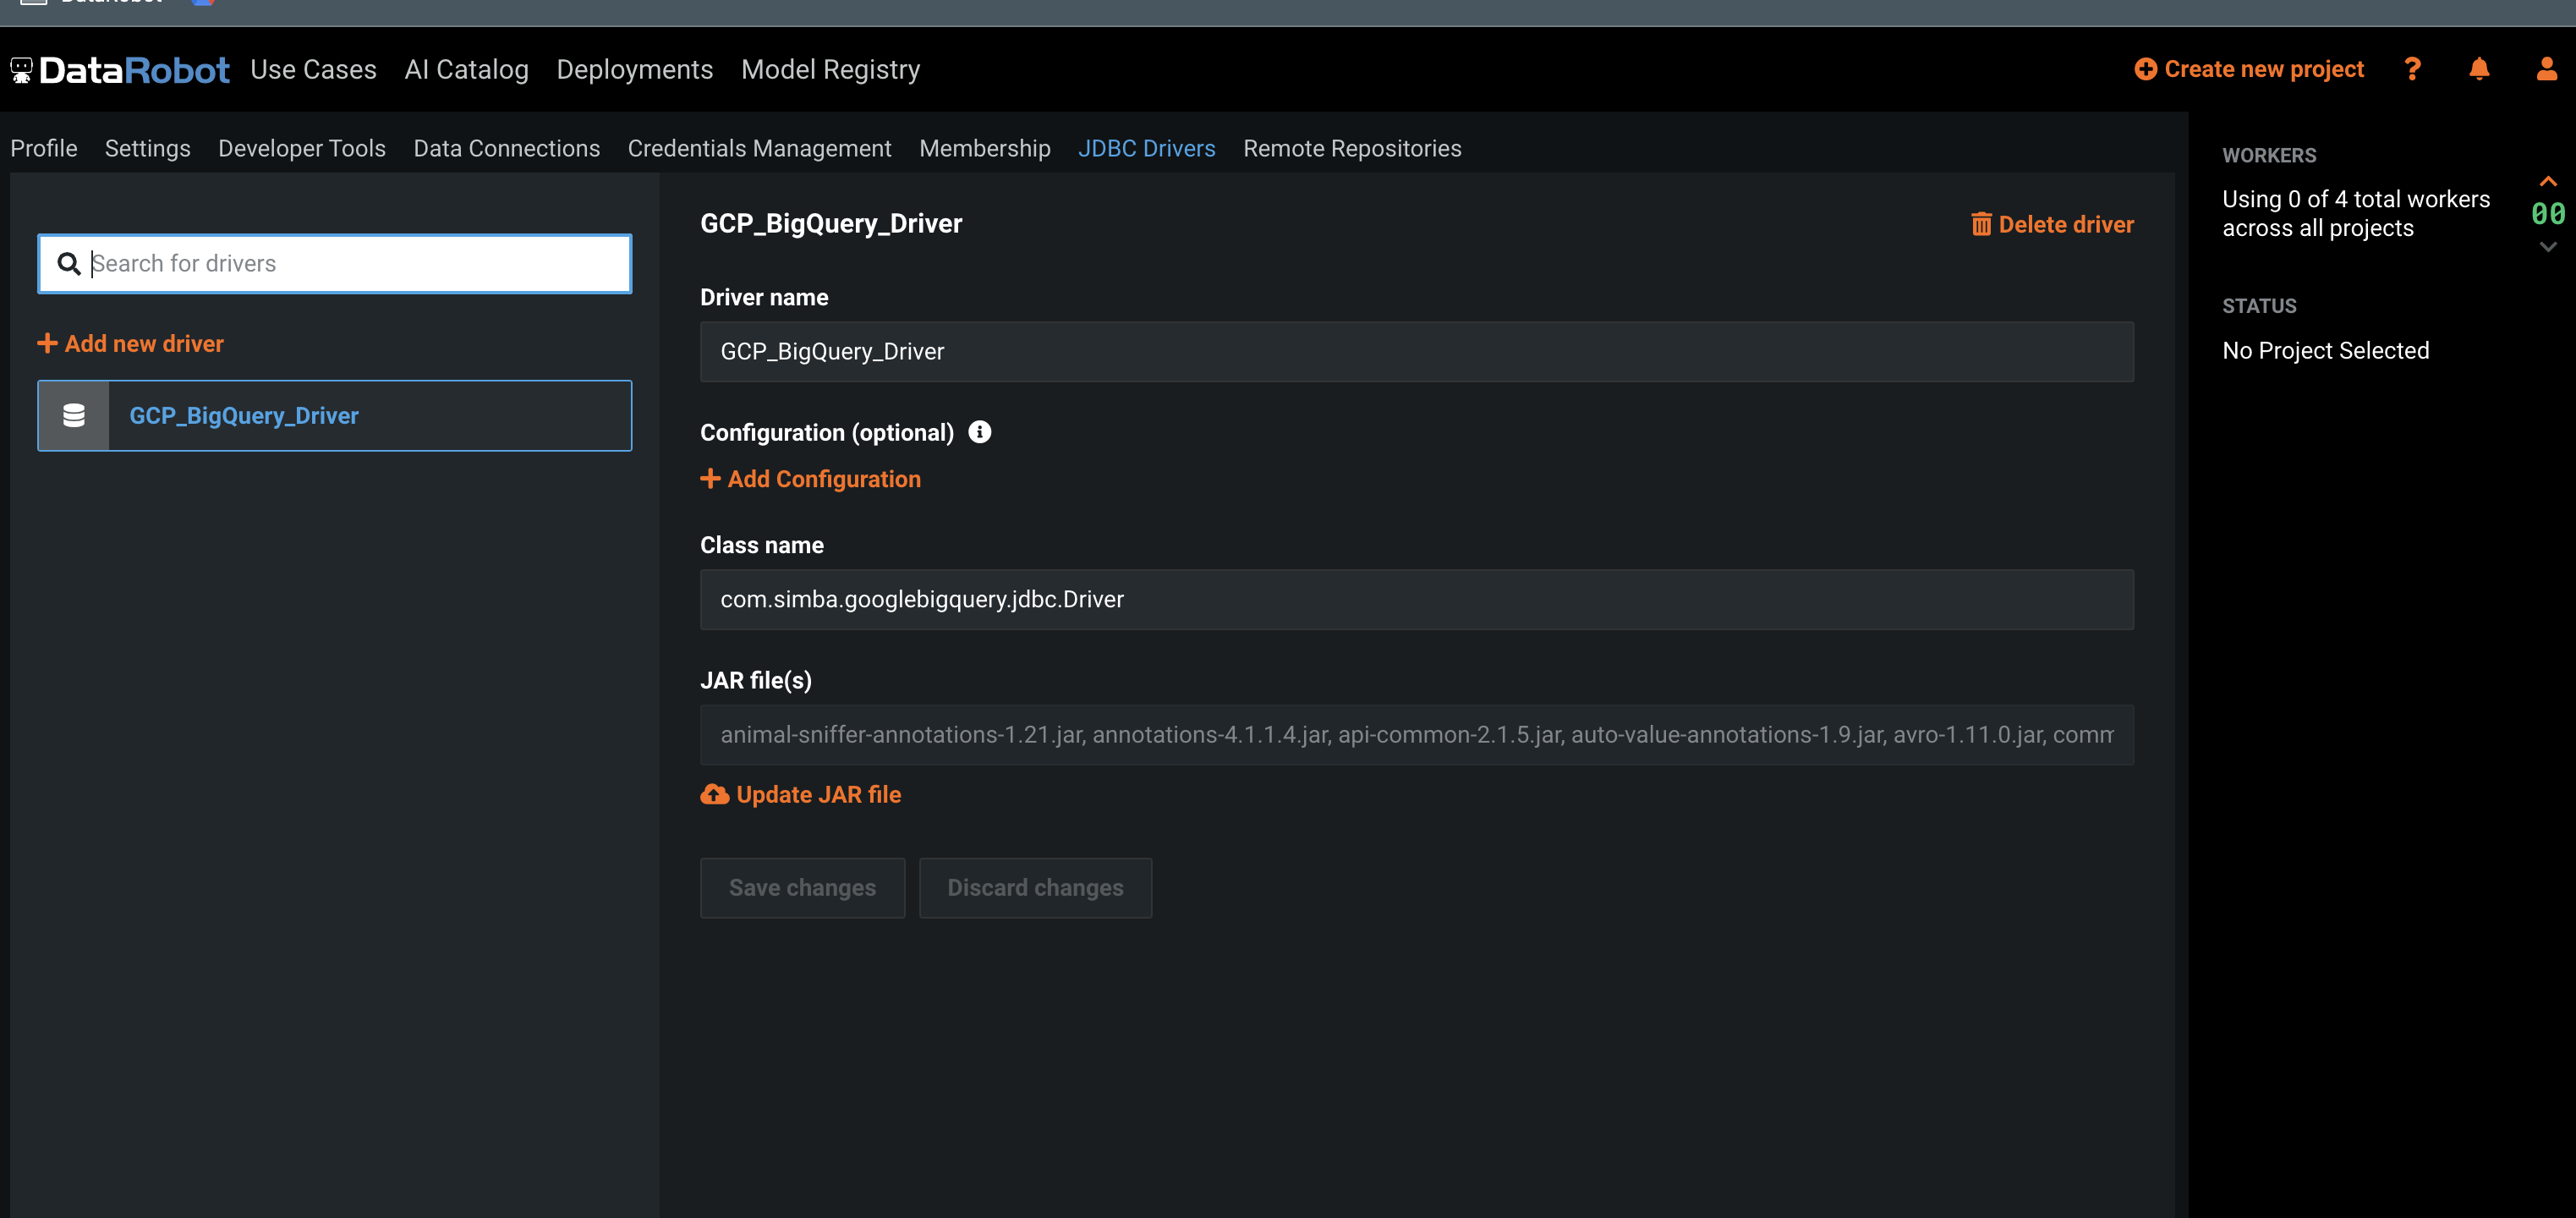
JDBC Driver – manual
Although it's possible to set up the JDBC driver manually, it's not recommended as each individual JAR file in the ZIP bundle needs to be uploaded one-by-one. You must also add the JAR files in alphabetical order.
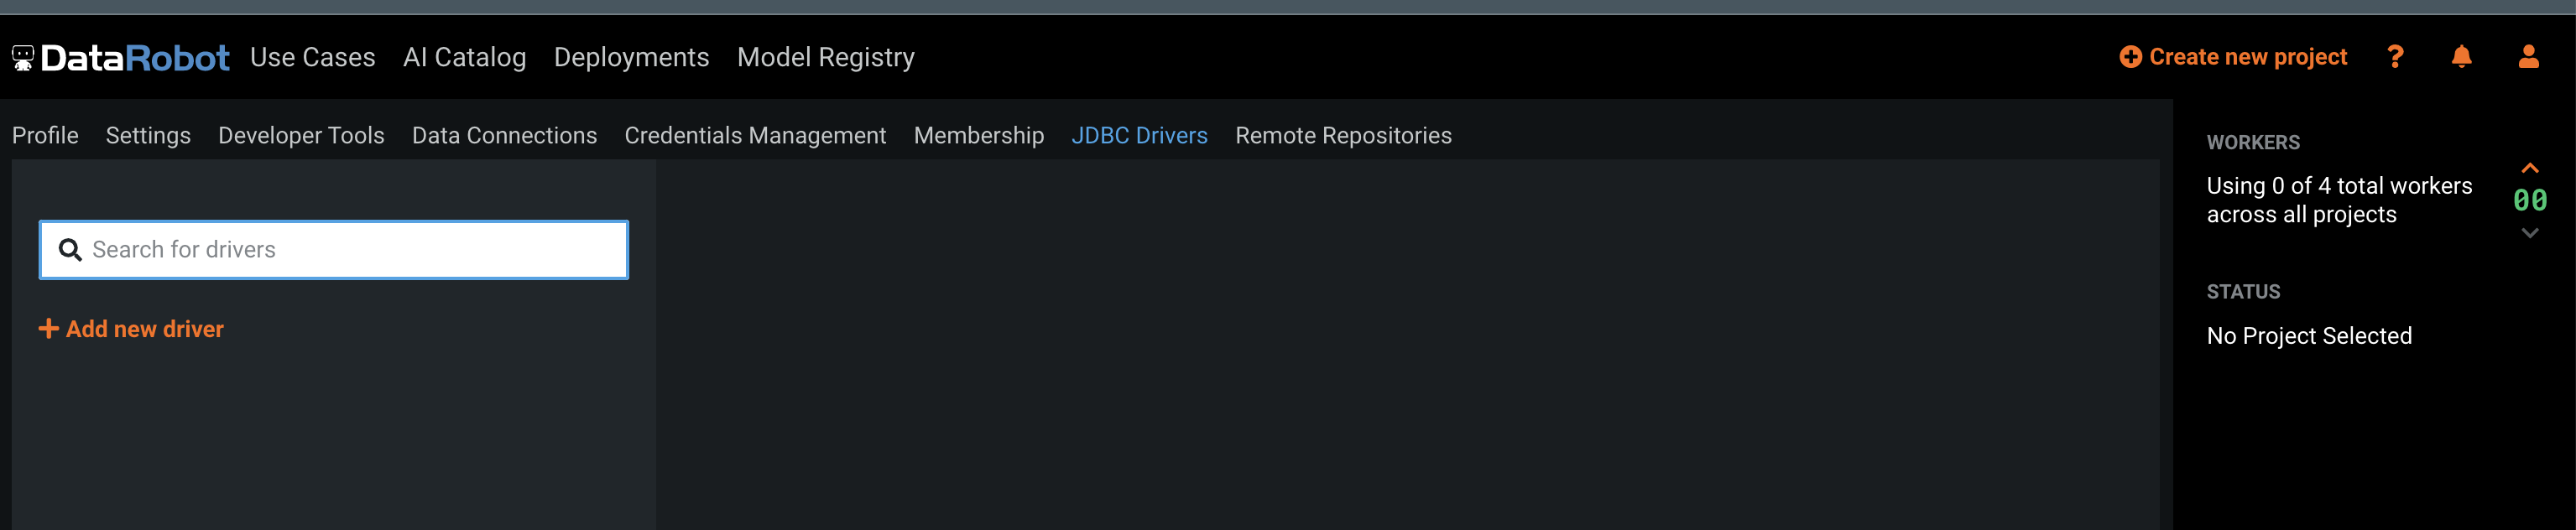
So, a user with the Can manage JDBC database drivers permission navigates to the JDBC Drivers tab and click the + Add new driver button, as shown here:
Create a new driver with the following settings:
- Configuration: "Predefined"
- Configuration drop-down: "Google BigQuery - 2022"
- Class name (predefined): "com.simba.googlebigquery.jdbc.Driver"
- Version:
< the version of the driver bundle downloaded from Google. In the below screenshot this is the version in the example python script > - Driver File(s):
upload each jar file in the bundle, one-by-one, in alphabetical order
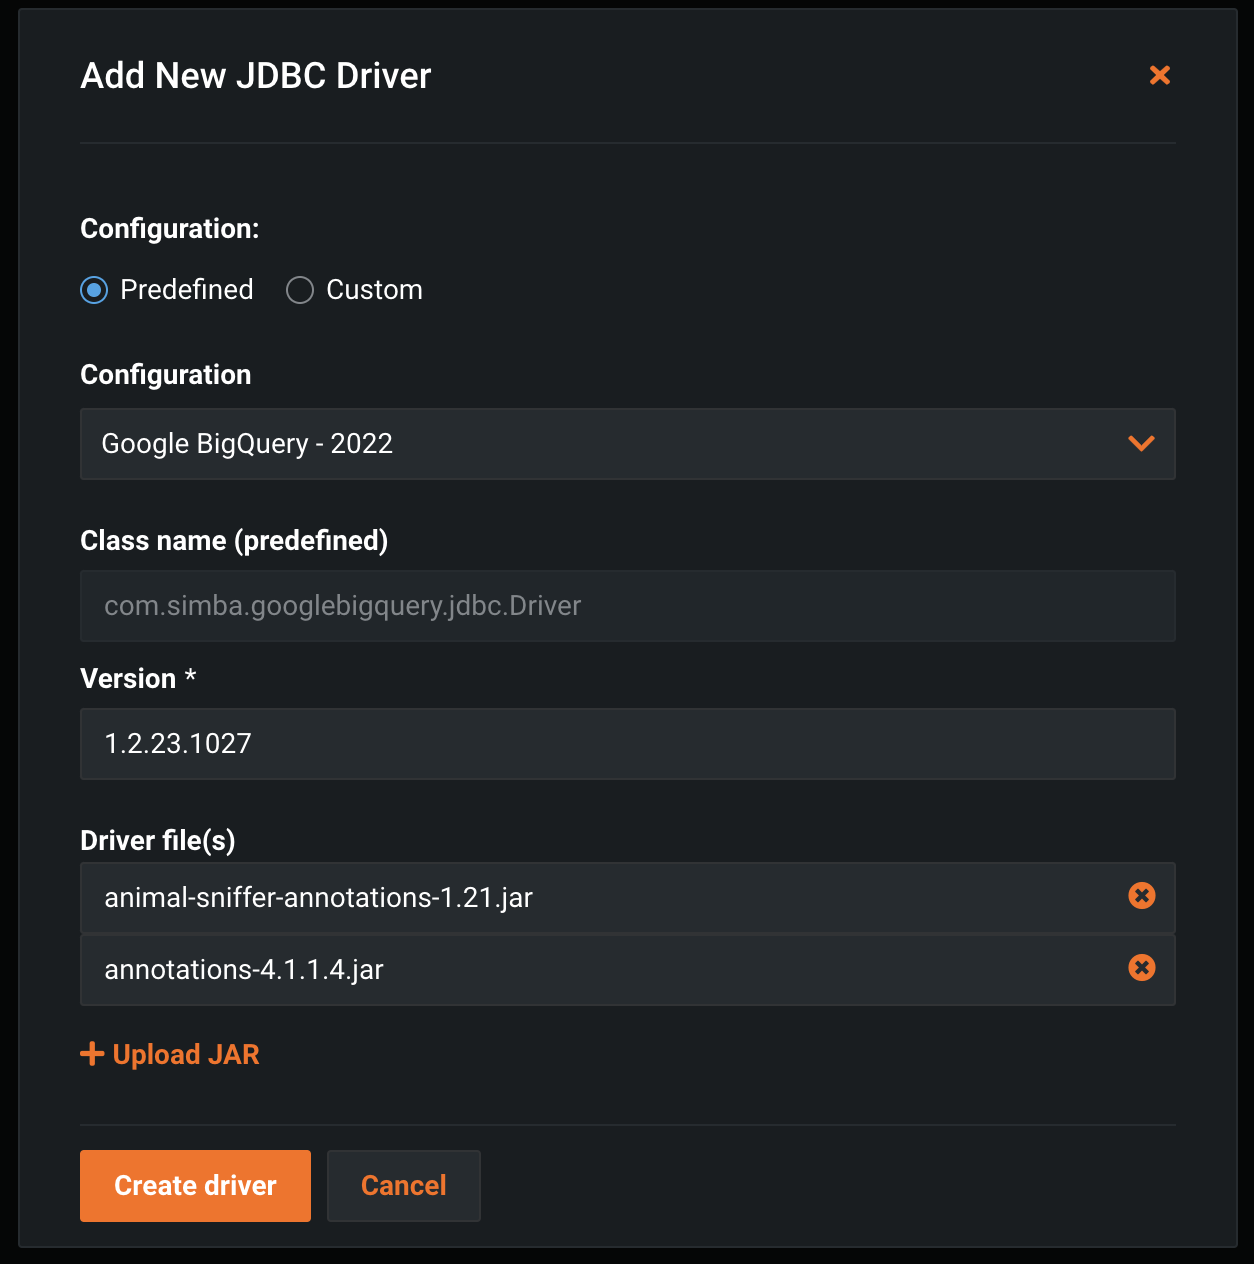
As of the 1.2.23.1027 bundle, there are 62 JAR files to upload.
If the user already has version 1.2.21.1025 or earlier, please upgrade it to 1.2.23.1027.
Configure new data connection – service account
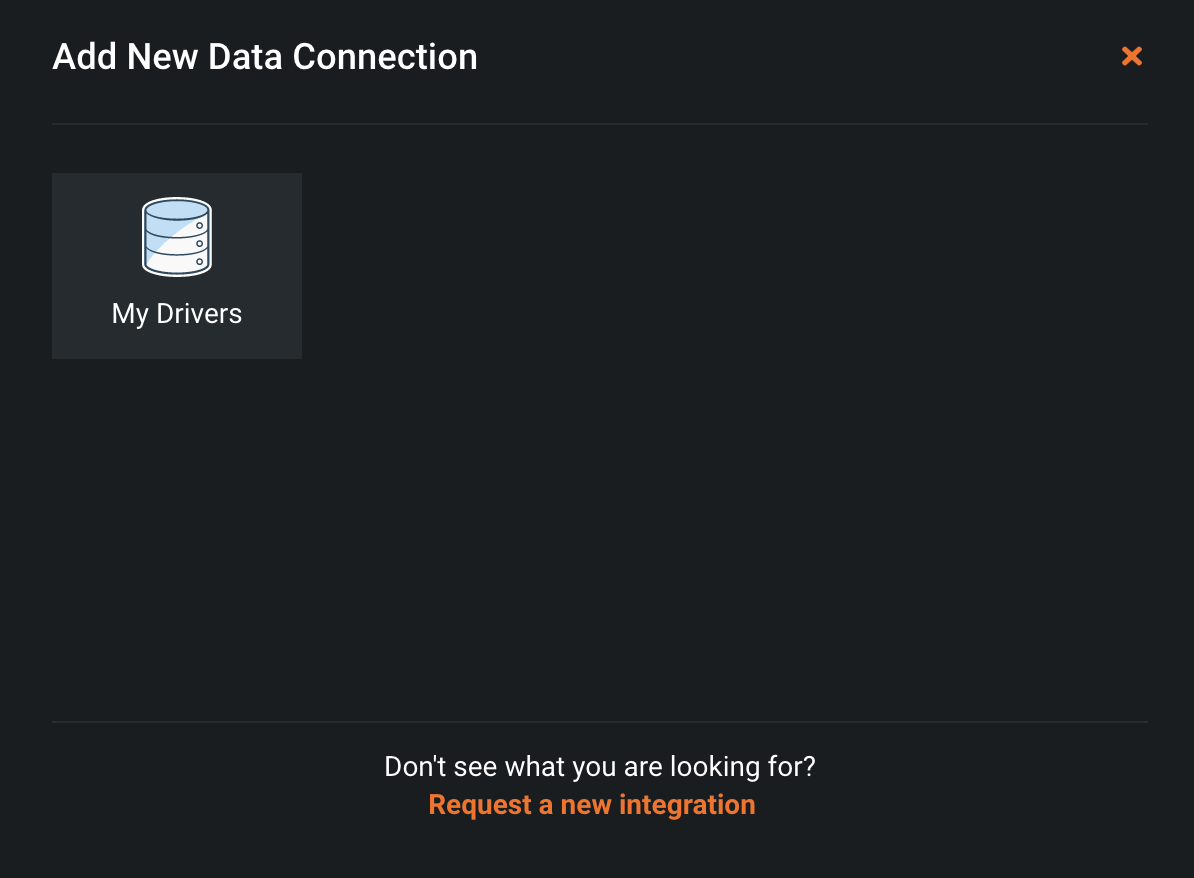
To use a Service Account to setup a data connection, navigate to the Data Connections tab, and click + Add new data connection.
Select My Drivers.
Enter a Data Connection Name, and ensure the URL (Advanced) option is selected.
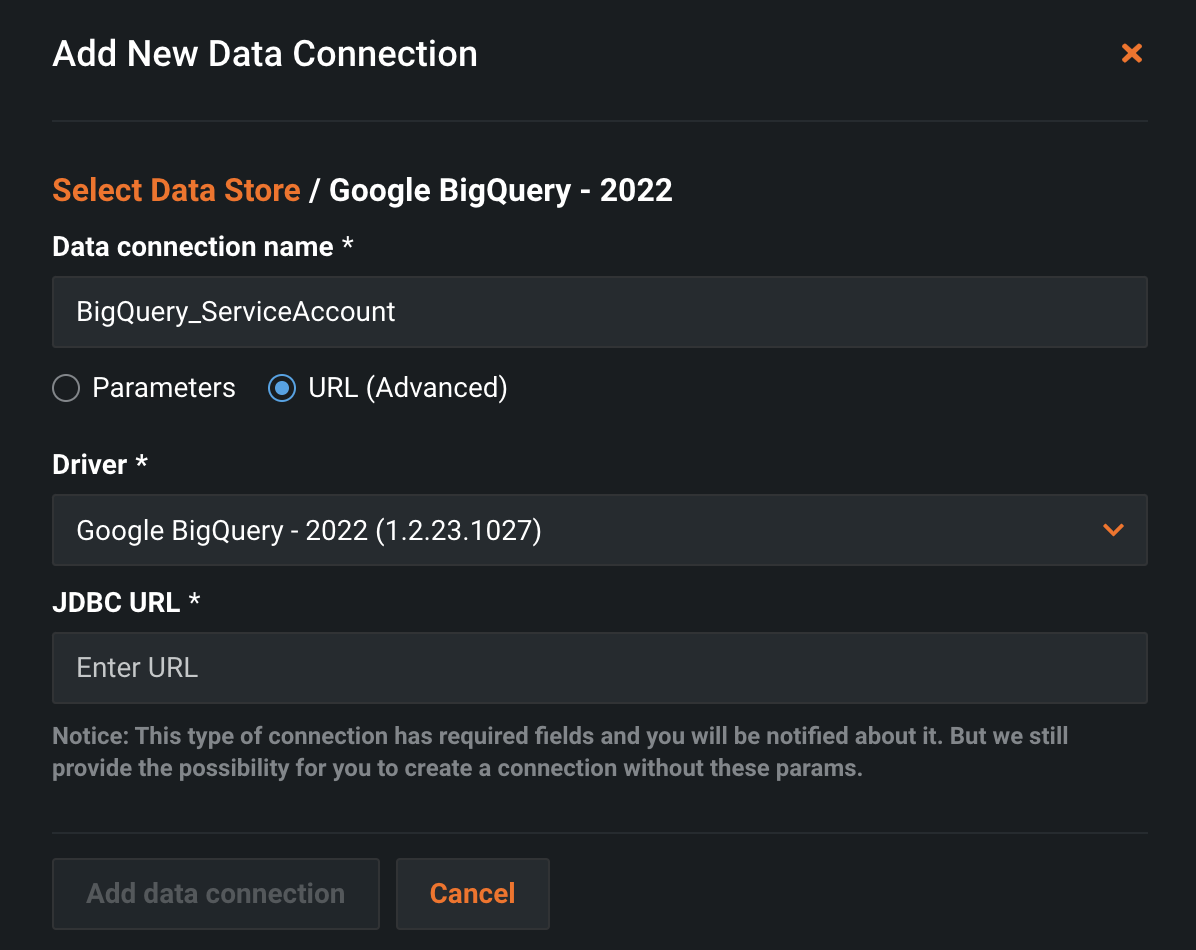
In the JDBC URL section, the URL is created from the data found in the JSON file downloaded in the Google Service Account section above.
The base URL is:
jdbc:bigquery://https://www.googleapis.com/bigquery/v2:443;ProjectId={PROJECT_ID};OAuthType=0;OAuthServiceAcctEmail={SERVICE_ACCOUNT};OAuthPvtKey={SERVICE_ACCOUNT_JSON_DATA}
- The {PROJECT_ID} is the same as the OAuth set up; for example,
example-project-name. -
The {SERVICE_ACCOUNT} is the email address of the service account created above, something like:
service-account-name@example-project-name.iam.gserviceaccount.com -
The {SERVICE_ACCOUNT_JSON_DATA} is the full content of the JSON file created above. It need to be one long string, without new lines. Taking the example JSON data from the
Google Service Accountsection above, that looks something like:{"type": "service_account","project_id": "PROJECT_ID","private_key_id": "KEY_ID","private_key": "-----BEGIN PRIVATE KEY-----\nPRIVATE_KEY\n-----END PRIVATE KEY-----\n","client_email": "SERVICE_ACCOUNT_EMAIL","client_id": "CLIENT_ID","auth_uri": "https://accounts.google.com/o/oauth2/auth","token_uri": "https://accounts.google.com/o/oauth2/token","auth_provider_x509_cert_url": "https://www.googleapis.com/oauth2/v1/certs","client_x509_cert_url": "https://www.googleapis.com/robot/v1/metadata/x509/SERVICE_ACCOUNT_EMAIL"}
The final, built JDBC URL then looks like:
jdbc:bigquery://https://www.googleapis.com/bigquery/v2:443;ProjectId=example-project-name;OAuthType=0;OAuthServiceAcctEmail=service-account-name@example-project-name.iam.gserviceaccount.com;OAuthPvtKey={"type": "service_account","project_id": "PROJECT_ID","private_key_id": "KEY_ID","private_key": "-----BEGIN PRIVATE KEY-----\nPRIVATE_KEY\n-----END PRIVATE KEY-----\n","client_email": "SERVICE_ACCOUNT_EMAIL","client_id": "CLIENT_ID","auth_uri": "https://accounts.google.com/o/oauth2/auth","token_uri": "https://accounts.google.com/o/oauth2/token","auth_provider_x509_cert_url": "https://www.googleapis.com/oauth2/v1/certs","client_x509_cert_url": "https://www.googleapis.com/robot/v1/metadata/x509/SERVICE_ACCOUNT_EMAIL"};
Paste the built JDBC URL into the text box on the new connection pop-up, and click Add New Connection.
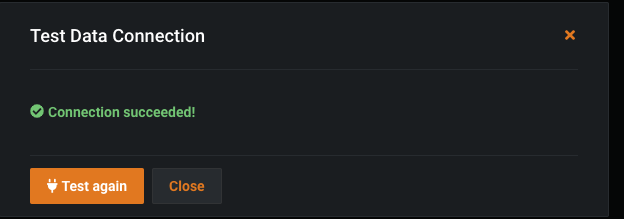
Click Test Connection. A new "Test Data Connection" window pops up.
Note: The
usernameandpasswordfields can contain any data as that information isn't passed to Google.
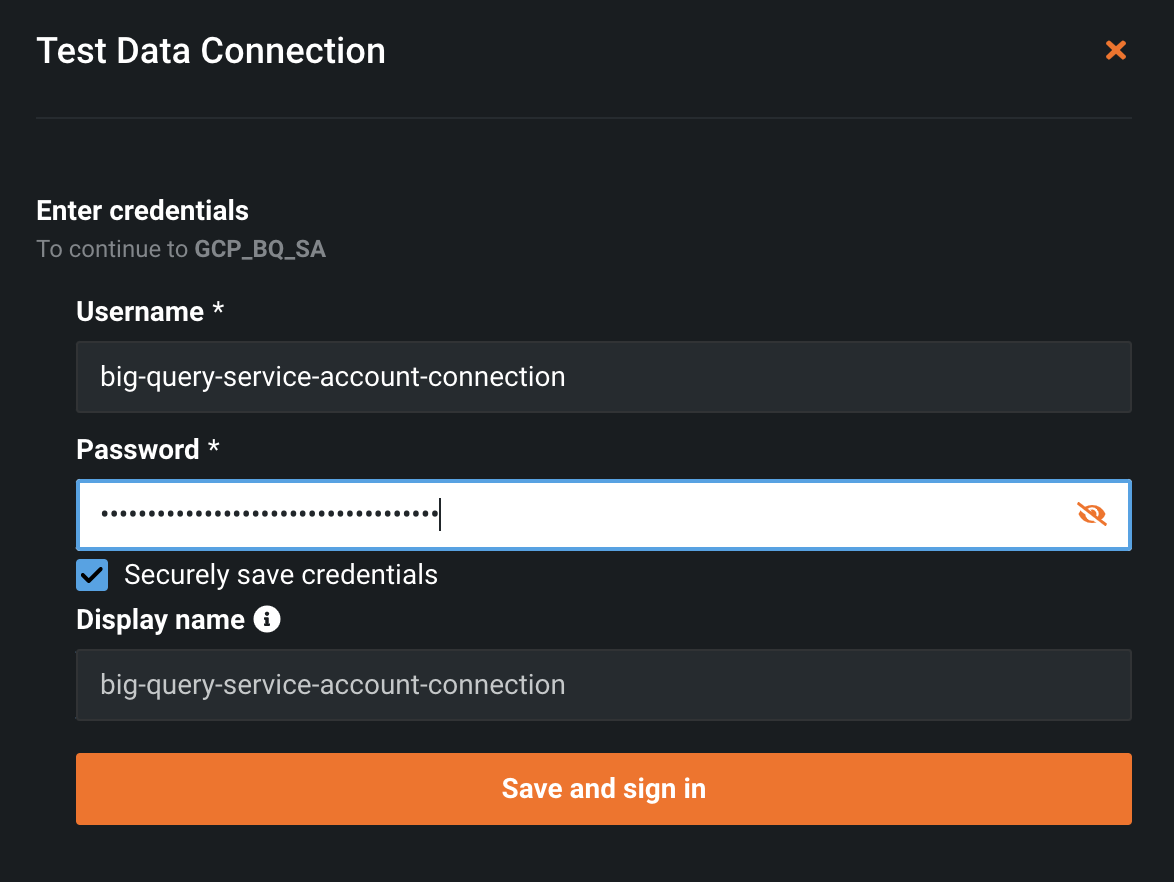
Click the Save and sign-in button. If it works, the success message looks like this: