Add custom model versions
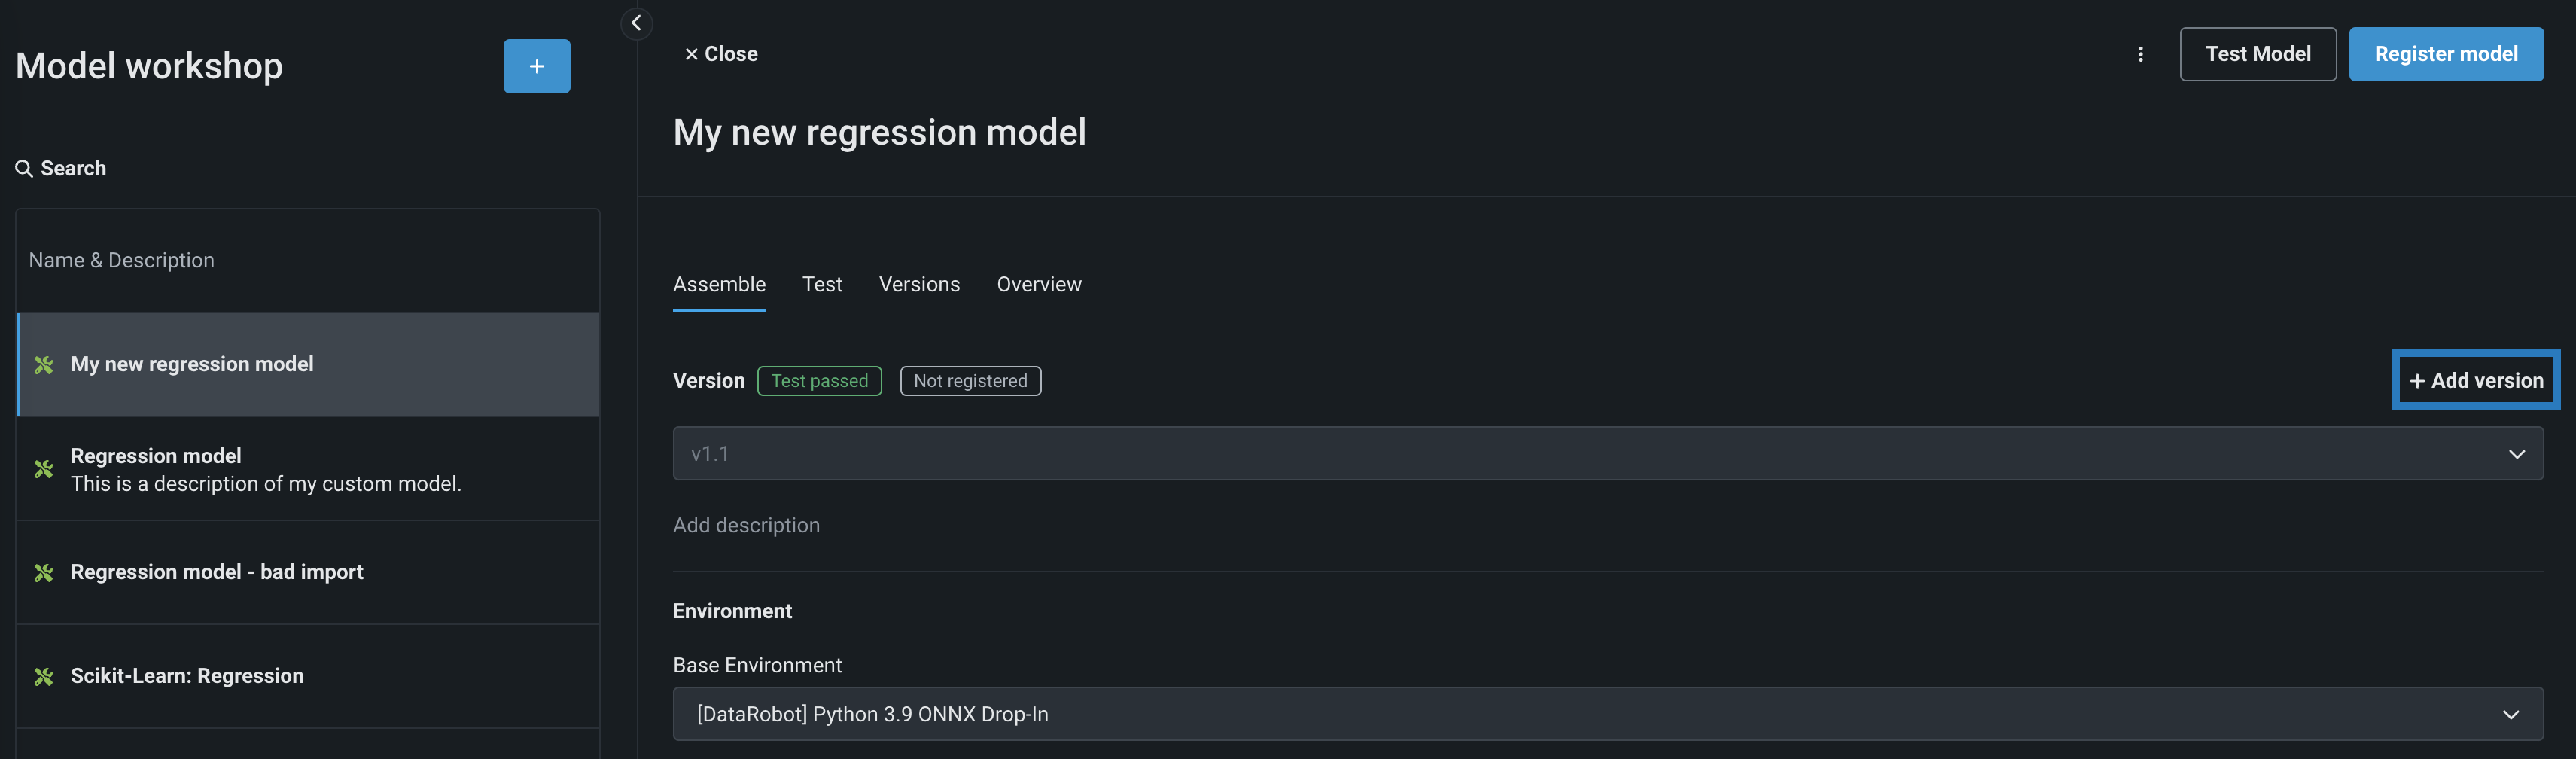
If you want to update a model, you can create a new minor version of the model (1.1, 1.2, etc.). To do this, open the custom model in the Workshop and navigate to the Assemble tab. On the Assemble tab, any changes to the Environment, Files, or Settings sections will create a new minor version.
To create a new major version of a model (1.0, 2.0, etc.), you can choose to copy contents from a previous version or create an empty version, then you can configure the version settings:
-
To create a new major version of a custom model, do either of the following:
-
Open the custom model you want to create a version of, and, on the Assemble tab, in the Version section, click + Add version.
-
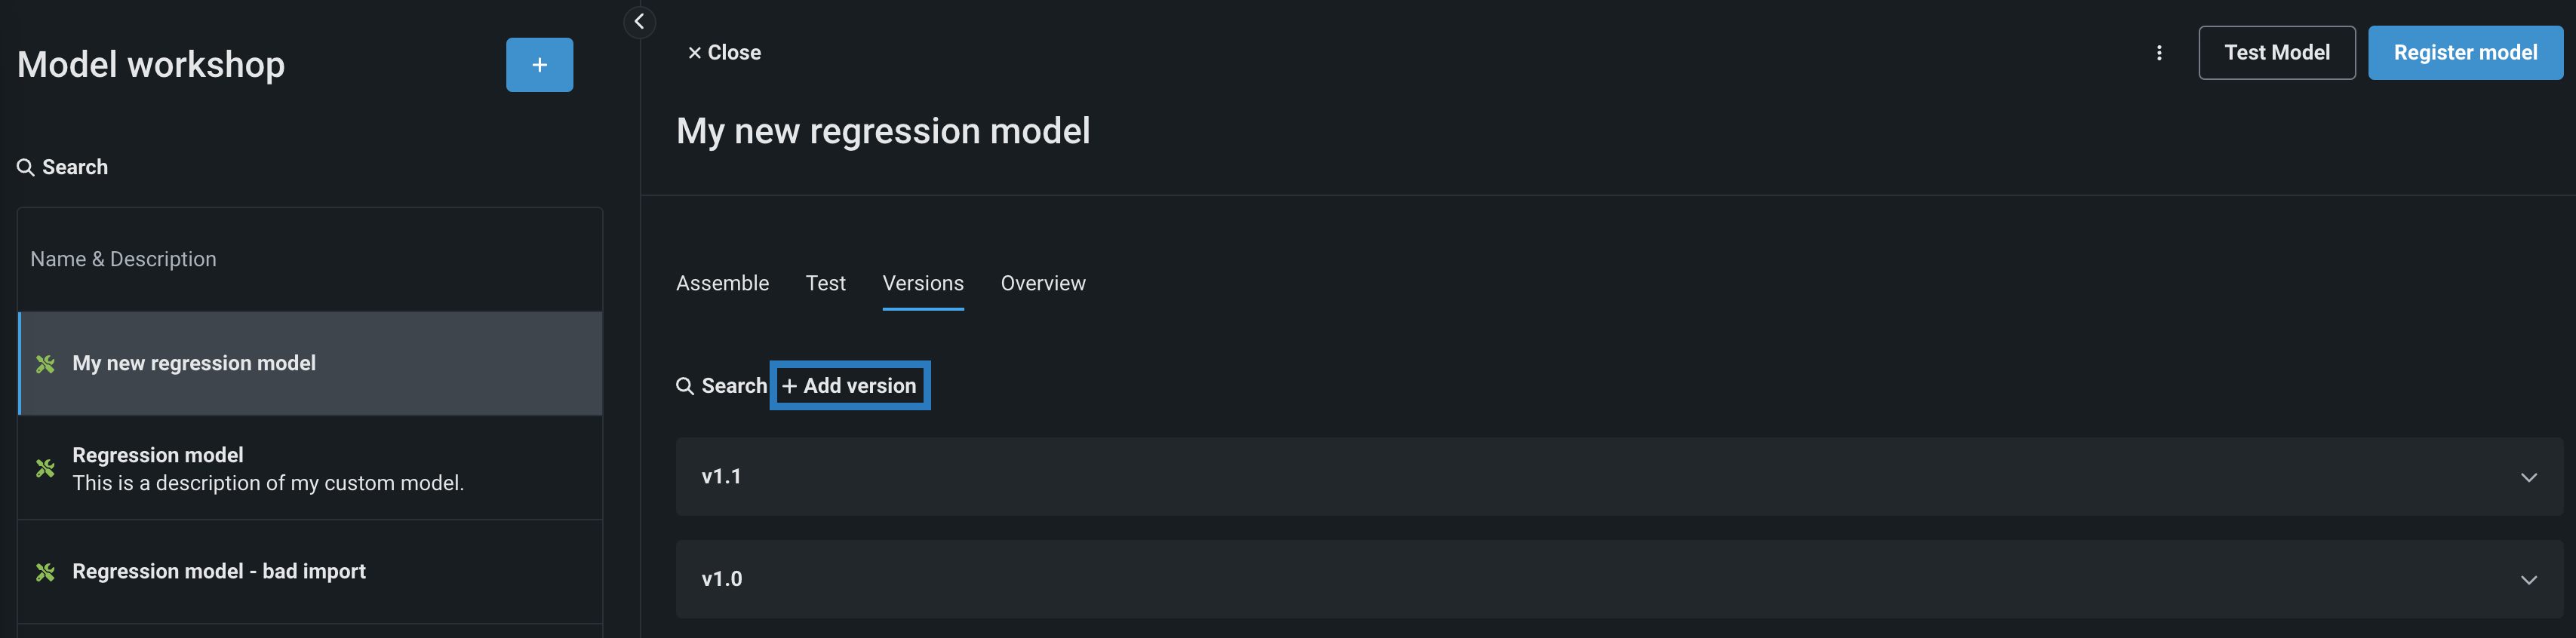
Open the custom model you want to create a version of, click the Versions tab, and then, on the Versions tab, click + Add version.
-
-
In the Create new model version dialog box, select a version content option and configure the new version:
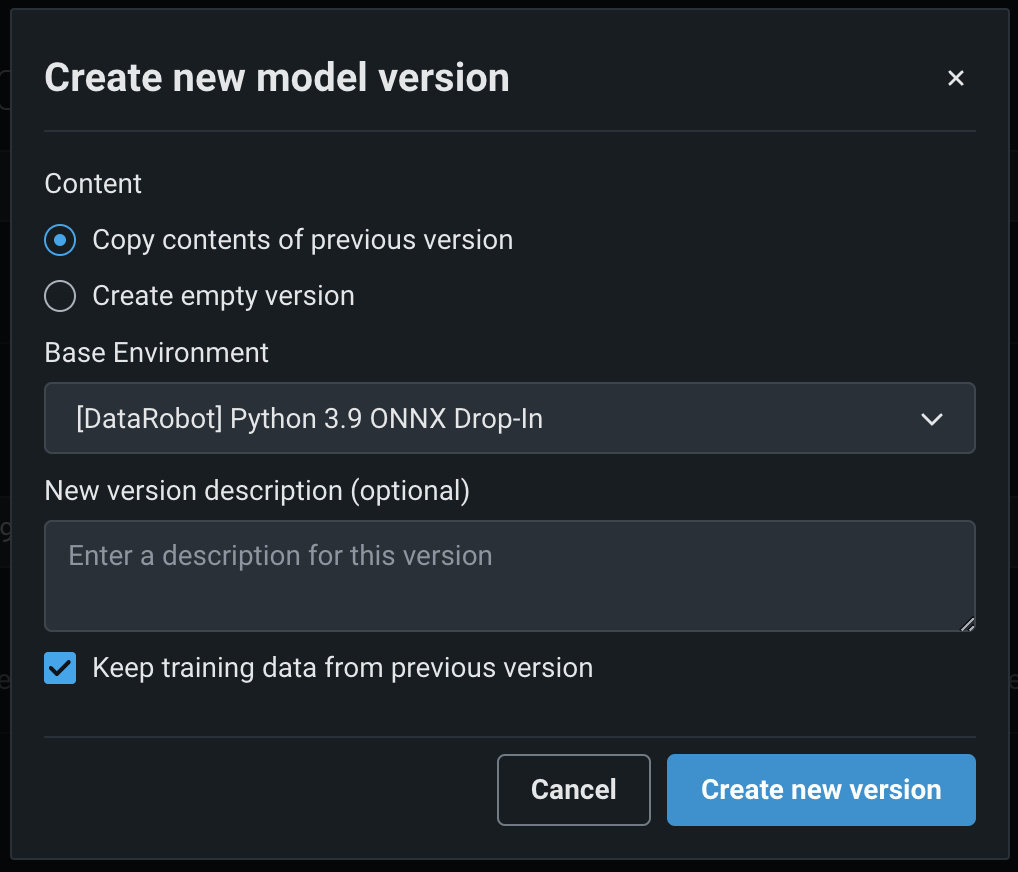
Setting Description Content - Copy contents of previous version: Add the contents of the current version to the new version of the custom model.
- Create empty version: Discard the contents of the current version and add new files for the new version of the custom model.
Base Environment Select the base execution environment of the new version. The execution environment of the current custom model version is selected by default. In addition, if the selected execution environment does not change, the version of that execution environment persists from the previous custom model version, even if a newer environment version is available. For more information on how to ensure the custom model version uses the latest version of the execution environment, see Trigger base execution environment update. New version description Enter a description of the new version. The version description is optional. Keep training data from previous version Enable or disable adding the training data from the current version to the new custom model version. This setting is enabled by default. -
Click Create new version.
Trigger base execution environment update
To override the default behavior for execution environment version selection, where the execution environment version persists between custom model versions even when a new environment version is available, you must temporarily change the Base Environment setting. To do this, create a new custom model version using a different Base Environment setting, then create a new custom model version, switching back to the intended Base Environment. After this change, the latest version of the custom model uses the latest version of the execution environment.
View version information
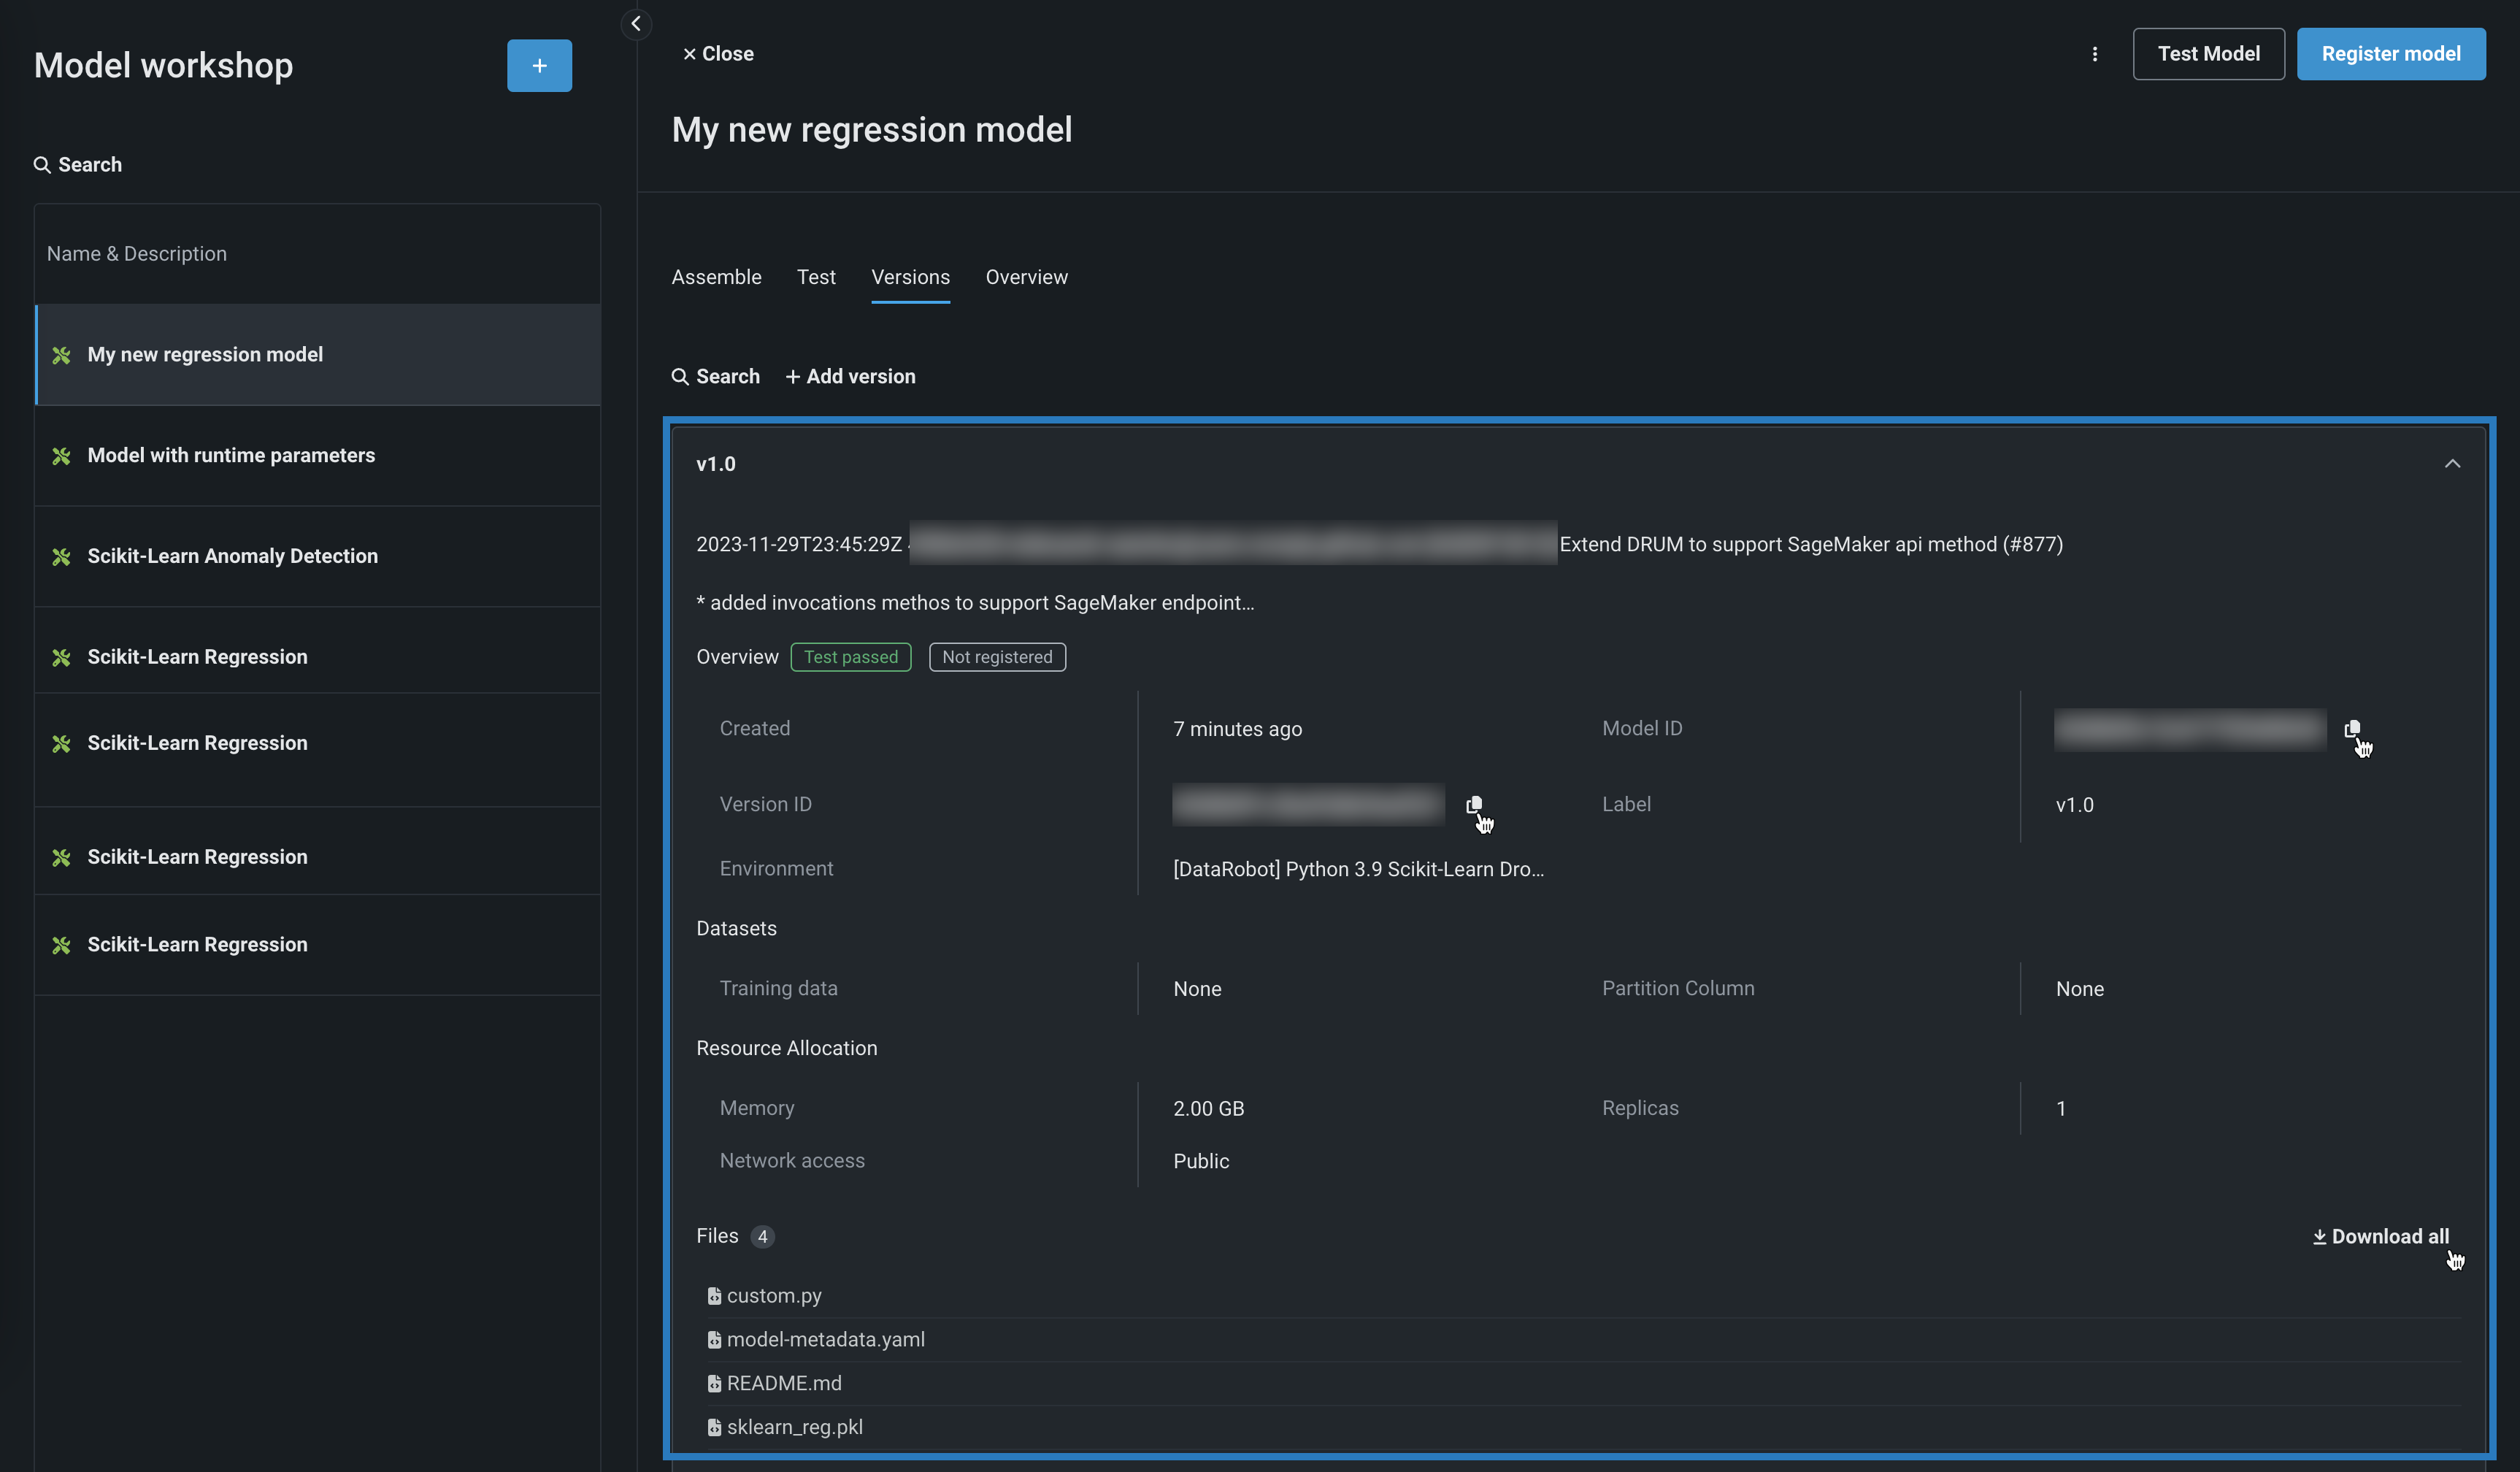
After you create a custom model and assemble at least one model version, you can view version information and download the code of the custom model represented by that version. To view version information, open the custom model containing the version you want to view, click the Versions tab, and then open the panel for a version where you can view the following sections:
- Overview
- Environment info
- Datasets
- Insights
- Resources
- Runtime Parameters (if defined)
- Files
- Lineage
In a custom model version panel, you can configure a version description and perform a number of other actions (in addition to reviewing custom model version information listed above):
| Element | Action |
|---|---|
| Overview | |
| 1 | Next to the Overview section header, in the Registered model version field, click View to see a list of models registered from the custom model version. Click a registered model version in the list to open it in Registry. |
| 2 | Next to the Model ID field, click the copy icon to copy the ID to your clipboard. |
| 3 | Next to the Version ID field, click the copy icon to copy the ID to your clipboard. |
| Environment info | |
| 4 | Next to the Environment ID field, click the copy icon to copy the ID to your clipboard. |
| 5 | Next to the Environment version ID field, click the copy icon to copy the ID to your clipboard or the view icon to open the environment version on the Environments tab. |
| Datasets | |
| 6 | Next to the Training dataset ID field, click the copy icon to copy the ID to your clipboard. |
| 7 | Next to the Training dataset version ID field, click the copy icon to copy the ID to your clipboard. |
| Insights | |
| 8 | Click View logs in the Logs field to open the model logs for a model registered and built in Registry. For more information on model logs, see Custom model build troubleshooting. |
| Files | |
| 9 | Next to the Files section header, click Download all to download a .zip archive of the model files. |
| 10 | Next to an individual file, click the view icon to open (and optionally copy) the model file. |
View asset lineage
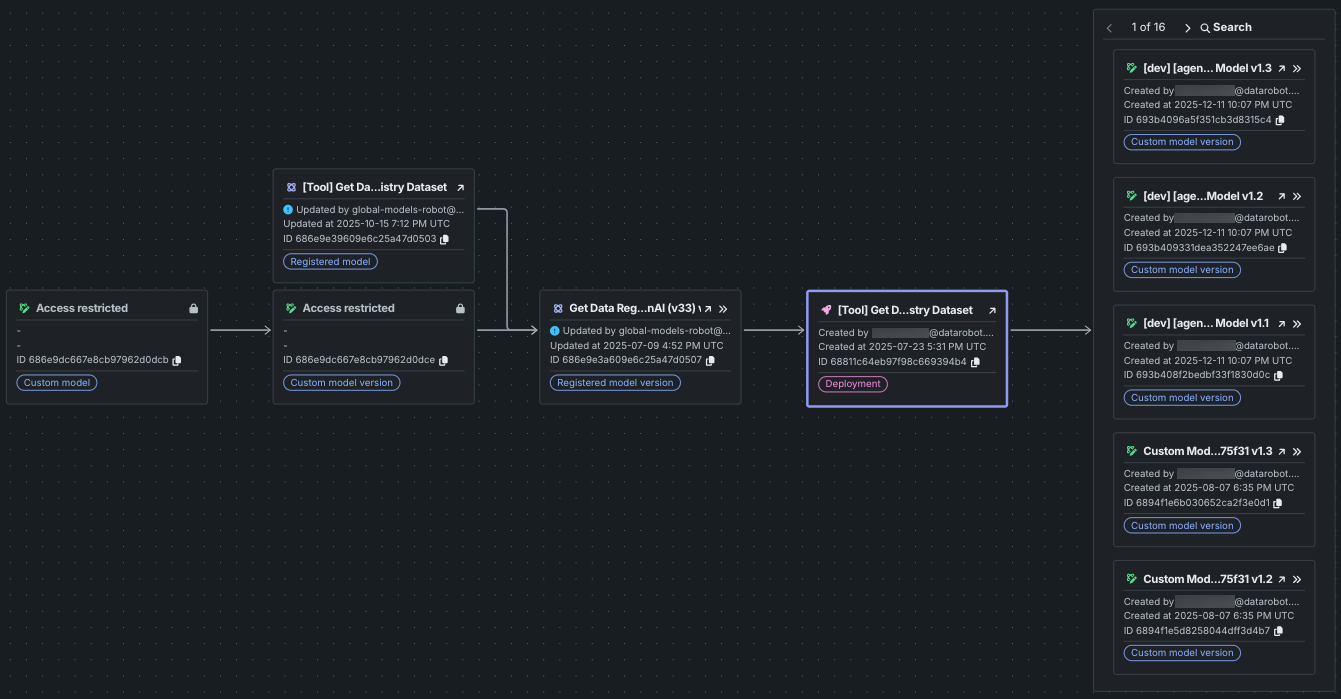
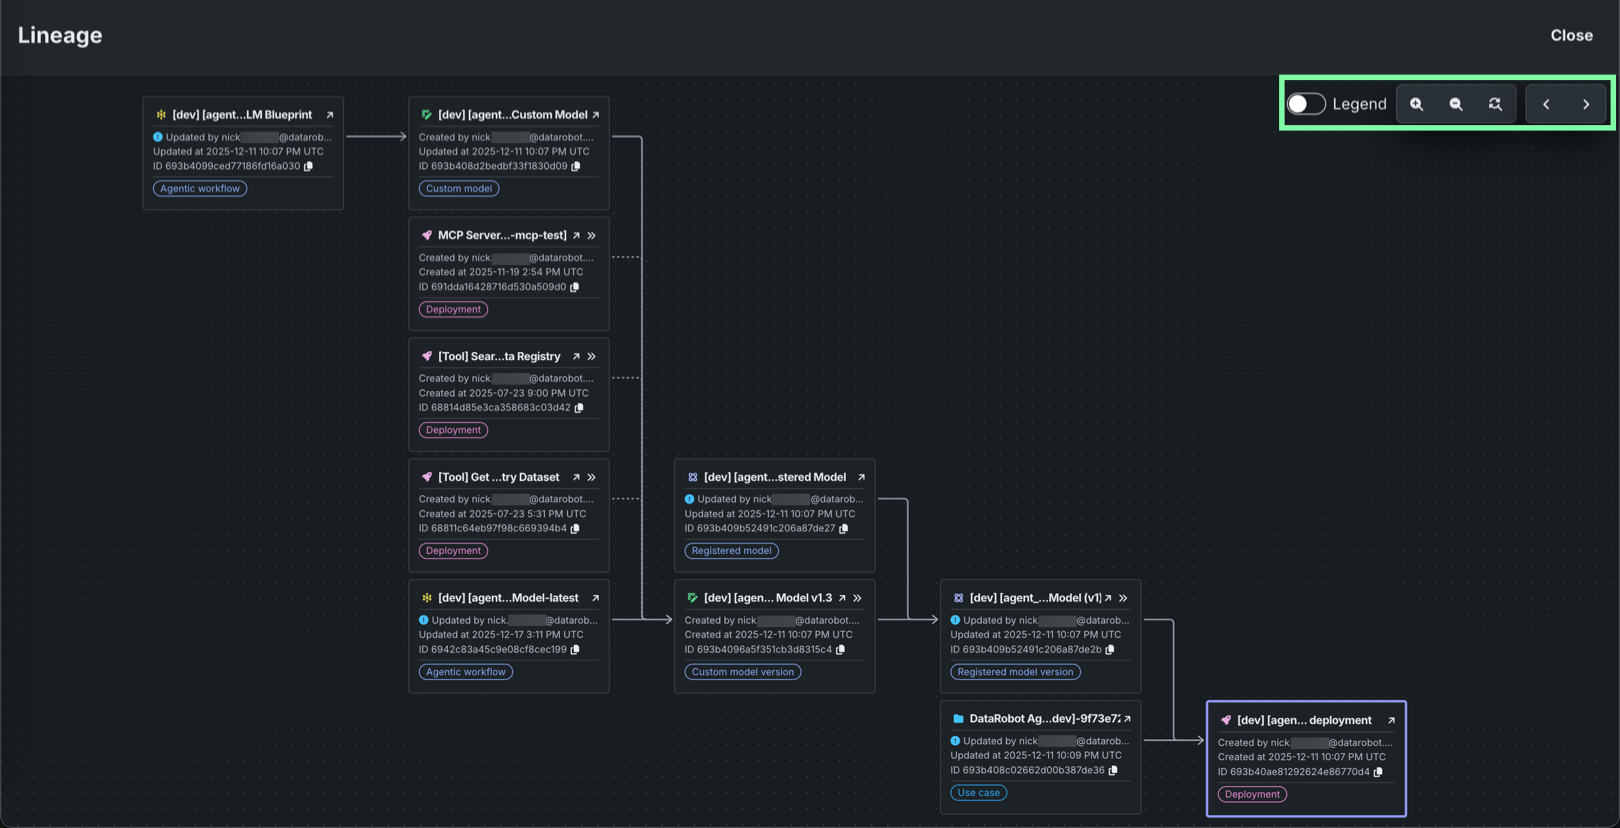
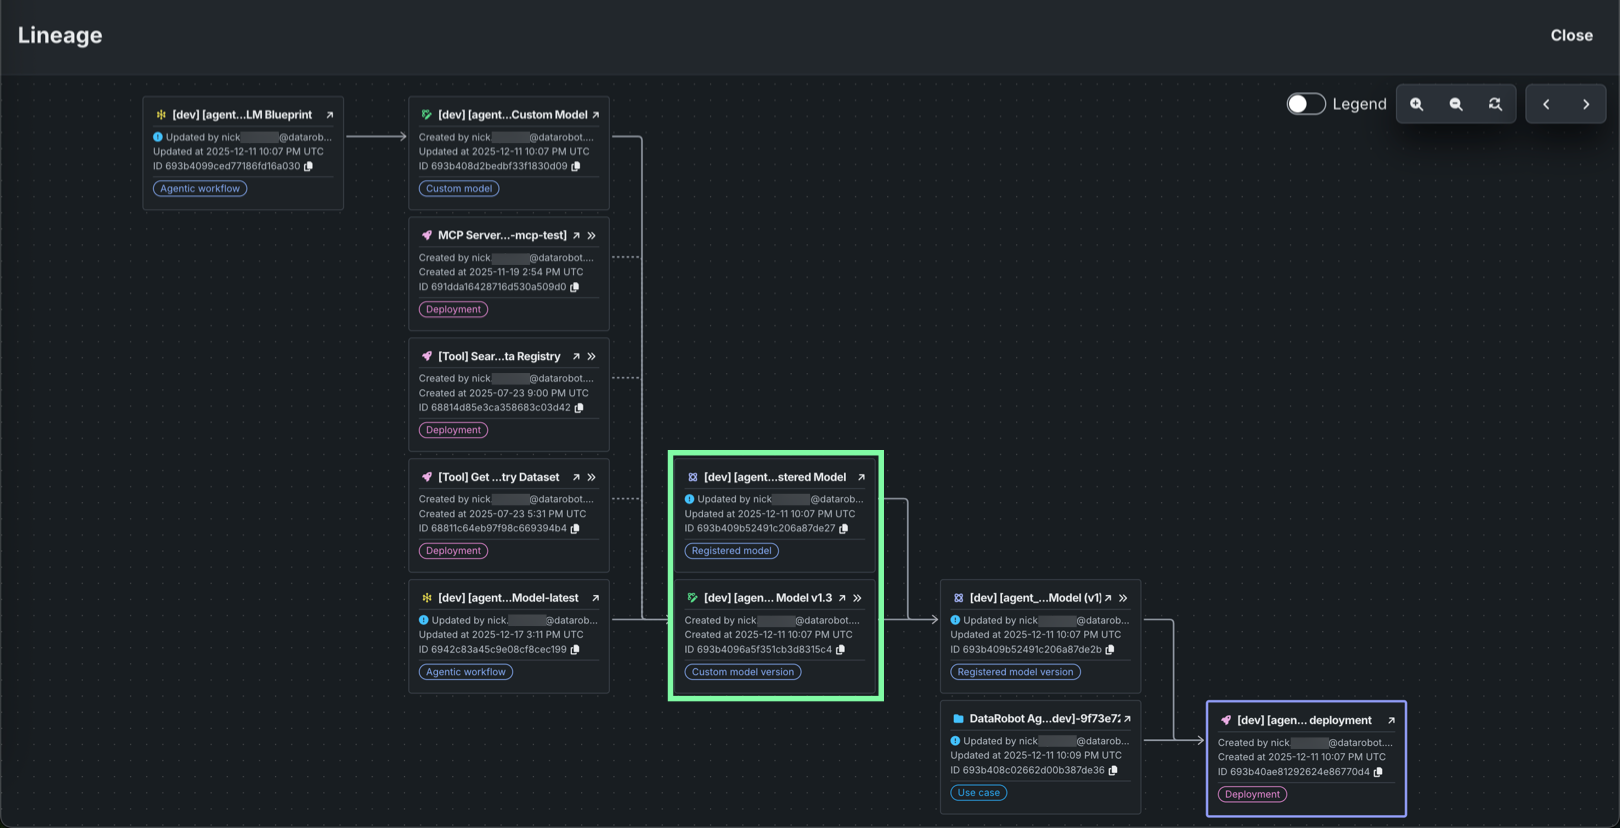
The Lineage section provides an end-to-end visualization of the relationships and dependencies between your MLOps assets. This feature is essential for auditing complex workflows, tracking asset lifecycles, and managing the various components of agentic and generative AI systems. The lineage is presented as a Directed Acyclic Graph (DAG) consisting of nodes (assets) and edges (relationships).
When reviewing nodes, the asset you are currently viewing is distinguished by a purple outline. Nodes display key information such as ID, name (or version number), creator, and the last modification information (user and date).
When reviewing edges, solid lines represent concrete, persistent relationships within the platform, such as a registered model used to create a deployment. Dashed lines indicate relationships inferred from runtime parameters. These are considered less reliable as they may change if a user modifies the underlying code or parameters. Arrows generally flow from the "ancestor" or container to the "descendant" or content (e.g., Registered model version to Deployment).
Inaccessible assets
If an asset exists but you do not have permission to view it, the node only displays the asset ID and is marked with an Asset restricted notice.
The view is highly interactive, allowing for deep exploration of your asset ecosystem. To interact with the graph area, use the following controls:
| Control | Description |
|---|---|
| Legend | View the legend defining how lines correspond to edges. |
| and | Control the magnification level of the graph view. |
| Reset the magnification level and center the graph view on the focused node. | |
| Open a fullscreen view of the related items lineage graph. | |
| and | In fullscreen view, navigate the history of selected nodes (assets/nodes viewed ). |
Graph area navigation
To navigate the graph, click and drag the graph area. To control the zoom level, scroll up and down.
To interact with the related item nodes, use the following controls when they appear:
| Control | Description |
|---|---|
| Navigate to the asset in a new tab. | |
| Open a fullscreen view of the related items lineage graph centered on the selected asset node. | |
| Copy the asset's associated ID. |
One-to-many list view
If an asset is used by many other assets (e.g., one dataset version used for many projects), in the fullscreen view, the graph shows a preview of the 5 most recent items. Additional assets are viewable in a paginated and searchable list. If you don't have permission to view the ancestor of a paginated group, you can only view the 5 most recent items, without the option to change pages or search.