Create a hosted metric job
Add a custom job, manually or from a template, for a hosted metric, defining the metric settings and associating the metric with a deployment. To view and add hosted metric jobs, navigate to the Jobs > Metrics tab, and then:
-
To add a new hosted metric job manually, click + Add new hosted metric job (or the minimized add button when the job panel is open).
-
To create a hosted metric job from a template, next to the add button, click , and then, under Custom Metric, click Create new from template.
The new job opens to the Assemble tab. Depending on the creation option you selected, proceed to the configuration steps linked in the table below.
| Hosted metric job type | Description |
|---|---|
| Add new hosted metric job | Manually add a job for a new hosted metric, defining the metric settings and associating the metric with a deployment. |
| Create new from template | Add a job for a hosted metric from a template provided by DataRobot, associating the metric with a deployment and setting a baseline. |
Add a new hosted metric job
To manually add a hosted metric job:
-
On the Assemble tab for the new hosted metric job, click the job name (or the edit icon ) to enter a new job name, and then click confirm .
-
In the Environment section, select a Base environment for the job.
The available drop-in environments depend on your DataRobot installation; however, the table below lists commonly available public drop-in environments with templates in the DRUM repository. Depending on your DataRobot installation, the Python version of these environments may vary, and additional non-public environments may be available for use.
Drop-in environment security
Starting with the March 2025 Managed AI Platform release, most general purpose DataRobot custom model drop-in environments are security-hardened container images. When you require a security-hardened environment for running custom jobs, only shell code following the POSIX-shell standard is supported. Security-hardened environments following the POSIX-shell standard support a limited set of shell utilities.
Drop-in environment security
Starting with the 11.0 Self-Managed AI Platform release, most general purpose DataRobot custom model drop-in environments are security-hardened container images. When you require a security-hardened environment for running custom jobs, only shell code following the POSIX-shell standard is supported. Security-hardened environments following the POSIX-shell standard support a limited set of shell utilities.
Environment name & example Compatibility & artifact file extension Python 3.X Python-based custom models and jobs. You are responsible for installing all required dependencies through the inclusion of a requirements.txtfile in your model files.Python 3.X GenAI Agents Generative AI models ( Text GenerationorVector Databasetarget type)Python 3.X ONNX Drop-In ONNX models and jobs ( .onnx)Python 3.X PMML Drop-In PMML models and jobs ( .pmml)Python 3.X PyTorch Drop-In PyTorch models and jobs ( .pth)Python 3.X Scikit-Learn Drop-In Scikit-Learn models and jobs ( .pkl)Python 3.X XGBoost Drop-In Native XGBoost models and jobs ( .pkl)Python 3.X Keras Drop-In Keras models and jobs backed by tensorflow ( .h5)Java Drop-In DataRobot Scoring Code models ( .jar)R Drop-in Environment R models trained using CARET ( .rds)
Due to the time required to install all libraries recommended by CARET, only model types that are also package names are installed (e.g.,brnn,glmnet). Make a copy of this environment and modify the Dockerfile to install the additional, required packages. To decrease build times when you customize this environment, you can also remove unnecessary lines in the# Install caret modelssection, installing only what you need. Review the CARET documentation to check if your model's method matches its package name. (Log in to GitHub before clicking this link.)scikit-learn
All Python environments contain scikit-learn to help with preprocessing (if necessary), but only scikit-learn can make predictions on
sklearnmodels. -
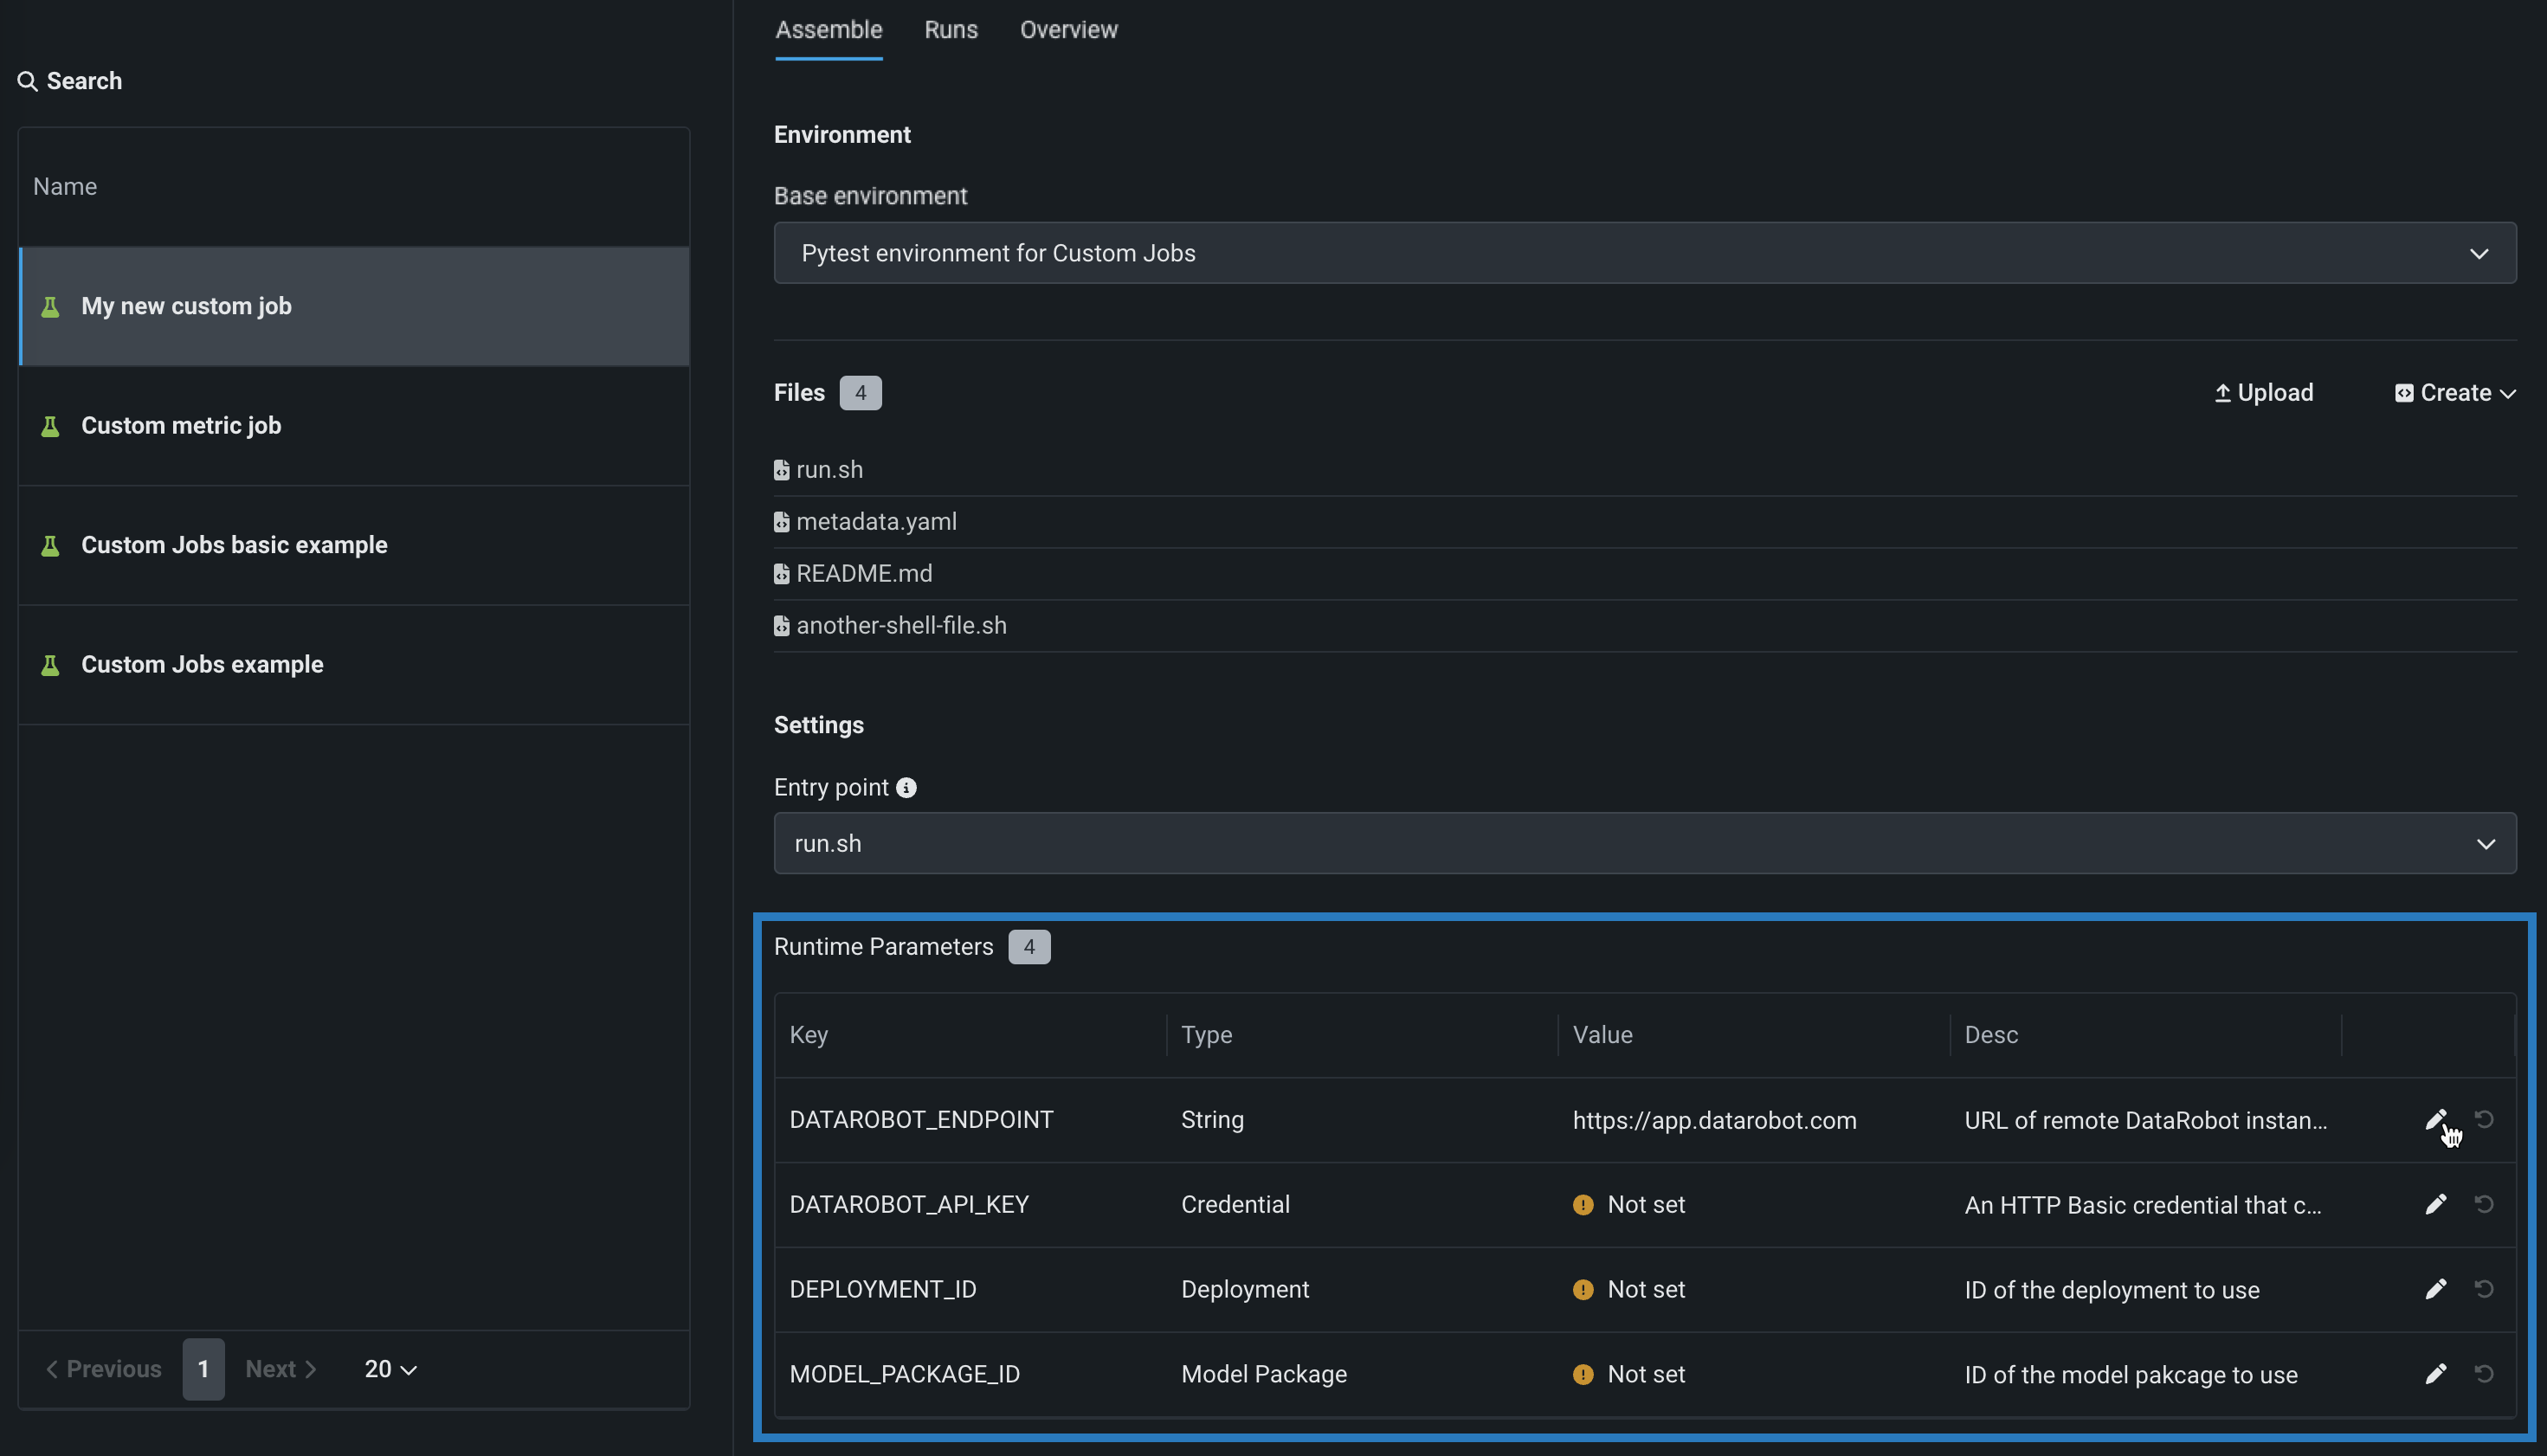
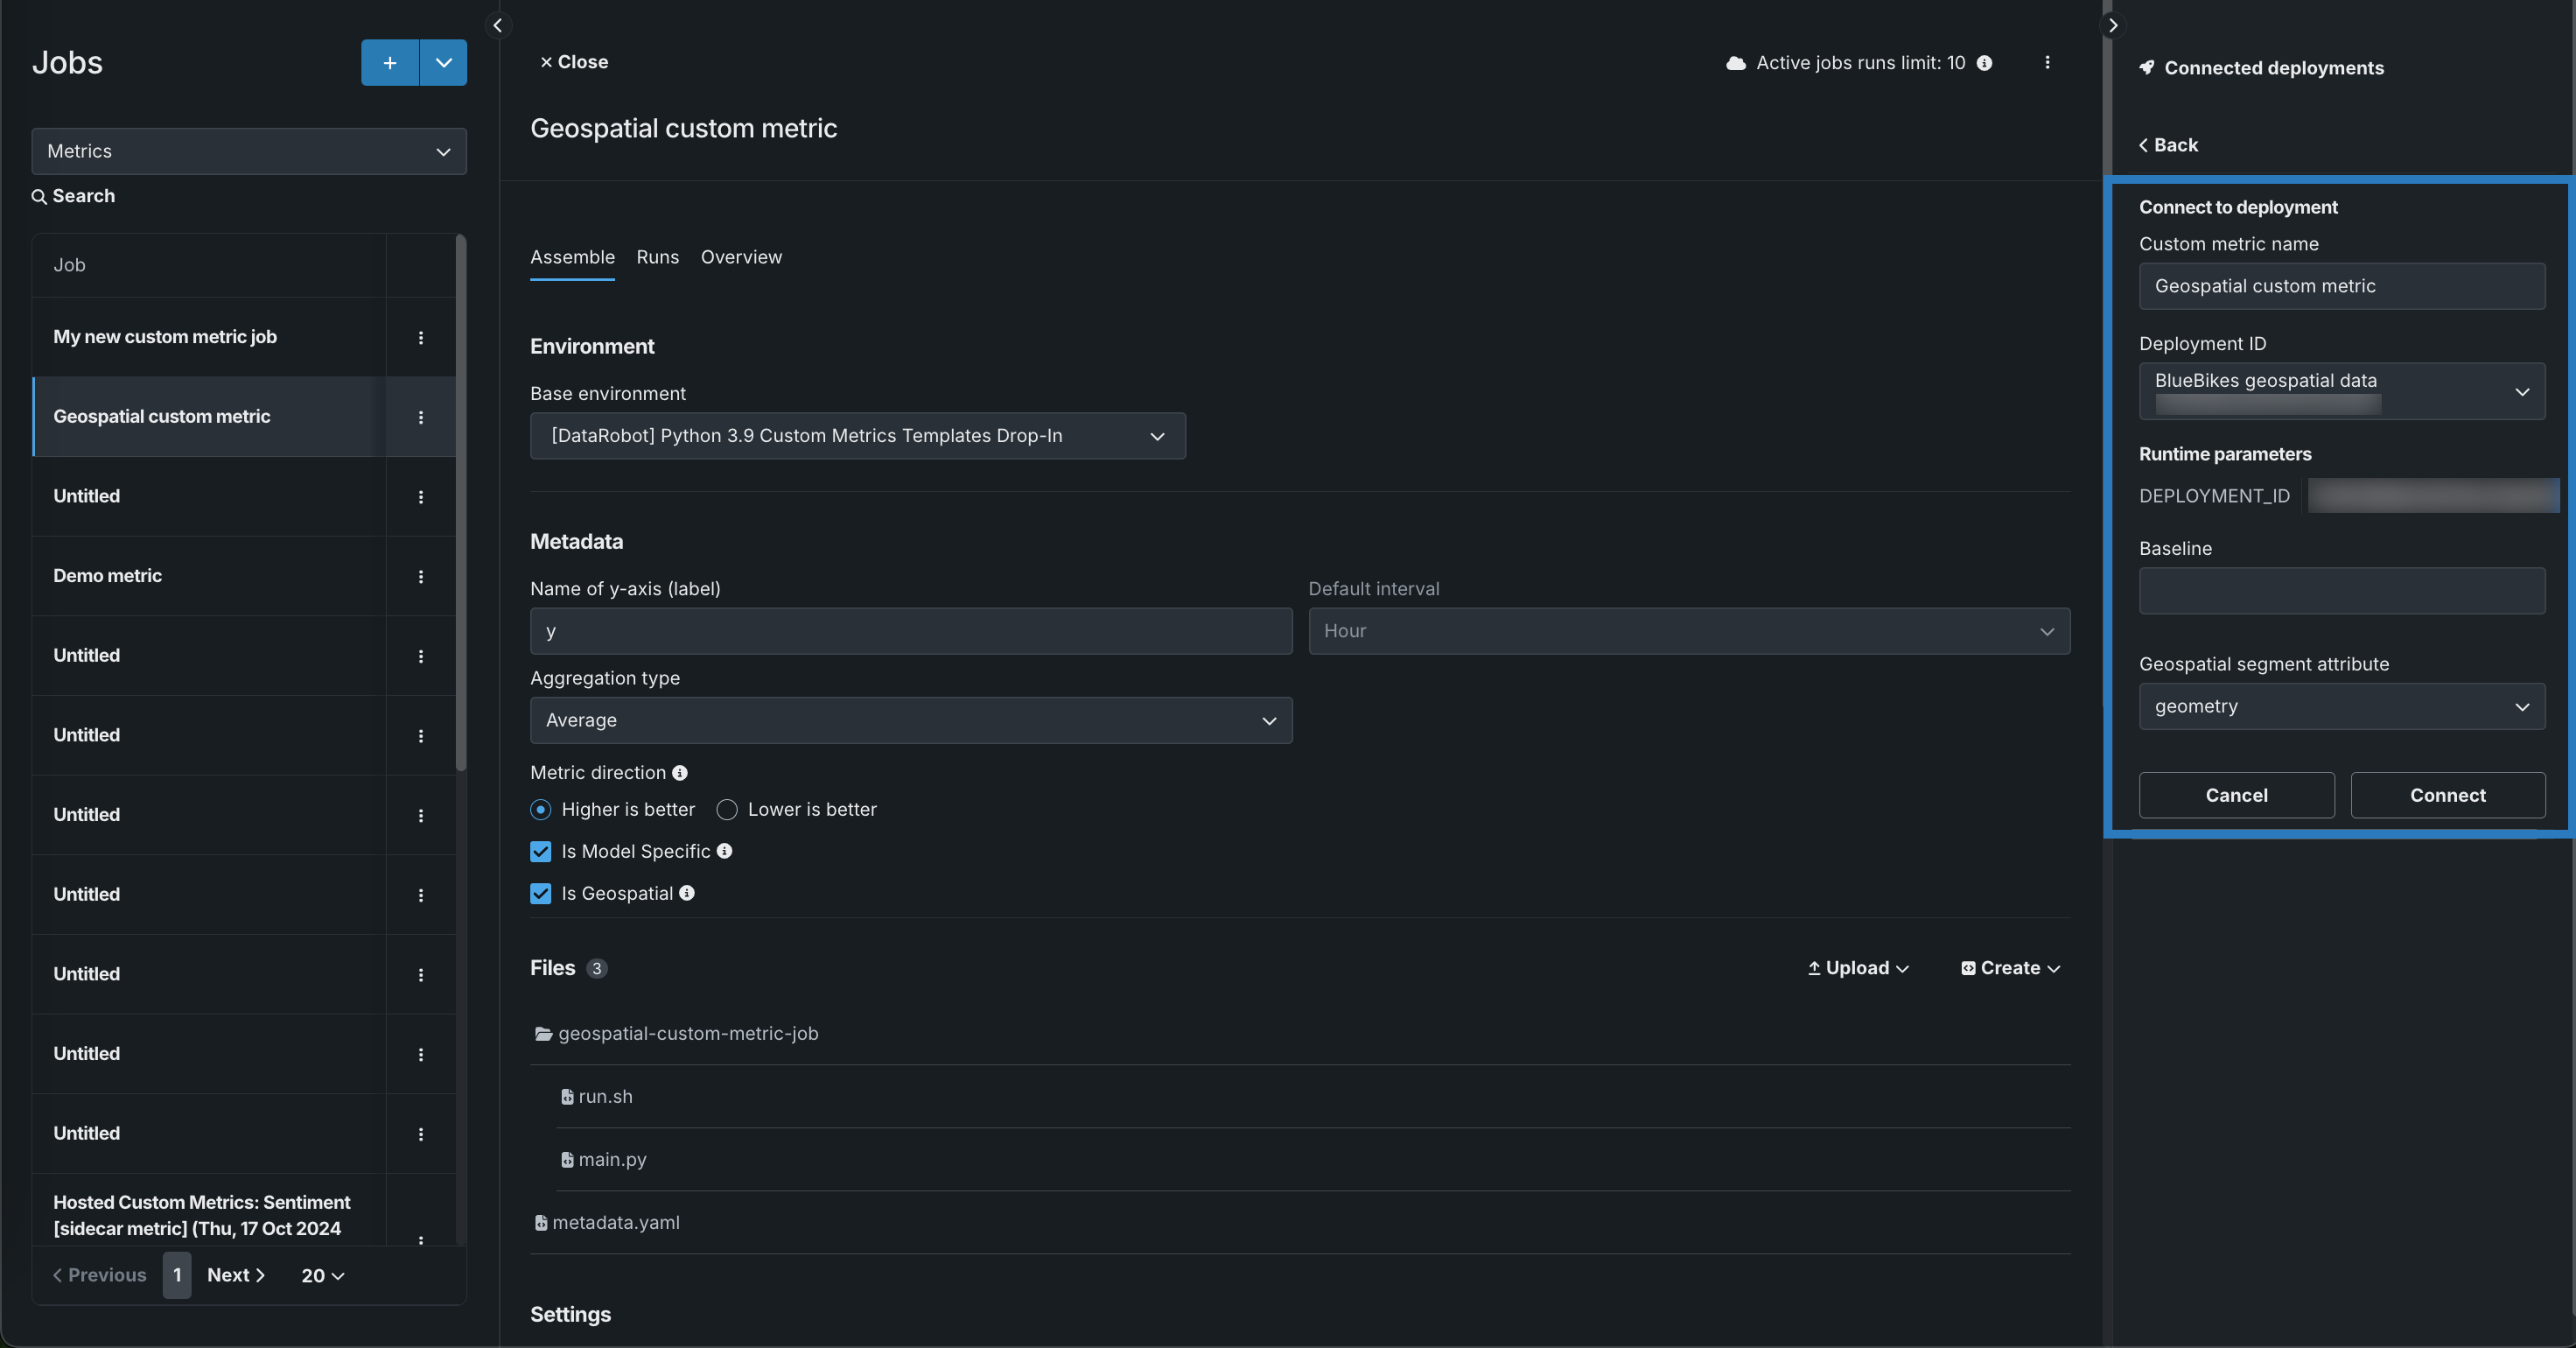
In the Metadata section, configure the following custom metric job fields:
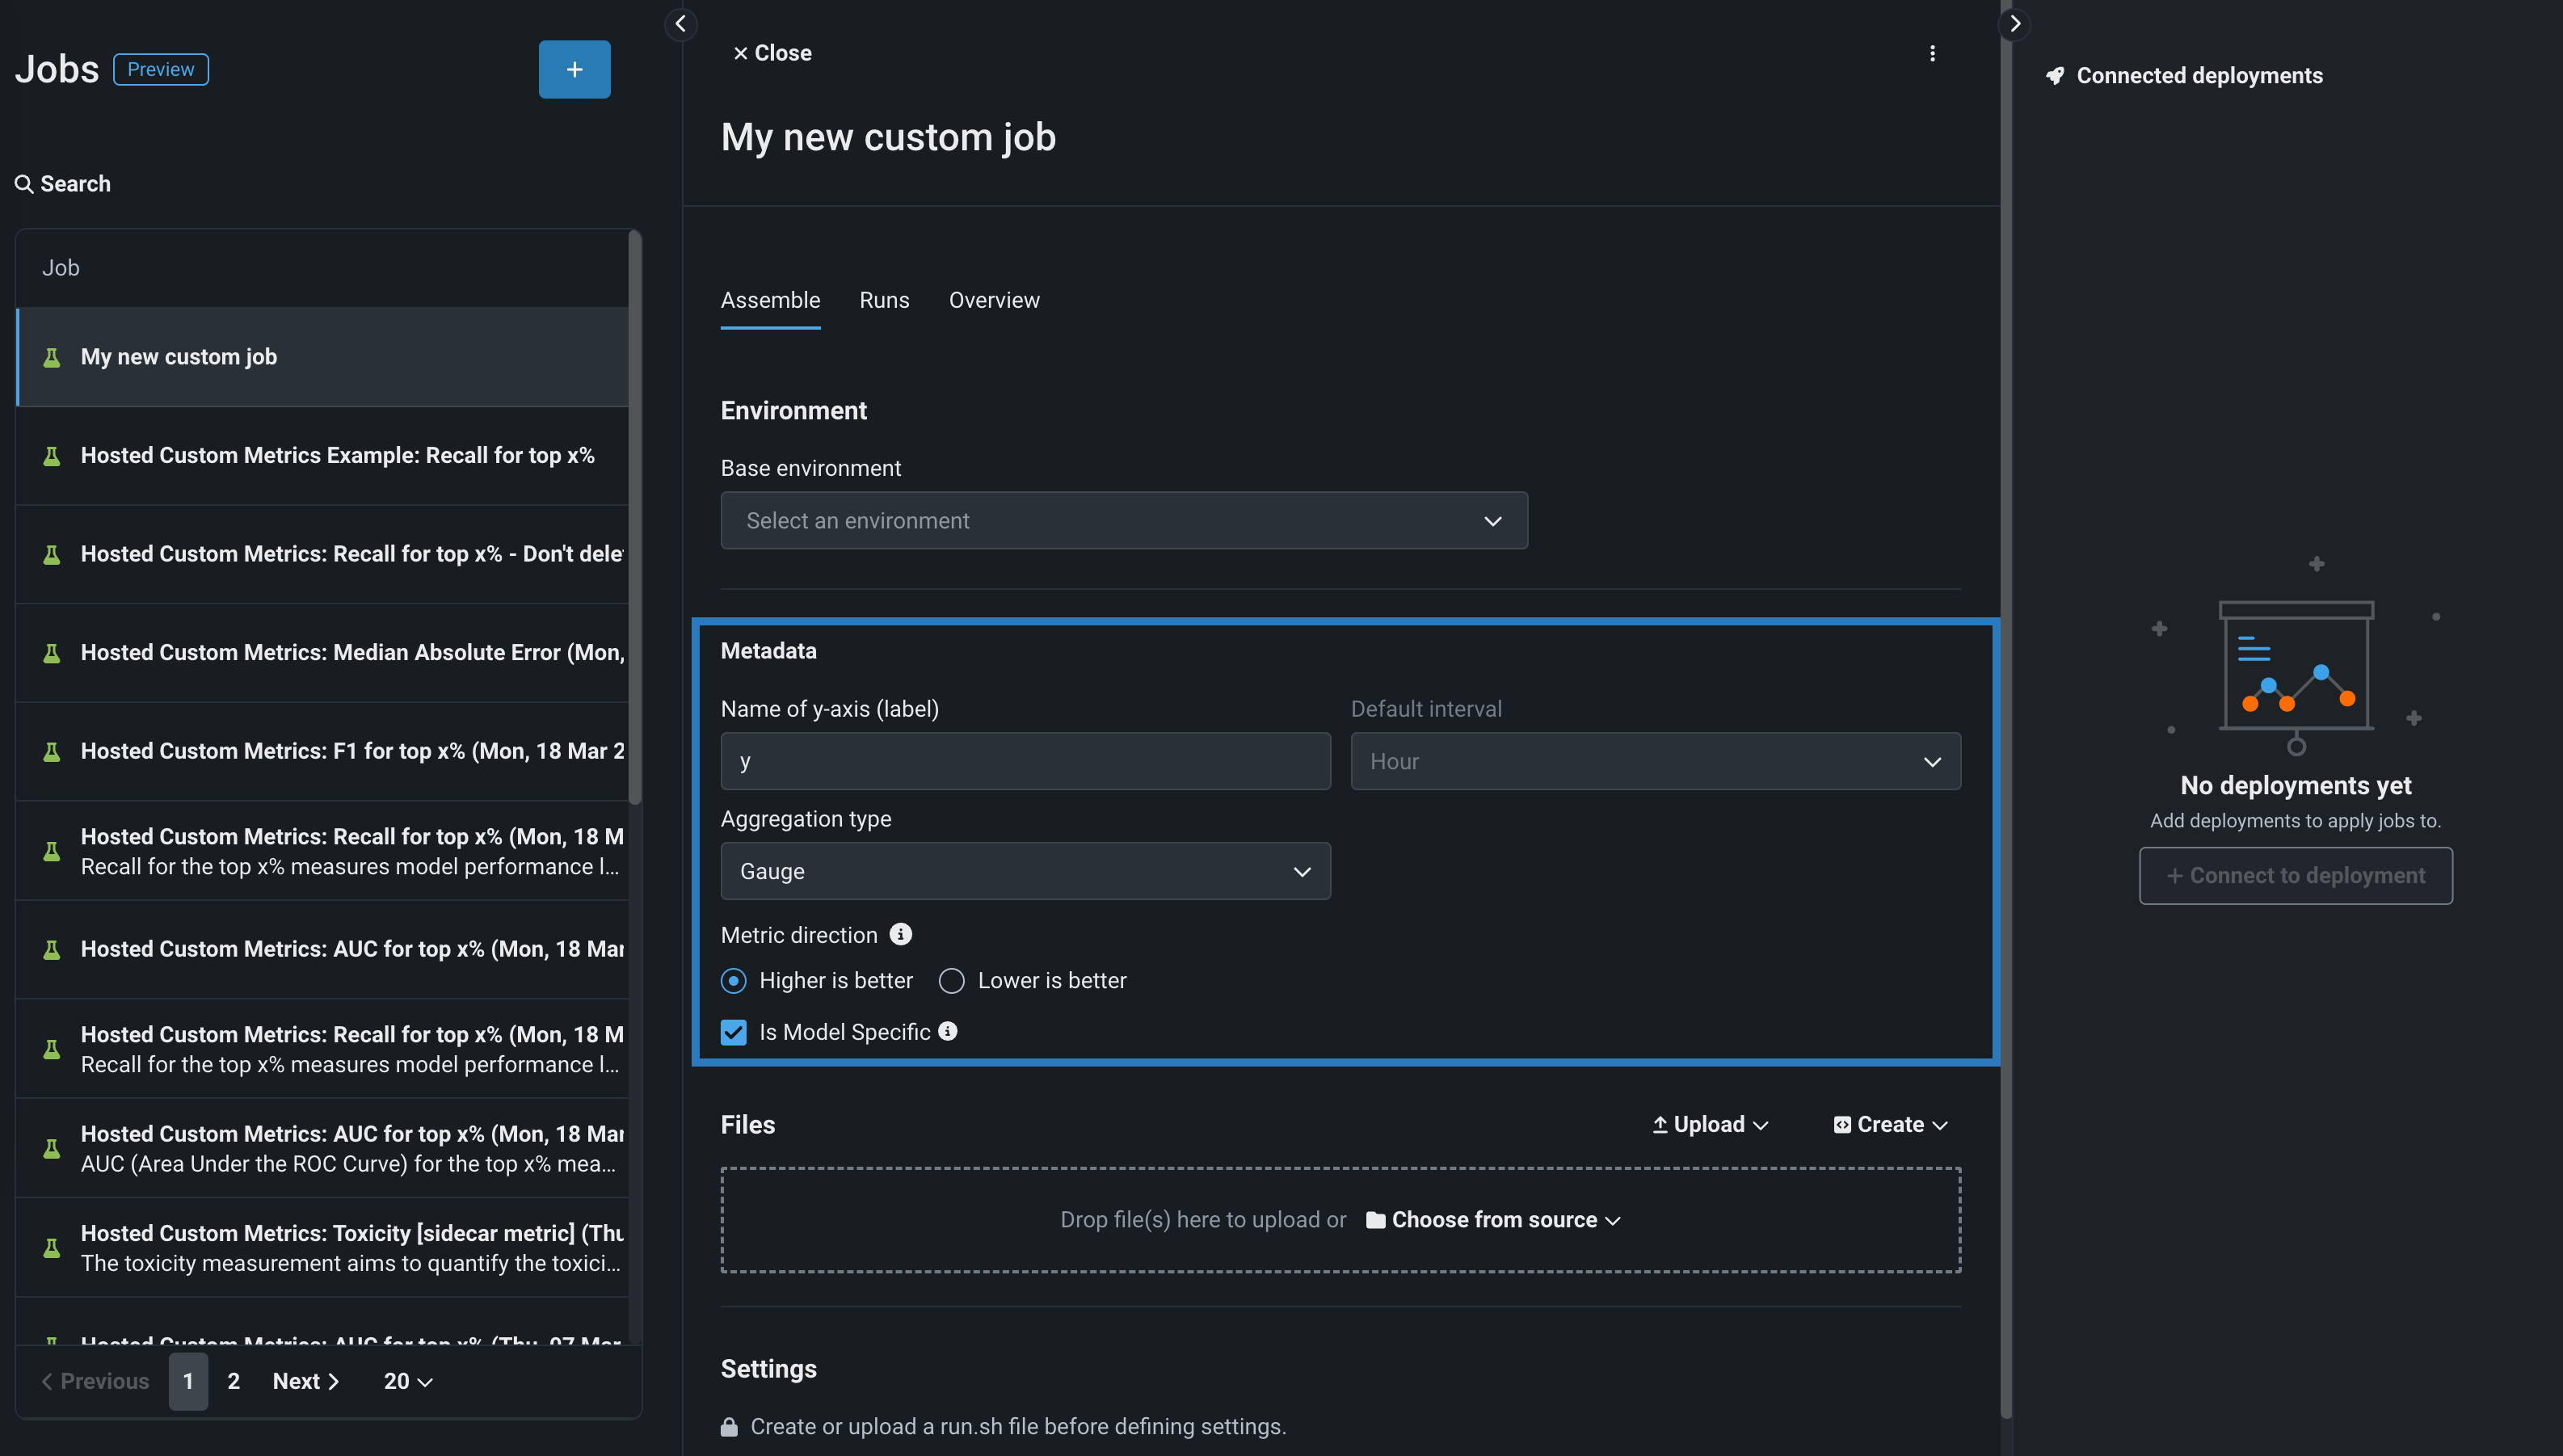
Field Description Name of y-axis (label) A descriptive name for the dependent variable. This name appears on the custom metric's chart on the Custom Metric Summary dashboard. Default interval Determines the default interval used by the selected Aggregation type. Only HOUR is supported. Aggregation type Determines if the metric is calculated as a Sum, Average, or Gauge—a metric with a distinct value measured at single point in time. Metric direction Determines the directionality of the metric, which controls how changes to the metric are visualized. You can select Higher is better or Lower is better. For example, if you choose Lower is better a 10% decrease in the calculated value of your custom metric will be considered 10% better, displayed in green. Is Model Specific When enabled, this setting links the metric to the model with the Model Package ID (Registered Model Version ID) provided in the dataset. This setting influences when values are aggregated (or uploaded). For example: - Model specific (enabled): Model accuracy metrics are model specific, so the values are aggregated completely separately. When you replace a model, the chart for your custom accuracy metric only shows data for the days after the replacement.
- Not model specific (disabled): Revenue metrics aren't model specific, so the values are aggregated together. When you replace a model, the chart for your custom revenue metric doesn't change.
Is Geospatial Determines if the custom metric will use geospatial data. Premium
Geospatial monitoring is a premium feature. Contact your DataRobot representative or administrator for information on enabling the feature.
Geospatial feature monitoring support
Geospatial feature monitoring is supported for binary classification, multiclass, regression, and location target types.
-
In the Files section, assemble the custom job. Drag files into the box, or use the options in this section to create or upload the files required to assemble a custom job:
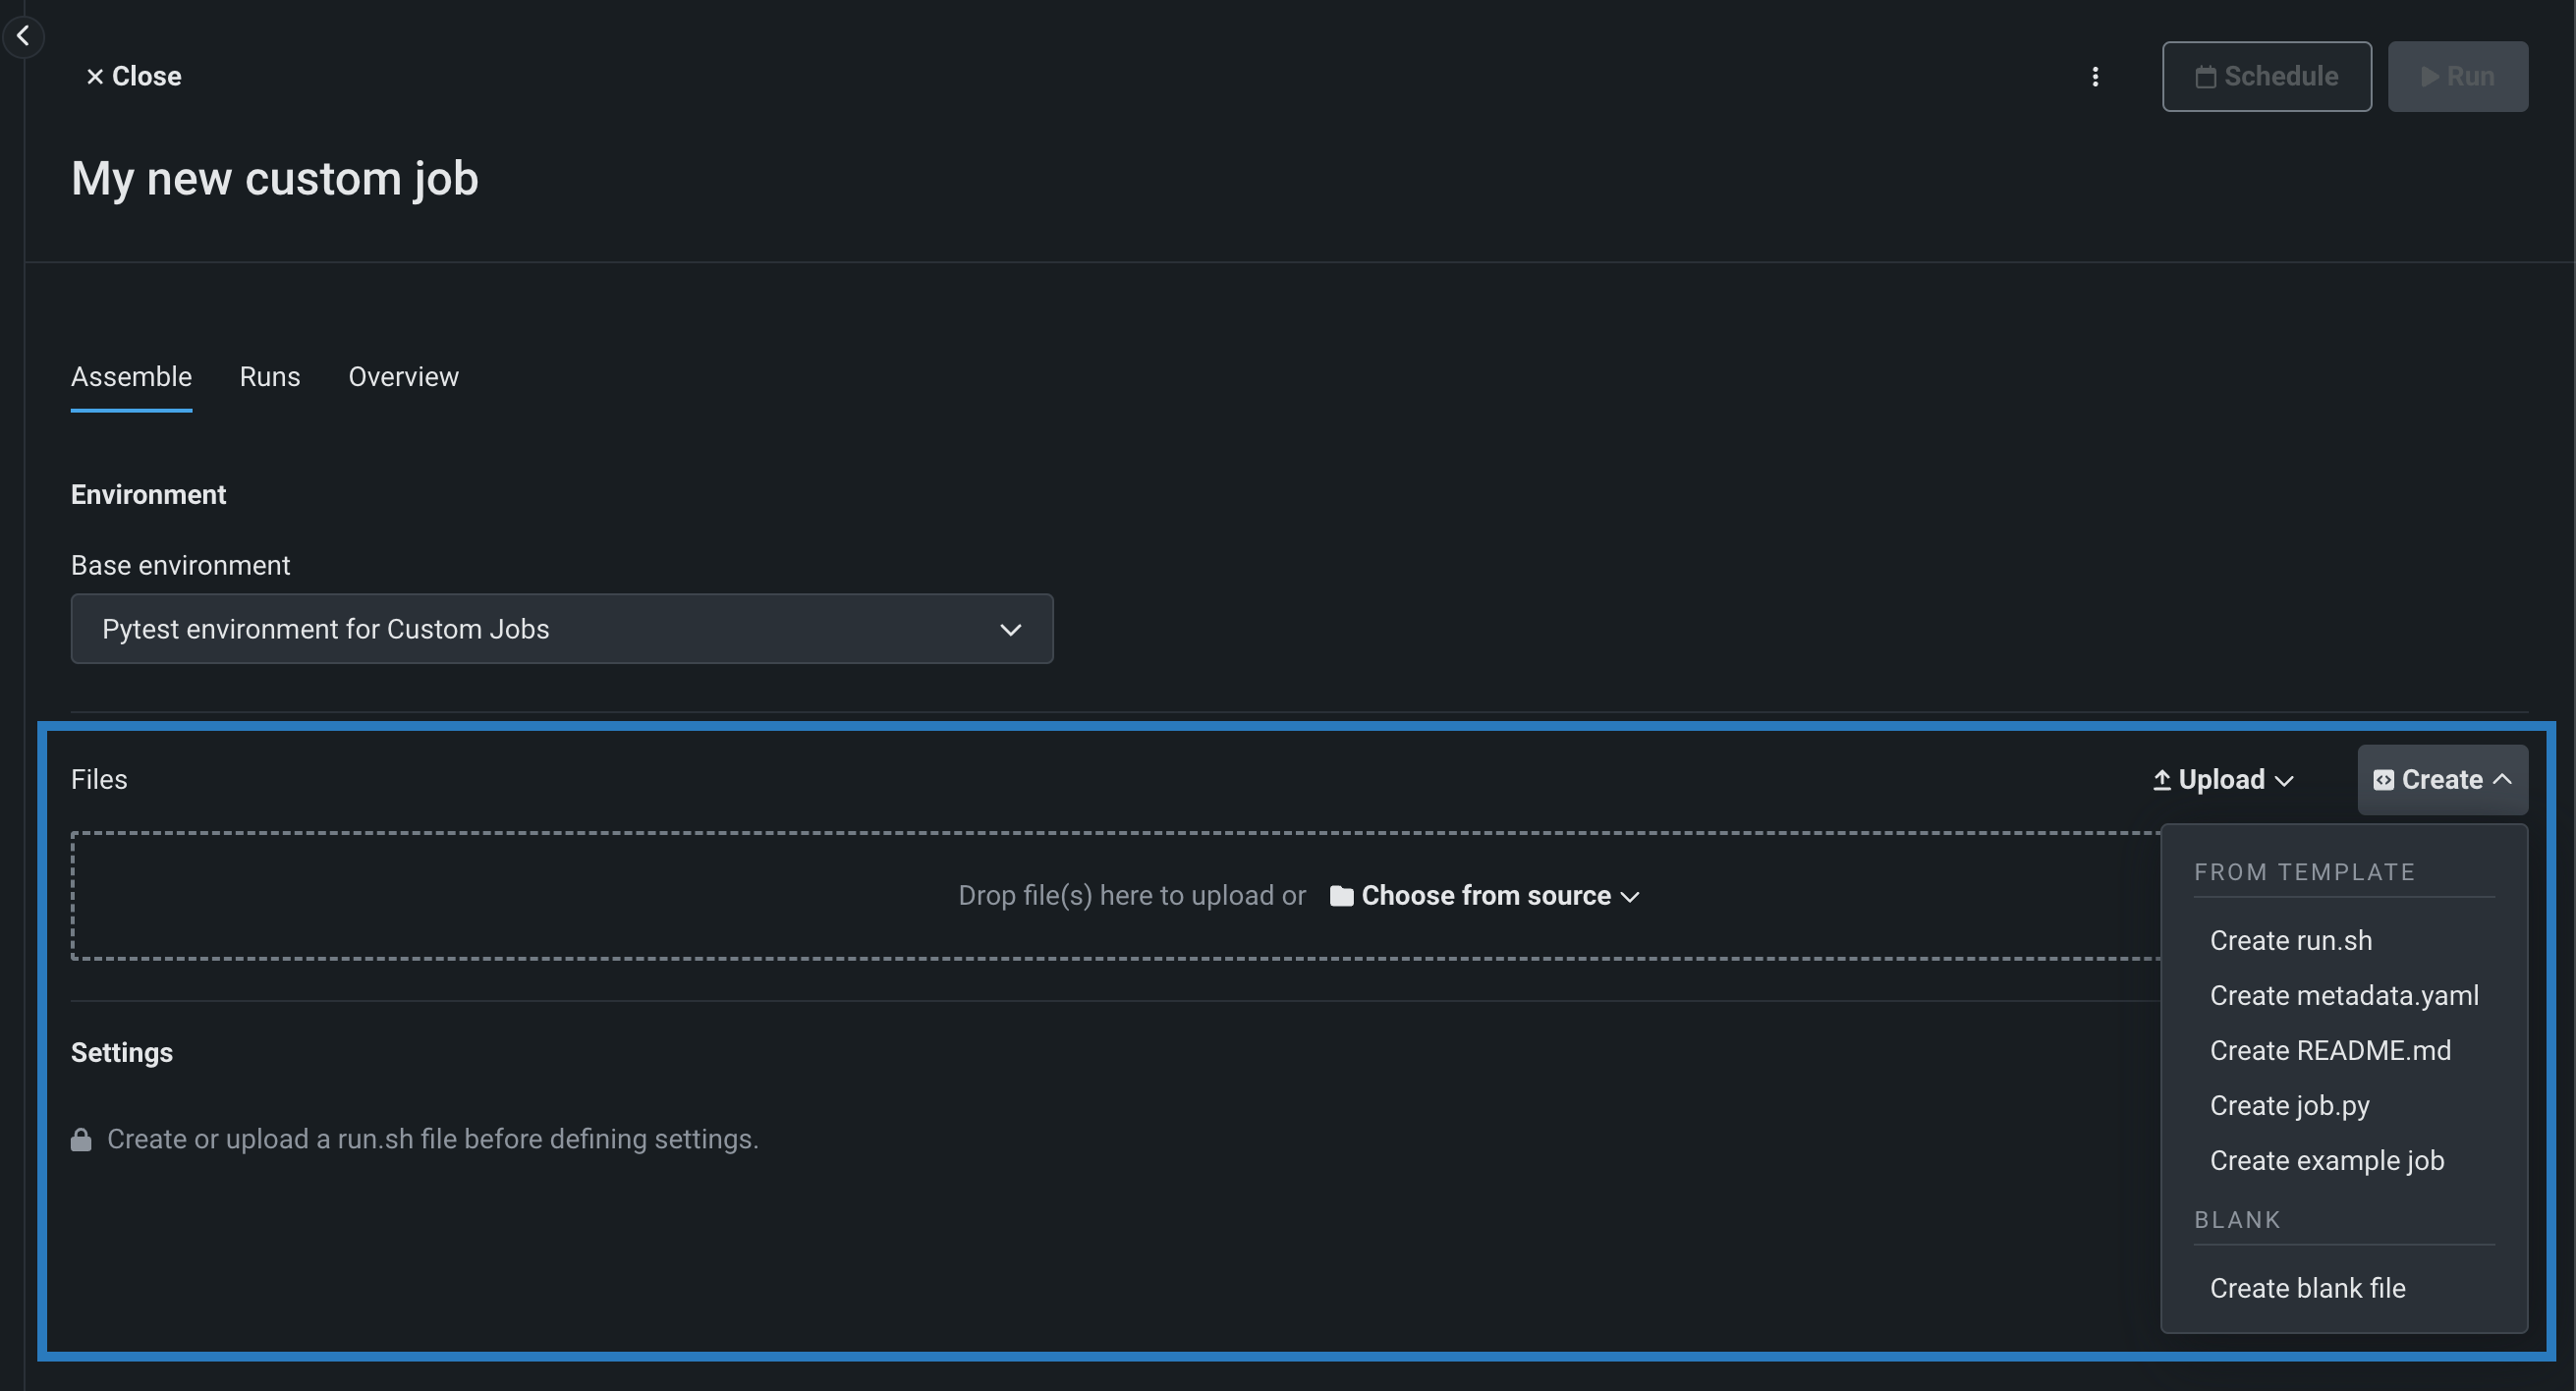
Option Description Choose from source / Upload Upload existing custom job files ( run.sh,metadata.yaml, etc.) as Local Files or a Local Folder.Create Create a new file, empty or containing a template, and save it to the custom job: - Create run.sh: Creates a basic, editable example of an entry point file.
- Create metadata.yaml: Creates a basic, editable example of a runtime parameters file.
- Create README.md: Creates a basic, editable README file.
- Create job.py: Creates a basic, editable Python job file to print runtime parameters and deployments.
- Create example job: Combines all template files to create a basic, editable custom job. You can quickly configure the runtime parameters and run this example job.
- Create blank file: Creates an empty file. Click the edit icon next to Untitled to provide a file name and extension, then add your custom contents. In the next step, it is possible to identify files created this way, with a custom name and content, as the entry point. After you configure the new file, click Save.
File replacement
If you add a new file with the same name as an existing file, when you click Save, the old file is replaced in the Files section.
-
In the Settings section, configure the Entry point shell (
.sh) file for the job. If you've added arun.shfile, that file is the entry point; otherwise, you must select the entry point shell file from the dropdown list. The entry point file allows you to orchestrate multiple job files: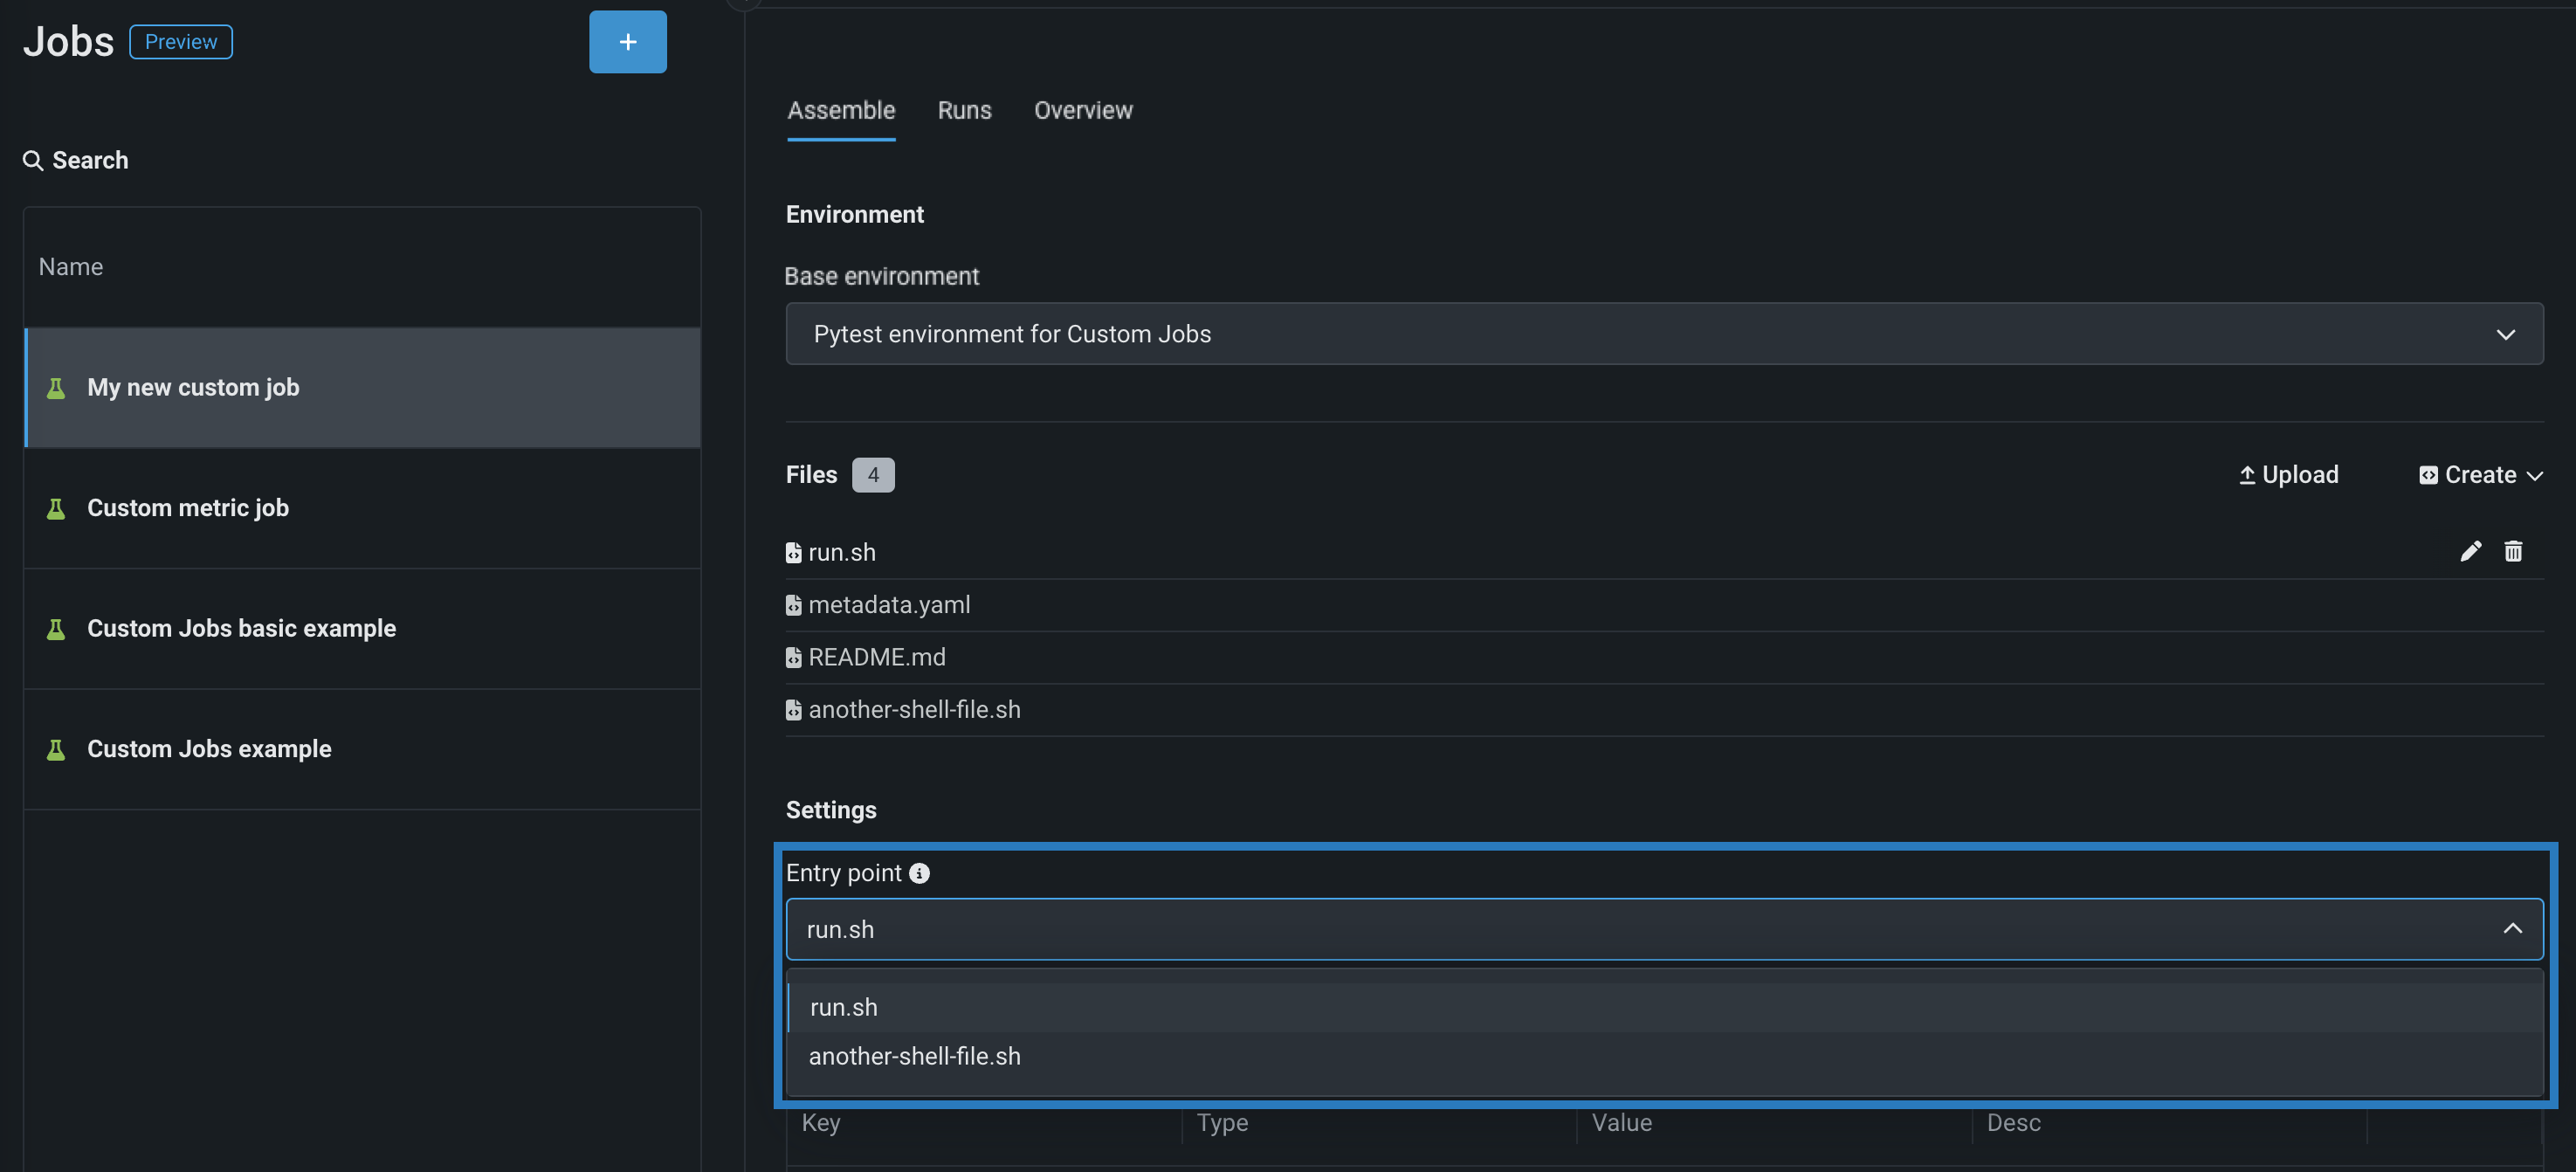
-
In the Resources section, next to the section header, click Edit and configure the following:
Preview
Custom job resource bundles are off by default. Contact your DataRobot representative or administrator for information on enabling this feature.
Feature flag: Enable Resource Bundles
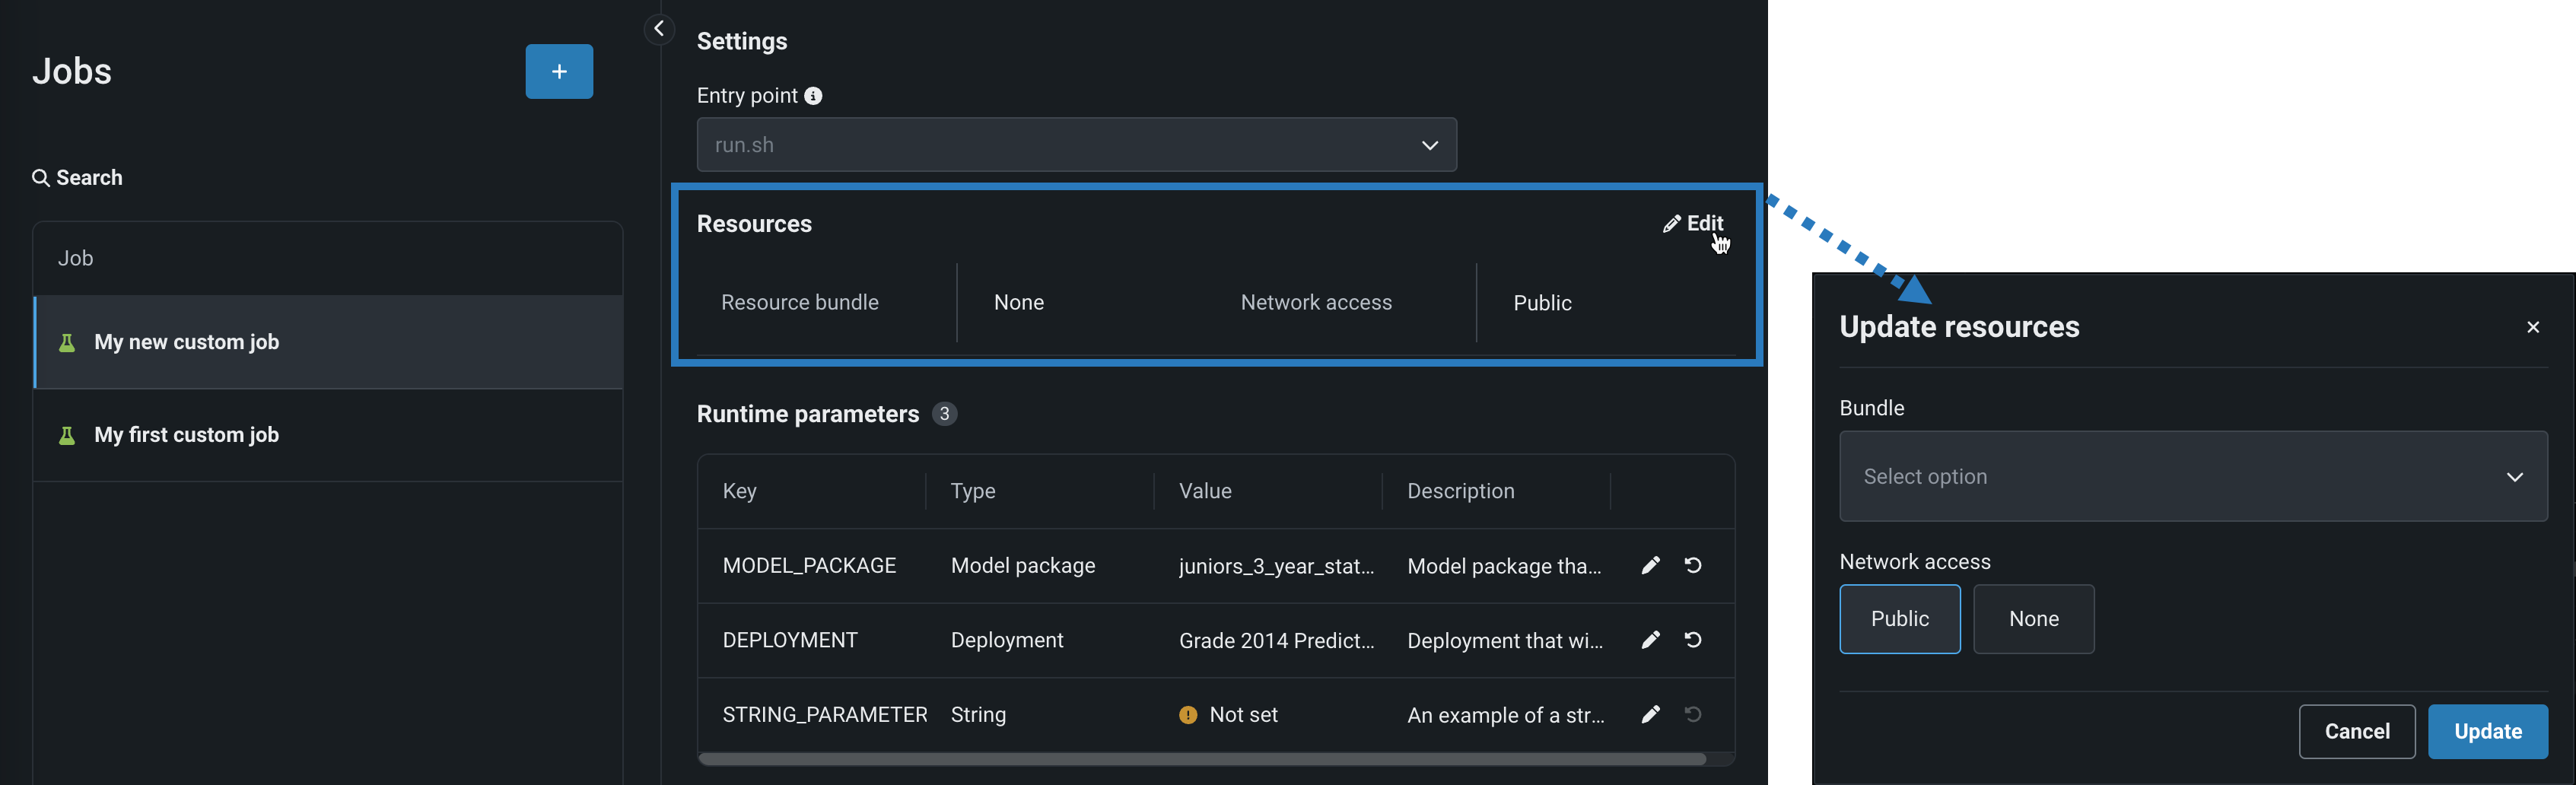
Setting Description Resource bundle (preview) Configure the resources the custom job uses to run. Network access Configure the egress traffic of the custom job. Under Network access, select one of the following: - Public: The default setting. The custom job can access any fully qualified domain name (FQDN) in a public network to leverage third-party services.
- None: The custom job is isolated from the public network and cannot access third party services.
Default network access
For the Managed AI Platform, the Network access setting is set to Public by default and the setting is configurable. For the Self-Managed AI Platform, the Network access setting is set to None by default and the setting is restricted; however, an administrator can change this behavior during DataRobot platform configuration. Contact your DataRobot representative or administrator for more information.
-
(Optional) Define Runtime parameters. Click + Add runtime parameter to define a new runtime parameter by providing a Name, Type, Value, and, optionally, a Description.
Alternatively define runtime parameters in a
metadata.yamlfile. A template for this file is available from the Files > Create dropdown.For existing runtime parameters, click Edit to edit parameter values, remove parameters, or reset parameter values.
-
(Optional) Configure additional Key values for Tags, Metrics, Training parameters, and Artifacts.
-
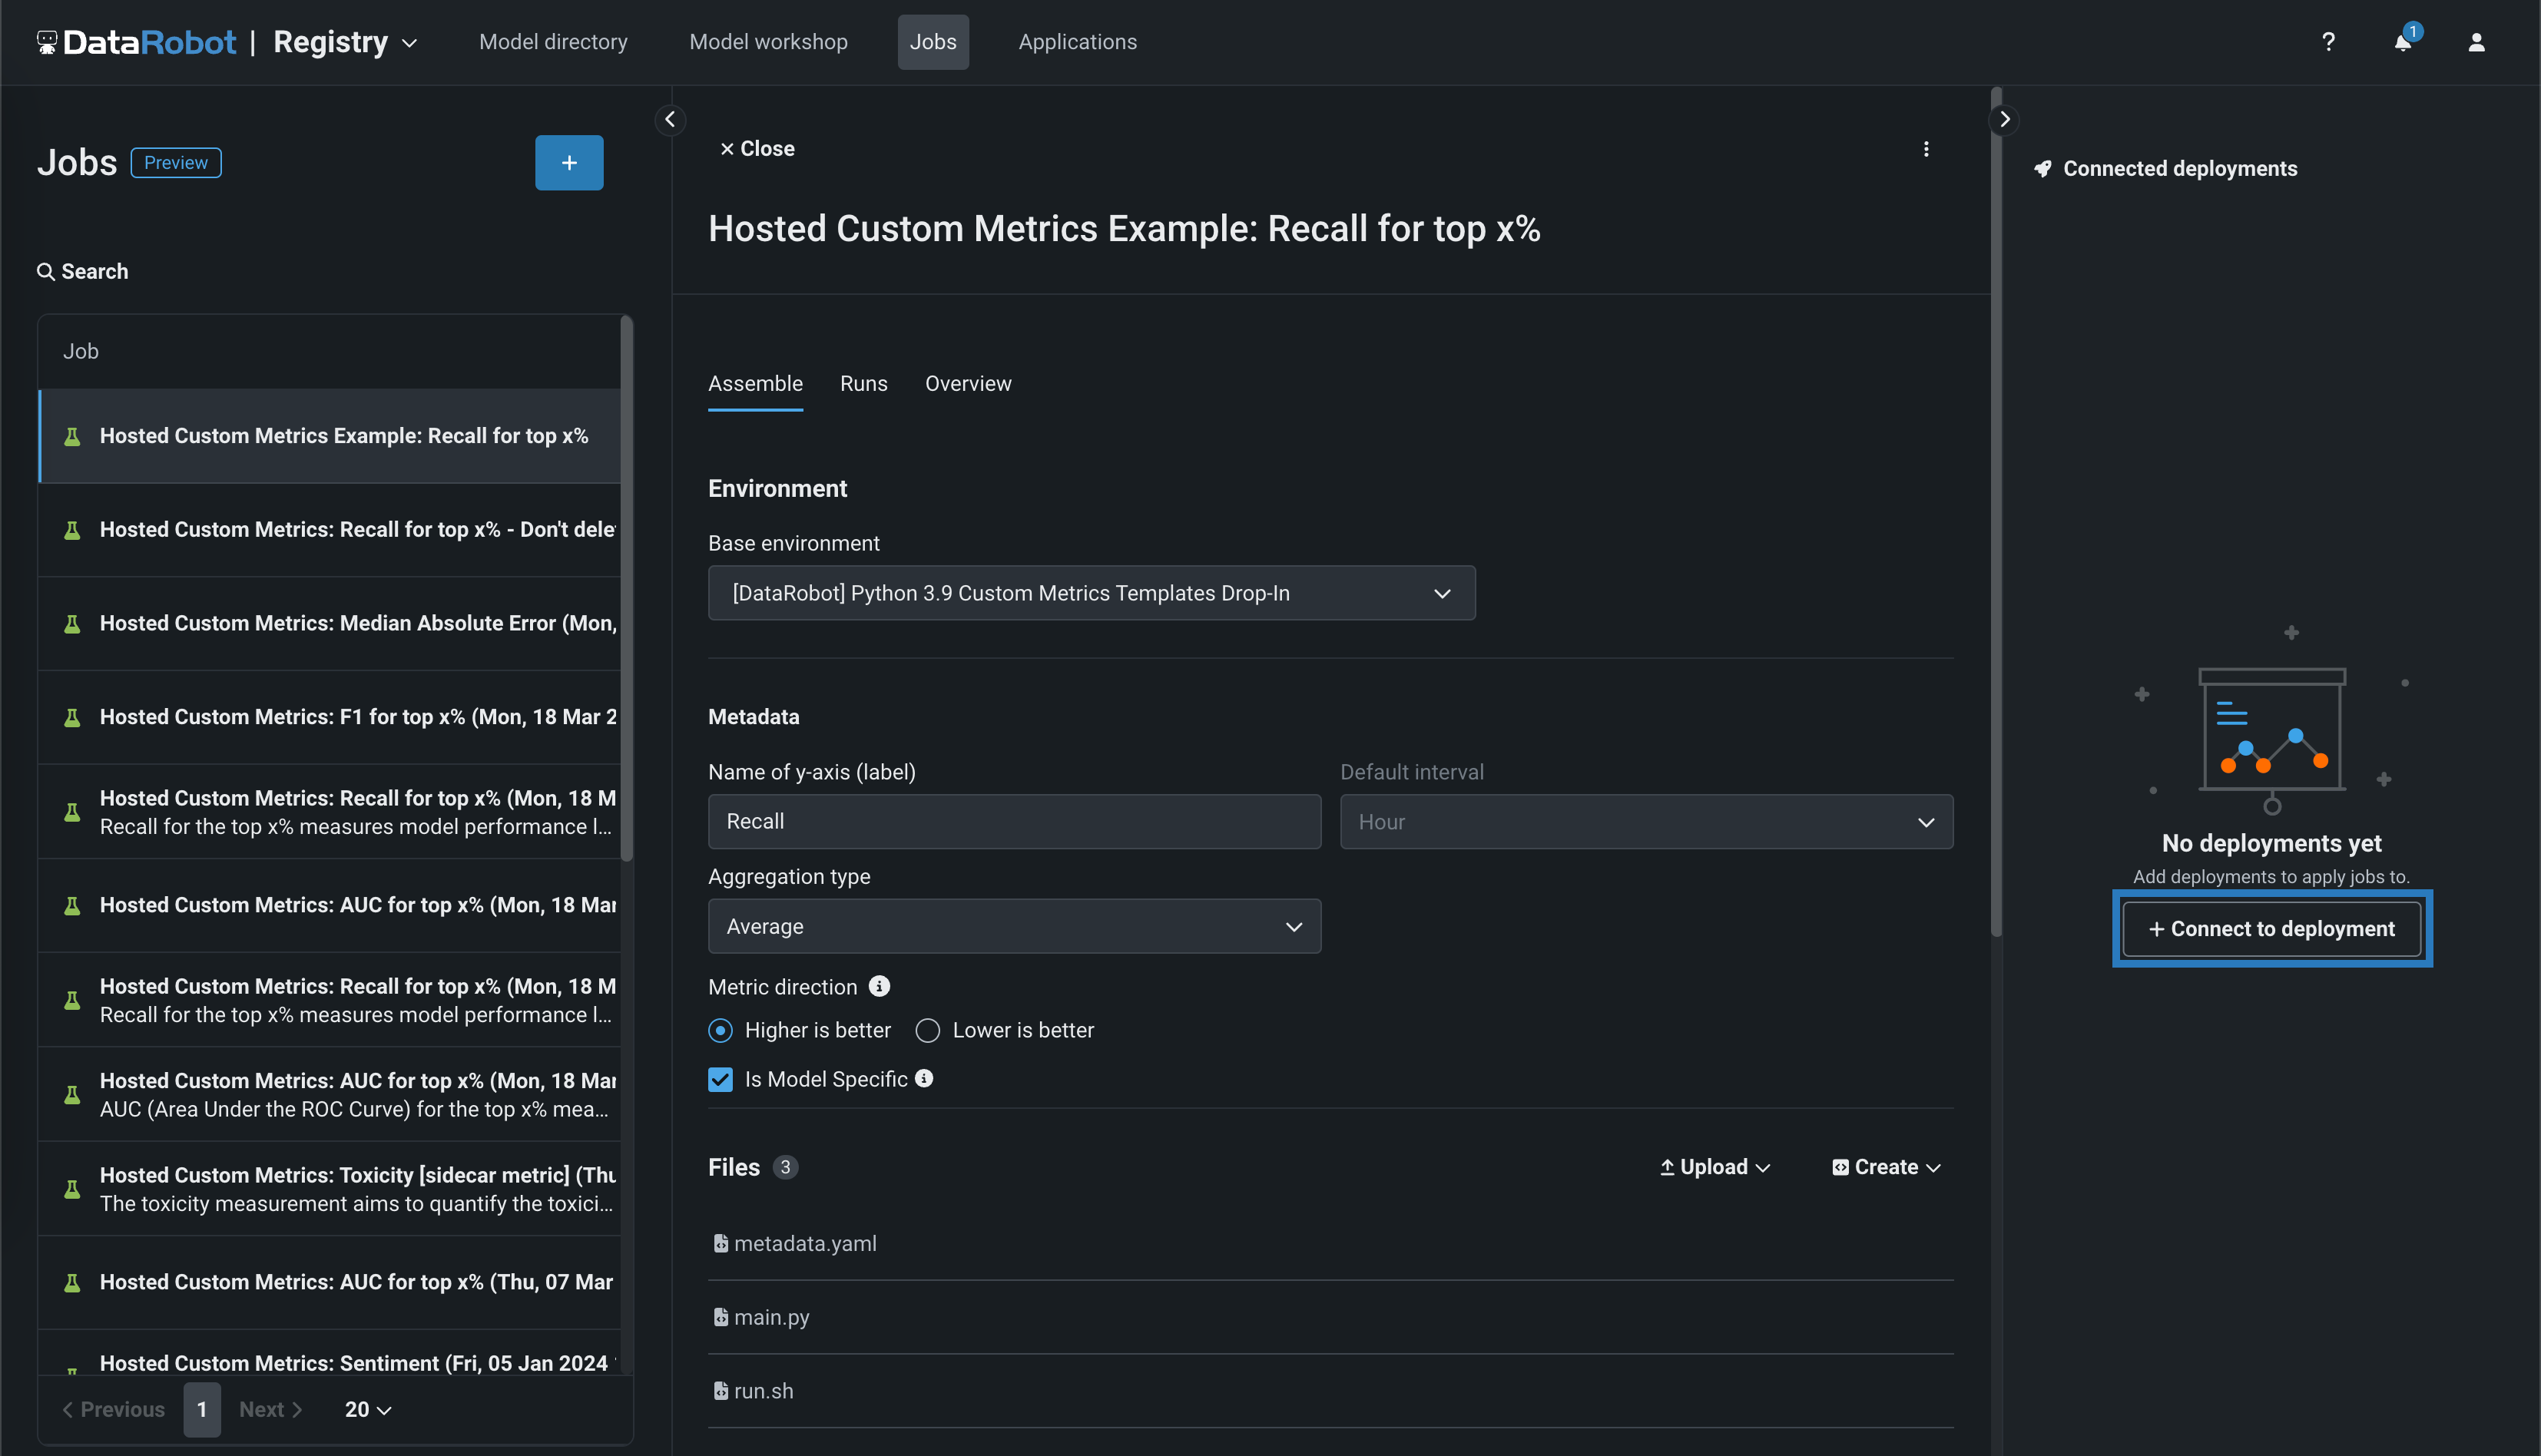
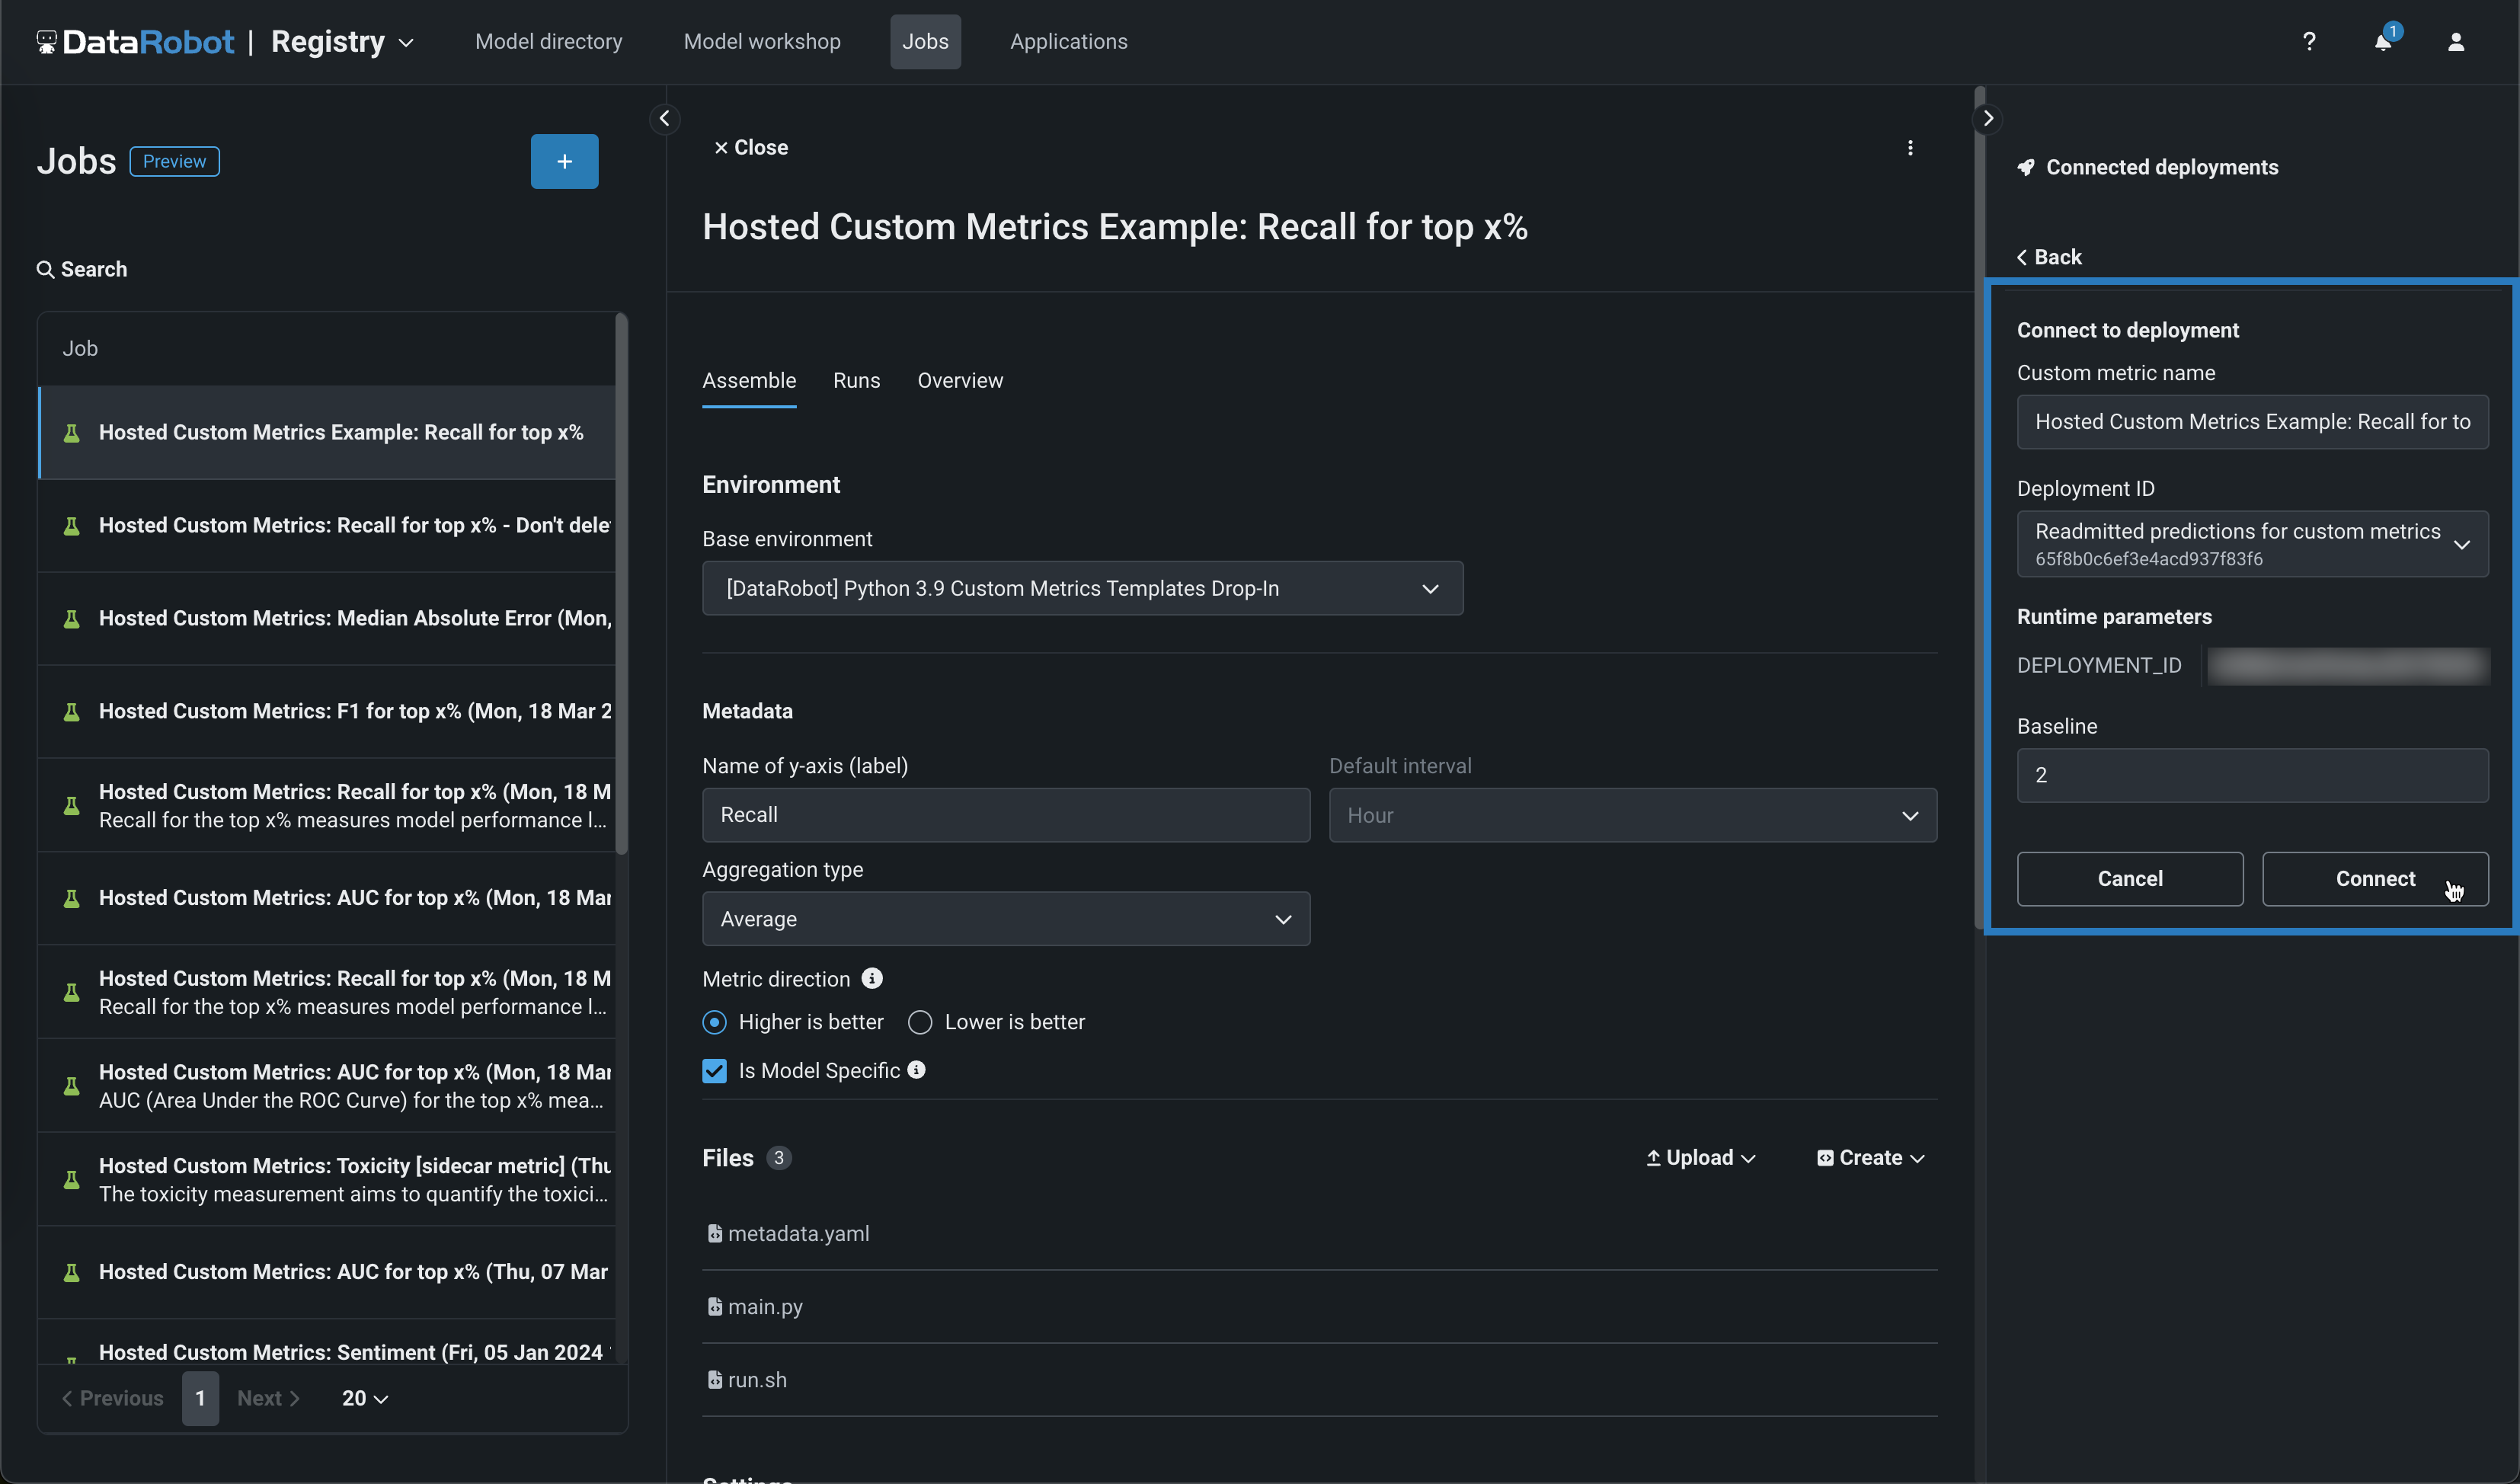
In the Connected deployments panel, click + Connect to deployment, define a Custom metric name, and select a Deployment ID to connect it to that deployment.
-
Edit the Custom metric name and select a Deployment ID, then, set a Baseline—the value used as a basis for comparison when calculating the x% better or x% worse values. If you selected Is Geospatial in the Metadata section, select a deployment with at least one geospatial/location feature and define the Geospatial segment attribute. Then, click Connect.
Geospatial feature monitoring support
Geospatial feature monitoring is supported for binary classification, multiclass, and regression target types.
How many deployments can I connect to a hosted custom metric job?
You can connect up to 10 deployments to a hosted custom metric job.
Connected deployments and runtime parameters
After you connect a deployment to a hosted custom metric job and schedule a run, you can't modify the
metadata.yamlfile for runtime parameters. You must disconnect all connected deployments to make any modifications to themetadata.yamlfile.
Create a hosted metric job from a template
To add a pre-made metric from a template:
Preview
The jobs template gallery is on by default.
Feature flag: Enable Custom Jobs Template Gallery
-
In the Add custom job from gallery panel, select a custom metric template applicable to your intended use case and click Create metric.
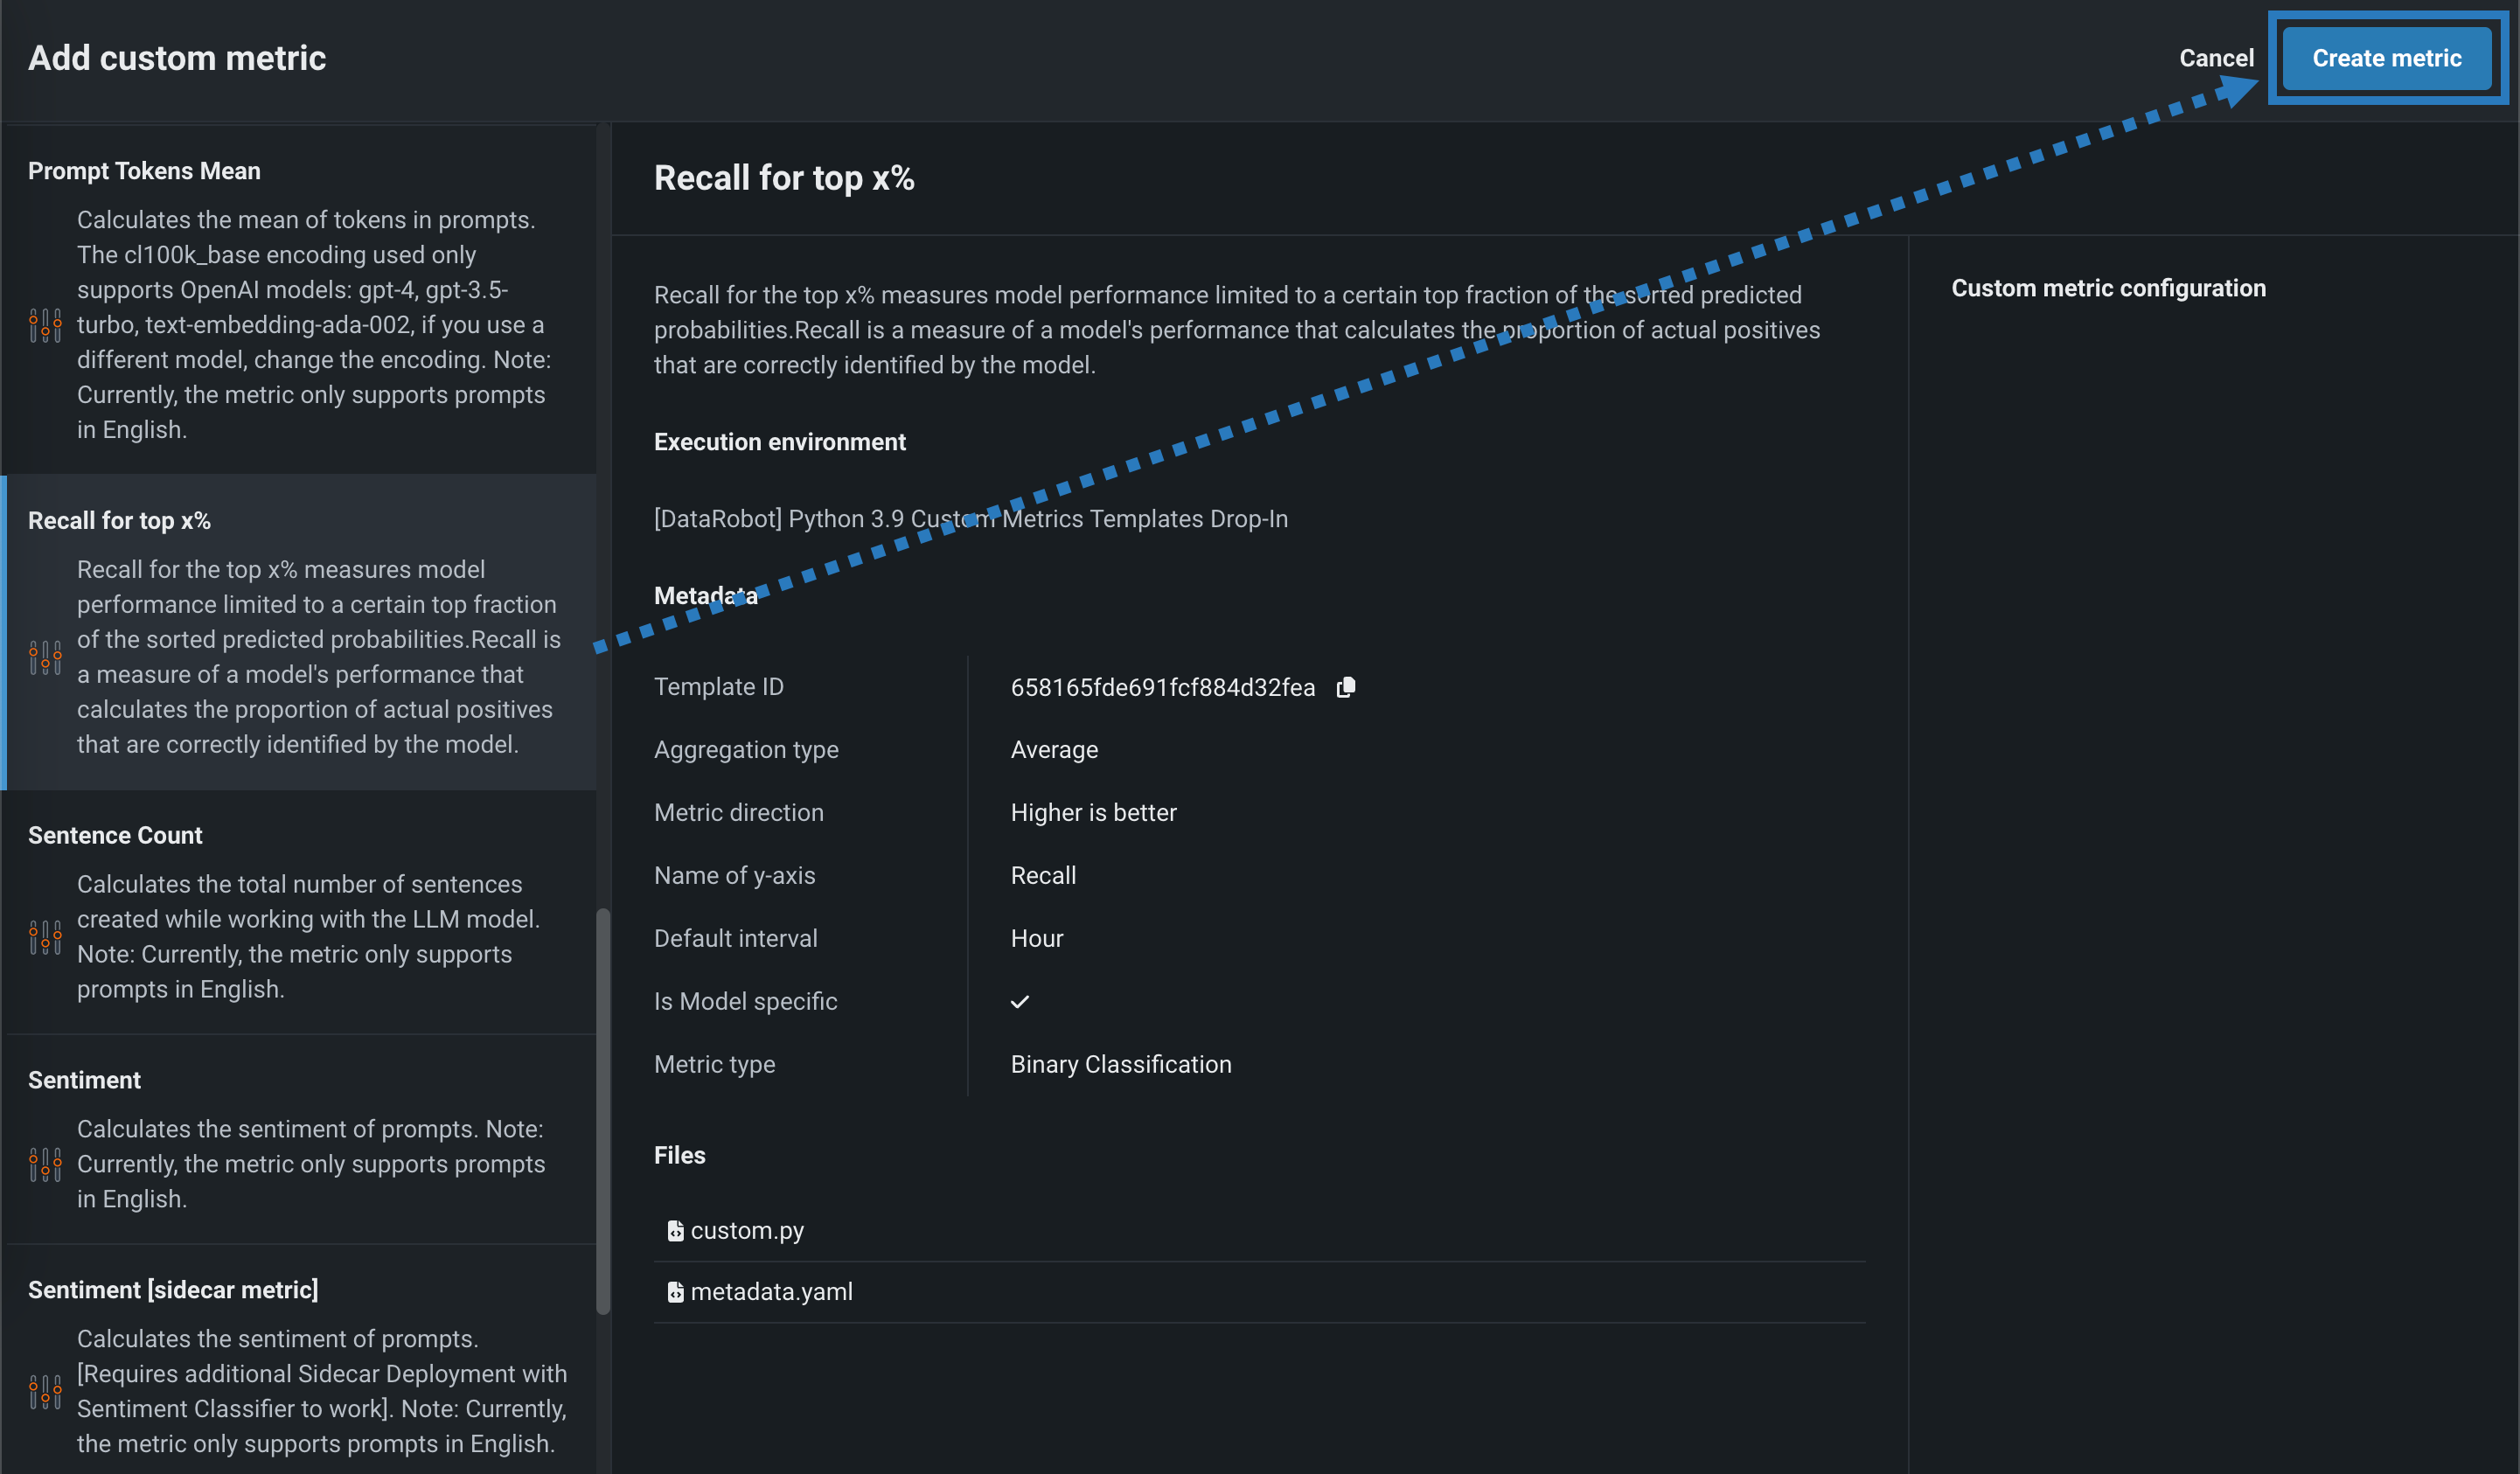
Custom metric template Description Recall for top x% Measures model performance limited to a certain top fraction of the sorted predicted probabilities. Recall is a measure of a model's performance that calculates the proportion of actual positives that are correctly identified by the model. Precision for top x% Measures model performance limited to a certain top fraction of the sorted predicted probabilities. Precision is a measure of a model's performance that calculates the proportion of correctly predicted positive observations from the total predicted positive. F1 for top x% Measures model performance limited to a certain top fraction of the sorted predicted probabilities. F1 score is a measure of a model's performance which considers both precision and recall. AUC (Area Under the ROC Curve) for top x% Measures model performance limited to a certain top fraction of the sorted predicted probabilities. Custom metric template Description Mean Squared Logarithmic Error (MSLE) Calculates the mean of the squared differences between logarithms of the predicted and actual values. It is a loss function used in regression problems when the target values are expected to have exponential growth, like population counts, average sales of a commodity over a time period, and so on. Median Absolute Error (MedAE) Calculates the median of the absolute differences between the target and the predicted values. It is a robust metric used in regression problems to measure the accuracy of predictions. Custom metric template Description Completion Reading Time Estimates the average time it takes a person to read text generated by the LLM. Completion Tokens Mean Calculates the mean number of tokens in completions for the time period requested. The cl100k_base encoding used only supports OpenAI models: gpt-4, gpt-3.5-turbo, and text-embedding-ada-002. If you use a different model, change the encoding. Cosine Similarity Average Calculates the mean cosine similarity between each prompt vector and corresponding context vectors. Cosine Similarity Maximum Calculates the maximum cosine similarity between each prompt vector and corresponding context vectors. Cosine Similarity Minimum Calculates the minimum cosine similarity between each prompt vector and corresponding context vectors. Cost Estimates the financial cost of using the LLM by calculating the number of tokens in the input, output, and retrieved text, and then applying token pricing. The cl100k_base encoding used only supports OpenAI models: gpt-4, gpt-3.5-turbo, and text-embedding-ada-002. If you use a different model, change the encoding. Dale Chall Readability Measures the U.S. grade level required to understand a text based on the percentage of difficult words and average sentence length. Euclidean Average Calculates the mean Euclidean distance between each prompt vector and corresponding context vectors. Euclidean Maximum Calculates the maximum Euclidean distance between each prompt vector and corresponding context vectors. Euclidean Minimum Calculates the minimum Euclidean distance between each prompt vector and corresponding context vectors. Flesch Reading Ease Measures the readability of text based on the average sentence length and average number of syllables per word. Prompt Injection [sidecar metric] Detects input manipulations, such as overwriting or altering system prompts, that are intended to modify the model's output. This metric requires an additional deployment of the Prompt Injection Classifier global model. Prompt Tokens Mean Calculates the mean number of tokens in prompts for the time period requested. The cl100k_base encoding used only supports OpenAI models: gpt-4, gpt-3.5-turbo, and text-embedding-ada-002. If you use a different model, change the encoding. Sentence Count Calculates the total number of sentences in user prompts and text generated by the LLM. Sentiment Classifies text sentiment as positive or negative Sentiment [sidecar metric] Classifies text sentiment as positive or negative using a pre-trained sentiment classification model. This metric requires an additional deployment of the Sentiment Classifier global model. Syllable Count Calculates the total number of syllables in the words in user prompts and text generated by the LLM. Tokens Mean Calculates the mean of tokens in prompts and completions. The cl100k_base encoding used only supports OpenAI models: gpt-4, gpt-3.5-turbo, and text-embedding-ada-002. If you use a different model, change the encoding. Toxicity [sidecar metric] Measures the toxicity of text using a pre-trained hate speech classification model to safeguard against harmful content. This metric requires an additional deployment of the Toxicity Classifier global model. Word Count Calculates the total number of words in user prompts and text generated by the LLM. Japanese text metrics [JP] Character Count Calculates the total number of characters generated while working with the LLM. [JP] PII occurrence count Calculates the total number of PII occurrences while working with the LLM. Custom metric template Description Agentic completion tokens Calculates the total completion tokens of agent-based LLM calls. Agentic cost Calculates the total cost of agent-based LLM calls. Requires that each LLM span reports token usage so the metric can compute cost from the trace. Agentic prompt tokens Calculates the total prompt tokens of agent-based LLM calls. -
Review the job description, Execution environment, Metadata, and Files. If necessary, set the Custom metric configuration setting to select a Sidecar deployment, then, click Create custom job:

The hosted metric job opens to the Assemble tab.
Sidecar metrics
If you selected a
[sidecar metric], ensure that you set the Sidecar deployment setting in the Custom metric configuration. To verify the connection, when you open on the Assemble tab, navigate to the Runtime Parameters and confirm theSIDECAR_DEPLOYMENT_IDparameter is set, associating the sidecar metric with the connected deployment required to calculate that metric. If you haven't deployed a model to calculate the metric, you can find pre-defined models for these metrics as global models. -
On the Assemble tab, you can optionally modify the template's default name, Environment, Files, Settings, Resources, Runtime Parameters, or Key values, just as with a standard custom metric job.
-
In the Connected deployments panel, click + Connect to deployment.
Connected deployments and runtime parameters
After you connect a deployment to a hosted custom metric job and schedule a run, you can't modify the
metadata.yamlfile for runtime parameters. You must disconnect all connected deployments to make any modifications to themetadata.yamlfile. -
Edit the Custom metric name and select a Deployment ID, then, set a Baseline—the value used as a basis for comparison when calculating the x% better or x% worse values—and click Connect.
How many Deployments can I connect to a hosted custom metric job?
You can connect up to 10 deployments to a hosted custom metric job.