Prediction jobs
To view and manage prediction job definitions, select a deployment on the Deployments dashboard and navigate to the Predictions > Prediction jobs tab.
Click the Actions menu for a job definition and select one of the actions described below:
| Action | Description |
|---|---|
| View job history | Displays the Console > Batch Jobs tab listing all jobs generated from the job definition. |
| Run now | Runs the job definition immediately. Go to the Console > Batch Jobs tab to view progress. |
| View / Edit definition | Depending on your permissions for the prediction job, either displays the job definition, or allows you to update and save it. |
| Enable / Disable definition | Disable suspends a job definition. Any scheduled batch runs from the job definition are suspended. After you select Disable definition, the menu item becomes Enable definition. Click Enable definition to re-enable batch runs from this job description. |
| Clone definition | Creates a new job definition populated with the values from an existing job definition. From the Actions menu of the existing job definition, click Clone definition, update the fields as needed, and click Save prediction job definition. Note that the Jobs schedule settings are turned off by default. |
| Delete definition | Deletes the job definition. Click Delete definition, and in the confirmation window, click Delete definition again. All scheduled jobs are cancelled. |
Shared job definitions
Shared job definitions appear alongside your own; however, if you don't have access to the prediction Source in the Data Registry, the dataset ID is [redacted].
With the correct permissions, you can perform the job definition actions defined above. For information on which actions are available for each deployment role, see the roles and permissions documentation.
If you have owner permissions, you can click Edit definition to edit the shared job definition. To edit the source settings, if the Source type relies on credentials or the Data Registry dataset isn't shared with you, you must click Reset connection and configure a new Source type:
In DataRobot, you cannot share connection credentials; therefore, you cannot edit the destination settings—you must click Reset connection and use your credentials to configure a new Destination type.
As a deployment Owner, you can edit any other information freely, and if the Prediction source dataset is from the Data Registry and it is shared with you, you can edit the existing connection directly.
Schedule recurring batch prediction jobs
Job definitions are flexible templates for creating batch prediction jobs. You can store definitions inside DataRobot and run new jobs with a single click, API call, or automatically via a schedule. Scheduled jobs do not require you to provide connection, authentication, and prediction options for each request.
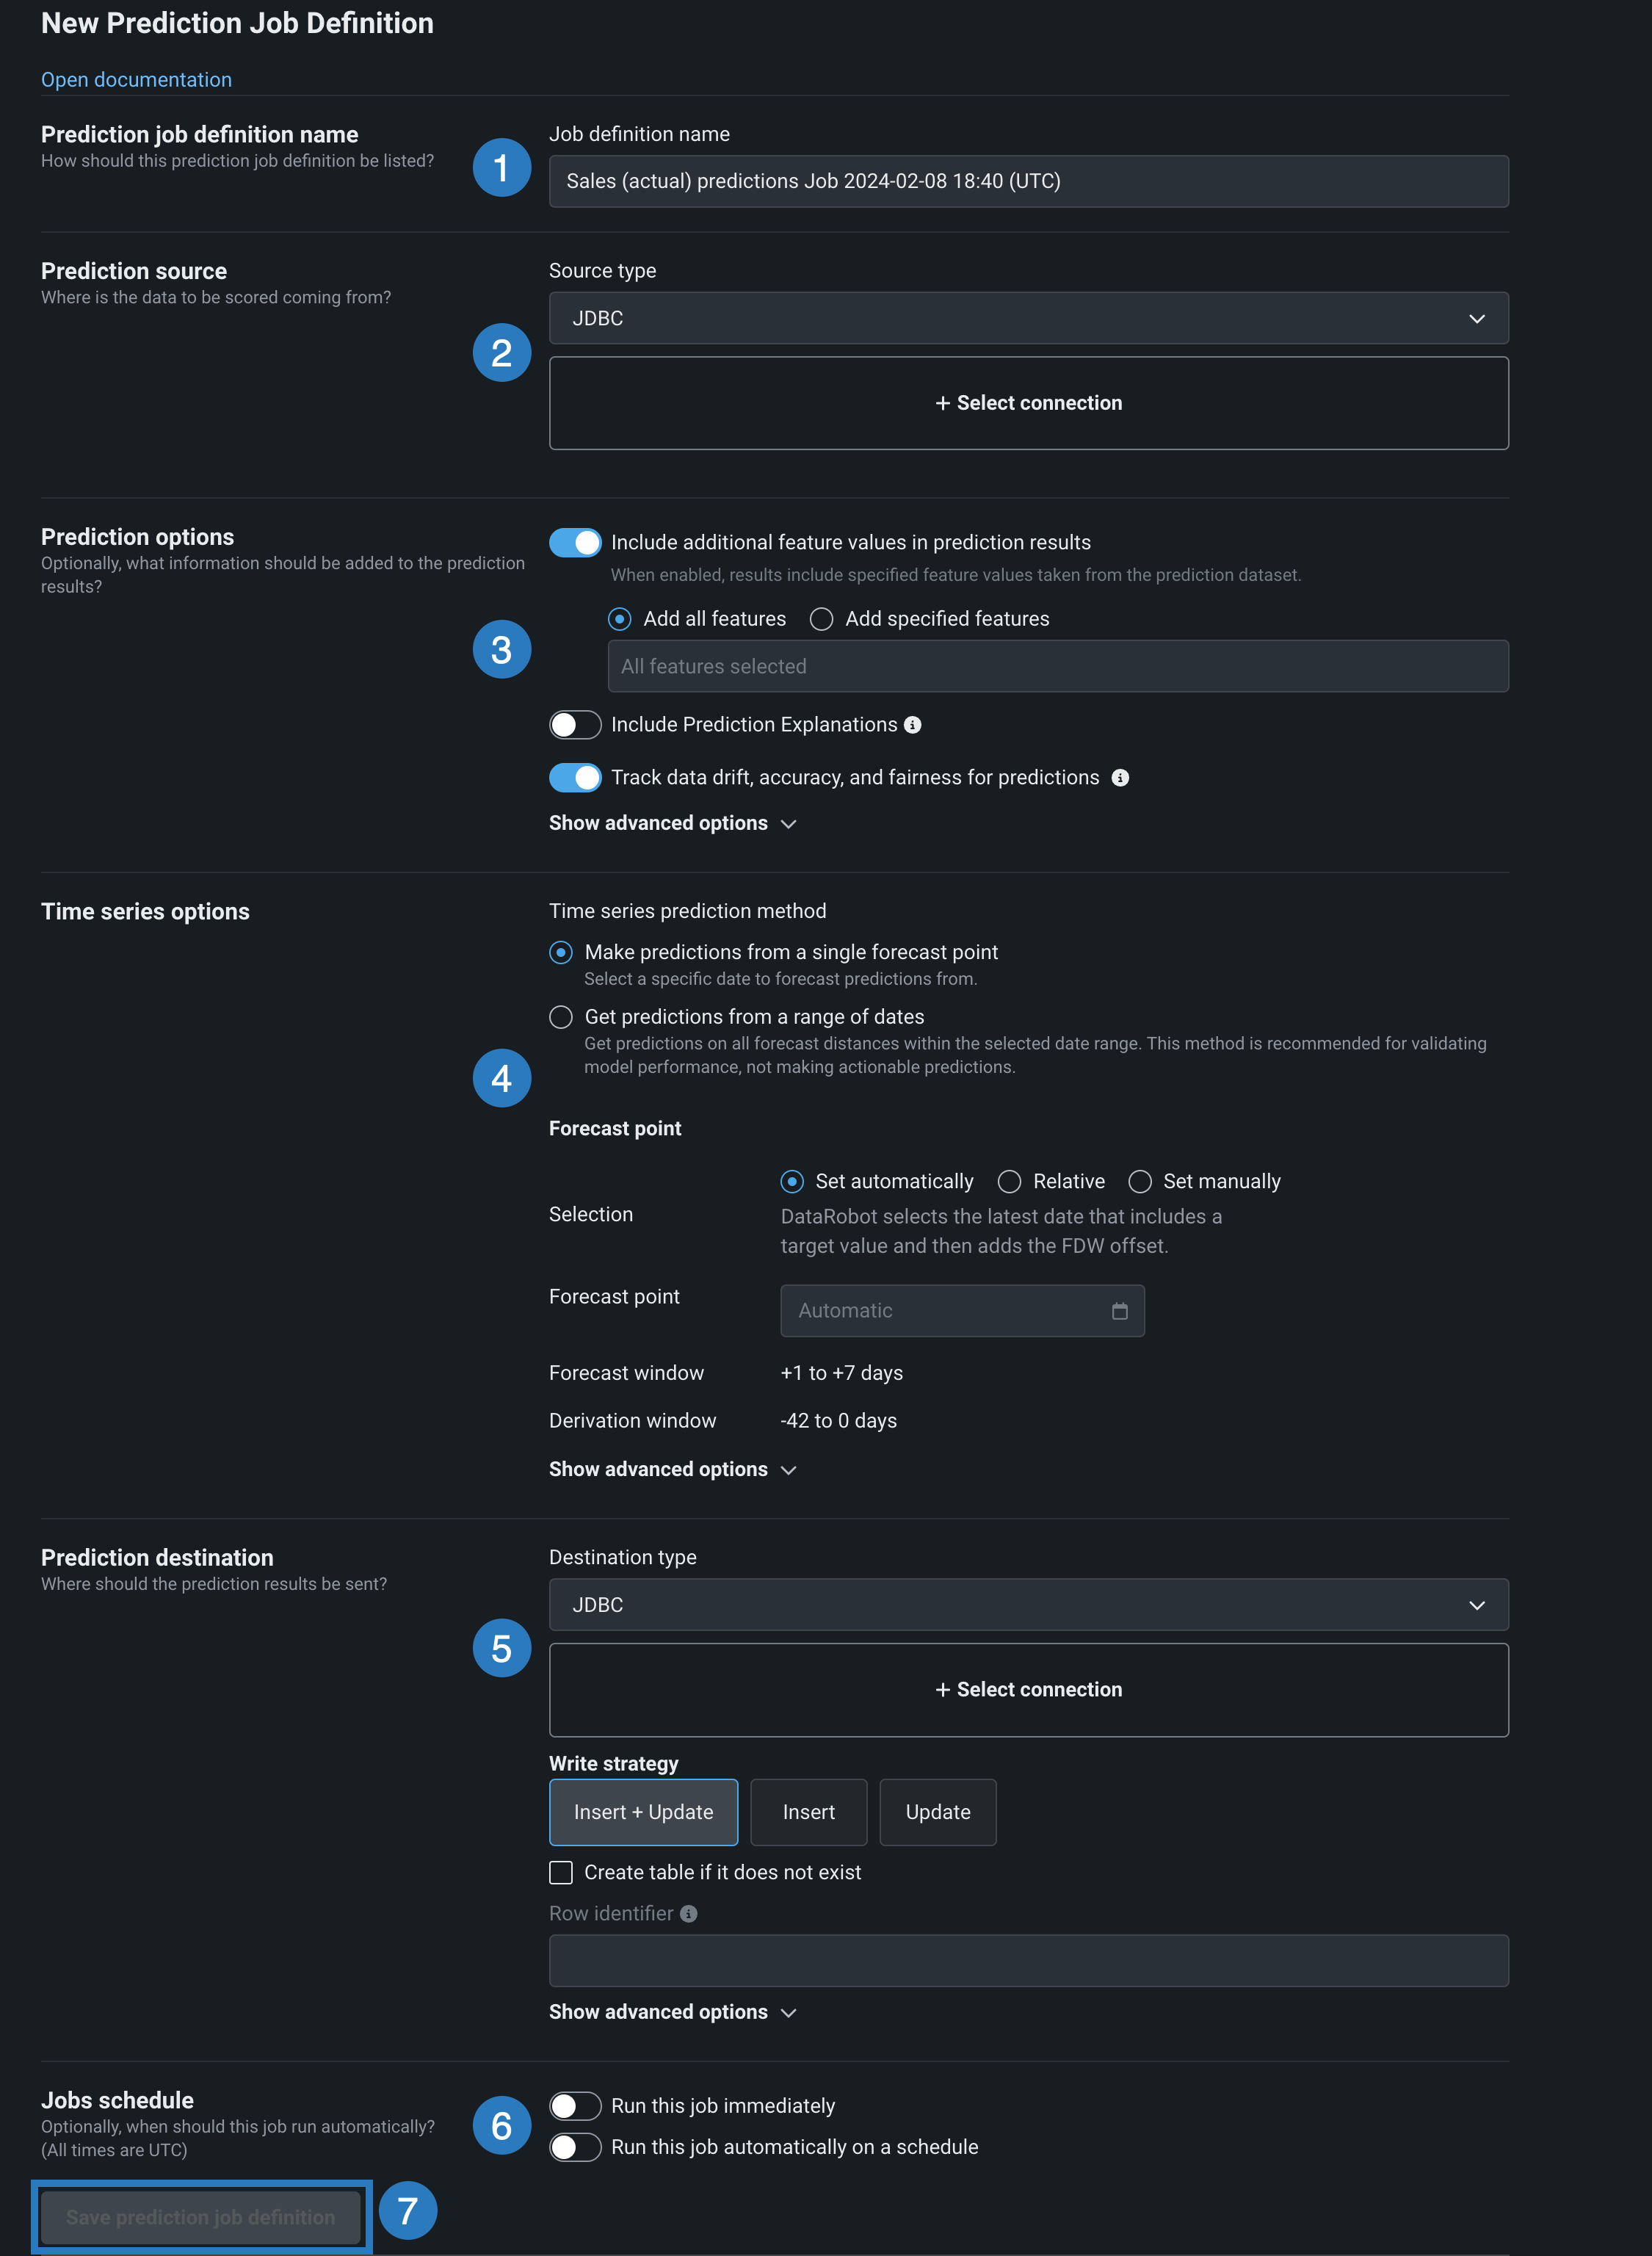
To create a job definition for a deployment, navigate to the Predictions > Prediction jobs tab and click + Add job definition. The following table describes the information and actions available on the New Prediction Job Definition tab:
| Field name | Description | |
|---|---|---|
| 1 | Prediction job definition name | Enter the name of the prediction job that you are creating for the deployment. |
| 2 | Prediction source | Set the source type and define the connection for the data to be scored. |
| 3 | Prediction options | Configure the prediction options. |
| 4 | Time series options | Specify and configure a time series prediction method. |
| 5 | Prediction destination | Indicate the output destination for predictions. Set the destination type and define the connection. |
| 6 | Jobs schedule | Toggle whether to run the job immediately and whether to schedule the job. |
| 7 | Save prediction job definition | Click this button to save the job definition. The button changes to Save and run prediction job definition if the Run this job immediately toggle is turned on. Note that this button is disabled if there are validation errors. |
Once fully configured, click Save prediction job definition (or Save and run prediction job definition if Run this job immediately is enabled).
Note
Completing the New Prediction Job Definition tab configures the details required by the Batch Prediction API. Reference the Batch Prediction API documentation for details.
Set up prediction sources
Select a prediction source (also called an intake adapter). To set a prediction source, complete the appropriate authentication workflow for the source type.
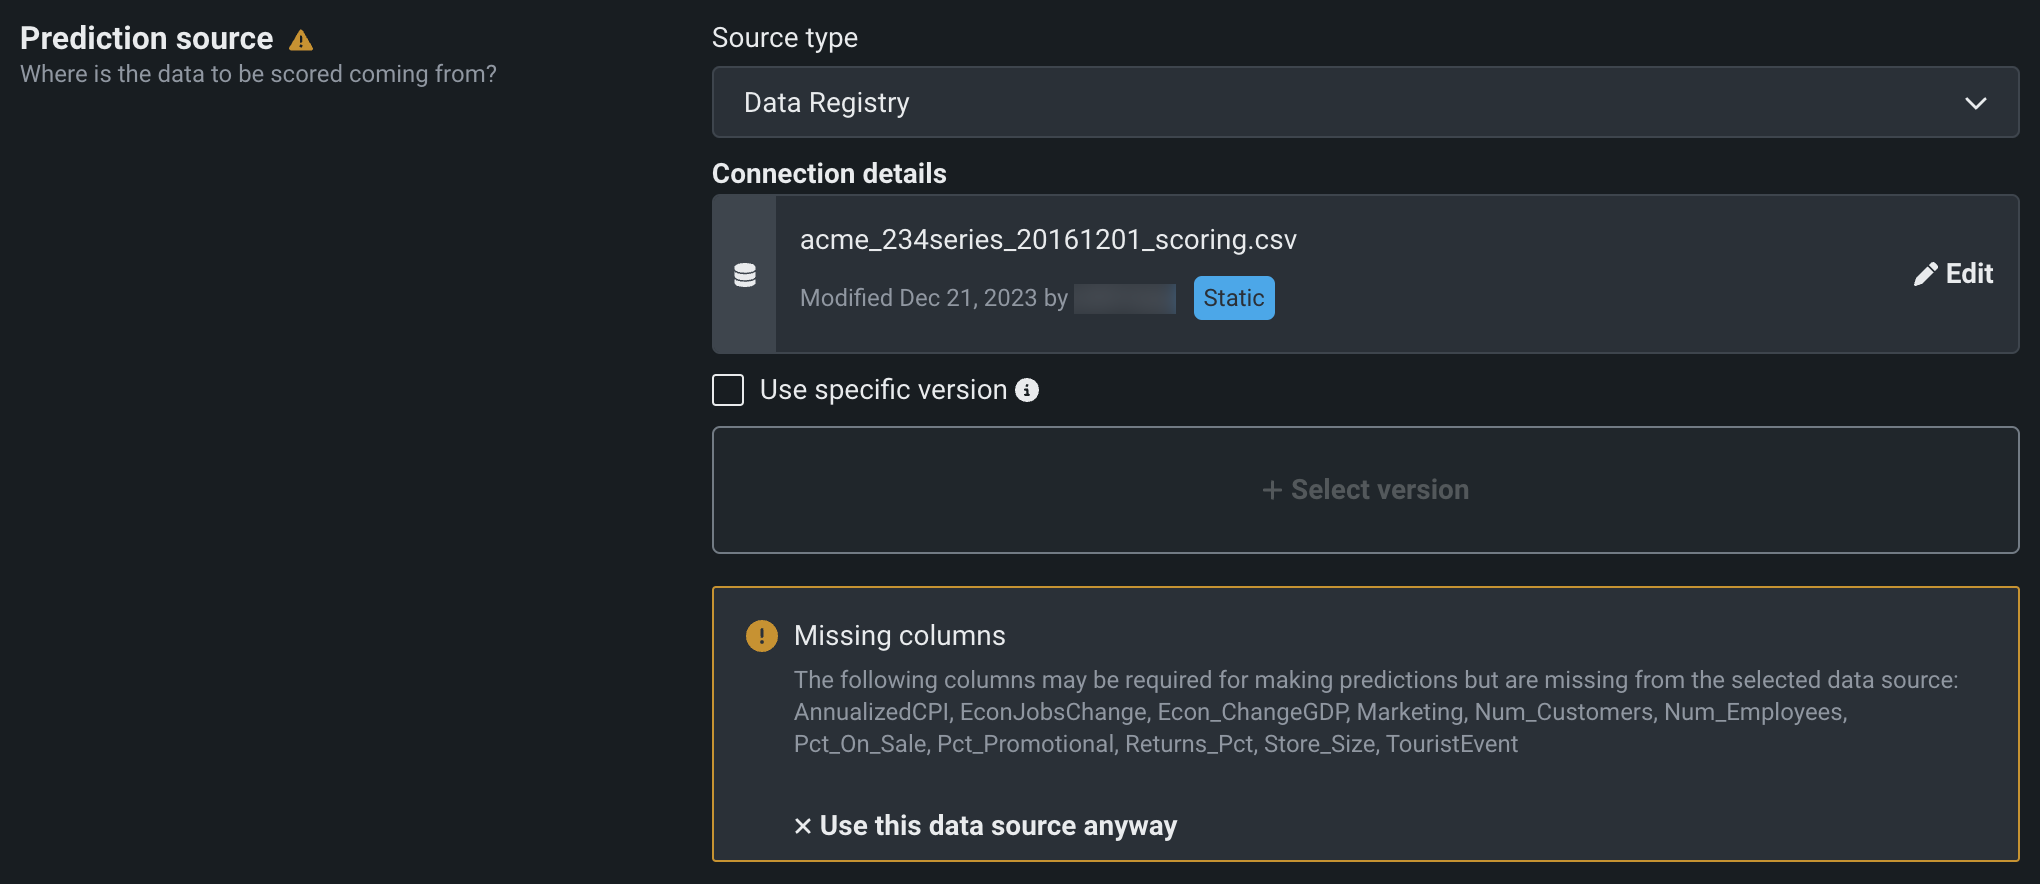
For Data Registry sources, the job definition displays the modification date, the user that set the source, and a badge that represents the state of the asset (in this case, STATIC).
After you set your prediction source, DataRobot validates that the data is applicable for the deployed model:
Note
DataRobot validates that a data source is applicable with the deployed model when possible but not in all cases. DataRobot validates for Data Registry, most JDBC connections, Snowflake, and Synapse.
Source connection types
Select a connection type below to view field descriptions.
Note
When browsing for connections, invalid adapters are not shown.
Database connections
Cloud storage connections
- Azure
- Google Cloud Storage (GCP)
- S3
Data warehouse connections
Other
Wrangler data connection
Wrangler recipes for batch prediction jobs support data wrangled from a Snowflake data connection or the AI Catalog/Data Registry.
For information about supported data sources, see Data sources supported for batch predictions.
Set prediction options
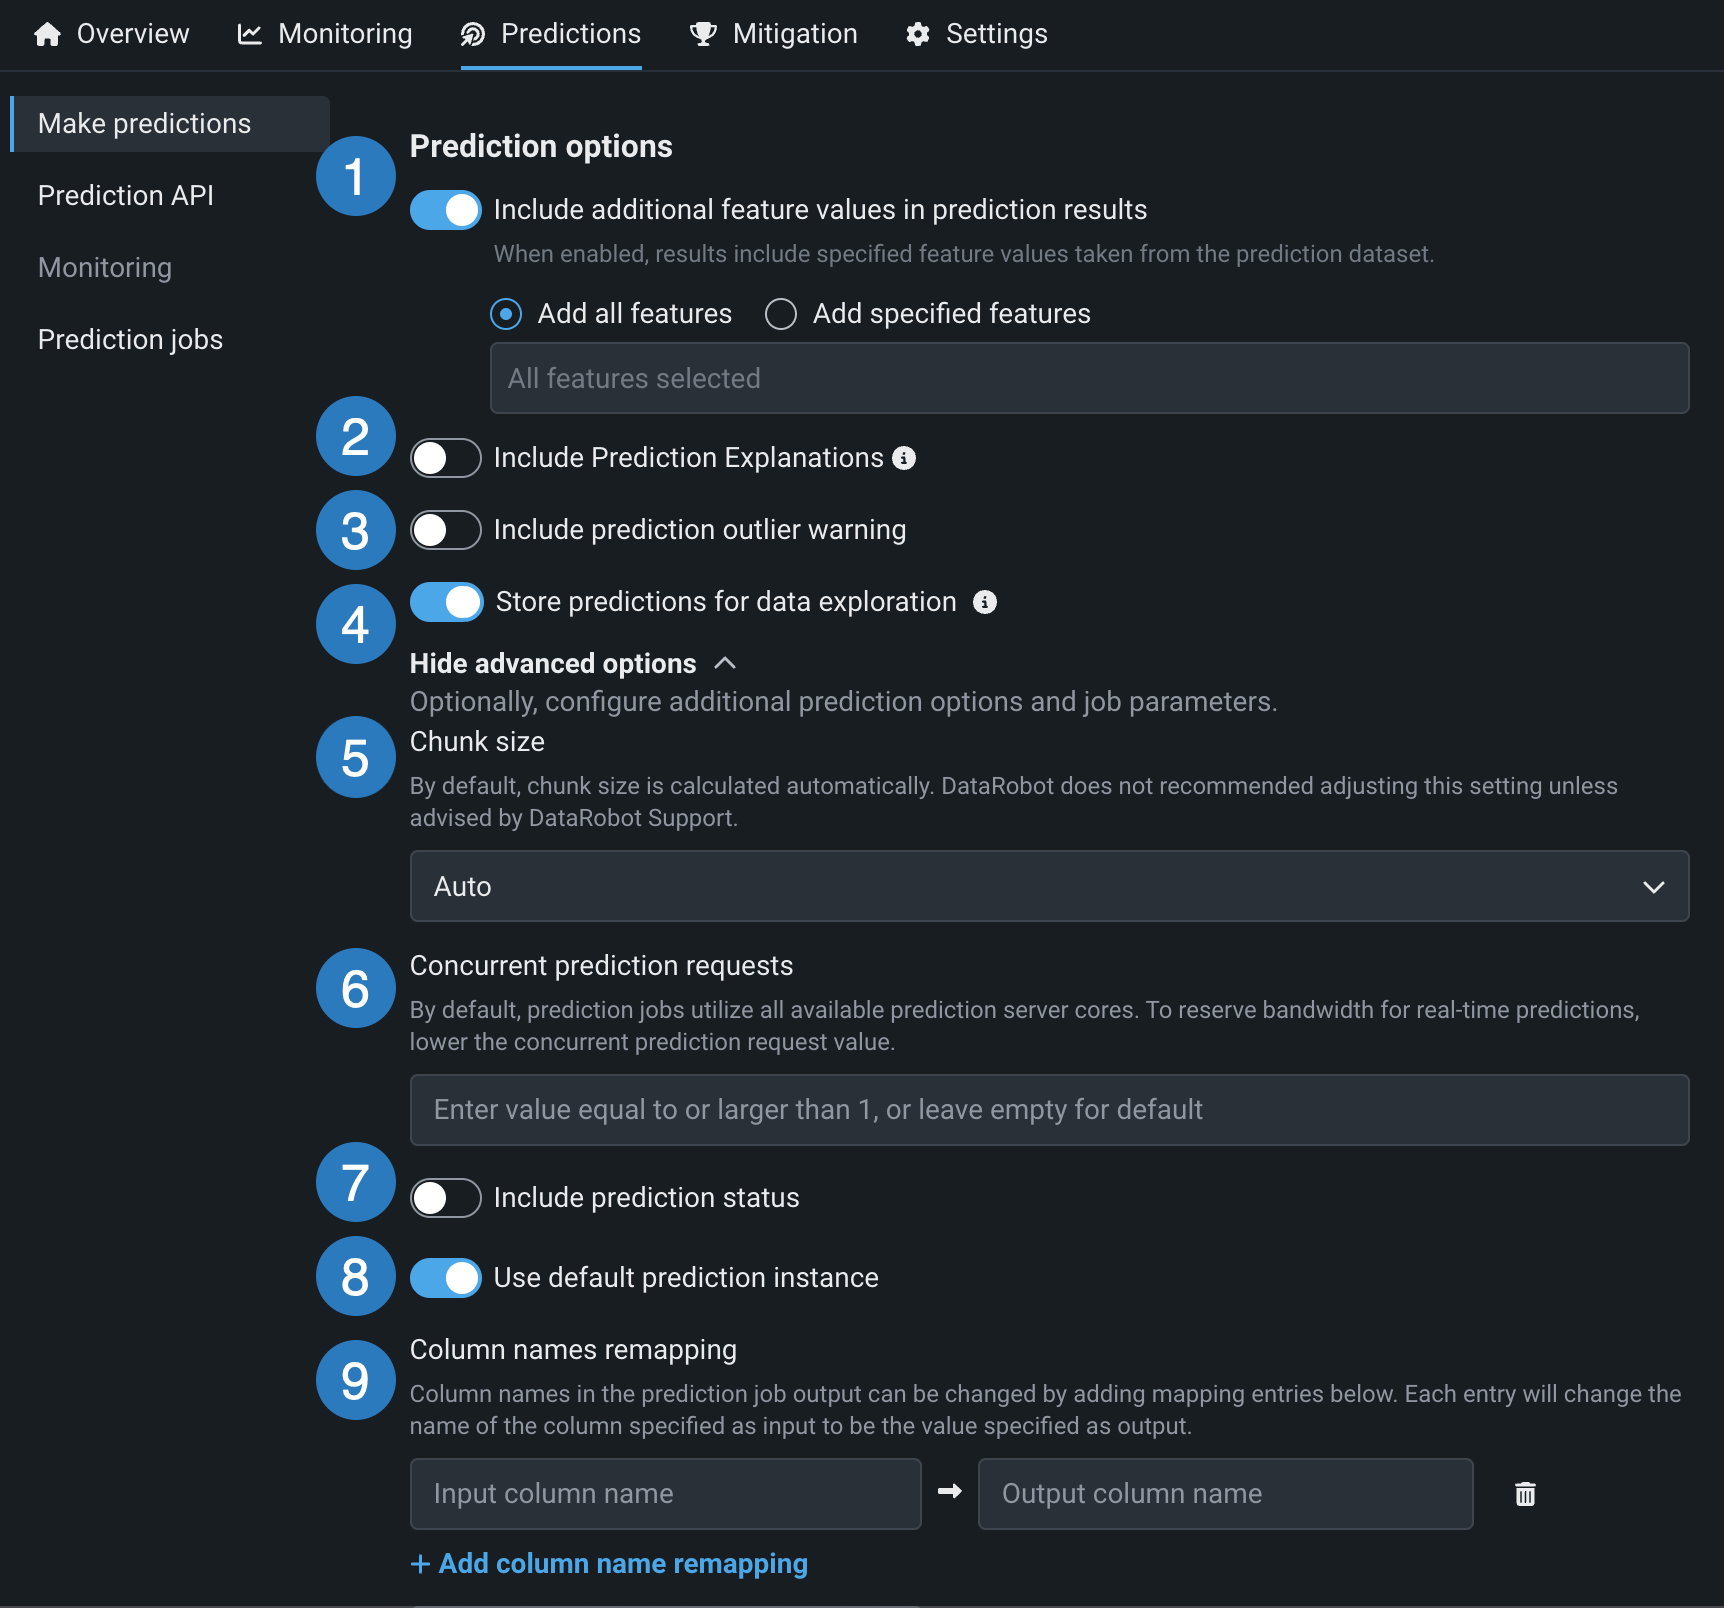
Specify what information to include in the prediction results:
| Element | Description | |
|---|---|---|
| 1 | Include additional feature values in prediction results | Writes input features to the prediction results file alongside predictions. To add specific features, enable the Include additional feature values in prediction results toggle, select Add specified features, and type feature names to filter for and then select features. To include every feature from the dataset, select Add all features. You can only append a feature (column) present in the original dataset, although the feature does not have to have been part of the feature list used to build the model. Derived features are not included. |
| 2 | Include Prediction Explanations | Adds columns for Prediction Explanations to your prediction output.
|
| 3 | Include prediction outlier warning | Includes warnings for outlier prediction values (only available for regression model deployments). |
| 4 | Store predictions for data exploration | Tracks data drift, accuracy, fairness, and data exploration (if enabled for the deployment). |
| 5 | Chunk size | Adjusts the chunk size selection strategy. By default, DataRobot automatically calculates the chunk size; only modify this setting if advised by your DataRobot representative. For more information, see What is chunk size? |
| 6 | Concurrent prediction requests | Limits the number of concurrent prediction requests. By default, prediction jobs utilize all available prediction server cores. To reserve bandwidth for real-time predictions, set a cap for the maximum number of concurrent prediction requests. |
| 7 | Include prediction status | Adds a column containing the status of the prediction. |
| 8 | Use default prediction instance | Lets you change the prediction instance. Turn the toggle off to select a prediction instance. |
| 9 | Column names remapping | Changes column names in the prediction job's output by mapping them to entries added in this field. Click + Add column name remapping and define the Input column name to replace with the specified Output column name in the prediction output. If you incorrectly add a column name mapping, you can click the delete icon to remove it. |
Set time series options
Time series data requirements
Making predictions with time series models requires the dataset to be in a particular format. The format is based on your time series project settings. Ensure the prediction dataset includes the correct historical rows, forecast rows, and any features known in advance. In addition, to ensure DataRobot can process your time series data, configure the dataset to meet the following requirements:
- Sort prediction rows by their timestamps, with the earliest row first.
- For multiseries, sort prediction rows by series ID and then by timestamp, with the earliest row first.
There is no limit on the number of series DataRobot supports. The only limit is the job timeout, as mentioned in Limits. For dataset examples, see the requirements for the scoring dataset.
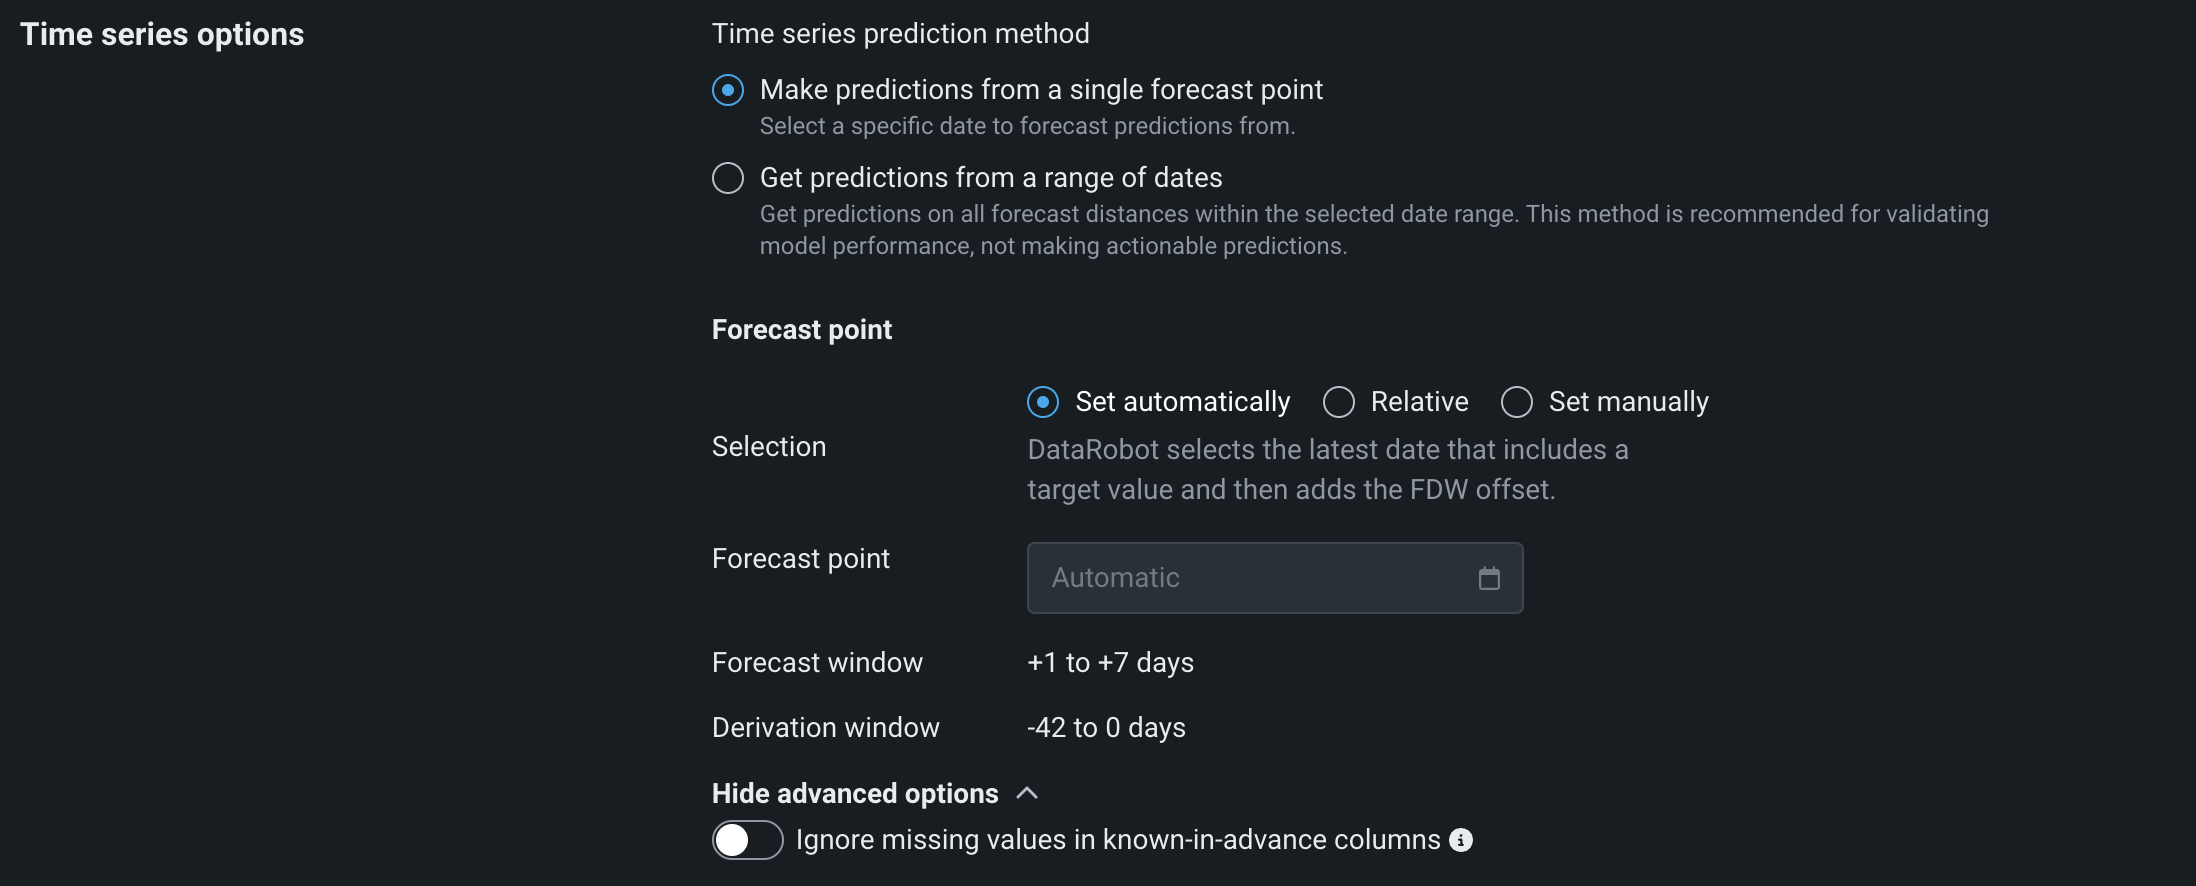
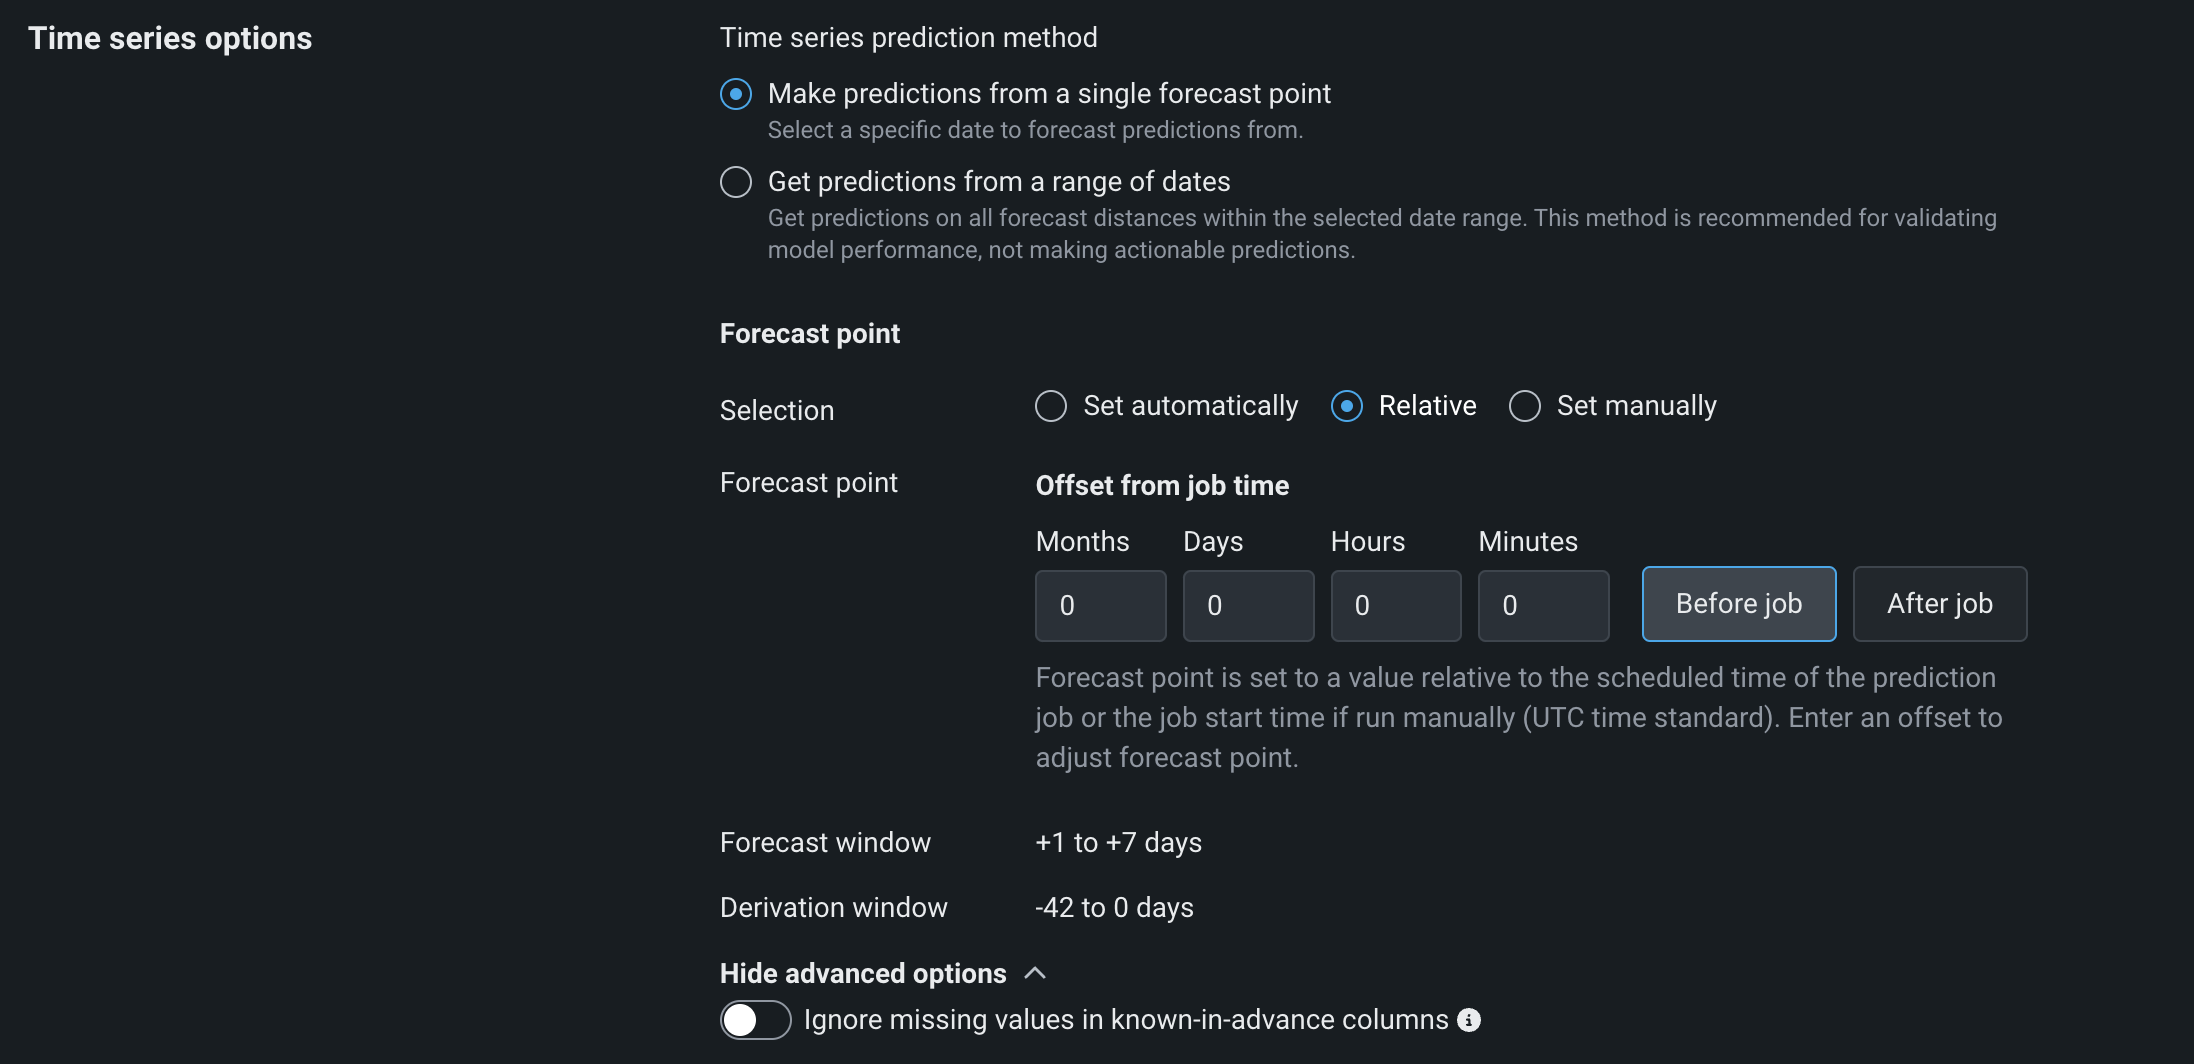
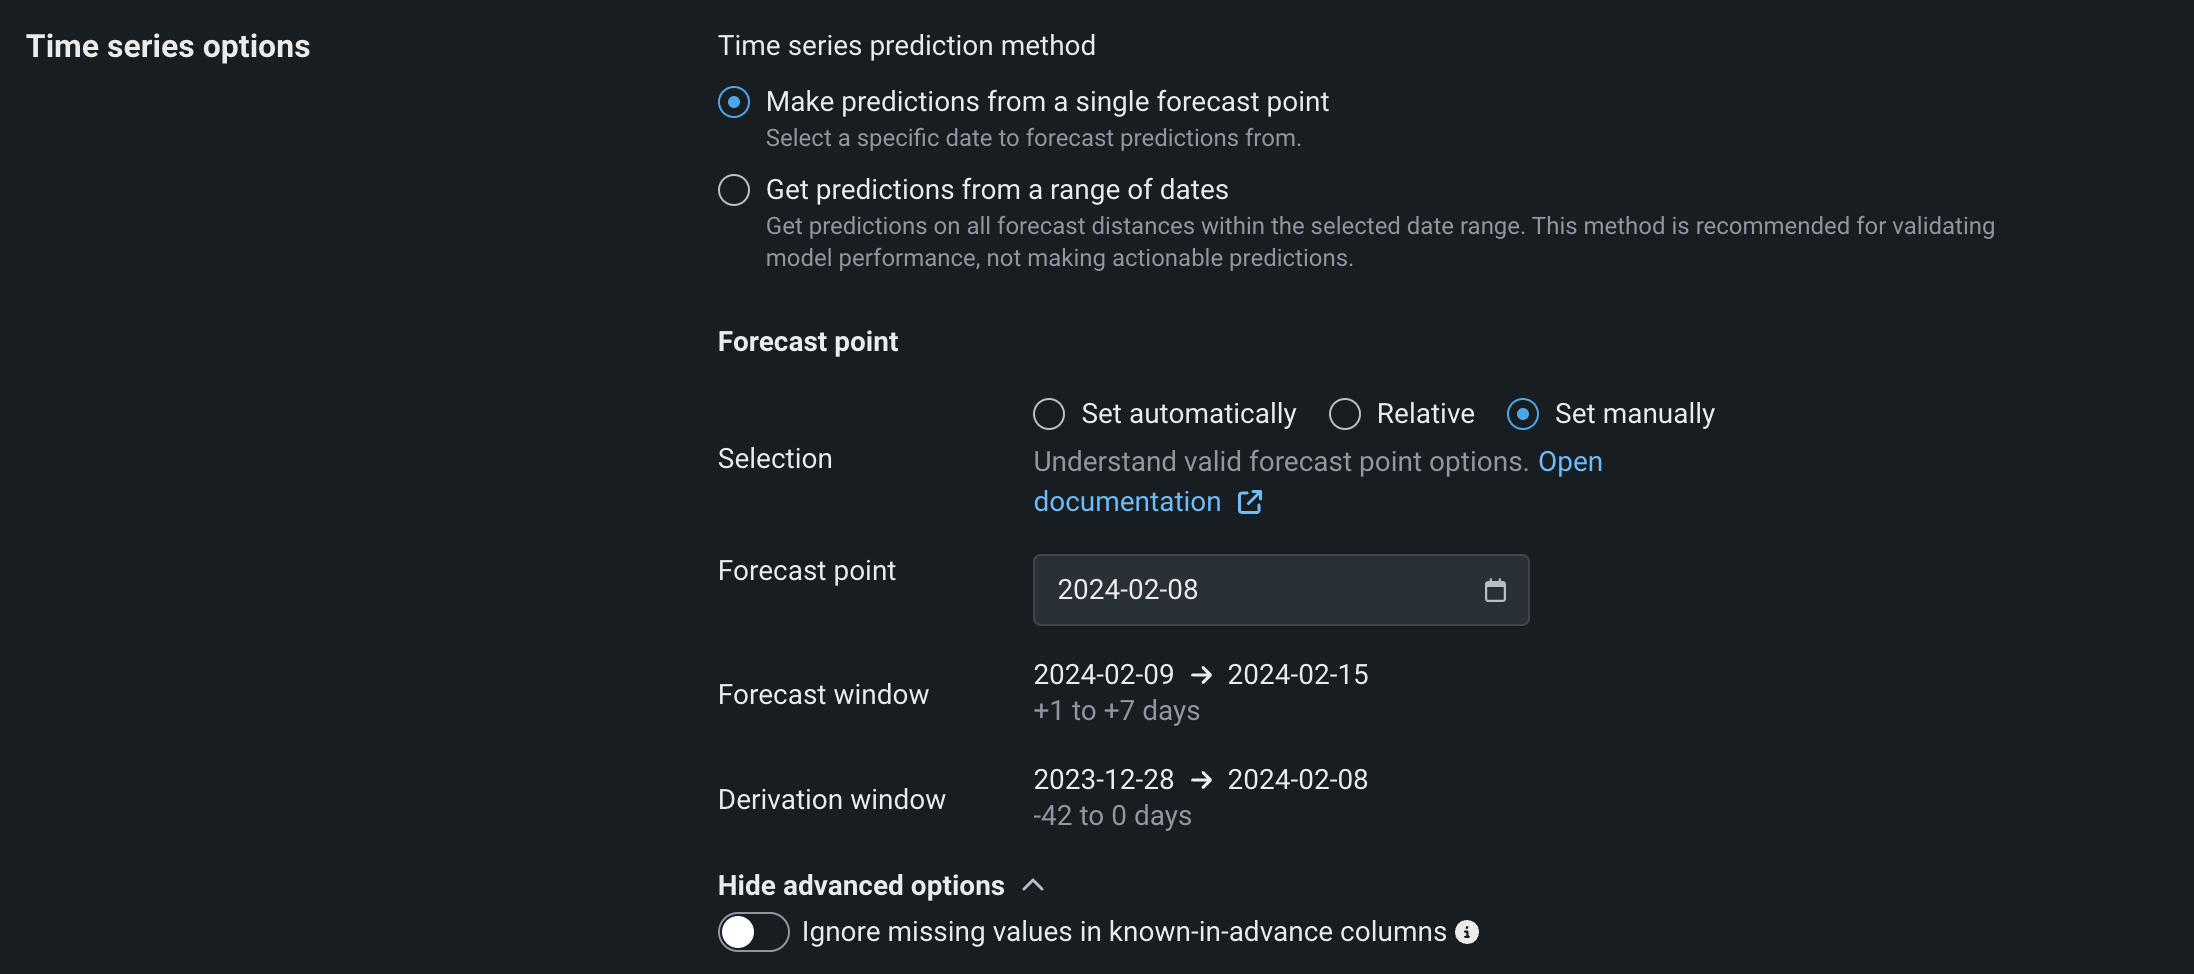
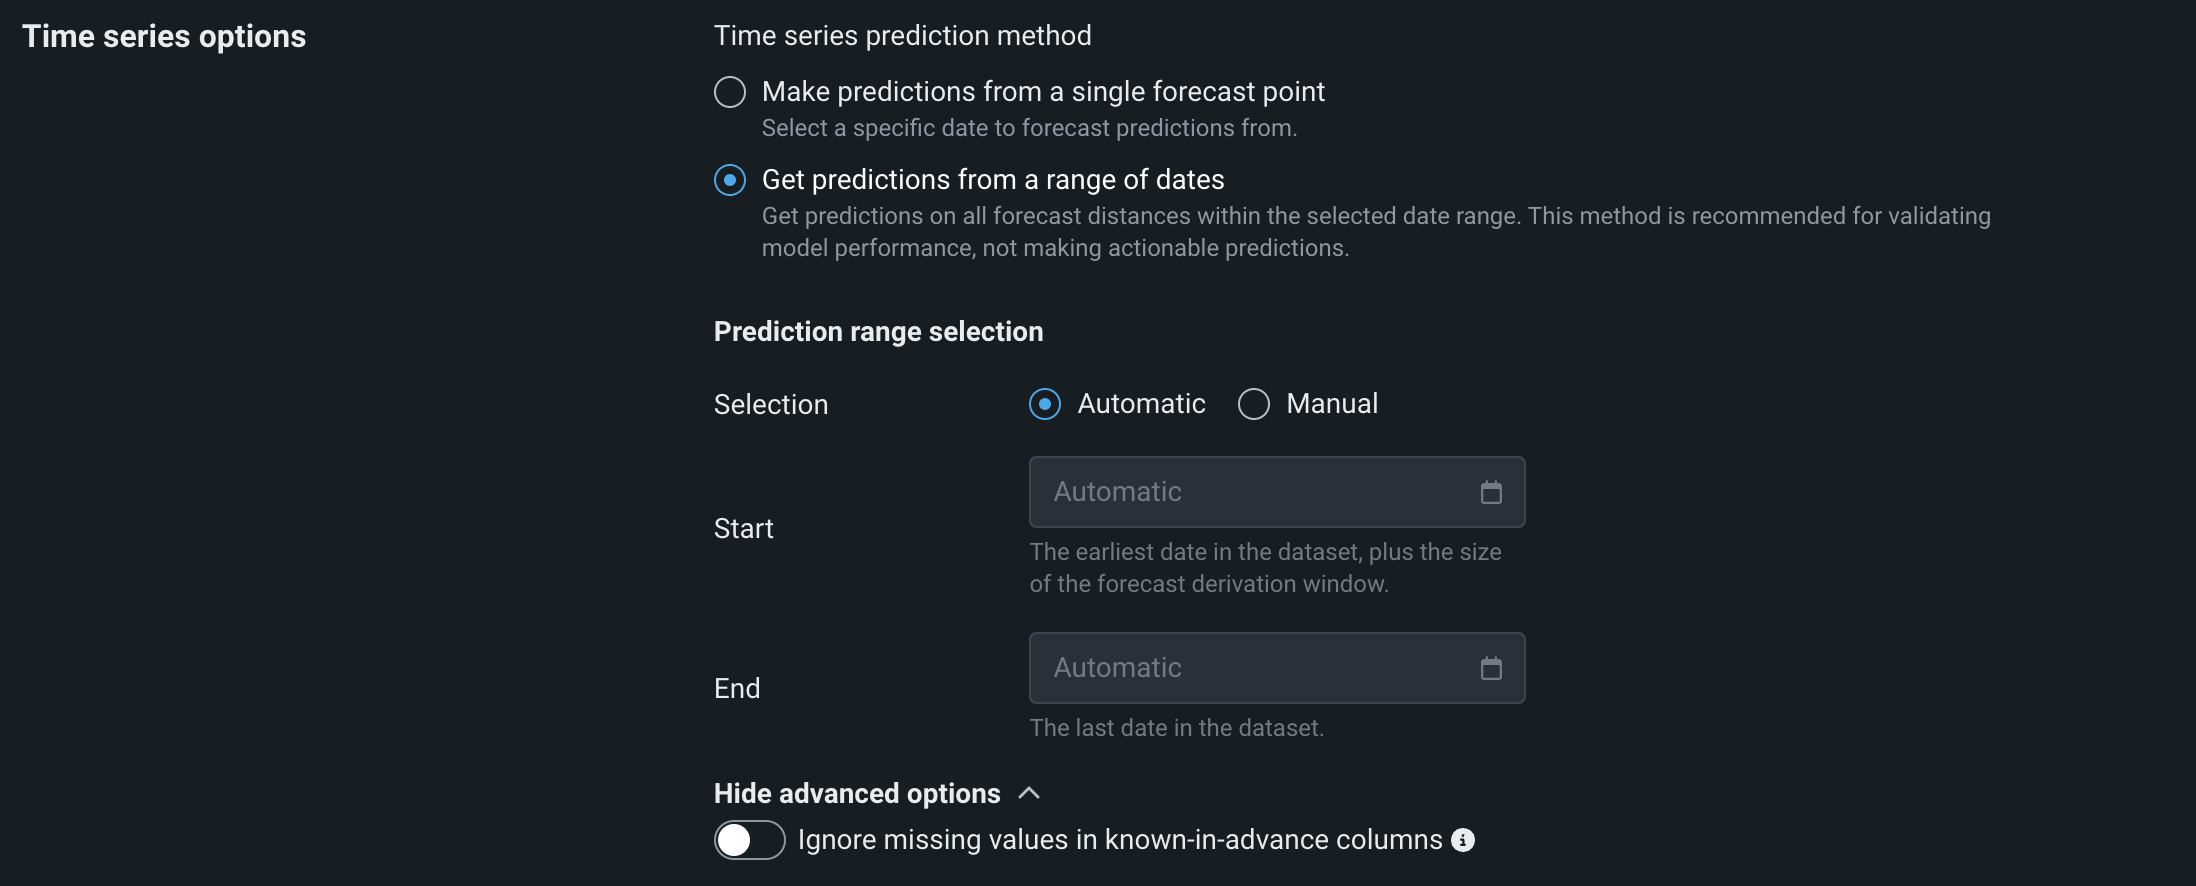
To configure the Time series options, under Time series prediction method, select Forecast point or Forecast range.
Select the forecast point option to choose the specific date from which you want to begin making predictions, and then, under Forecast point define a Selection method:
-
Set automatically: DataRobot sets the forecast point for you based on the scoring data.
-
Relative: Set a forecast point by the Offset from job time, configuring the number of Months, Days, Hours, and Minutes to offset from scheduled job runtime. Click Before job time or After job time, depending on how you want to apply the offset.
-
Set manually: Set a specific date range using the date selector, configuring the Start and End dates manually.
Select the forecast range option if you intend to make bulk, historical predictions (instead of forecasting future rows from the forecast point) and then, under Prediction range selection, define a Selection method:
-
Automatic: Predictions use all forecast distances within the selected time range.
-
Manual: Set a specific date range using the date selector, configuring the Start and End dates manually.
In addition, you can click Show advanced options and enable Ignore missing values in known-in-advance columns to make predictions even if the provided source dataset is missing values in the known-in-advance columns; however, this may negatively impact the computed predictions.
Forecast point placement for predictions
When deploying a forecasting model, the placement of the forecast point within the uploaded prediction dataset affects the prediction horizon. The dates provided in the BatchJob request determine how far predictions extend.
If the forecast point is set within the prediction dataset (not at the beginning or end), predictions will only extend to the last available date in the uploaded dataset. This occurs because the input data restricts the forecast horizon, limiting predictions to the provided dates. A full 24-month forecast will not be generated unless the forecast point is positioned at the beginning or end of the dataset.
When the forecast point is set at the start of the prediction dataset, the dataset contains a full 24 months of future dates available for forecasting. In this case, a complete 24-month forecast is generated as sufficient future dates exist in the uploaded dataset.
If the forecast point is set at the end of the prediction dataset, and no explicit forecast end date is provided, the forecast is correctly extended to cover the full 24-month period.
Set up prediction destinations
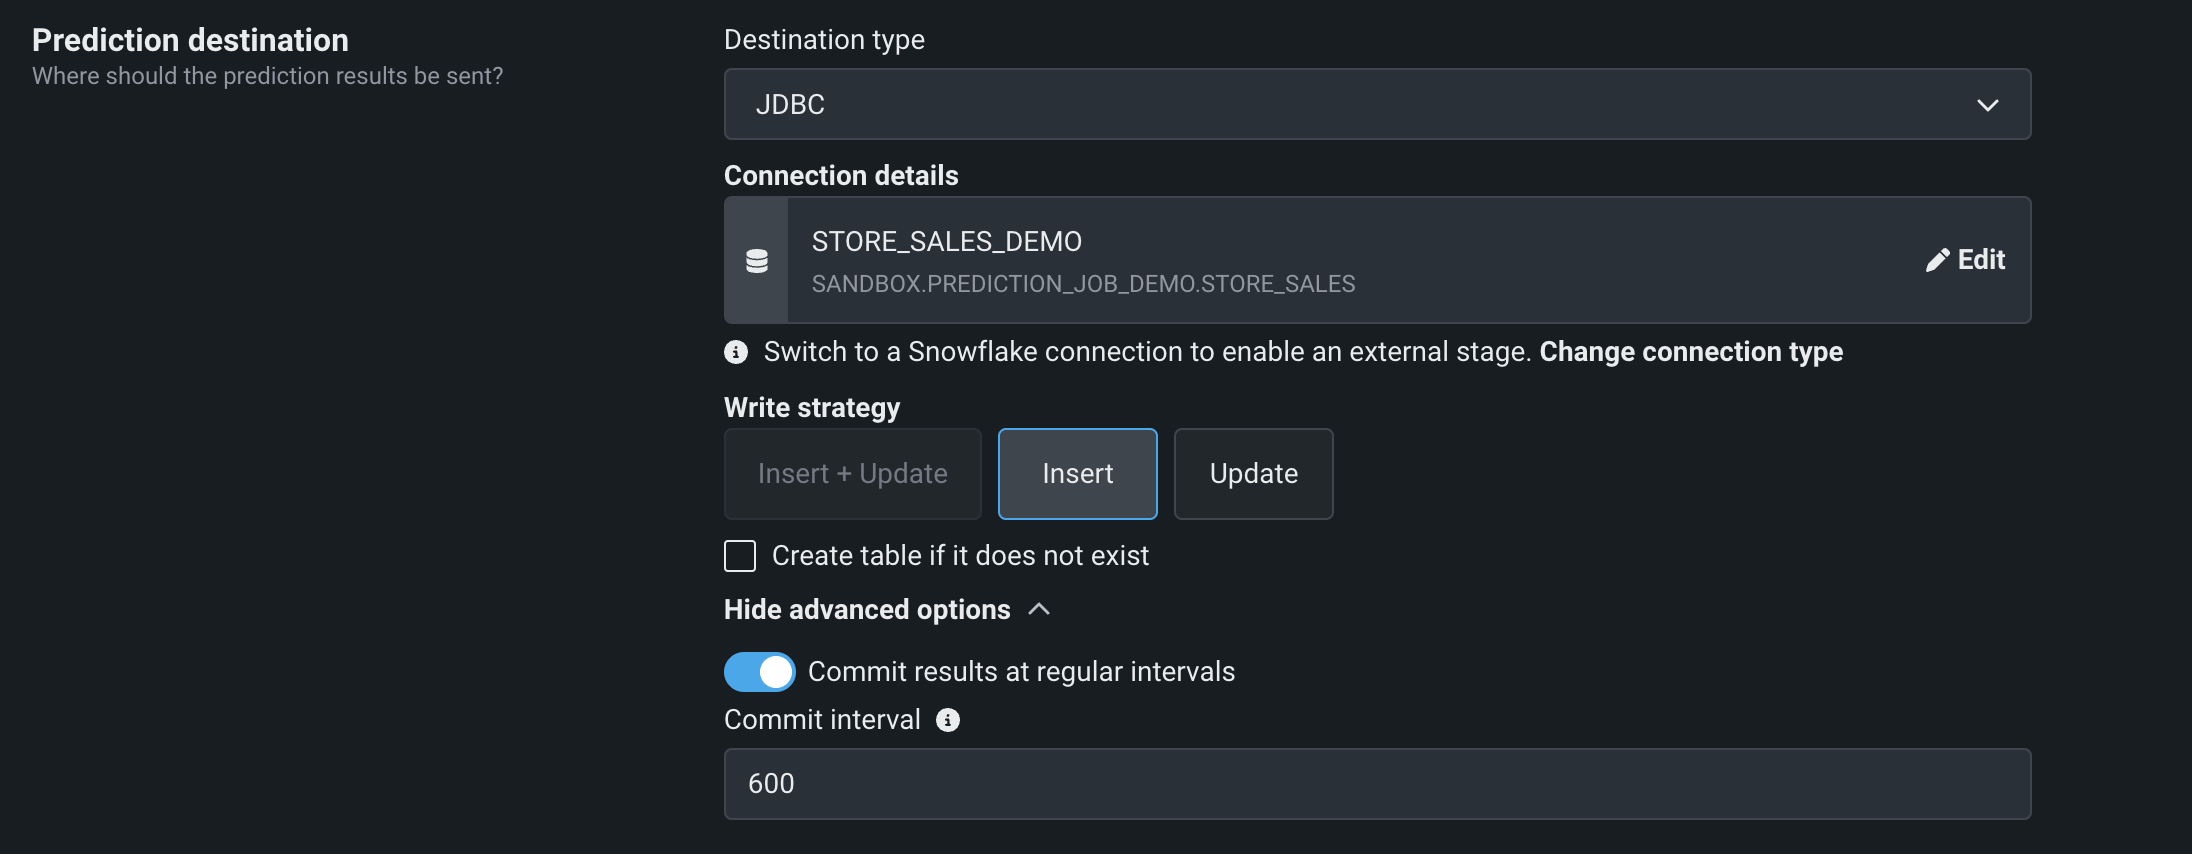
Select a prediction destination (also called an output adapter). Then, complete the appropriate authentication workflow for the destination type.
In addition, you can click Show advanced options to Commit results at regular intervals, defining a custom Commit interval to indicate how often to commit write operations to the data destination.
Destination connection types
Select a connection type below to view field descriptions.
Note
When browsing for connections, invalid adapters are not shown.
Database connections
Cloud storage connections
- Azure
- Google Cloud Storage (GCP Cloud)
- S3
Data warehouse connections
Schedule prediction jobs
You can schedule prediction jobs to run automatically on a schedule. When outlining a job definition, toggle the jobs schedule on. Specify the frequency (daily, hourly, monthly, etc.) and time of day to define the schedule on which the job runs.
For further granularity, select Use advanced scheduler. You can specify the exact time for the prediction job to run down to the minute.


