Feature Discovery
To deploy AI across the enterprise and make the best use of predictive models, you must be able to access relevant features. Often, the starting point of your data does not contain the right set of features. Feature Discovery discovers and generates new features from multiple datasets so that you no longer need to perform manual feature engineering to consolidate various datasets into one.
See the Feature Discovery file requirements for information about dataset sizes, and the associated considerations for important additional information.
Self-managed: Allocate resources for large datasets
If you're working with large datasets, an admin can allocate additional compute resources by navigating to User settings > System configuration, enabling XLARGE_MM_WORKER_SAFER_AIM_CONTAINER_MEM_MB, and specifying the number of resources in the field.
Open Feature Discovery
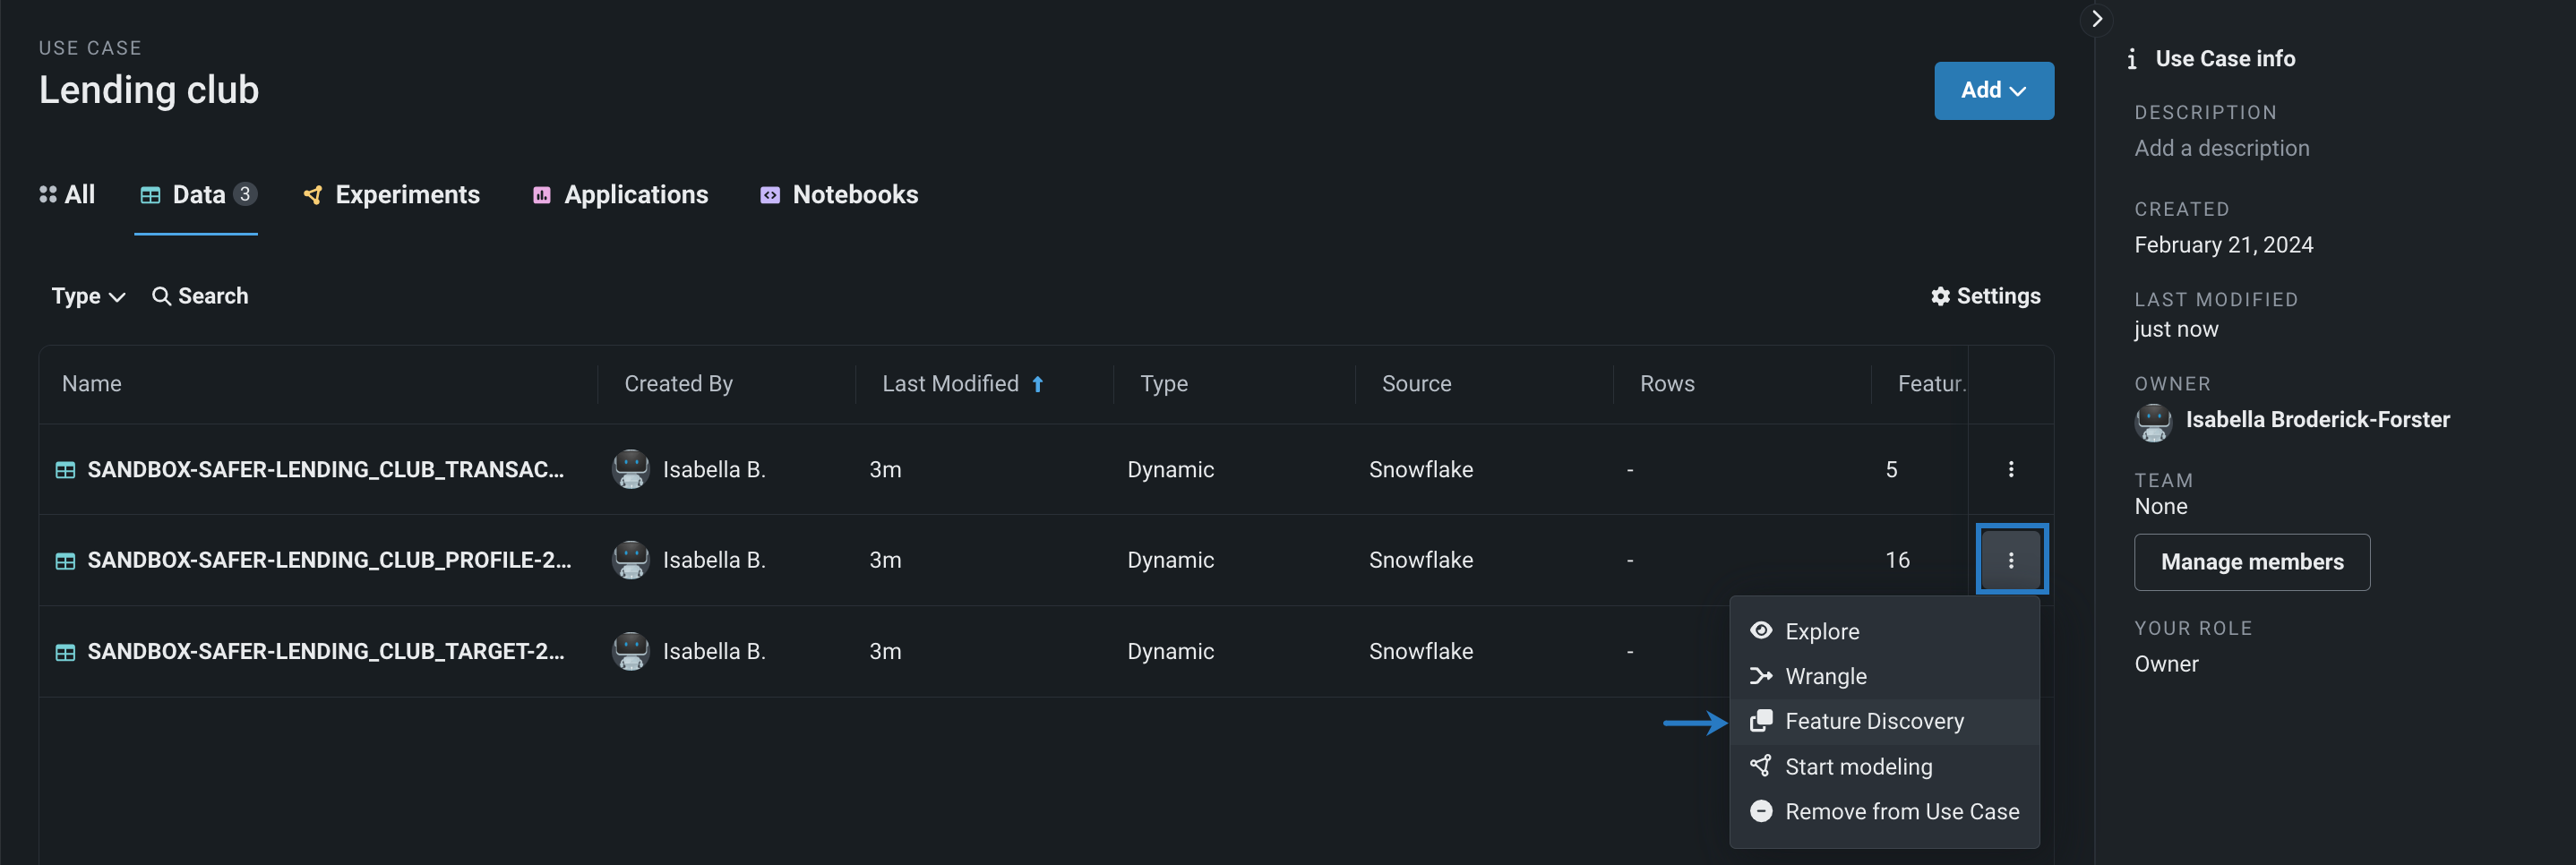
To perform Feature Discovery in Workbench, in the Data tab, click the Actions menu > Feature Discovery to the right of the dataset that will serve as the primary dataset. When you add and configure secondary datasets in the Feature Discovery recipe, you will define their relationship to the dataset selected here.
DataRobot opens Feature Discovery and adds the primary dataset to the canvas.
Configure primary dataset settings
With the primary dataset selected, enter the Prediction point (time of the prediction). Prediction point is only available if a date feature is detected in the dataset.
Then, click Save—Primary data settings saved is displayed at the bottom of the page.
Add secondary datasets
Feature Discovery requires at least one secondary dataset. Otherwise, you do not need to perform Feature Discovery and can use the single dataset to directly set up an experiment. To add secondary datasets:
-
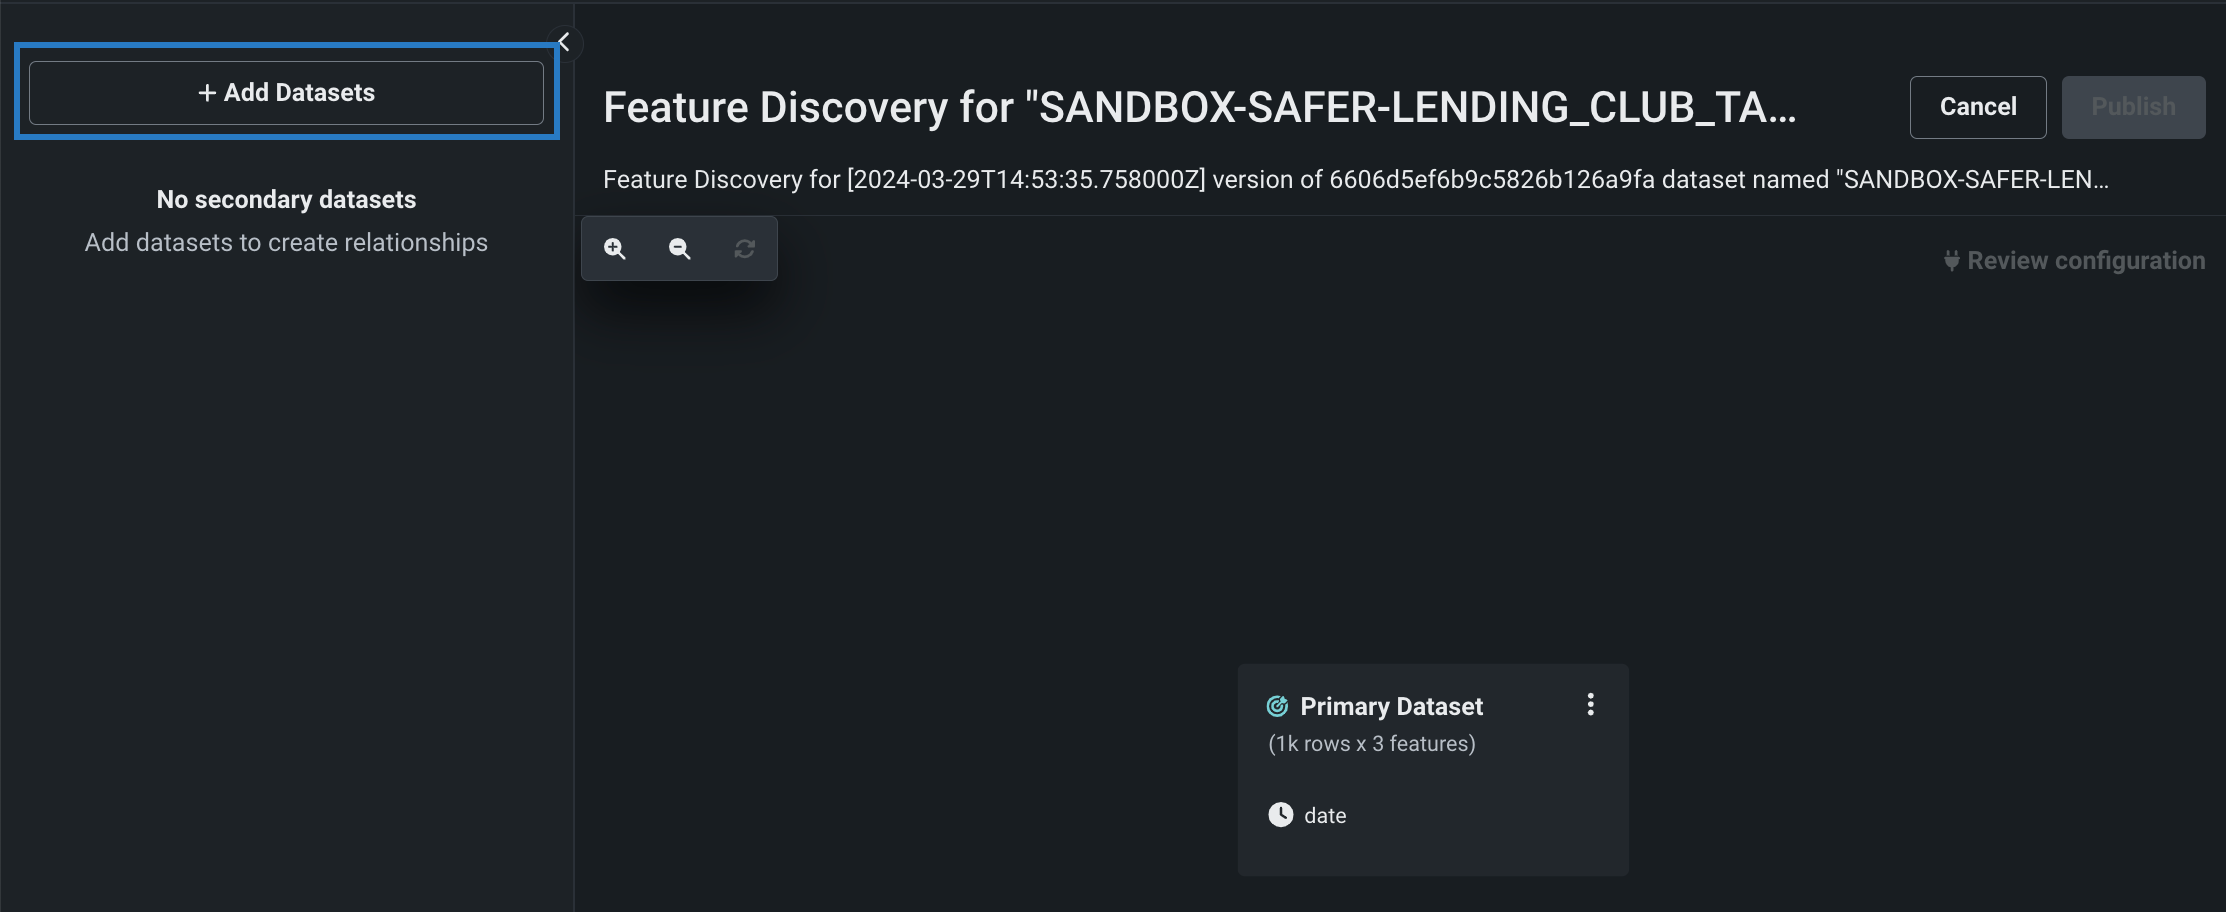
Click + Add Datasets in the left panel. The Add Data modal opens.
-
You can add data from a data connection, the Data Registry, or your current Use Case, as well as preview a dataset by clicking it. Select the box to the left of each secondary dataset you want to add, then click Add Datasets.
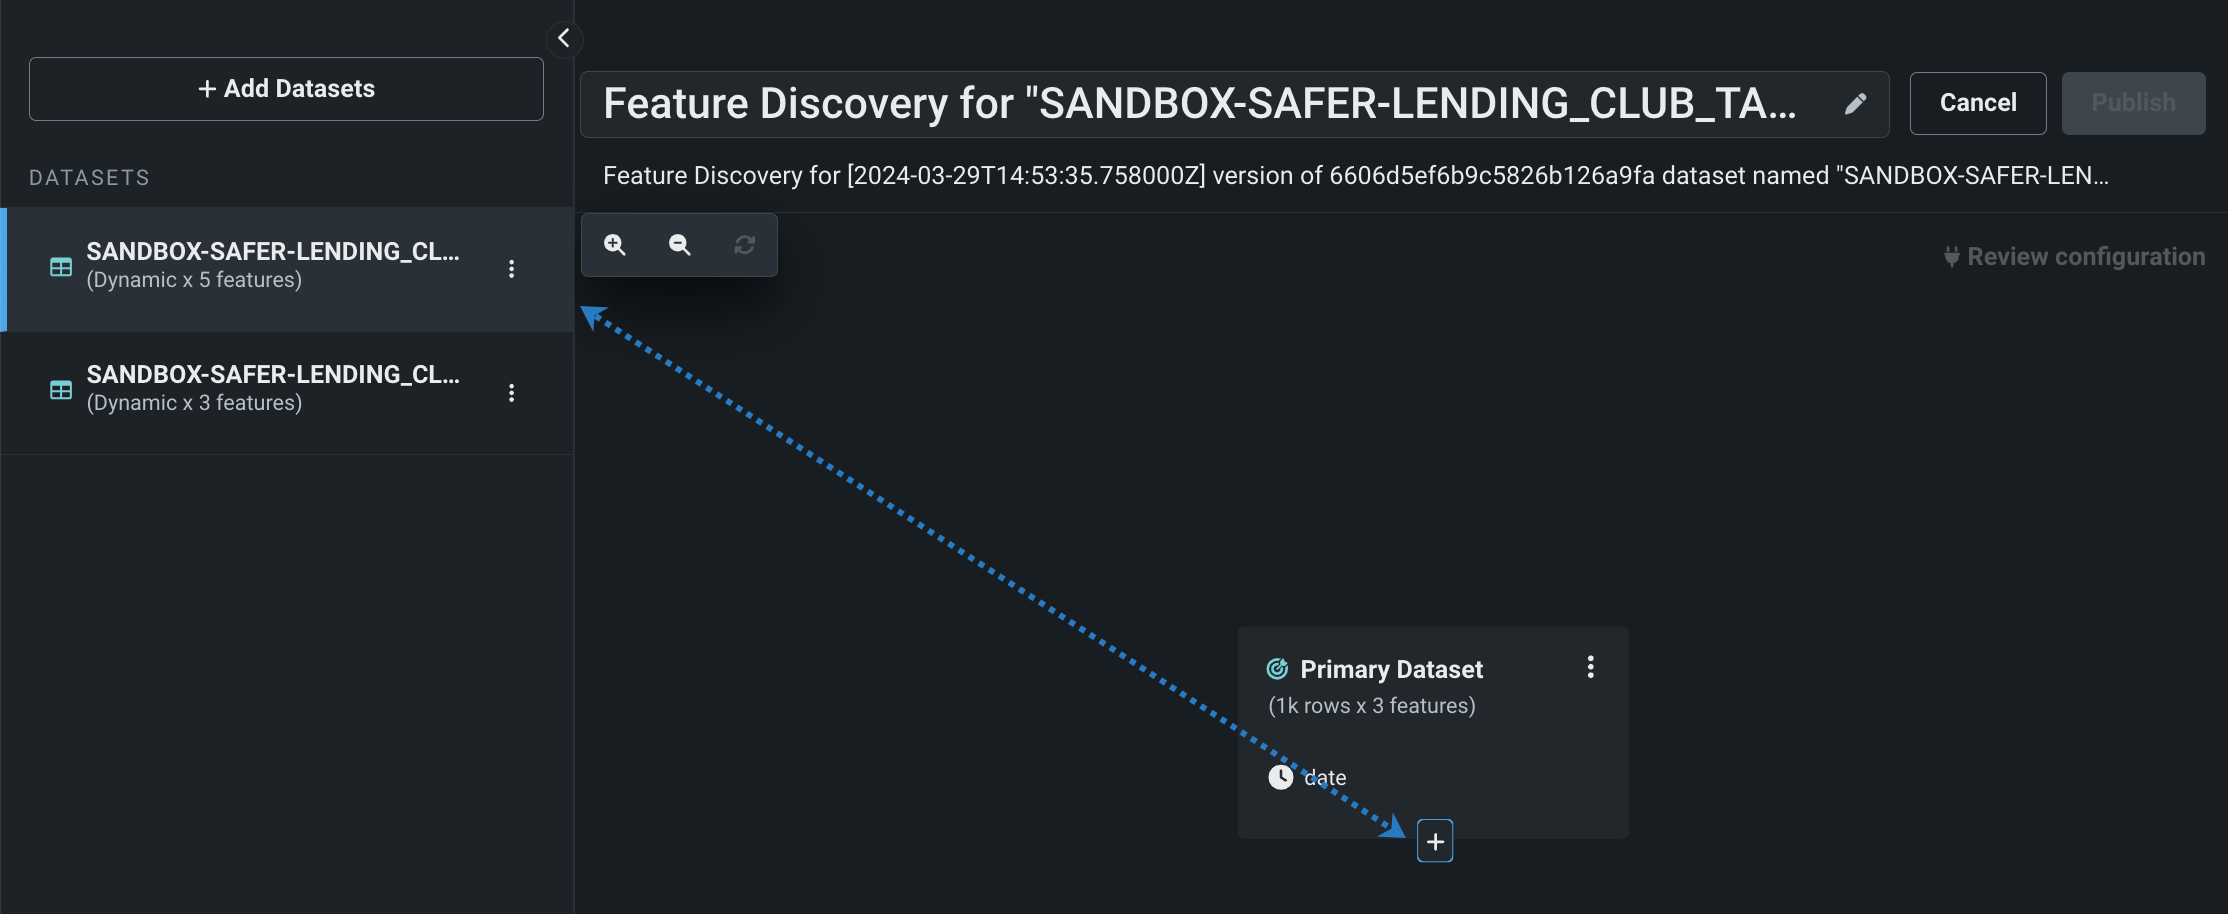
All secondary datasets are displayed in the left panel.
Add relationships
Adding a relationship between datasets tells DataRobot that the two datasets are connected. There are two ways to establish a relationship between a primary and secondary dataset:
-
Select the secondary dataset, and click the + that appears below a dataset node on the canvas.
-
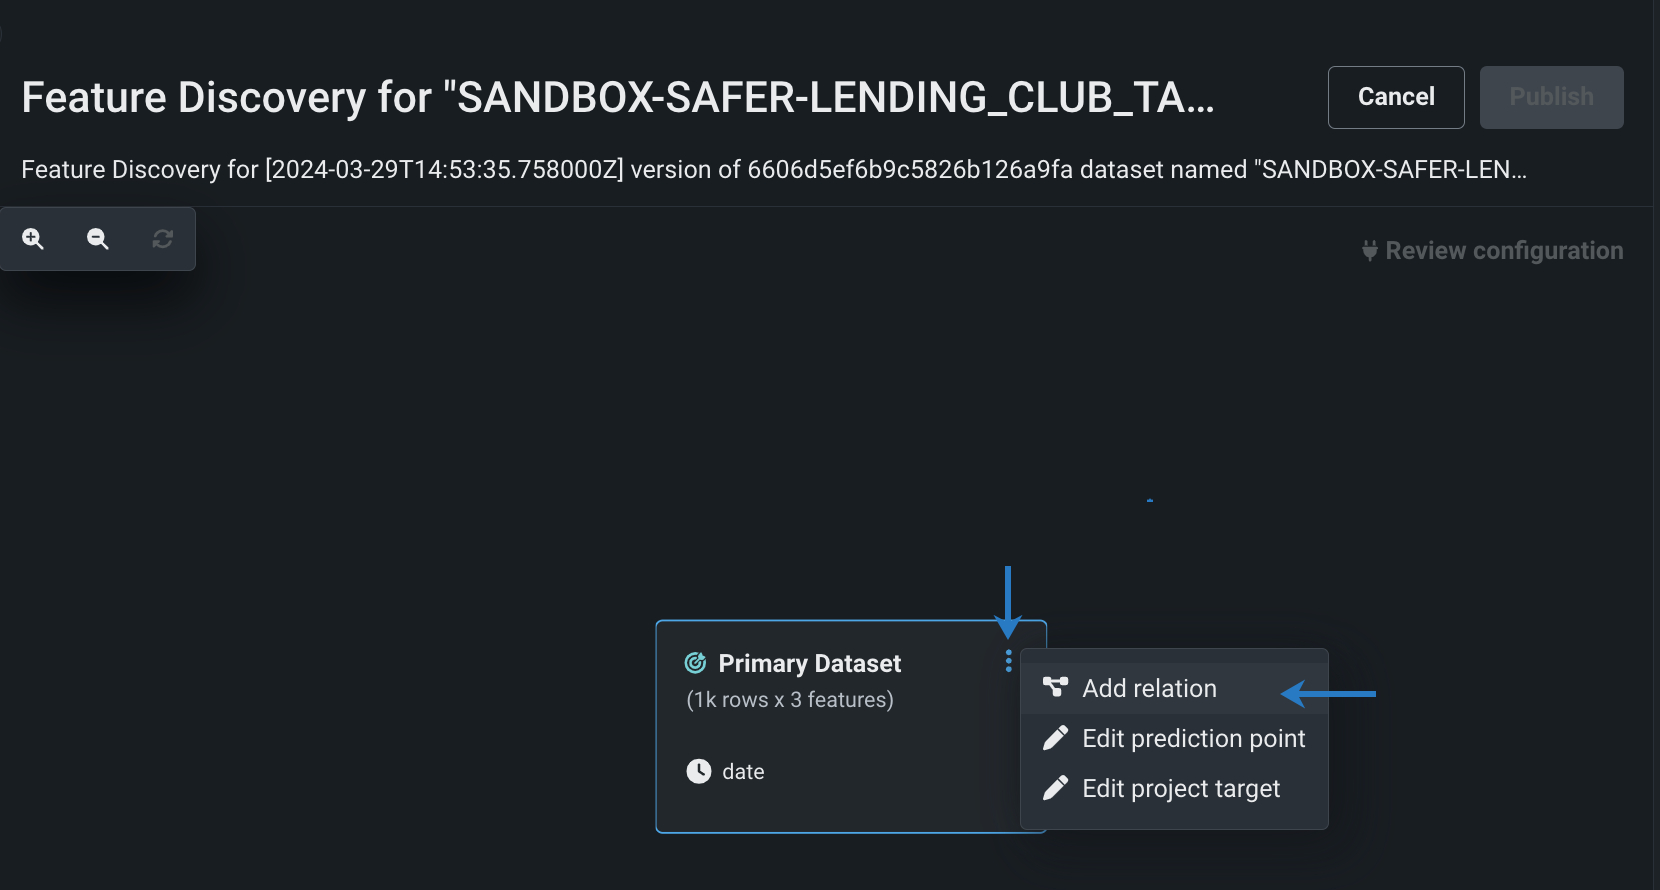
Select a dataset node on the canvas and from the Actions menu , select Add relation. In the left panel, select the dataset you want to join.
Note
After defining a relationship between a primary and secondary dataset, you must configure the join conditions for that relationship before adding another dataset.
Set join conditions
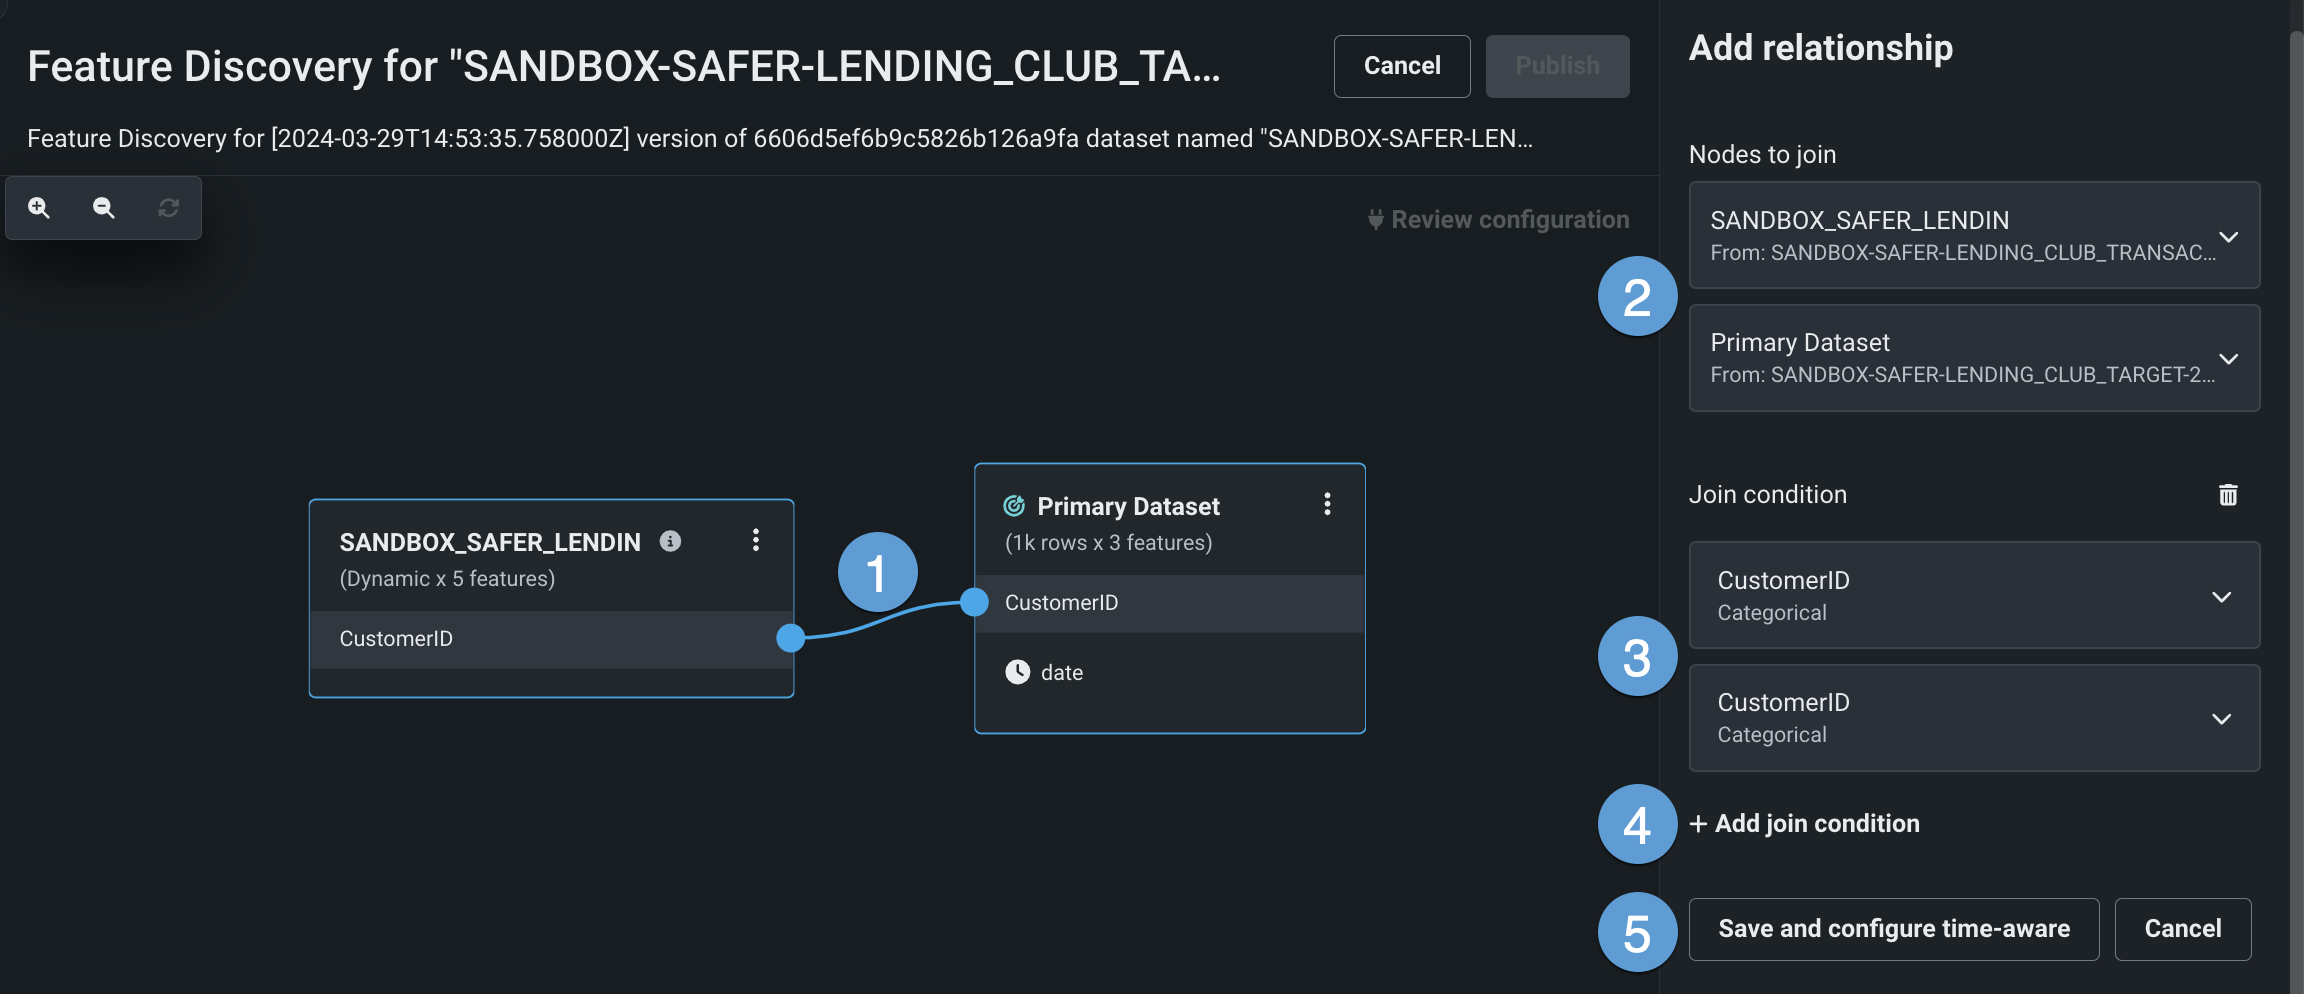
While adding a relationship establishes that there's a connection between two datasets, the join conditions specify how they're related.
If the tables in your datasets are well-formed, DataRobot automatically detects compatible features and populates the Join condition field with the most appropriate feature, typically, a feature that's included in both datasets.
| Element | Description | |
|---|---|---|
| 1 | Join | A visual representation indicating a relationship, or join, between two dataset nodes. Click this to edit a relationship and its join conditions. |
| 2 | Nodes to join | The two dataset nodes that are joined. |
| 3 | Join condition | The features, one from each dataset, that tell DataRobot how the two datasets are related. |
| 4 | + Add join condition | Click to include an additional join condition. |
| 5 | Save / Save and configure time-aware |
|
Join feature type compatibility and restrictions
See the table below for compatible join types when creating or modifying joins:
| Feature type | Compatible join types |
|---|---|
| Numeric | Numeric, Categorical |
| Categorical | Categorical, Numeric, Text |
| Text | Text, Categorical |
| Date | Date |
The following feature types cannot be used as join keys:
- Summarized categorical
- Length
- Currency
- Percentage
- Audio
- Image
- Document
For more information, see Set join conditions in the DataRobot Classic section.
Configure secondary dataset settings
Select a secondary dataset node on the canvas to configure its settings, including its name, feature list, and time-awareness (if applicable).
Node Settings
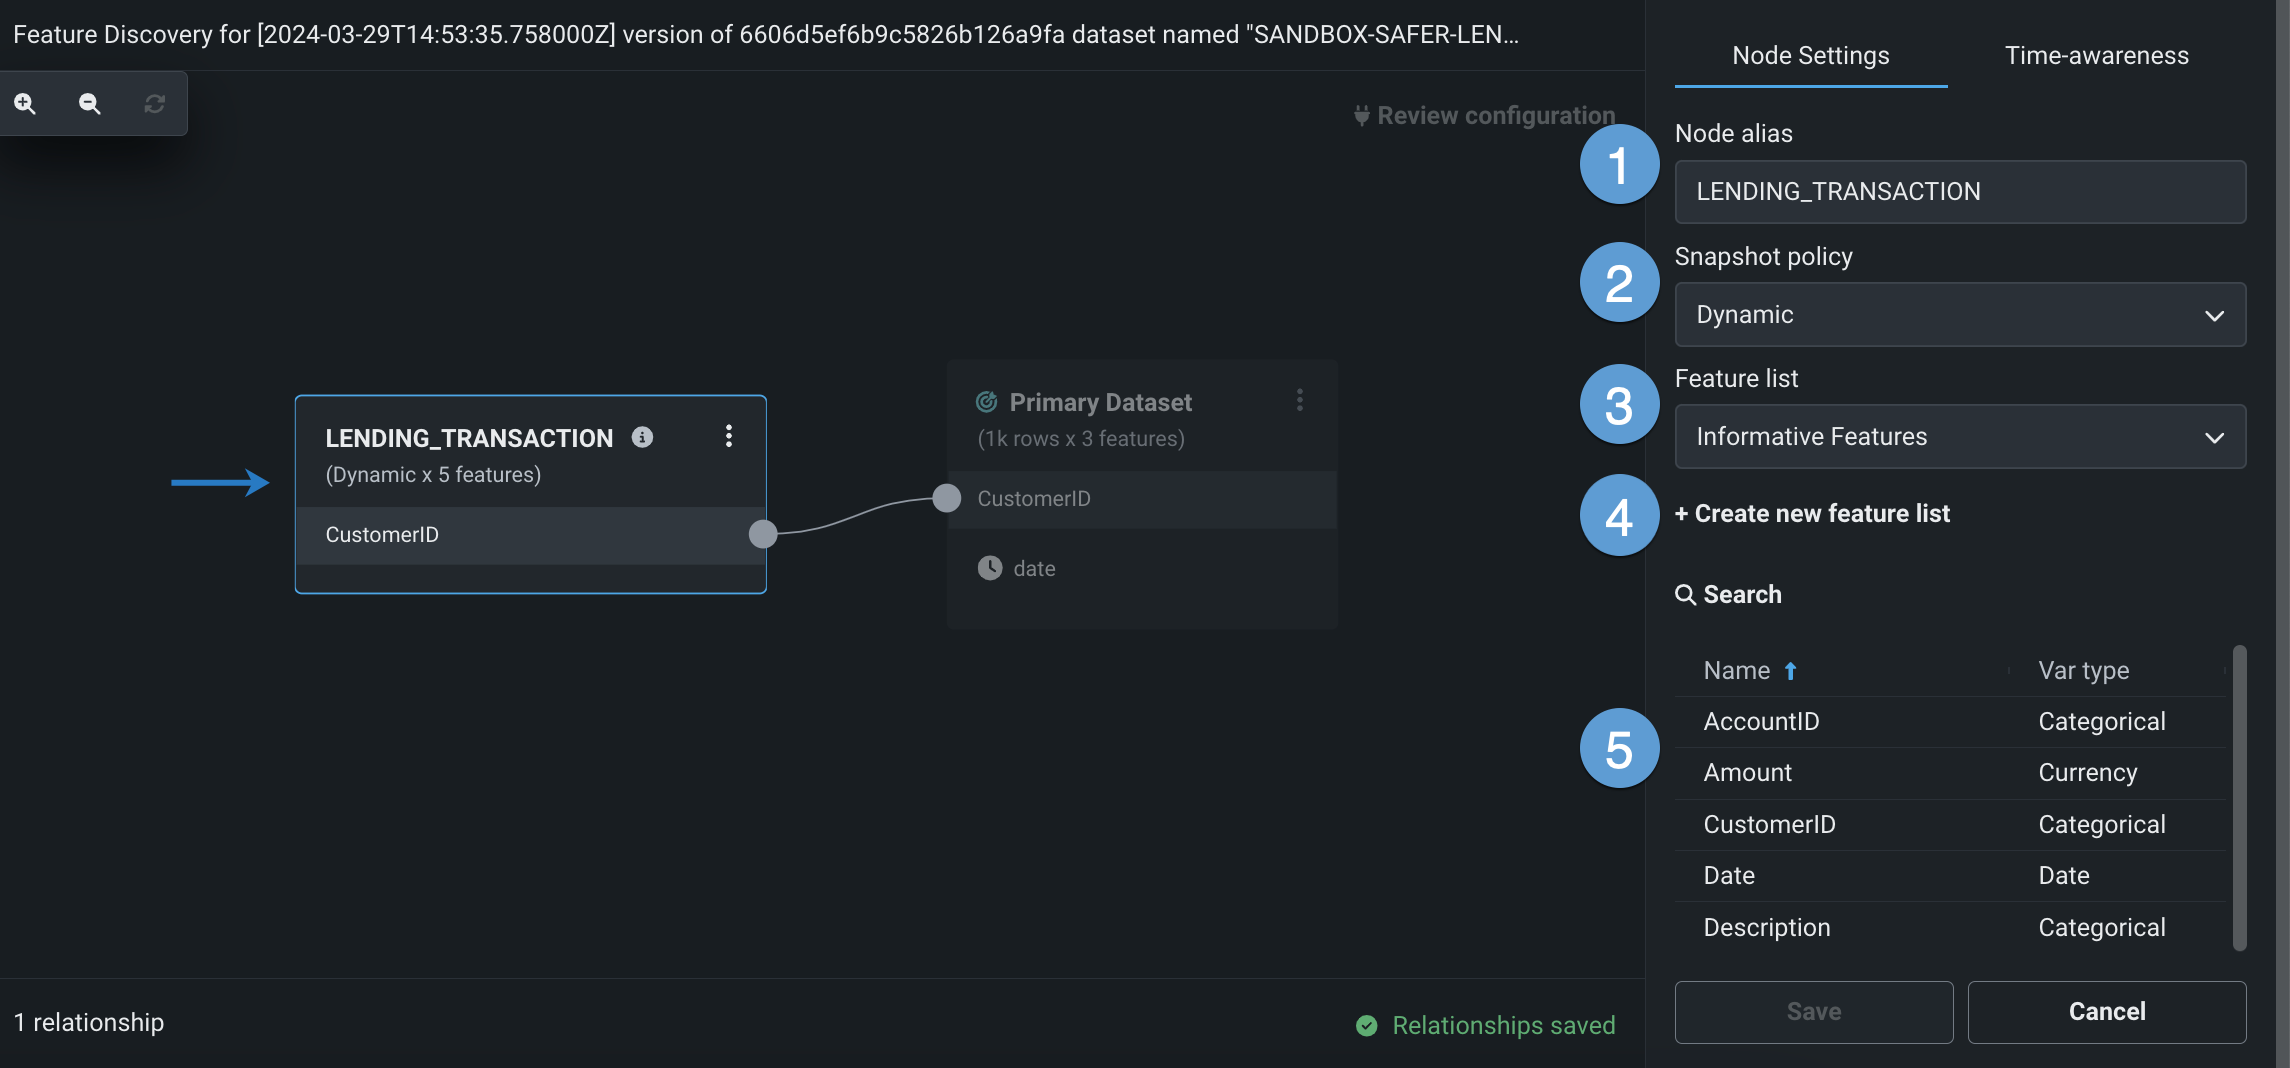
To edit the settings for a secondary dataset node, click on a secondary dataset node and open the Node Settings tab, which includes the following options:
| Element | Description | |
|---|---|---|
| 1 | Node alias | Modify the name displayed at the top of the node. By default, the string displayed on the canvas is the name of the secondary dataset. Entering a node alias is helpful if the dataset name is too long to display in full. |
| 2 | Snapshot policy | Select a snapshot policy to associate with the dataset node. |
| 3 | Feature list | Select a feature list to apply to the dataset in this node. |
| 4 | + Create new feature list | Create a new feature list to apply to the dataset node using the features listed below. |
| 5 | Features | View the features included in the dataset. |
Time-awareness
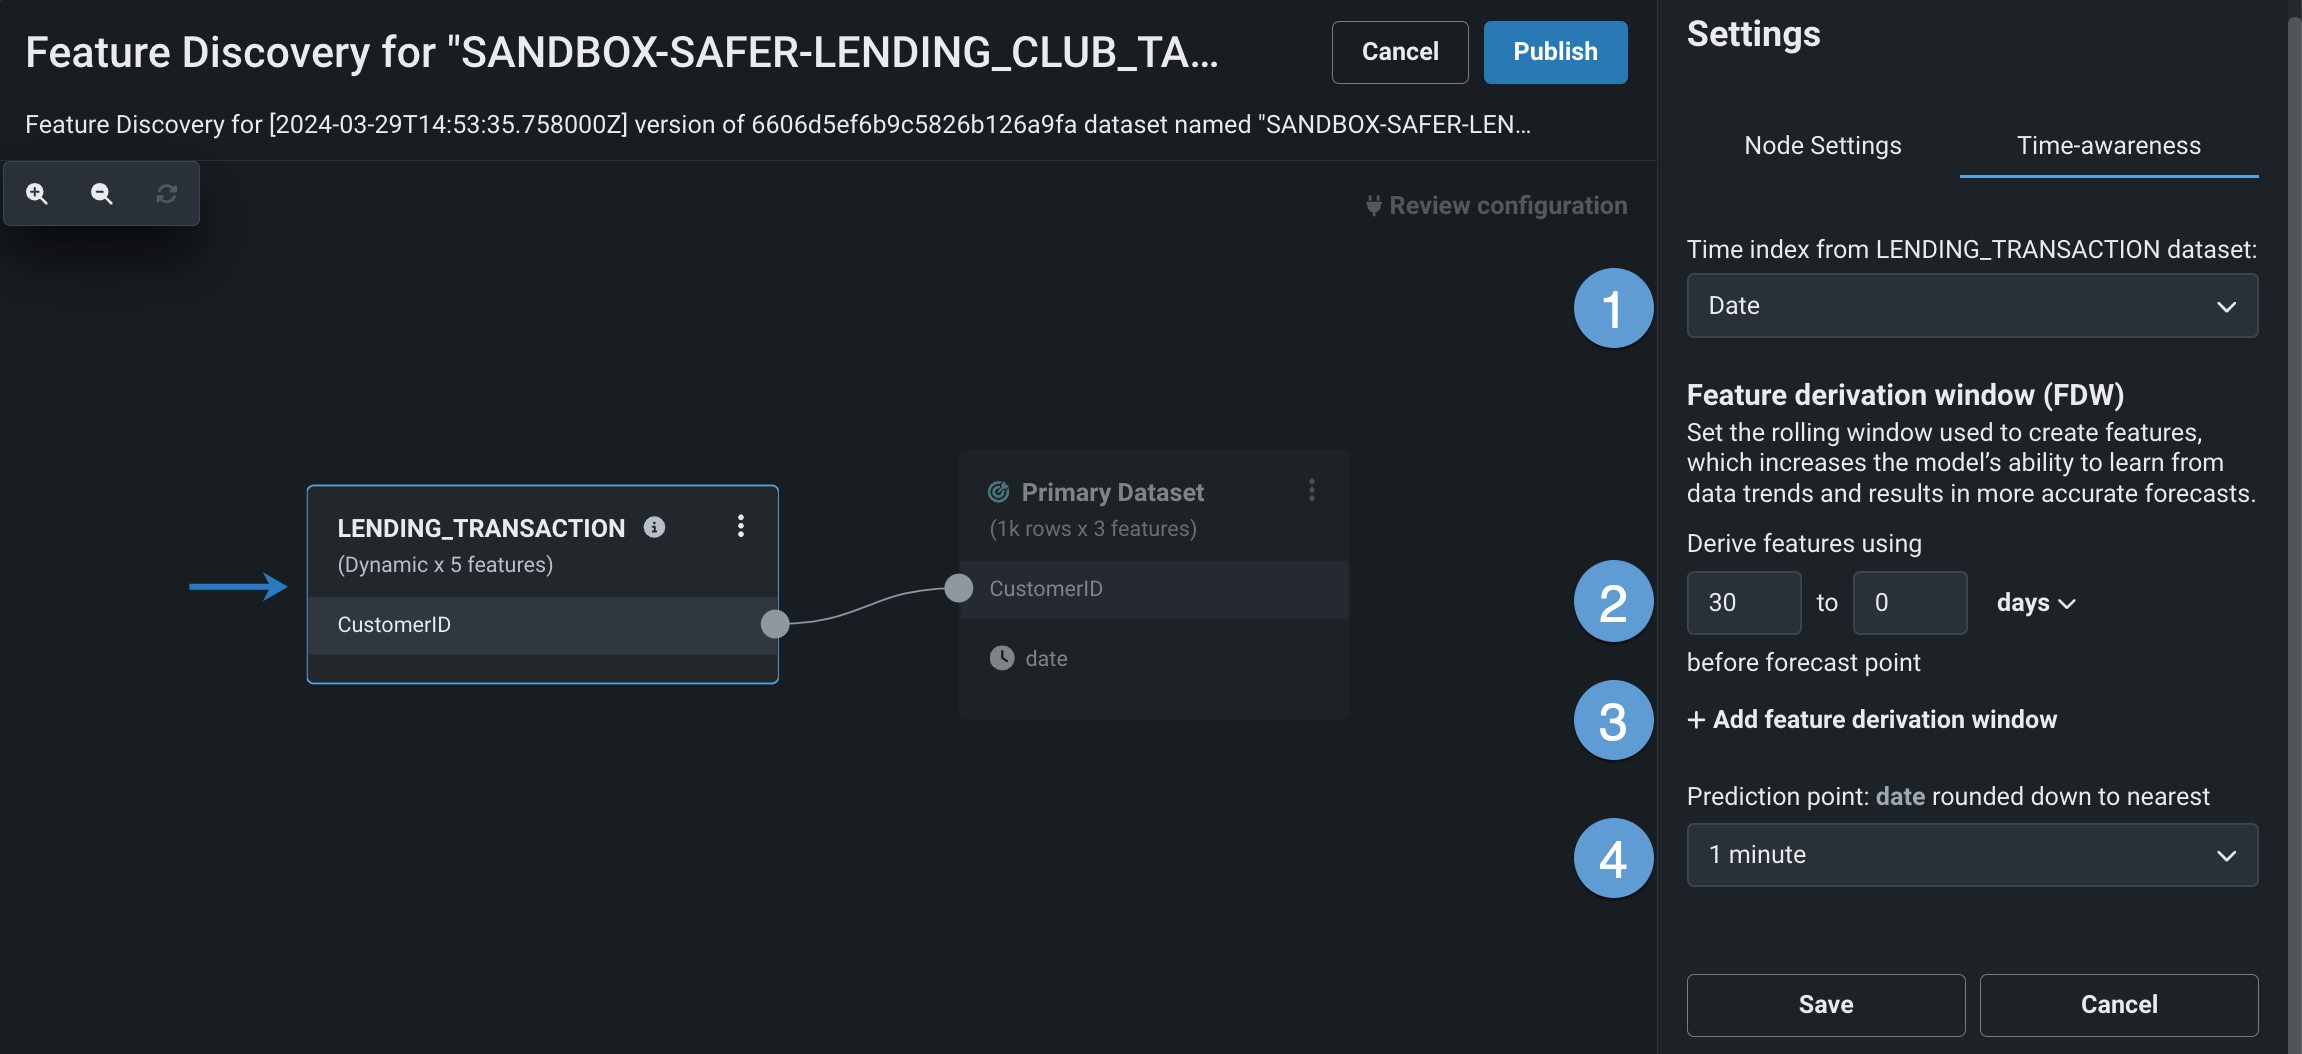
If DataRobot detects a date feature in the primary dataset, you can select a prediction point to configure time-awareness. To edit these settings for a secondary node, open the Time-awareness tab, which includes the following options:
| Element | Description | |
|---|---|---|
| 1 | Time index | Determines the time window when DataRobot performs joins and aggregations during Feature Discovery. |
| 2 | Feature derivation window (FDW) | Set the rolling window used to create features, which increases the model’s ability to learn from data trends and results in more accurate forecasts. |
| 3 | + Add feature derivation window | Define additional FDWs to finetune time-aware Feature Discovery. |
| 4 | Prediction point: {date_feature} rounded down to nearest | Control how DataRobot rounds down the prediction point when running Feature Discovery. While rounding makes the Feature Discovery process faster, doing so comes at a cost of potentially losing fresh secondary dataset records. |
Prediction point vs. Time index
Prediction point applies to the primary dataset and is used as the reference date for when you can make predictions. Time index applies to secondary datasets and is used to determine the time window when DataRobot can perform joins and aggregations as part of Feature Discovery.
For more information, see Time-aware feature engineering.
Automatically generate relationships
Automatic relationship detection (ARD) analyzes the primary dataset and all secondary datasets in a Feature Discovery recipes to detect and generate relationships between features, allowing you to quickly explore potential relationships when you're unsure of how the datasets connect.
Note
Note the following before automatically generating relationships:
- All secondary datasets must be added to the Feature Discovery recipe prior to running ARD.
- ARD does not run on dynamic datasets.
To automatically generate relationships in a Feature Discovery recipe:
-
Make sure all secondary datasets are added.
-
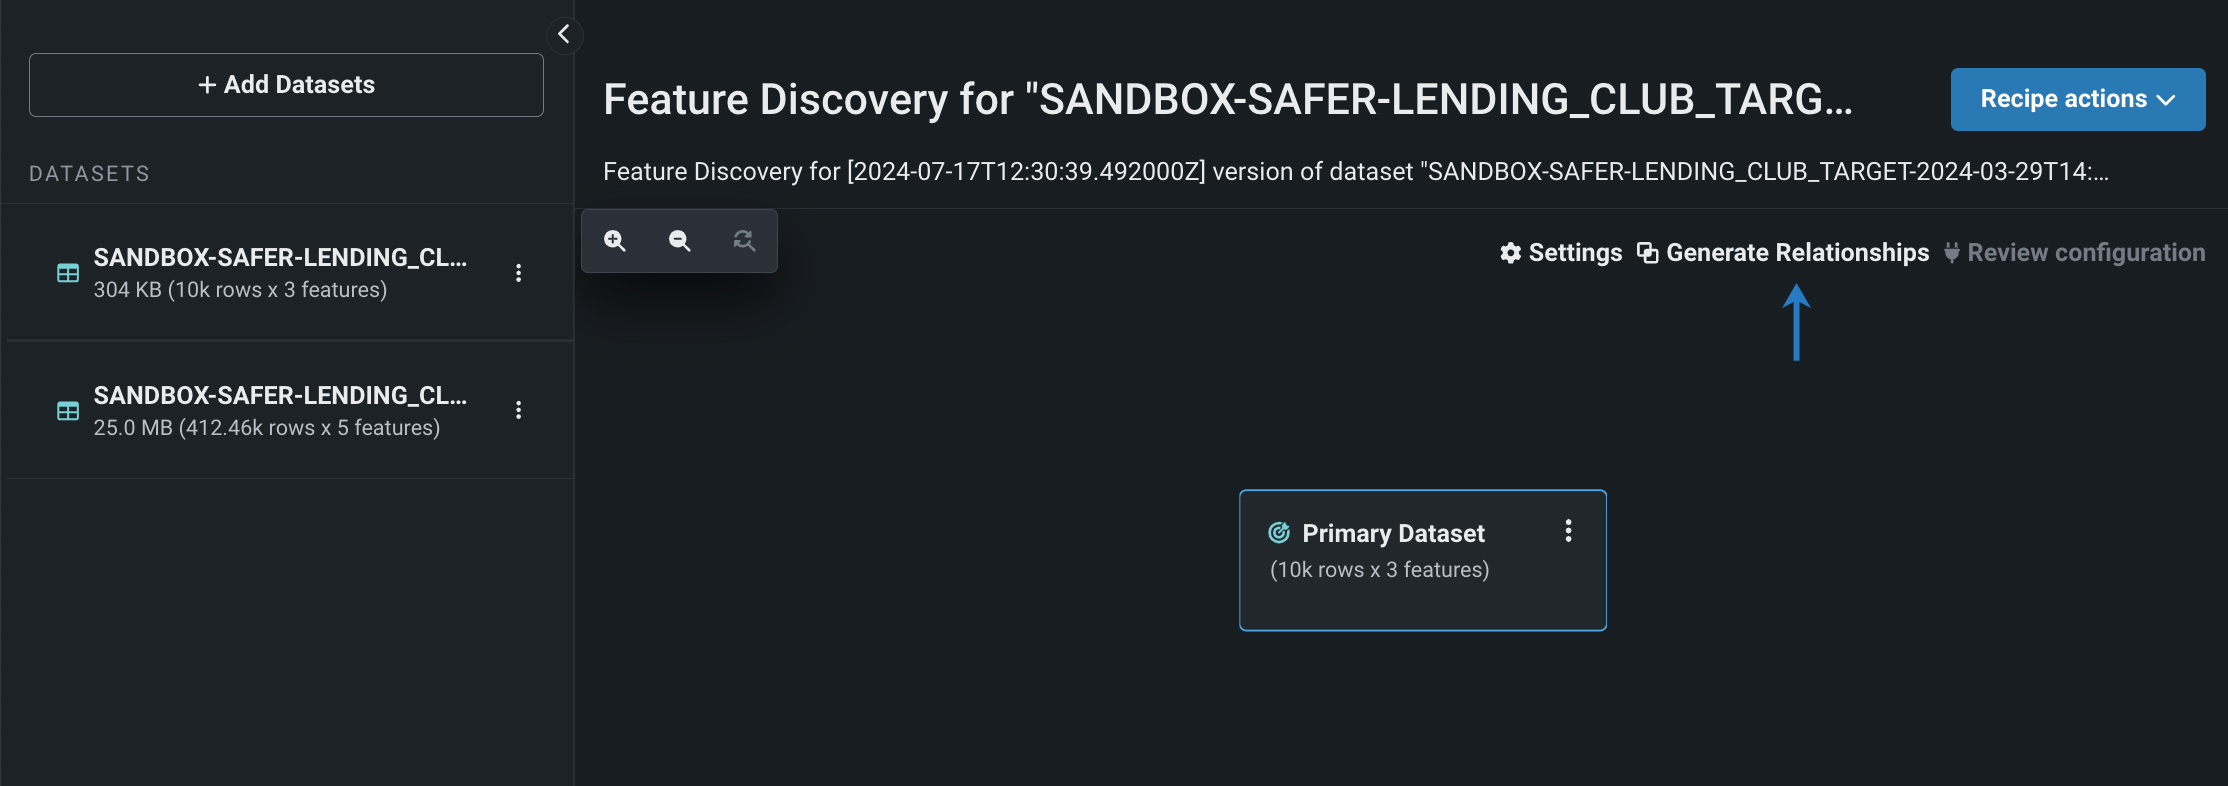
Then, click Generate Relationships at the top of the canvas.
Once ARD is complete, DataRobot automatically adds secondary datasets to the canvas and configures relationships between the datasets.
Review relationship configurations
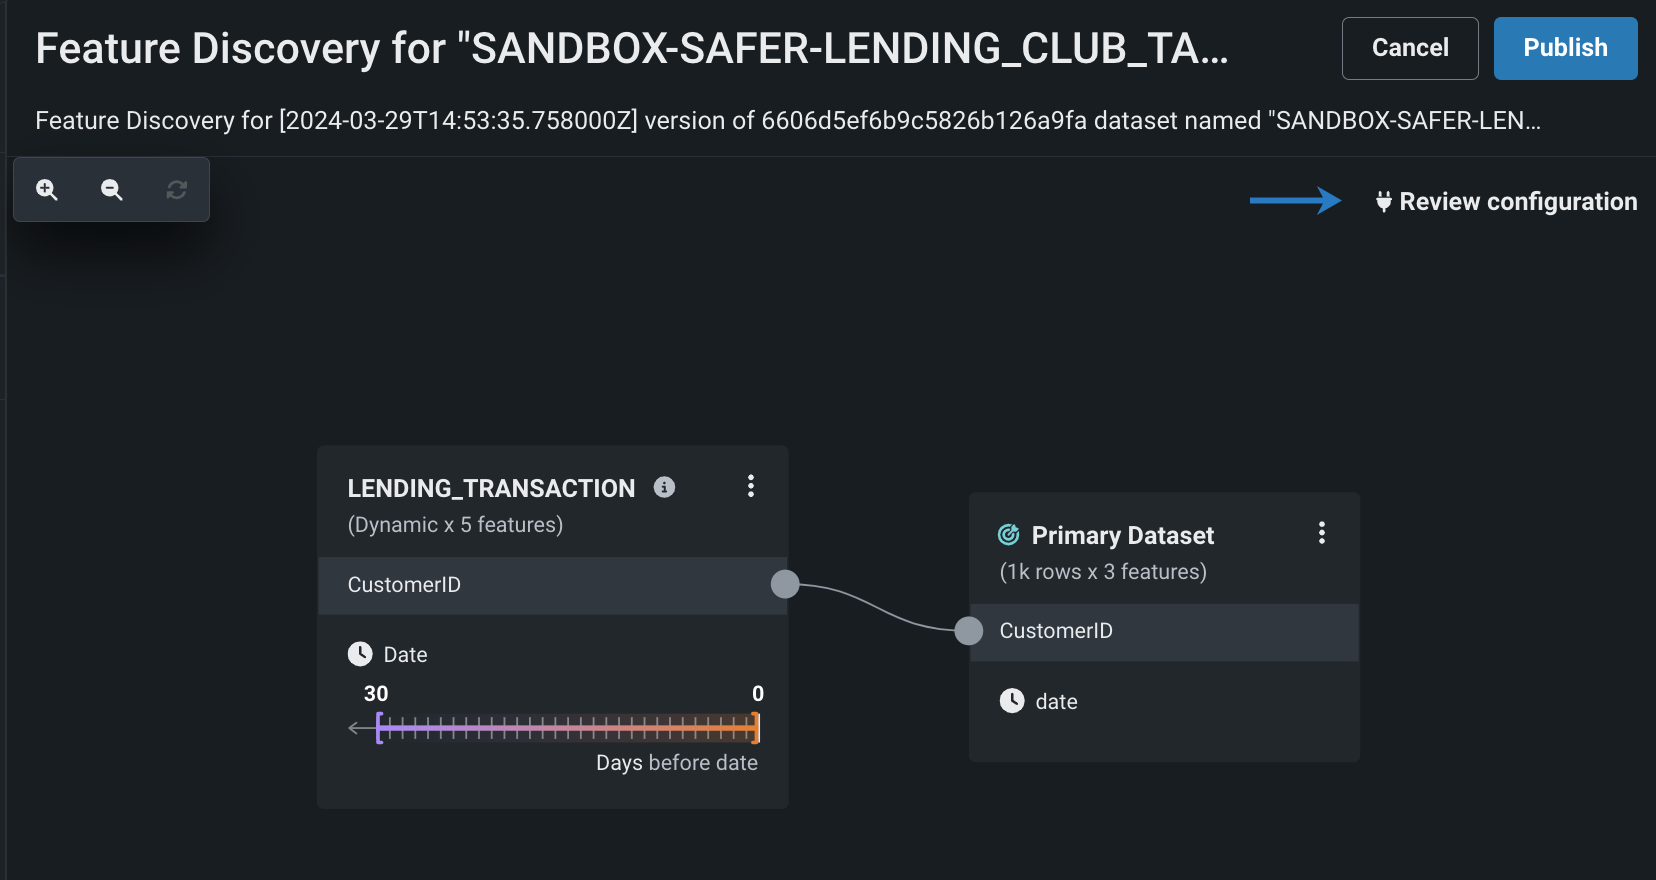
After configuring at least one secondary dataset, you can test the quality of those relationship configurations to identify and resolve potential problems early in the creation process. The Relationship Quality Assessment tool verifies join keys, dataset selection, and time-aware settings.
Click Review configuration to test the relationships on the Feature Discovery canvas.
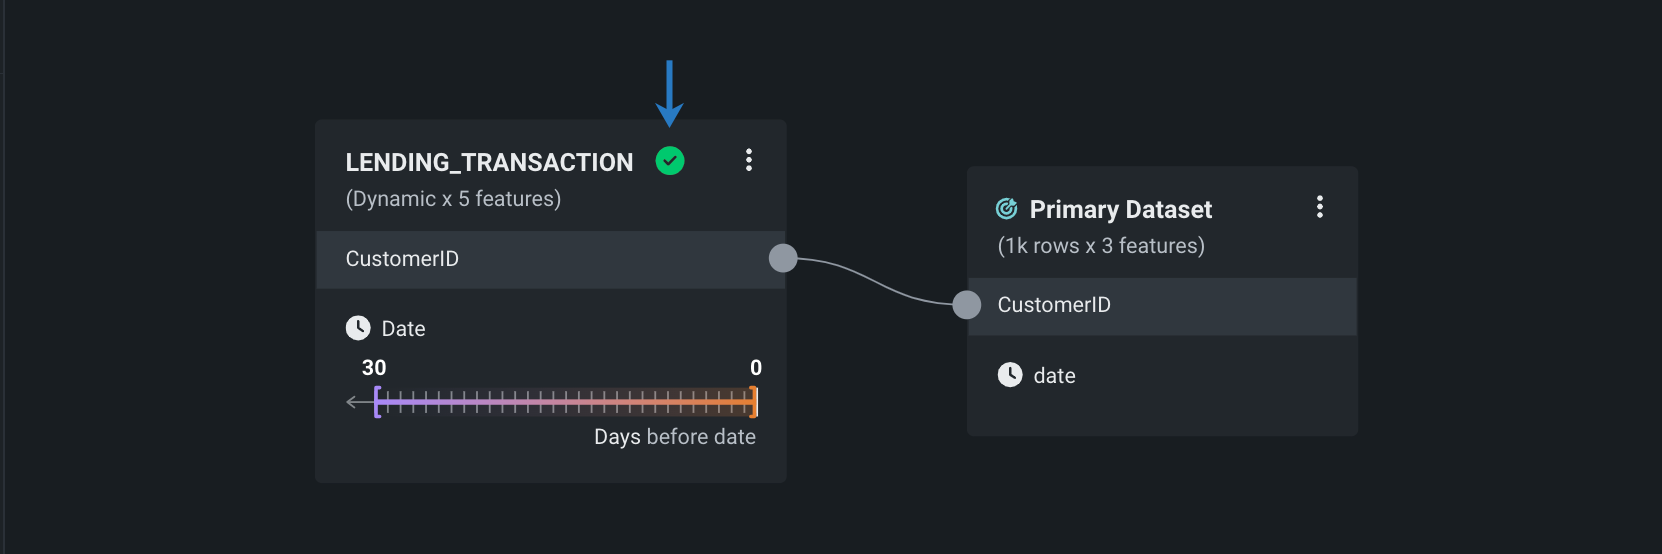
Each node displays the results of the assessment. If the quality of a relationship passes the assessment, a green check mark is displayed in the node.
If the assessment detects quality issues, a yellow exclamation point is displayed in the affected node.
For more information, see Test relationship quality.
Configure Feature Discovery controls
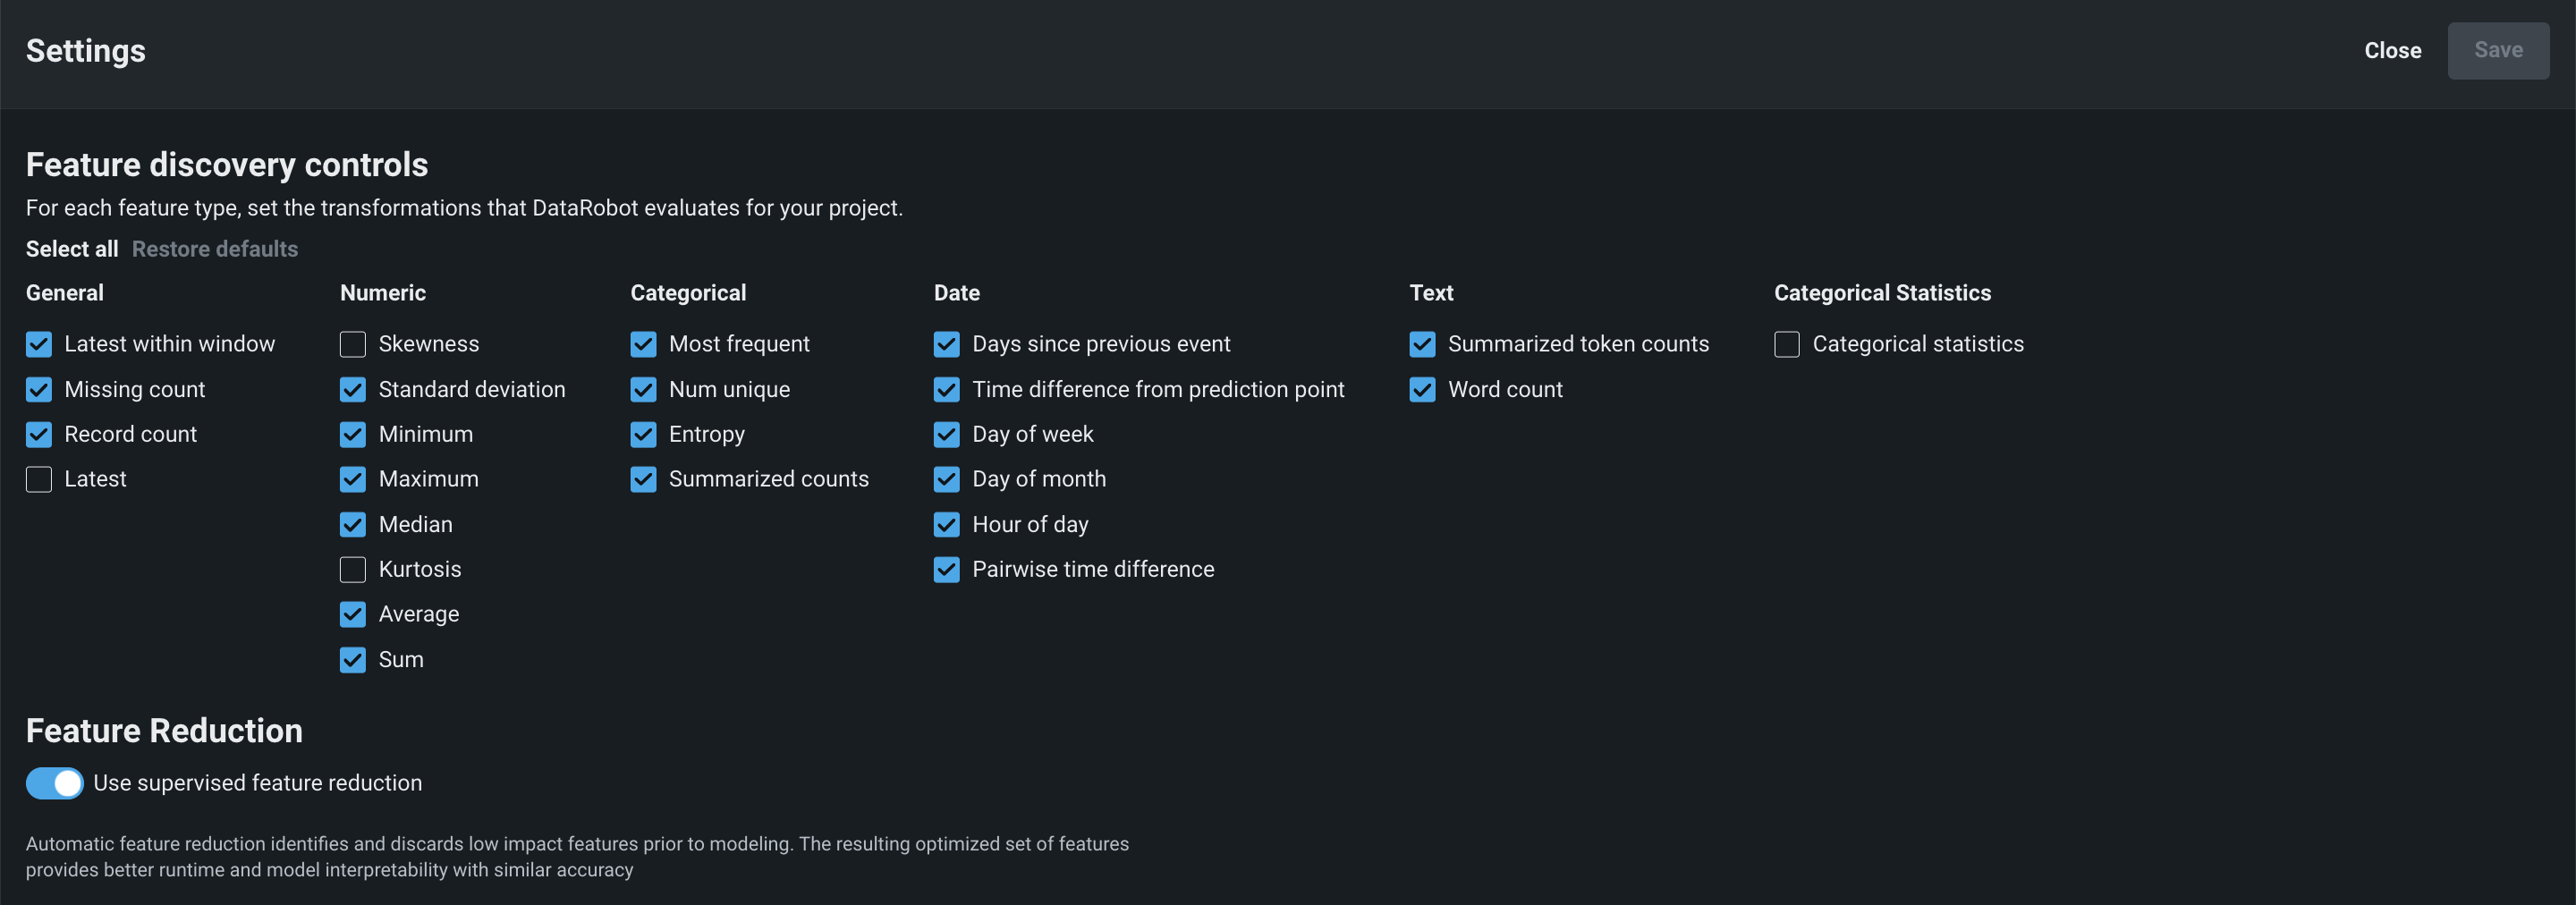
To influence how DataRobot conducts feature engineering, open Settings, which includes feature engineering controls and feature reduction.
| Setting | Description | Read more in DataRobot Classic |
|---|---|---|
| Feature discovery controls | Set which feature types DataRobot evaluates during Feature Discovery. | See Feature Discovery settings. |
| Feature reduction | When enabled, during Feature Discovery, DataRobot generates new features, and then removes features that have low impact or are redundant. | See Feature reduction. |
Start modeling
When you've finished configuring relationships and they've passed the relationship configuration assessment, you can proceed directly to experiment set up to start modeling.
To set up an experiment using the Feature Discovery recipe:
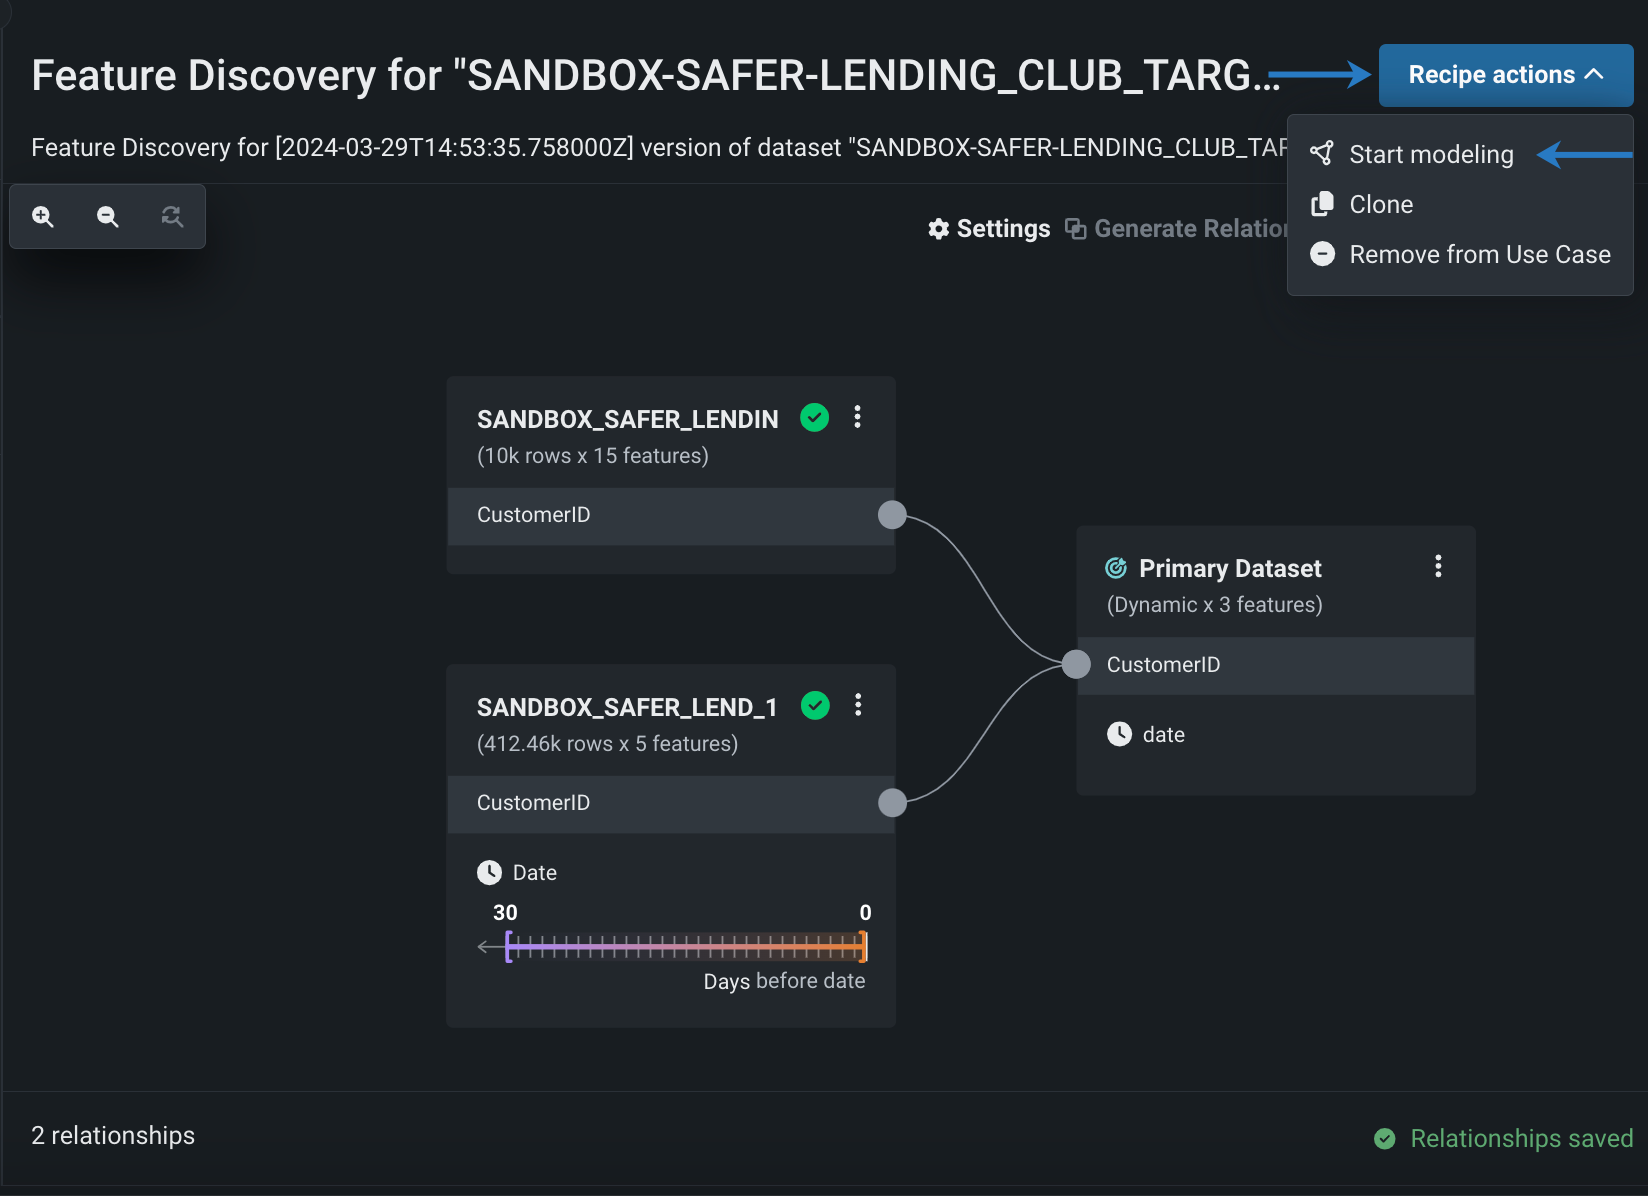
-
Click Recipe actions > Start modeling.
-
Set up the experiment for either predictive or time-aware modeling.
After you click Start modeling in the experiment, DataRobot performs joins and aggregations as part of Feature Discovery, generating an enriched output dataset that is then registered in the Data Registry and added to your current Use Case.
Download recipe SQL
Once the enriched dataset is registered and added to the Use Case—which only happens after you start modeling—you can access the Spark SQL that DataRobot used to execute the actions specified in your Feature Discovery recipe.
To access the recipe SQL:
- Open the enriched dataset in the Use Case.
-
On the Info tab for the dataset, click Recipe SQL.
-
View the SQL to understand how DataRobot performed the joins and aggregations as part of Feature Discovery or copy the SQL to run the SQL in a new Spark cluster.
