Advanced experiment setup
To apply more advanced modeling criteria before training, you can:
- Modify partitioning.
- Configure incremental learning
- Configure additional settings.
- Change configuration settings.
Data partitioning tab
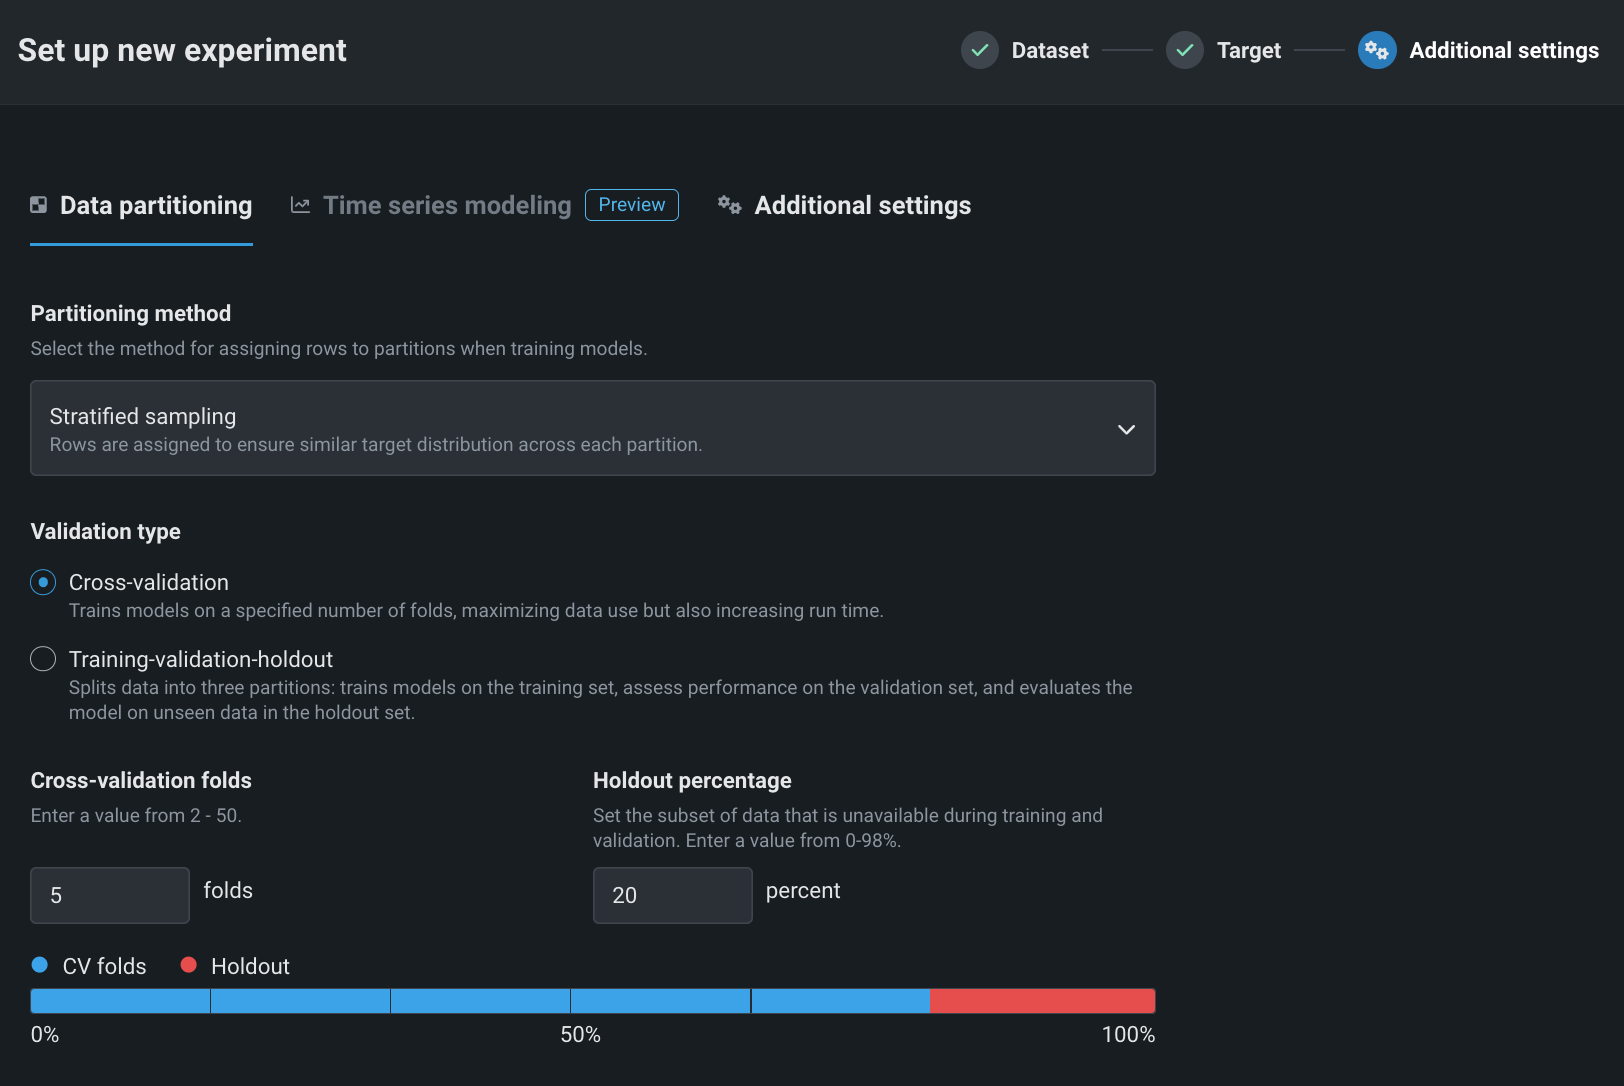
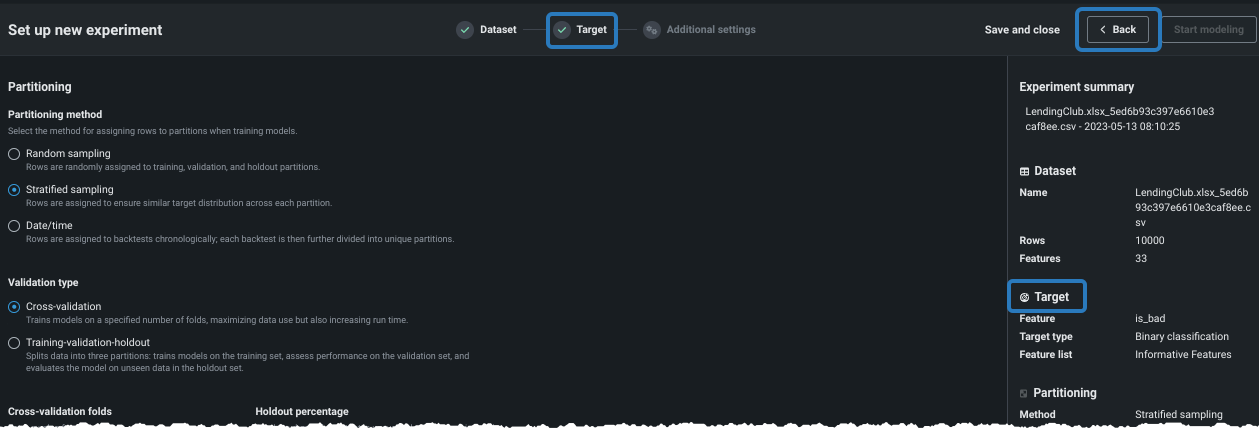
Partitioning describes the method DataRobot uses to “clump” observations (or rows) together for evaluation and model building. Workbench defaults to five-fold cross-validation with stratified sampling (for binary classification experiments) or random (for regression experiments) and a 20% holdout fold.
Note
If there is a date feature available, your experiment is eligible for Date/time partitioning, which assigns rows to backtests chronologically instead of, for example, randomly. This is the only valid partitioning method for time-aware projects. See the time-aware modeling documentation for more information.
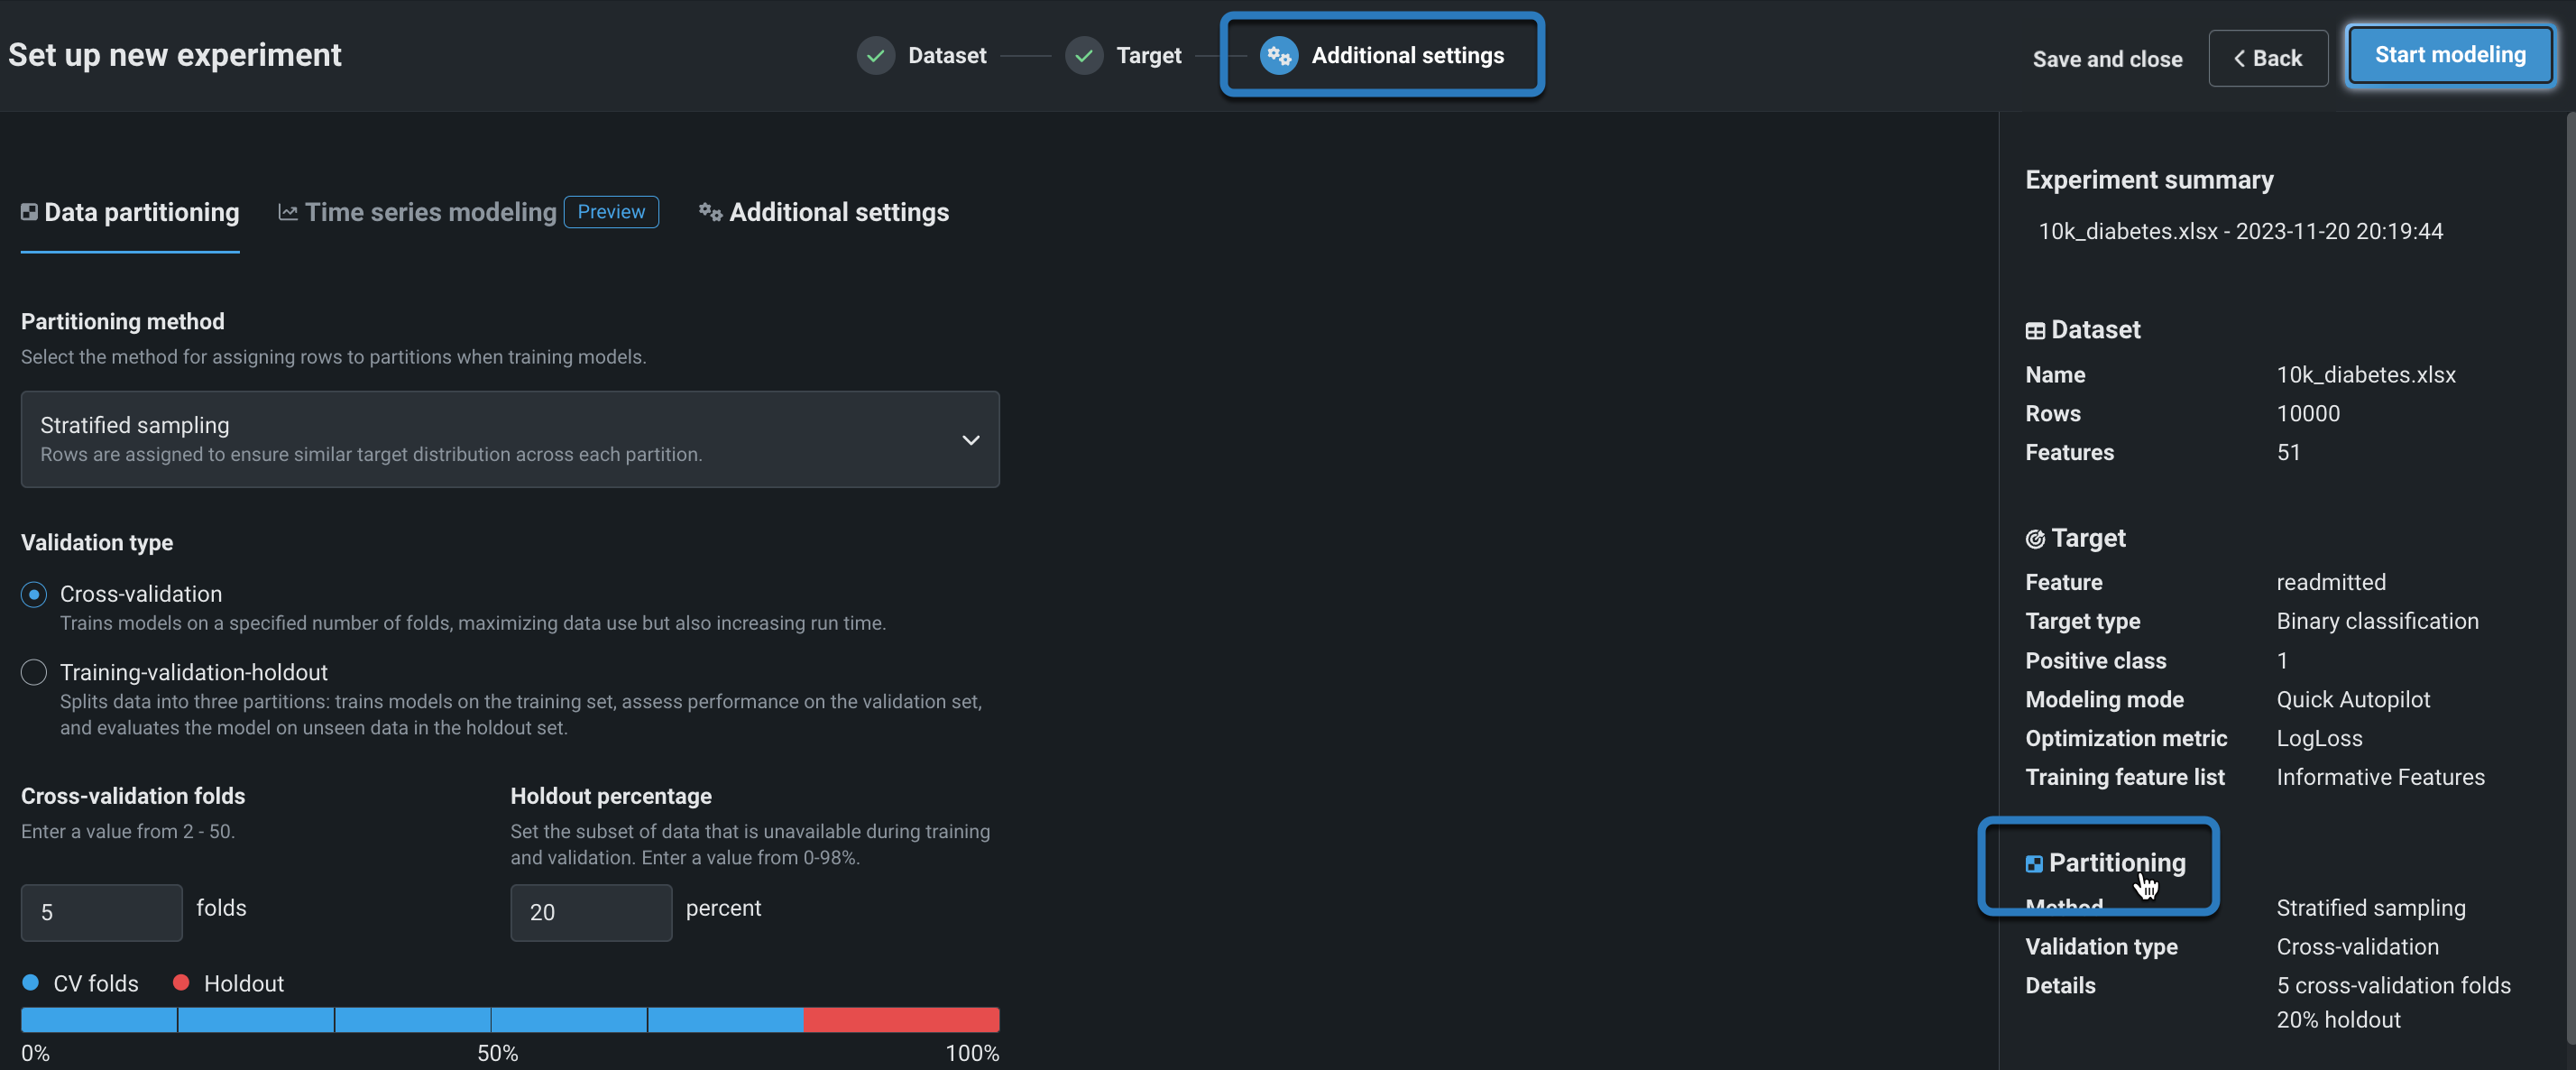
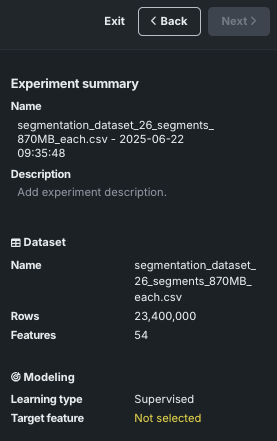
Change the partitioning method or validation type from Additional settings or by clicking the Partitioning field in the summary:
Set the partitioning method
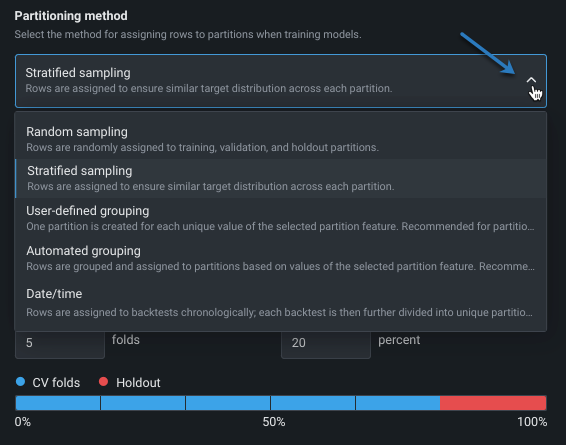
The partitioning method instructs DataRobot on how to assign rows when training models. Note that the choice of partitioning method and validation type is dependent on the target feature and/or partition column. In other words, not all selections will always display as available. The following table briefly describes each method; see also this section for more partitioning details.
| Method | Description |
|---|---|
| Stratified | Rows are randomly assigned to training, validation, and holdout sets, preserving (as close as possible to) the same ratio of values for the prediction target as in the original data. This is the default method for binary classification problems. |
| Random | DataRobot randomly assigns rows to the training, validation, and holdout sets. This is the default method for regression problems. |
| User-defined grouping | Creates a 1:1 mapping between values of this feature and validation partitions. Each unique value receives its own partition, and all rows with that value are placed in that partition. This method is recommended for partition features with low cardinality. See partition by grouping, below. |
| Automated grouping | All rows with the same single value for the selected feature are guaranteed to be in the same training or test set. Each partition can contain more than one value for the feature, but each individual value will be automatically grouped together. This method is recommended for partition features with high cardinality. See partition by grouping, below. |
| Date/time | See time-aware experiments. |
Set the validation type
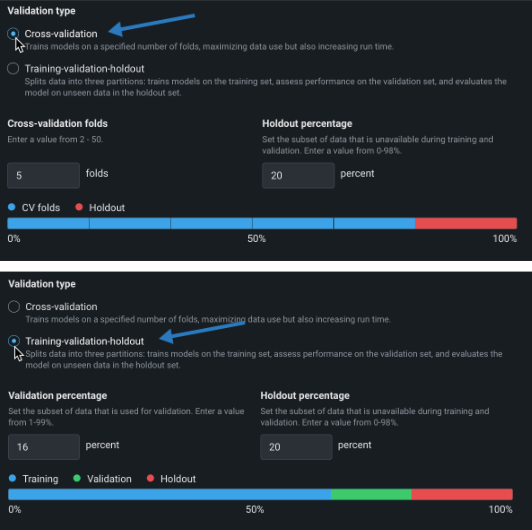
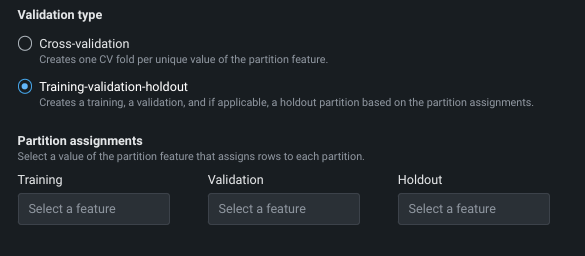
Validation type sets the method used on data to validate models. Choose a method and set the associated fields. A graphic below the configuration fields illustrates the settings. See the description of validation type when using user-defined or automated group partitioning.
| Field | Description |
|---|---|
| Cross-validation: Separates the data into two or more “folds” and creates one model per fold, with the data assigned to that fold used for validation and the rest of the data used for training. | |
| Cross-validation folds | Sets the number of folds used with the cross-validation method. A higher number increases the size of training data available in each fold; consequently increasing the total training time. |
| Holdout percentage | Sets the percentage of data that Workbench “hides” when training. The Leaderboard shows a holdout value, which is calculated using the trained model's predictions on the holdout partition. |
| Training-validation-holdout: For larger datasets, partitions data into three distinct sections—training, validation, and holdout— with predictions based on a single pass over the data. | |
| Validation percentage | Sets the percentage of data that Workbench uses for validation of the trained model. |
| Holdout percentage | Sets the percentage of data that Workbench “hides” when training. The Leaderboard shows a Holdout value, which is calculated using the trained model's predictions on the holdout partition. |
Note
If the dataset exceeds 800MB, training-validation-holdout is the only available validation type for all partitioning methods.
Partition by grouping
While less common, user-defined and automated group partitioning provides a method for partitioning by partition feature—a feature from the dataset that is the basis of grouping.
-
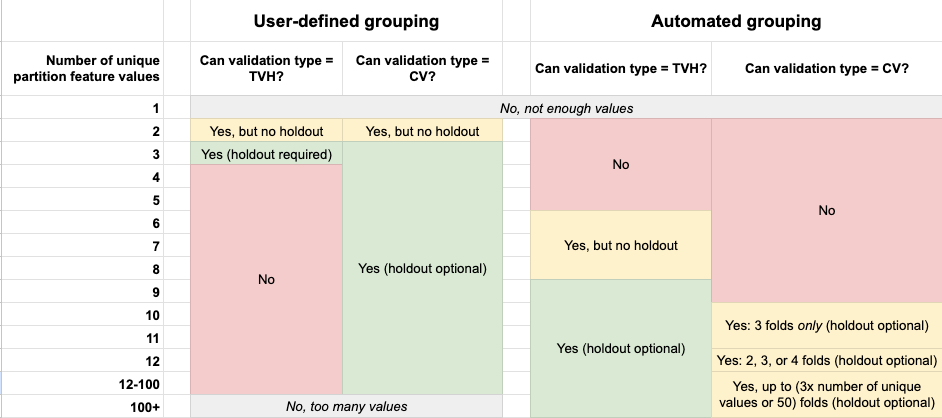
With user-defined grouping, one partition is created for each unique value of the selected partition feature. That is, rows are assigned to partitions using the values of the selected partition feature, one partition for each unique value. When this method is selected, DataRobot recommends specifying a feature that has fewer than 10 unique values of the partition feature.
-
With automated grouping, all rows with the same single (specified) value of the partition feature are assigned to the same partition. Each partition can contain multiple values of that feature. When this method is selected, DataRobot recommends specifying a feature that has six or more unique values.
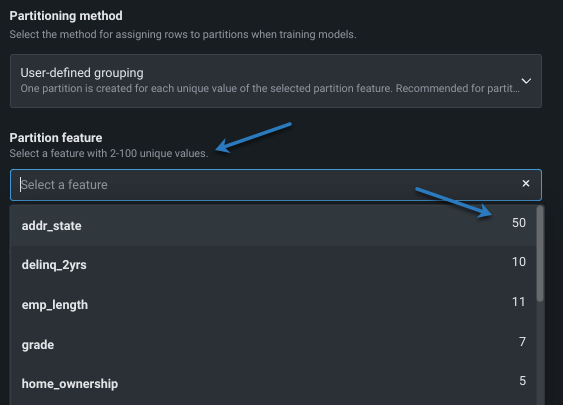
Once either of these methods are selected, you are prompted to enter the partition feature. Help text provides information on the number of values the partition feature must contain; click in the dropdown to view features with a unique value count.
After choosing a partition feature, set the validation type. The applicability of validation type is dependent on the unique values for the partition features, as illustrated in the following chart.
Automated grouping uses the same validation settings as described above. User-defined grouping, however, prompts for values specific to the partition feature. For cross-validation, setting holdout is optional. If you do set it, you select a value of the partition feature instead of a percentage. For training-validation-holdout, select a value of the partition feature for each section, again instead of a percentage.
Configure incremental learning
Note
For single-tenant SaaS (STS) users running versions 11.1 or 11.2, chunking service is disabled. As a result, incremental learning is not available. Managed and on-premise Self-Managed deployments are not affected.
Incremental learning (IL) is a model training method specifically tailored for large datasets—those between 10GB and 100GB—that chunks data and creates training iterations. After model building begins, you can compare trained iterations and optionally assign a different active version or continue training. The active iteration is the basis for other insights and is used for making predictions.
Using the default settings, DataRobot trains the most accurate model on all iterations and all other models on only the first iteration. From the Model Iterations insight, you can train additional increments once models have built. Incremental learning experiments can use both static and dynamic datasets.
IL experiment setup
Note
IL is automatically enabled (required) for any static or snapshotted dataset larger than 10GB. It is not supported for dynamic datasets (they must be snapshotted). Datasets use the EDA sample—a good representation of the full dataset—to speed experiment setup.
To configure IL for a static or snapshotted dataset:
-
From within a Use Case, add a static or snapshotted dataset larger than 10GB and wait for the dataset to register. You can check the registration status in the Data Registry.
-
After registration, open the Data tile, select the dataset, and choose Data actions > Start modeling. DataRobot creates the data sample and uses the sample to create the project. It also creates the first chunk, 4GB, to allow experiment setup to continue, and then runs chunking in the background. The experiment summary begins to populate.
-
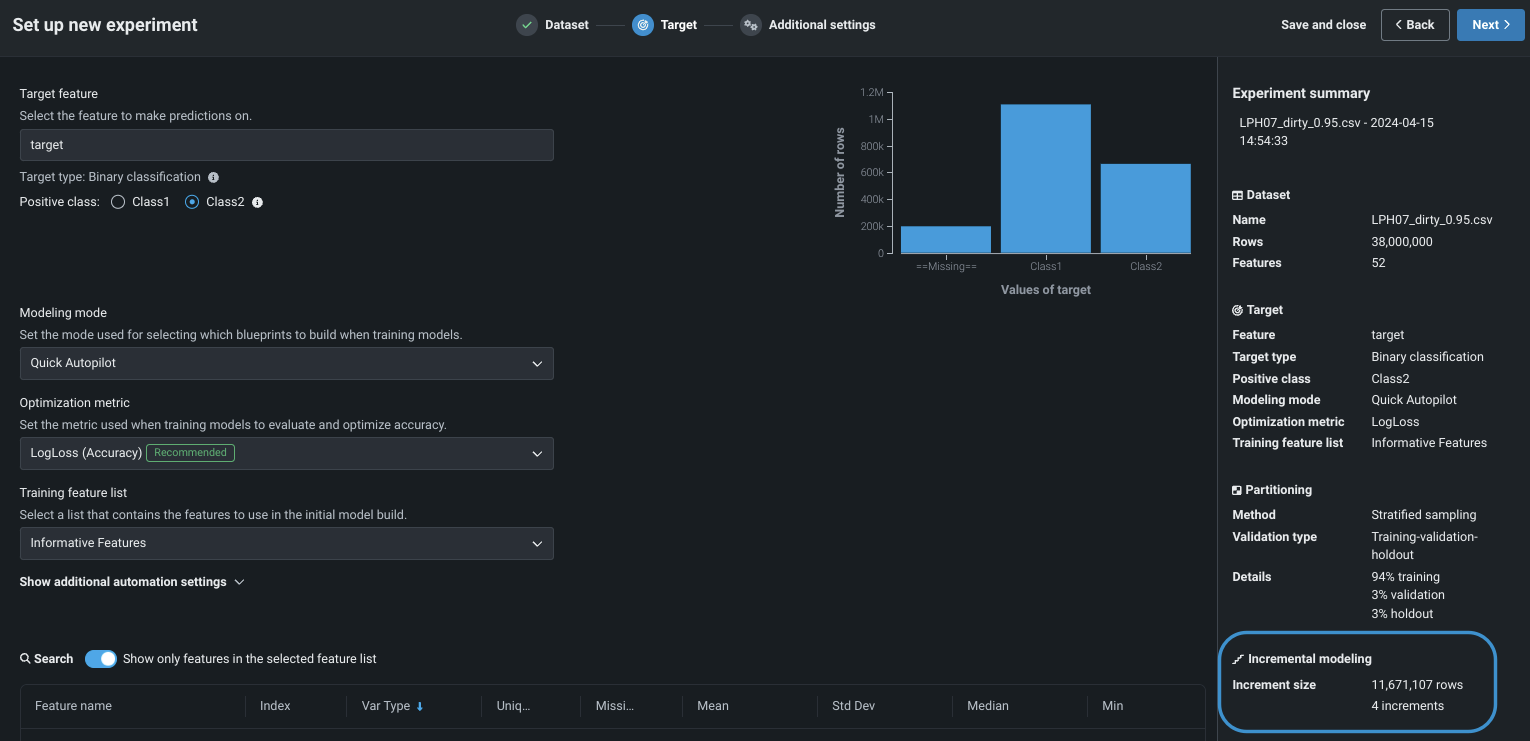
Once EDA sampling is complete, the configuration window becomes available. Set a binary classification or regression target to enable IL. Notice that the experiment summary updates to show incremental modeling has been activated.
-
Choose a modeling mode—either Quick Autopilot (the default) or Manual. Comprehensive mode is not available in IL.
-
Open the Additional settings > Data partitioning tab and set the partitioning method. If using time-aware data, enter an ordering feature once the time-based dataset registers.
Working with time-aware data
DataRobot calculates the validation start date from the EDA sample. The first chunk—the validation chunk—will always have the most recent data. Everything after that validation date is randomized and used for the validation dataset (the data used for scoring). The other time-aware fields are disabled in incremental learning. After DataRobot creates the first chunk, target selection becomes available and the regular incremental learning flow follows.
IL partitioning
Note the following about IL partitioning:
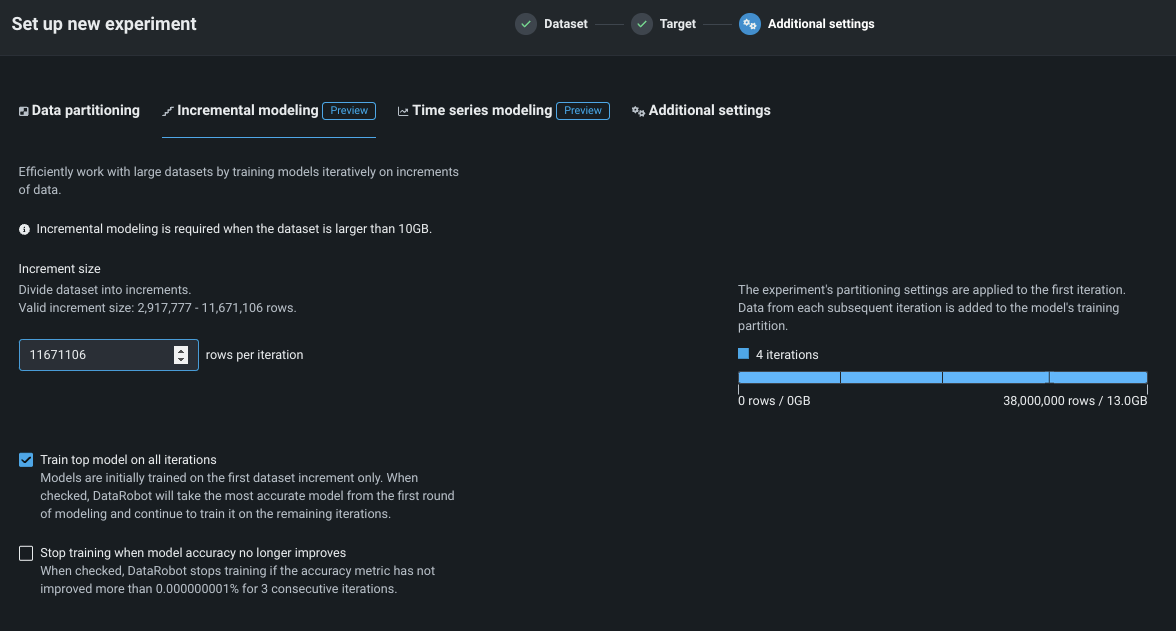
- The experiment’s partitioning settings are applied to the first iteration. Data from each subsequent iteration is added to the model’s training partition.
- Because the first iteration is used for all partitions—training, validation, and holdout—it is smaller than subsequent iterations, which only hold training data.
-
While still in Additional settings, click the Incremental modeling tab:
-
Configure the settings for your project:
Setting Description Train top model on all iterations Sets whether training continues for the top-performing model. When checked, the top-performing model is trained on all increments; other Leaderboard models are trained on a single increment. When unchecked, all models are trained on a single increment. This setting is disabled when manual modeling mode is selected. Stop training when model accuracy no longer improves Sets whether to stop training new model iterations when model accuracy, based on the validation partition, plateaus. Specifically, training ceases when the accuracy metric has not improved more than 0.000000001% over the 3 preceding iterations. -
Click Start modeling.
-
When the first iteration completes, the Model Iterations insight becomes available on the Leaderboard.
IL considerations
Incremental learning is activated automatically when datasets are 10GB or larger. Consider the following when working with IL:
-
IL is available for predictive and time-aware predictive binary classification, multiclass classification, multilabel, and regression experiments (no time series forecasting). Time series, anomaly detection, and clustering experiments are API-only.
- With multiclass data, any new classes not found in the initial chunk will be excluded from the training process. The model will exclusively train on classes present in the initial chunk.
- In multiclass experiments with new data chunks, there must be a minimum of two classes from the initial chunk (the data from which the project was started).
- You cannot restart a draft of an IL experiment from a Use Case. You must create a new experiment.
- Datasets must be either static or snapshots and registered in the Data Registry. They cannot be directly uploaded from a local computer. Dynamic datasets are not supported.
- Datasets must be between 10GB and 100GB.
- IL does not support user-defined grouping or automated grouping.
- Comprehensive modeling mode is disabled for IL experiments.
- Cross-validation is not available.
- Monotonic feature constraints, assigning weights, and insurance-specific settings are not supported.
- Sharing is only available at the Use Case level; experiment-level sharing is not supported. When sharing, changing the active iteration is the only available option for any user but the experiment creator. If a user with whom an experiment was shared trains new iterations, all iterations will error.
- To model on datasets over 10GB, an organization's Data Registry file size limit must be increased. Contact your administrator.
- Feature Discovery is available on AWS multi-tenant SaaS only. Primary datasets are limited to a maximum of 20GB; secondary datasets can be up to 100GB.
- The following blueprint families are available:
- GBM (Gradient Boosting Machine), such as Light Gradient Boosting, eXtreme Gradient Boosted Trees Classifier.
- SGD (linear models), such as Stochastic Gradient Descent.
- NN (Neural Network), such as Keras.
- By default, Feature Effects generates insights for the top 500 features (ranked by feature impact). In consideration of runtime performance, Feature Effects generates insights for the top 100 features in IL experiments.
Configure additional settings
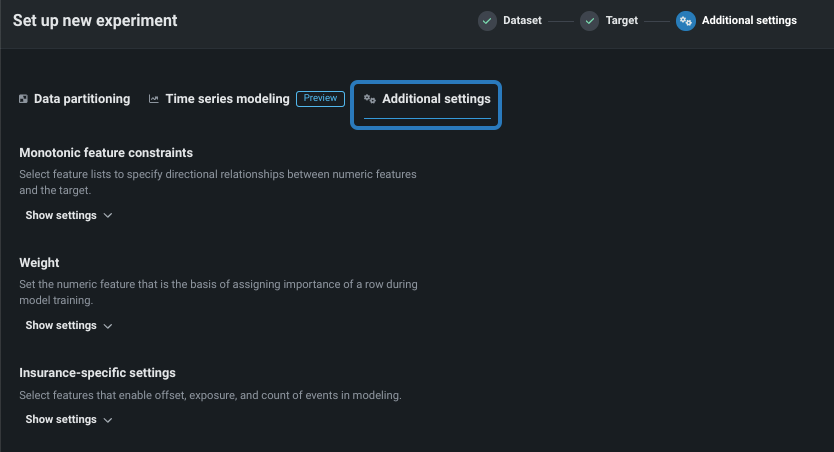
Choose the Additional settings tab to set more advanced modeling capabilities. Note that the Time series modeling tab will be available or grayed out depending on whether DataRobot found any date/time features in the dataset.
Configure the following, as required by your business use case. Available options are dependent on the data.
| Setting | Description |
|---|---|
| Monotonic feature constraints | Controls the influence, both up and down, between variables and the target. |
| Weight | Sets a single feature to use as a differential weight. |
| Insurance-specific settings | Sets weighting needs specific to the insurance industry. |
| Geospatial insights | Build enhanced model blueprints with spatially-explicit modeling tasks. |
| Image augmentation | Incorporate supported image types with other feature types in a modeling dataset. |
Monotonic feature constraints
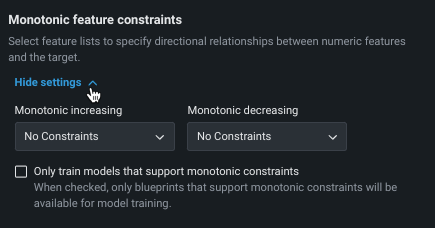
Monotonic constraints control the influence, both up and down, between variables and the target. In some use cases (typically insurance and banking), you may want to force the directional relationship between a feature and the target (for example, higher home values should always lead to higher home insurance rates). By training with monotonic constraints, you force certain XGBoost models to learn only monotonic (always increasing or always decreasing) relationships between specific features and the target.
Using the monotonic constraints feature requires creating special feature lists, which are then selected here. Note also that when using Manual mode, available blueprints are marked with a MONO badge to identify supporting models.
Weight
Weight sets a single feature to use as a differential weight, indicating the relative importance of each row. It is used when building or scoring a model—for computing metrics on the Leaderboard—but not for making predictions on new data. All values for the selected feature must be greater than 0. DataRobot runs validation and ensures the selected feature contains only supported values.
Insurance-specific settings
Several features are available that address frequent weighting needs of the insurance industry. The table below describes each briefly, but more detailed information can be found here.
| Setting | Description |
|---|---|
| Exposure | In regression problems, sets a feature to be treated with strict proportionality in target predictions, adding a measure of exposure when modeling insurance rates. DataRobot handles a feature selected for exposure as a special column, adding it to raw predictions when building or scoring a model; the selected column(s) must be present in any dataset later uploaded for predictions. The parameter accepts only a single feature. |
| Count of events | Improves modeling of a zero-inflated target by adding information on the frequency of non-zero events. The parameter accepts only a single feature. |
| Offset | Adjusts the model intercept (linear model) or margin (tree-based model) for each sample; DataRobot displays a message below the selection reporting which link function it will use. The parameter accepts multiple features. |
Geospatial settings
Geospatial modeling helps you gain insights into geospatial patterns in your data. You can natively ingest common geospatial formats and build enhanced model blueprints with spatially-explicit modeling tasks. Interactive maps post-modeling, such as Accuracy Over Space and Anomaly Over Space, help highlight errors and anomalies in your data.
DataRobot supports ingest of the following native geospatial data formats:
- ESRI Shapefiles
- GeoJSON
- ESRI File Geodatabase
- Well Known Text (embedded in table column)
- PostGIS Databases
To set up geospatial modeling, click Show settings and choose a location feature from the dropdown:
Note
To access geospatial insights, you must include the selected location feature in the modeling feature list.
Geospatial modeling in Workbench offers the same features as the Location AI functionality in DataRobot Classic, with the exception of Exploratory Spatial Data Analysis (ESDA) insights. See the Location AI documentation for a full description of geo-aware modeling.
Image augmentation
Note
Image augmentation for Visual AI is not supported in time series experiments, but is available for time-aware predictive experiments. See other feature considerations, below.
Image augmentation is a part of the DataRobot Visual AI offering. It adds a processing step in the blueprint that creates new images by randomly transforming existing images, thereby increasing the size of ("augmenting") the training data.
Why use augmentation?
There are two main reasons for transforming images and augmenting the dataset:
-
To create a new image that looks like it could have reasonably been in the original data. Since applying transformations is typically less expensive than collecting and labelling more data, this is a great way to increase your training set size with images that are almost as authentic as originals.
-
To intentionally remove some information from the image, guiding the model to focus on different aspects of the image and thereby learning a more robust representation of it. This is described with examples under the sections for Blur and Cutout.
Important
Be certain to correctly prepare the dataset before uploading.
To begin image augmentation through image transformation, toggle on Generate new images. When enabled, DataRobot will create copies of every original training image, based on the transformation settings. If you do not toggle augmentation on, the insights are still available based on the DataRobot settings.
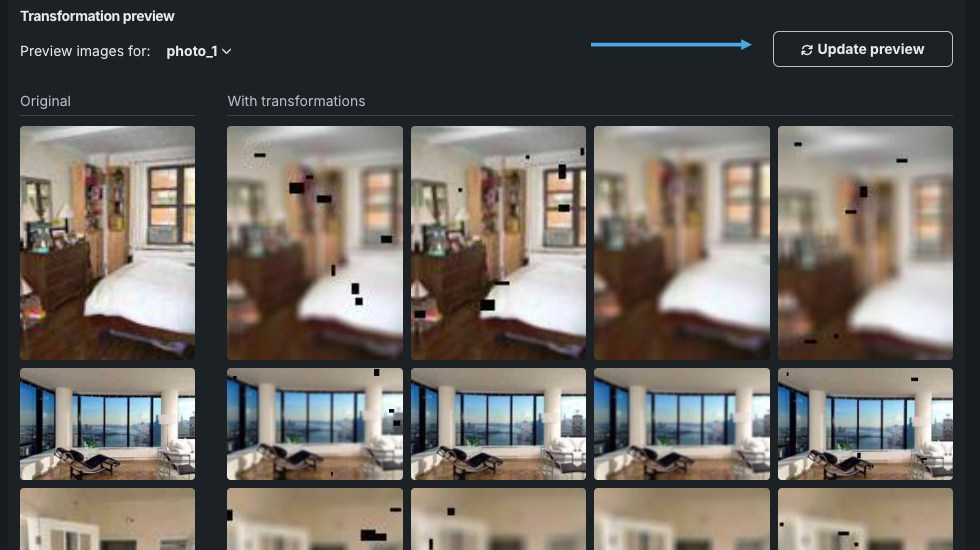
After setting values, you can preview a sample of the new images to fine-tune values. The preview does not display all dataset images with all possible transformations. Instead, it shows the original image with examples of transformations as they would appear in the data used for training.
Next, set the number of copies and the transformation options as described below.
See the following sections for more detail on Visual AI and image augmentation:
- Overview
- Making predictions
- Reference, including information about network architectures, neural networks, and visualization details.
New images per original
The New images per original specifies how many versions of the original image DataRobot will create. Basically, it sets how much larger your dataset will be after augmentation. For example, if your original dataset has 1000 rows, a "new images" value of 3 will result in 4000 rows for your model to train on (1000 original rows and 3000 new rows with transformed images).
The maximum allowed value for New images per original is dynamic. That is, DataRobot determines a value—based on the number of original rows—that it can safely use to build models without exceeding memory limits. Put simply, for a project (regardless of current feature list), the maximum is equal to 300,000 / (number_of_rows * feature_columns) or 1, whichever is greater.
When you create new images, DataRobot adds rows to the dataset. All feature column, with the exception of the column containing the new image, are duplicate values of the original row.
Shift
Helpful when: Object(s) to detect are not centered.
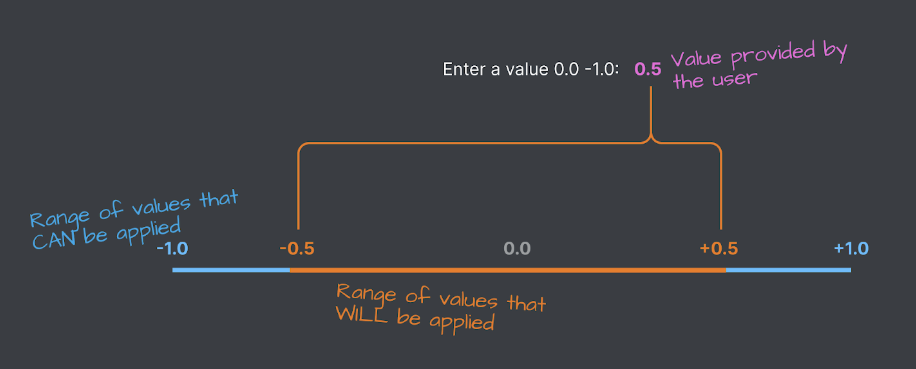
Specify the offset to apply. The offset value is the maximum amount the image will be shifted up, down, left, or right. A value of 0.5 means that the image could be shifted up to half the width of the image left or right, or half the height of the image up or down. The actual amount shifted for each image is random, and Shift is only applied to each image with probability equal to the transformation probability. The image will be padded with reflection padding. This transformation typically serves the purpose mentioned above—simulating whether the photographer had taken a step forward or back, or raised or lowered the camera.
Scale
Helpful when:
- The object(s) to detect are not a consistent distance from the camera.
- The object(s) to detect vary in size.
Once selected, set the maximum amount the image will be scaled in or out. The actual amount scaled for each image is random—Scale is only applied to each image with probability equal to the transformation probability. If scaled out, the image will be padded with reflection padding. This transformation typically serves the first purpose mentioned above, simulating whether the photographer had taken a step forward or backward.
Rotate
Helpful when:
- The object(s) to detect are in a variety of orientations.
- The object(s) to detect have some radial symmetry.
If set, use the Maximum Degrees parameter to set the maximum degree to which the image will be rotated clockwise or counterclockwise. The actual amount rotated for each image is random, and Rotate is only applied to each image with probability equal to the transformation probability. Rotate best simulates if the object captured had turned or if the photographer had tilted the camera.
Blur
Helpful when:
- The images have a variety of blurriness.
- The model must learn to recognize large-scale features in order to make accurate predictions.
Why use Blur?
If the images have a variety of blurriness, adding Blur can simulate new images with varying levels of focus. With the second purpose, by adding Blur you guide the model to focus on larger-scale shapes or colors in the image rather than specific small groups of pixels. For example, if you are worried that the model is learning to identify cats only by a single patch of fur rather than also considering the whole shape, then adding Blur can help the model to focus on both small-scale and large-scale features. But if you're training a model to recognize tiny manufacturing defects, it's possible that applying Blur might only remove valuable information that would be useful for training.
Specify a filter size that sets the maximum size of the gaussian filter passed over the image to smooth it. For example, a filter size of 3 means that the value of each pixel in the new image will be an aggregate of the 3x3 square surrounding the original pixel. Higher filter size leads to a more blurry image. The actual filter size for each image is random, and is only applied to each image with probability equal to the transformation probability.
Cutout
Helpful when:
- The object(s) to detect are frequently partially occluded by other objects.
- The model should learn to make predictions based off multiple features in the image.
Why use Cutout?
If the object(s) to detect are frequently partially occluded by other objects, adding Cutout can simulate new images with objects that continue to be partially obscured in new ways. Regarding the second purpose, adding Cutout guides the model to not always look at the same part of an object to make a prediction.
For example, imagine training a model to distinguish among various car types. The model might learn that the shape of the hood is enough to reach 80% accuracy, and so the signal from the hood might outweigh any other information in training. By applying Cutout, the model won't always be able to see the hood, and will be forced to learn to make a prediction using other parts of the car. This could lead to a more accurate model overall, because it has now learned how to use various features in the image to make a prediction.
Once selected, further configure the transformation.
- Use Add holes to set the number of black rectangles that will be pasted over the image randomly.
- Set the maximum height and width, in pixels, to indicate rectangle size, though the value for each rectangle will be random and is only applied to each image with probability equal to the transformation probability.
Flip
Helpful when:
- The object(s) to detect has symmetry around a vertical line.
- The camera was pointed parallel to the ground.
- The object you are trying to detect could have come from either the left or the right.
- The object(s) to detect have symmetry around a horizontal line.
- The camera was pointed perpendicular the ground—for example, down at the ground, table, or conveyor belt, or up at the sky.
- The images are of microscopic objects that are hardly affected by gravity.
Flip typically serves the purpose of simulating if the object was flipped vertically or if the overhead image was captured from the opposite orientation. The transformation has no parameters—new images will be flipped with probability of 50% (ignoring the value of the transformation probability).
Transformation probability
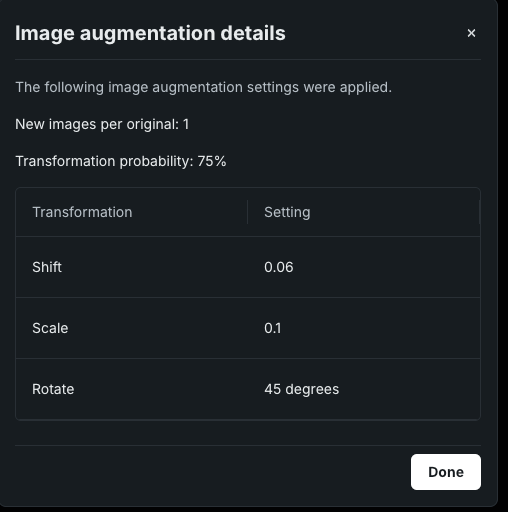
For each new image that is created, each enabled transformation will have a probability of being applied equal to the value of this parameter. By default, transformation probability is 75%.
For example, if you enable Rotate and Shift and set the individual transformation probability to 0.8, this means that ~80% of your new images will at least have Rotate and ~80% will at least have Shift. Because the probability for each transformation is independent, and each new image could have neither, one, or both transformations, your new images would be distributed as follows:
| No Shift | Shift | |
|---|---|---|
| No Rotate | 4% | 16% |
| Rotate | 16% | 64% |
Set this value to 100 to ensure that all selected transformations are applied to all images.
Modeling with augmentation
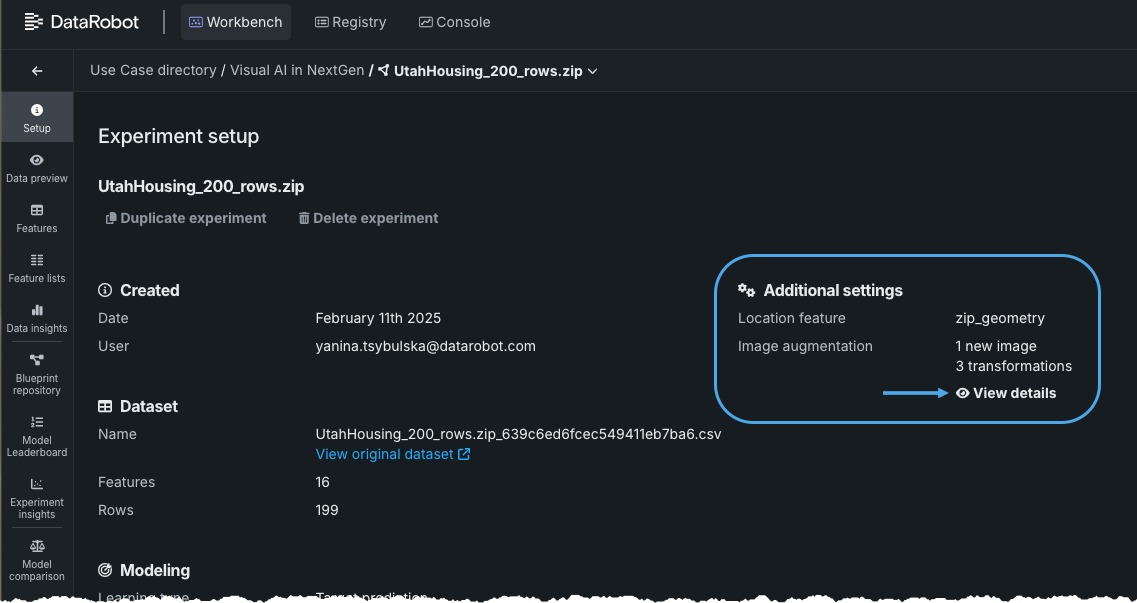
After modeling is complete, open the experiment and click Setup to review the modeling configuration:
Click View details to see a summary of applied transformations:
Available insights
Click the left-side Model Leaderboard tile and select a model to see applicable image-specific insights:
| Insight | Description |
|---|---|
| Attention Maps | Highlight regions of an image according to its importance to a model's prediction. |
| Image Embeddings | View projections of images in two dimensions to see visual similarity between a subset of images and help identify outliers. |
| Neural Network Visualizer | View a visual breakdown of each layer in the model's neural network. |
Augmentation feature considerations
-
For Prediction Explanations, there is a limit of 10,000 images per prediction dataset. Because DataRobot does not run EDA on prediction datasets, it estimates the number of images as
number of rowsxnumber of image columns. As a result, missing values will count toward the image limit. -
Image Explanations, or Prediction Explanations for images, are not available from a deployment (for example, Batch predictions or the Predictions API).
-
There is no drift tracking for image features.
-
Although Scoring Code export is not supported, you can use Portable Prediction Servers.
-
Object detection is not available.
-
Image augmentation does not support time series. Time-aware predictive experiments are supported.
Change the configuration
You can make changes to the project's target or feature list before you begin modeling by returning to the Target page. To return, click the target icon, the Back button, or the Target field in the summary:
