Portable predictions
Availability information
The Portable Prediction Server and Scoring Code are premium features exclusive to DataRobot MLOps. Contact your DataRobot representative or administrator for information on enabling them.
DataRobot offers portable prediction methods on the Predictions > Portable predictions tab, allowing you to execute prediction jobs outside of the DataRobot application. The portable prediction methods are detailed below:
| Method | Description |
|---|---|
| Portable Prediction Server | Configure a remote DataRobot execution environment for DataRobot model packages (.mlpkg files) distributed as a self-contained Docker image. |
| Scoring Code | Export a Scoring Code JAR file from DataRobot and copy the Java, Python, or CLI snippet used to make predictions. Scoring Code is portable and executable in any computing environment. This method is useful for low-latency applications that cannot fully support REST API performance or lack network access. |
Portable Prediction Server
The Portable Prediction Server (PPS) is a DataRobot execution environment for DataRobot model packages (.mlpkg files) distributed as a self-contained Docker image. After configuring the PPS, you can begin running single or multi model portable real-time predictions and portable batch prediction jobs.
CPU considerations
DataRobot strongly recommends using an Intel CPU to run the Portable Prediction Server. Using non-Intel CPUs can result in prediction inconsistencies, especially in deep learning models like those built with Tensorflow or Keras. This includes ARM architecture processors (e.g., AArch32 and AArch64).
The general configuration steps are:
- Download the model package.
- Download the PPS Docker image.
- Load the PPS image to Docker.
- Copy the Docker snippet DataRobot provides to run the PPS in your Docker container.
Important
If you want to configure the PPS for a model through a deployment, you must first add an external prediction environment and deploy that model to an external environment.
Download the model package
You can download a PPS model package for a deployed DataRobot model running on an external prediction environment to run prediction jobs with a Portable Prediction Server outside of DataRobot. When you download a model package from a deployment, the Portable Prediction Server will monitor your model for performance and track prediction statistics; however, you must ensure that your deployment supports model package downloads. The deployment must have a DataRobot build environment and an external prediction environment.
In the Console, on the Deployments tab (the deployment inventory), open a deployment with both a DataRobot build environment and an external prediction environment, and then navigate to the Predictions > Portable predictions tab:
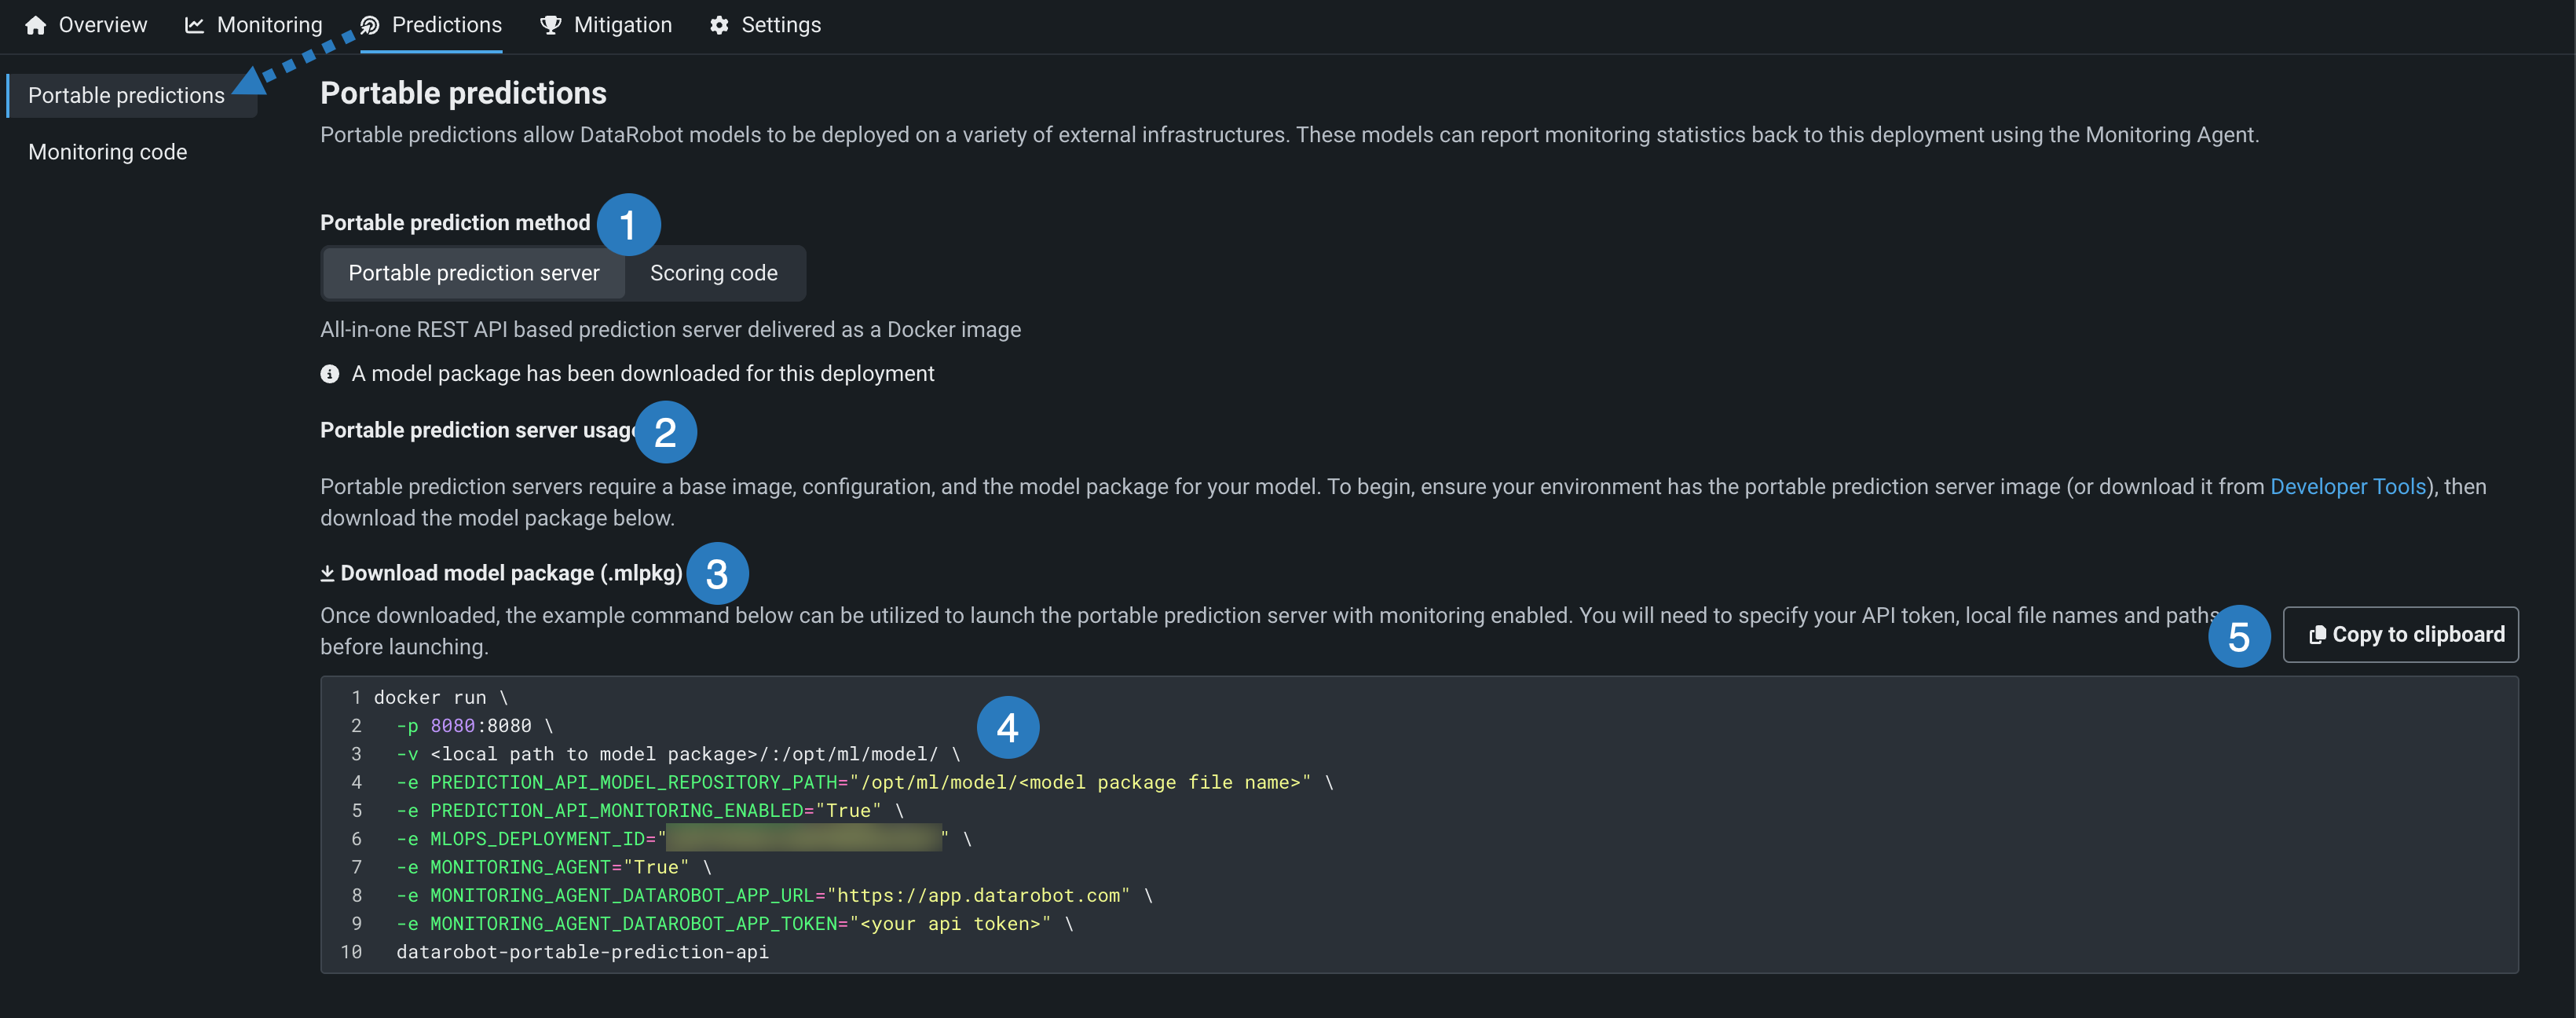
| Element | Description | |
|---|---|---|
| 1 | Portable prediction method / Portable Prediction Server | Helps you configure a REST API-based prediction server as a Docker image. |
| 2 | Portable prediction server usage | Links to the API keys and tools tab where you obtain the Portable Prediction Server Docker image. |
| 3 | Download model package (.mlpkg) | Downloads the model package for your deployed model. |
| 4 | Docker snippet | After you download your model package, use the Docker snippet to launch the Portable Prediction Server for the model with monitoring enabled. You will need to specify your API key, local filenames, paths, and monitoring options before launching. |
| 5 | Copy to clipboard | Copies the Docker snippet to your clipboard so that you can paste it on the command line. |
On the Predictions > Portable predictions tab, click Download model package (.mlpkg). The download appears in the downloads bar when complete. After downloading the model package, click Copy to clipboard and save the code snippet for later. You need this code to launch the Portable Prediction Server for the downloaded model package.
Download a time series model package
When you export a time series model for portable predictions, you can enable the computation of a model's time series prediction intervals (from 1 to 100) during model package generation. The interface is the same as the interface for non-time series models, with the addition of the Compute prediction intervals setting:
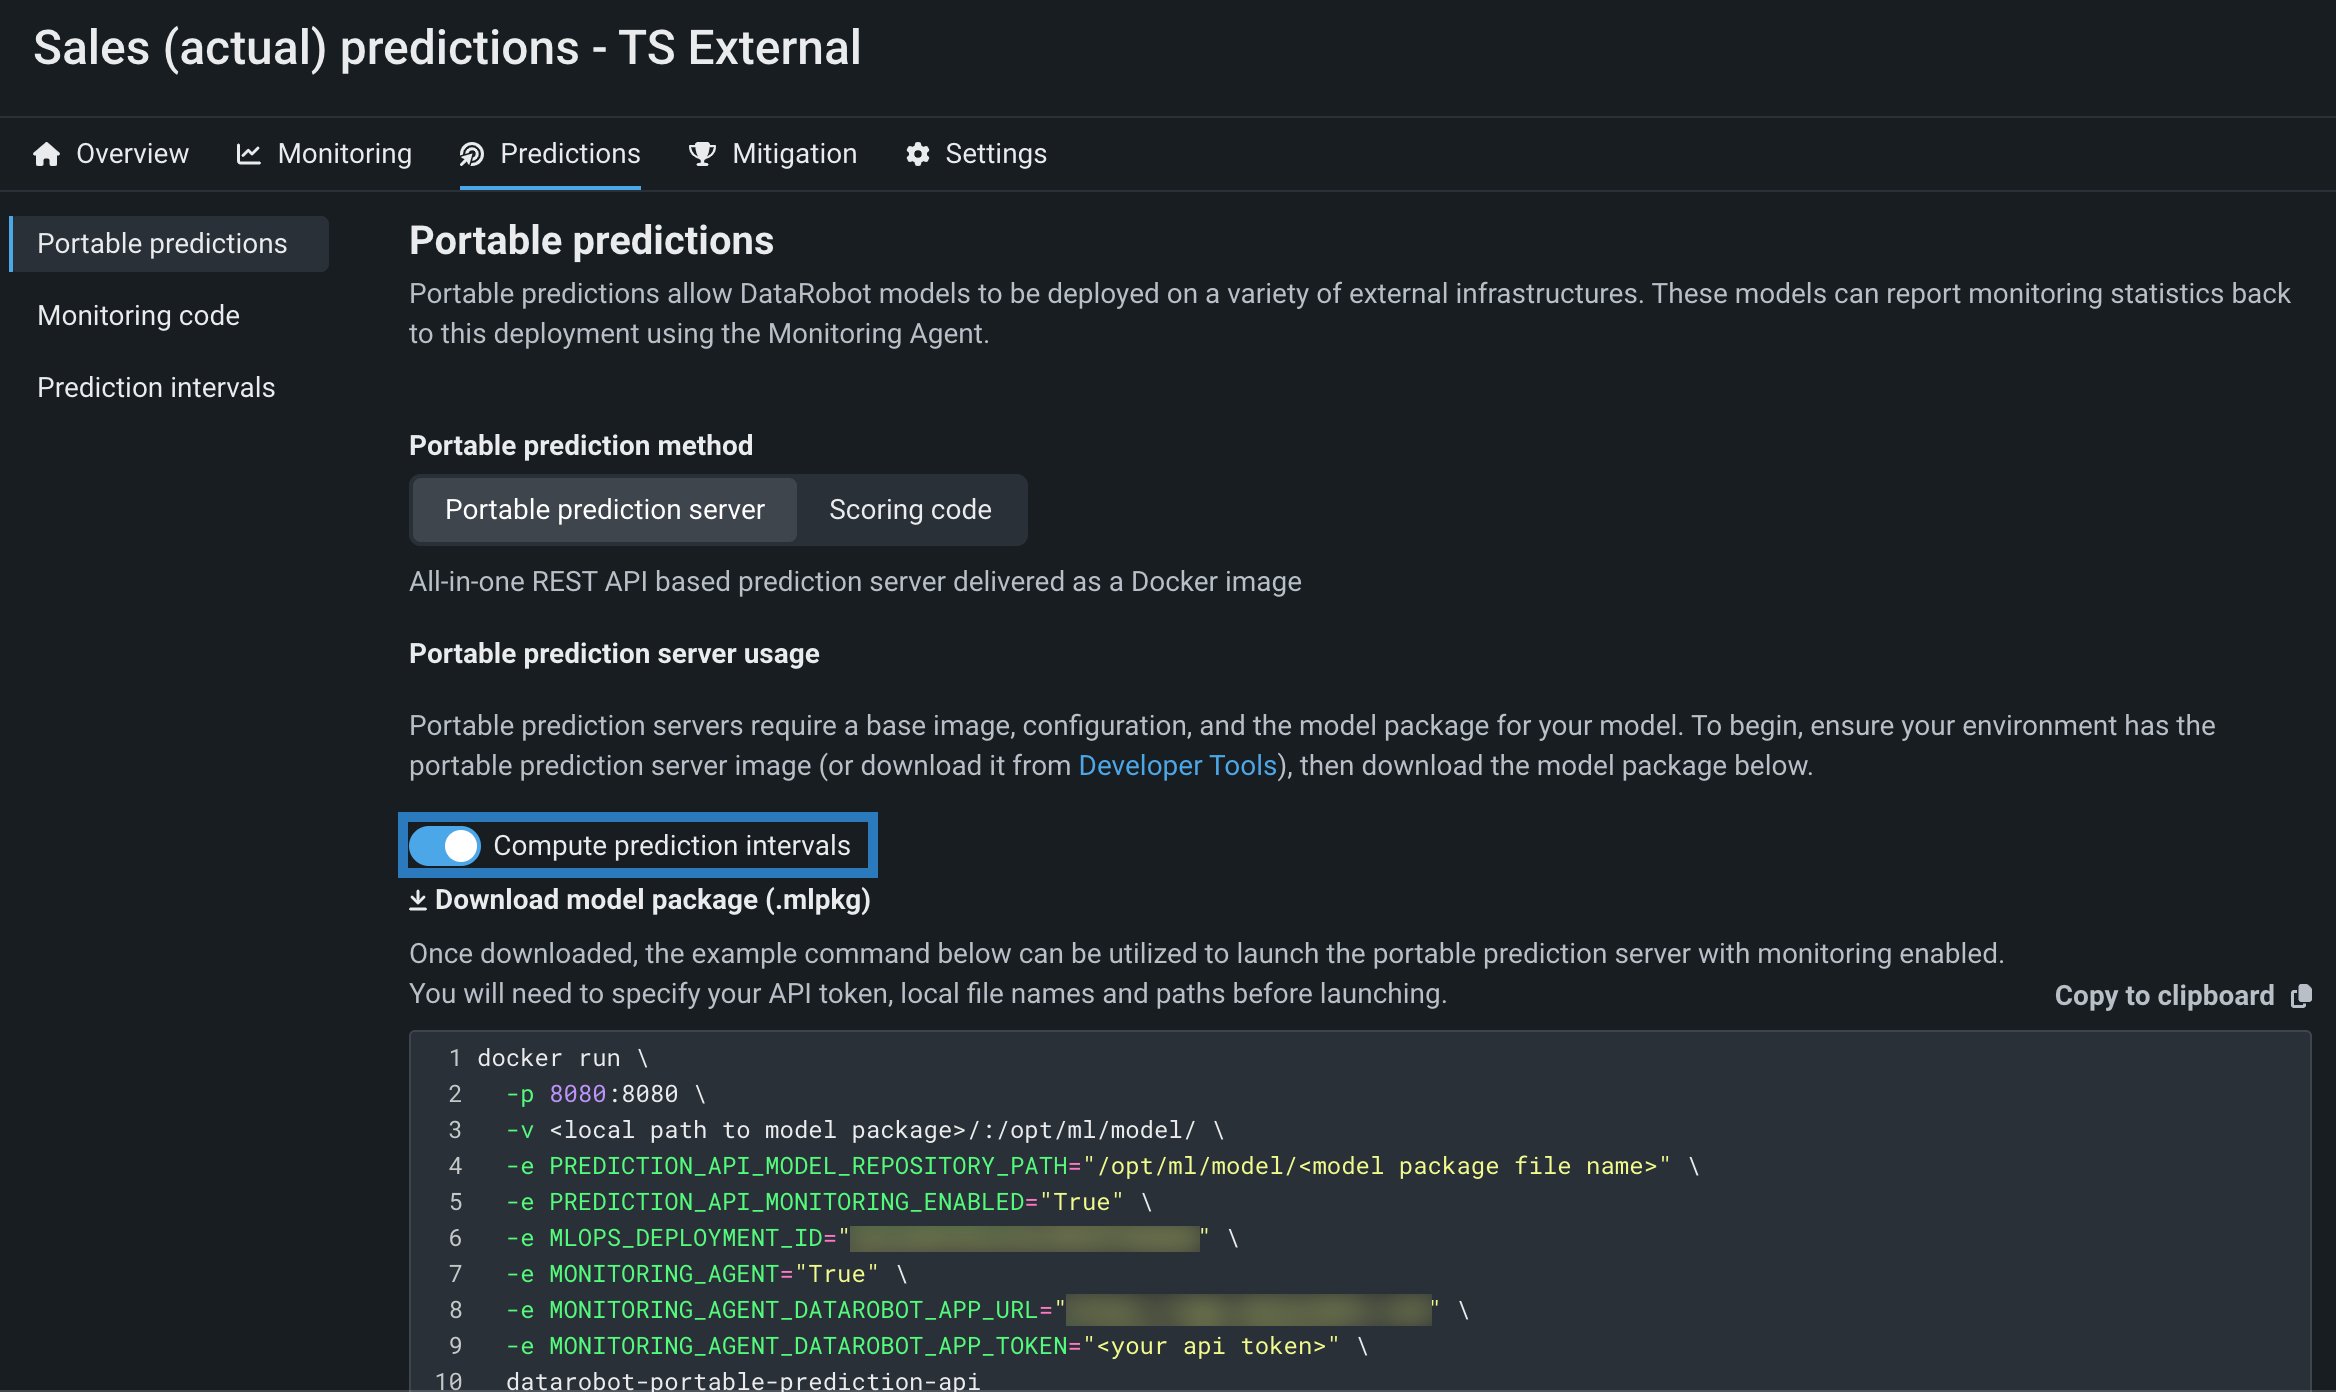
Model package generation performance considerations
The Compute prediction intervals option is off by default because the computation and inclusion of prediction intervals can significantly increase the amount of time required to generate a model package.
After you've enabled prediction intervals for a model package and loaded the model to a Portable Prediction Server, you can configure the prediction intervals percentile and exponential trend in the .yaml PPS configuration file or through the use of PPS environment variables.
Note
The environment variables below are only used if the YAML configuration isn't provided.
| YAML Variable / Environment Variable | Description | Type | Default |
|---|---|---|---|
prediction_intervals_percentile / MLOPS_PREDICTION_INTERVALS_PERCENTILE |
Sets the percentile to use when defining the prediction interval range. | integer | 80 |
Configure the Portable Prediction Server
To deploy the model package you downloaded to the Portable Prediction Server, you must first download the PPS Docker image and then load that image to Docker.
Obtain the PPS Docker image
Navigate to the API keys and tools tab to download the Portable Prediction Server Docker image. Depending on your DataRobot environment and version, options for accessing the latest image may differ, as described in the table below:
| Deployment type | Software version | Access method |
|---|---|---|
| Self-Managed AI Platform | v6.3 or older | Contact your DataRobot representative. The image will be provided upon request. |
| Self-Managed AI Platform | v7.0 or later | Download the image from API keys and tools; install as described below. If the image is not available contact your DataRobot representative. |
| Managed AI Platform | Jan 2021 or later | Download the image from API keys and tools; install as described below. |
Load the image to Docker
Warning
DataRobot is working to reduce image size; however, the compressed Docker image can exceed 6GB (Docker-loaded image layers can exceed 14GB). Consider these sizes when downloading and importing PPS images.
Before proceeding, make sure you have downloaded the image from Developer Tools. It is a gzip'ed tar archive that can be loaded by Docker.
Once downloaded and the file checksum is verified, use docker load to load the image. You do not have to uncompress the downloaded file because Docker natively supports loading images from gzip'ed tar archives.
Copy the command below, replace <version>, and run the command to load the PPS image to Docker:
docker load < datarobot-portable-prediction-api-<version>.tar.gz
File path consideration
If the PPS file isn't located in the current directory, you need to provide a local, absolute filepath to the tar file (for example, /path/to/datarobot-portable-prediction-api-<version>.tar.gz).
After running the docker load command for your PPS file, you should see output similar to the following:
docker load < datarobot-portable-prediction-api-9.0.0-r4582.tar.gz
33204bfe17ee: Loading layer [==================================================>]  214.1MB/214.1MB
62c077c42637: Loading layer [==================================================>]  3.584kB/3.584kB
54475c7b6aee: Loading layer [==================================================>]  30.21kB/30.21kB
0f91625c248c: Loading layer [==================================================>]  3.072kB/3.072kB
21c5127d921b: Loading layer [==================================================>]  27.05MB/27.05MB
91feb2d07e73: Loading layer [==================================================>]  421.4kB/421.4kB
12ca493d22d9: Loading layer [==================================================>]  41.61MB/41.61MB
ffb6e915efe7: Loading layer [==================================================>]  26.55MB/26.55MB
83e2c4ee6761: Loading layer [==================================================>]  5.632kB/5.632kB
109bf21d51e0: Loading layer [==================================================>]  3.093MB/3.093MB
d5ebeca35cd2: Loading layer [==================================================>]  646.6MB/646.6MB
f72ea73370ce: Loading layer [==================================================>]  1.108GB/1.108GB
4ecb5fe1d7c7: Loading layer [==================================================>]  1.844GB/1.844GB
d5d87d53ea21: Loading layer [==================================================>]  71.79MB/71.79MB
34e5df35e3cf: Loading layer [==================================================>]  187.3MB/187.3MB
38ccf3dd09eb: Loading layer [==================================================>]  995.5MB/995.5MB
fc5583d56a81: Loading layer [==================================================>]  3.584kB/3.584kB
c51face886fc: Loading layer [==================================================>]    402MB/402MB
c6017c1b6604: Loading layer [==================================================>]  1.465GB/1.465GB
7a879d3cd431: Loading layer [==================================================>]  166.6MB/166.6MB
8c2f17f7a166: Loading layer [==================================================>]  188.7MB/188.7MB
059189864c15: Loading layer [==================================================>]  115.9MB/115.9MB
991f5ac99c29: Loading layer [==================================================>]  3.072kB/3.072kB
f6bbaa29a1c6: Loading layer [==================================================>]   2.56kB/2.56kB
4a0a241b3aab: Loading layer [==================================================>]  415.7kB/415.7kB
3d509cf1aa18: Loading layer [==================================================>]  5.632kB/5.632kB
a611f162b44f: Loading layer [==================================================>]  1.701MB/1.701MB
0135aa7d76a0: Loading layer [==================================================>]  6.766MB/6.766MB
fe5890c6ddfc: Loading layer [==================================================>]  4.096kB/4.096kB
d2f4df5f0344: Loading layer [==================================================>]  5.875GB/5.875GB
1a1a6aa8556e: Loading layer [==================================================>]  10.24kB/10.24kB
77fcb6e243d1: Loading layer [==================================================>]  12.97MB/12.97MB
7749d3ff03bb: Loading layer [==================================================>]  4.096kB/4.096kB
29de05e7fdb3: Loading layer [==================================================>]  3.072kB/3.072kB
2579aba98176: Loading layer [==================================================>]  4.698MB/4.698MB
5f3d150f5680: Loading layer [==================================================>]  4.699MB/4.699MB
1f63989f2175: Loading layer [==================================================>]  3.798GB/3.798GB
3e722f5814f1: Loading layer [==================================================>]  182.3kB/182.3kB
b248981a0c7e: Loading layer [==================================================>]  3.072kB/3.072kB
b104fa769b35: Loading layer [==================================================>]  4.096kB/4.096kB
Loaded image: datarobot/datarobot-portable-prediction-api:9.0.0-r4582
Once the docker load command completes successfully with the Loaded image message, verify that the image is loaded with the docker images command:
To view a list of the images in Docker, copy and run the command below:
docker images
In this example, you can see the datarobot/datarobot-portable-prediction-api image loaded in the previous step:
docker images
REPOSITORY                                    TAG           IMAGE ID       CREATED        SIZE
datarobot/datarobot-portable-prediction-api   9.0.0-r4582   df38ea008767   29 hours ago   17GB
Save disk space
(Optional) To save disk space, you can delete the compressed image archive datarobot-portable-prediction-api-<version>.tar.gz after your Docker image loads successfully.
Launch the PPS with the code snippet
After you've downloaded the model package and configured the Docker PPS image, you can use the associated docker run code snippet to launch the Portable Prediction Server with the downloaded model package.
Launching the PPS in OpenShift
When attempting to run a PPS deployment in an OpenShift environment, the OpenShift deployment YAML must include the following environment variable setting in order to ensure that NGINX doesn't try to use a privileged port by default:
env:
- name: NGINX_BIND_PRIVILEGES_MODE
  value: "unprivileged"
In the example code snippet below from a deployed model, configure the following highlighted options:
1 2 3 4 5 6 7 8 9 10 | |
-
-v <local path to model package>/:/opt/ml/model/ \: Provide the local, absolute file path to the location of the model package you downloaded. The-v(or--volume) option bind mounts a volume, adding the contents of your local model package directory (at<local path to model package>) to your Docker container's/opt/ml/modelvolume. -
-e PREDICTION_API_MODEL_REPOSITORY_PATH="/opt/ml/model/<model package file name>" \: Provide the file name of the model package mounted to the/opt/ml/model/volume. This sets thePREDICTION_API_MODEL_REPOSITORY_PATHenvironment variable, indicating where the PPS can find the model package. -
-e MONITORING_AGENT_DATAROBOT_APP_TOKEN="<your api token>" \: Provide your API token from the DataRobot Developer Tools for monitoring purposes. This sets theMONITORING_AGENT_DATAROBOT_APP_TOKENenvironment variable, where the PPS can find your API key. -
datarobot-portable-prediction-api: Replace this line with the image name and version of the PPS image you're using. For example,datarobot/datarobot-portable-prediction-api:<version>.
Use docker tag to name and tag an image
Alternatively, you can keep datarobot-portable-prediction-api in the last line if you use docker tag to tag the new image as latest and rename it to datarobot-portable-prediction-api.
In this example, Docker renames the image and replaces the 9.0.0-r4582 tag with the latest tag:
docker tag datarobot/datarobot-portable-prediction-api:9.0.0-r4582 datarobot-portable-prediction-api:latest
To verify the new tag and name, you can use the docker images command again:
docker images
REPOSITORY                                    TAG           IMAGE ID       CREATED        SIZE
datarobot/datarobot-portable-prediction-api   9.0.0-r4582   df38ea008767   29 hours ago   17GB
datarobot-portable-prediction-api             latest        df38ea008767   29 hours ago   17GB
After completing setup, you can use the Docker snippet to run single or multi model portable real-time predictions or run portable batch predictions. See also additional examples for prediction jobs using PPS. The PPS can be run disconnected from the main DataRobot installation environments. Once started, the image serves HTTP API via the :8080 port.
Run the PPS for FIPS-enabled model packages
If you configure your DataRobot cluster with ENABLE_FIPS_140_2_MODE: true (in the config.yaml file at the cluster level), that cluster builds .mlpkg files that require you to launch the PPS with ENABLE_FIPS_140_2_MODE: true. For this reason, you can’t host FIPS-enabled models and standard models in the same PPS instance.
To run the PPS with support for FIPS-enabled models, you can include the following argument in the docker run command:
-e ENABLE_FIPS_140_2_MODE="true"
The full command for PPS container startup would look like the following example:
docker run
-td
-p 8080:8080
-e PYTHON3_SERVICES="true"
-e ENABLE_FIPS_140_2_MODE="true"
-v <local path to model package>/:/opt/ml/model
--name portable_predictions_server
--rm datarobot/datarobot-portable-prediction-api:<version>
Scoring Code
Scoring Code allows you to export DataRobot-generated models as JAR files that you can use outside of the platform. Export a model's Scoring Code from the model's deployment; the download includes a pre-compiled JAR file (with all dependencies included), as well as the source code JAR file. Once exported, you can view the model's source code to help understand each step DataRobot takes in producing your predictions.
Scoring Code JARs contain Java Scoring Code for a predictive model. The prediction calculation logic is identical to the DataRobot API—the code generation mechanism tests each model for accuracy as part of the generation process. The generated code is easily deployable in any environment and is not dependent on the DataRobot platform.
How does DataRobot determine which models will have Scoring Code?
When the Scoring Code feature is enabled, DataRobot generates a Java alternative for each blueprint preprocessing step and compares its results on the validation set with the original results. If the difference between results is greater than 0.00001, DataRobot does not provide the option to download the Scoring Code. In this way, DataRobot ensures that the Scoring Code JAR model always produces the same predictions as the original model.
Java requirement
The MLOps monitoring library requires Java 11 or higher. Without monitoring, a model's Scoring Code JAR file requires Java 8 or higher; however, when using the MLOps library to instrument monitoring, a model's Scoring Code JAR file requires Java 11 or higher. For Self-managed AI platform installations, the Java 11 requirement applies to DataRobot v11.0 and higher.
Scoring Code considerations
For information on Scoring Code support, see the Scoring Code considerations.
Download Scoring Code
You can download Scoring Code for models as pre-compiled JAR files (with all dependencies included) to be used outside of the DataRobot platform. This topic describes how to download Scoring Code from a deployment.
In the Console, on the Deployments tab, open a Scoring Code-enabled deployment (with a DataRobot build environment) and then navigate to the Predictions > Portable predictions tab to complete the fields described below:
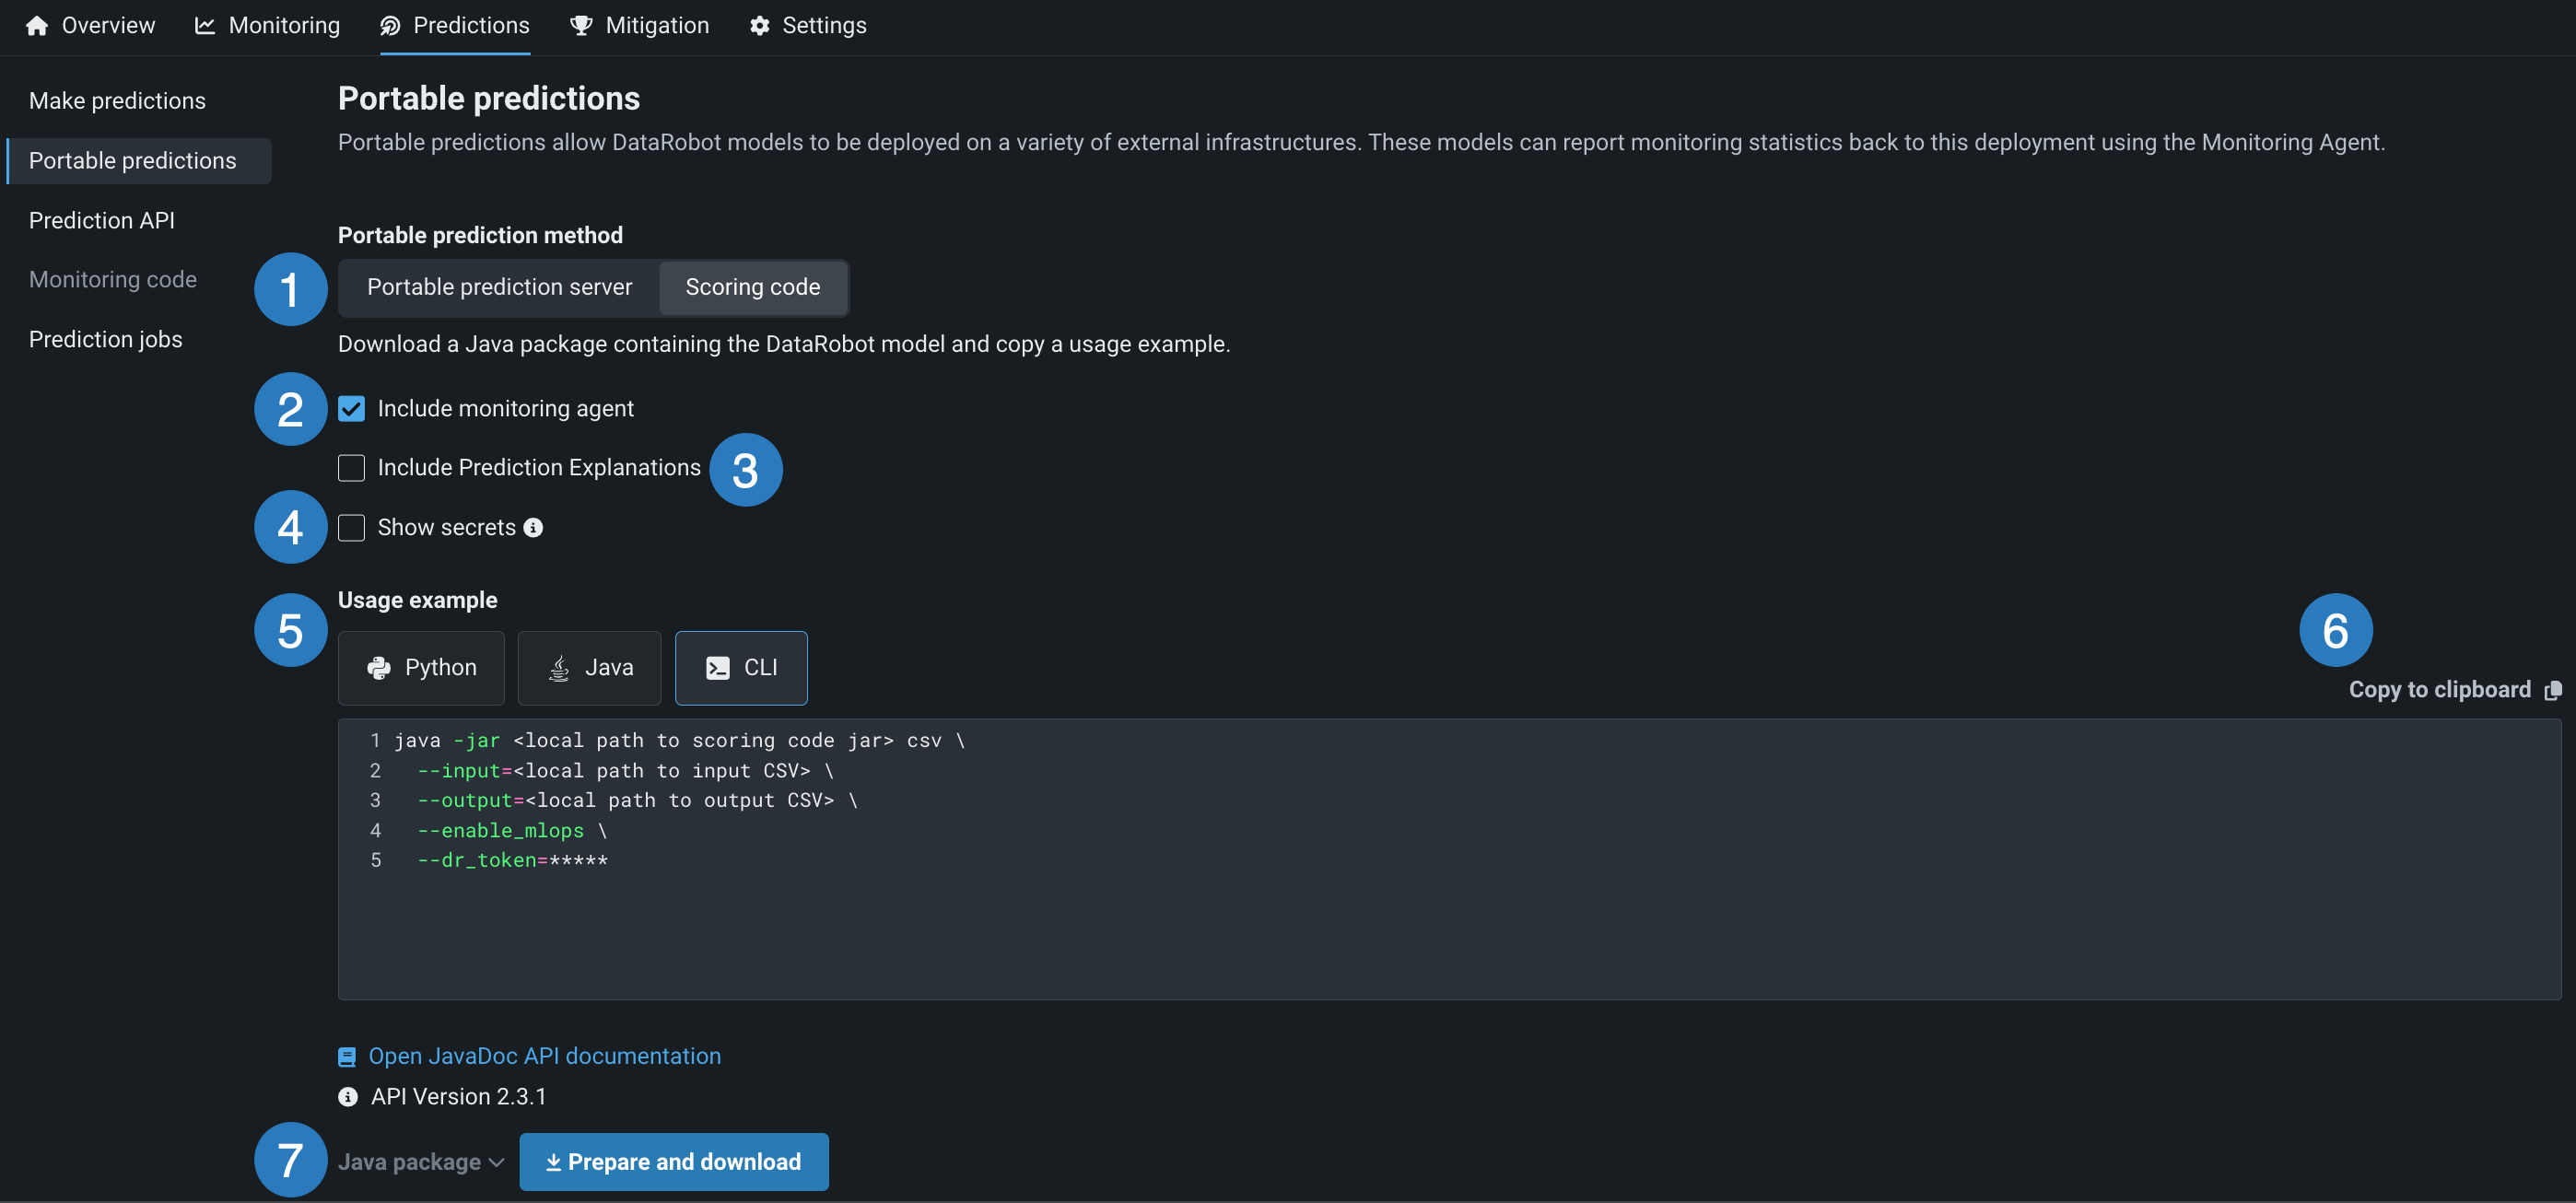
| Element | Description | |
|---|---|---|
| 1 | Scoring Code | Provides a Java package containing your DataRobot model. Under Portable prediction method, select Scoring Code. |
| 2 | Include monitoring agent | Downloads the MLOps Agent with your Scoring Code. |
| 3 | Include Prediction Explanations / Include Prediction Intervals (for time series) | Depending on the model type, enable either of the following prediction options:
|
| 4 | Show secrets | For CLI code snippets, displays any secrets hidden by ***** in the code snippet. Revealing the secrets in a code snippet can provide a convenient way to retrieve your API key or datarobot-key; however, these secrets are hidden by default for security reasons, so ensure that you handle them carefully. |
| 5 | Usage example | Provides a code example that calls the Scoring Code using the selected method: Python (Python API), Java (Java API), or CLI (command line interface). Selecting a location updates the example snippet displayed below to the corresponding language. |
| 6 | Copy to clipboard | Copies the Scoring Code example to your clipboard so that you can paste it in your IDE or on the command line. |
| 7 | Prepare and download | Depending on the options selected above, select either of the following download methods:
|
Tip
Access the DataRobot Prediction Library to make predictions using various prediction methods supported by DataRobot via a Python API. The library provides a common interface for making predictions, making it easy to swap out any underlying implementation. Note that the library requires a Scoring Code JAR file.
Once the settings are configured, click Prepare and download.
Warning
For users on pricing plans from before March 2020, downloading the Scoring Code makes a deployment permanent, meaning that it cannot be deleted. A warning message prompts you to accept this condition. Use the toggle to indicate your understanding, then click Prepare and download.
When the Scoring Code download completes, use the snippet provided on the tab to call the Scoring Code. For implementation examples, reference the MLOps agent tarball documentation, which you can download from the API keys and tools page. You can also use the monitoring snippet to integrate with the MLOps Agent.