Make predictions
After you create an experiment and train models, you can make predictions on new data, registered data, or training data to validate those models.
To make predictions with a model in a Workbench experiment:
-
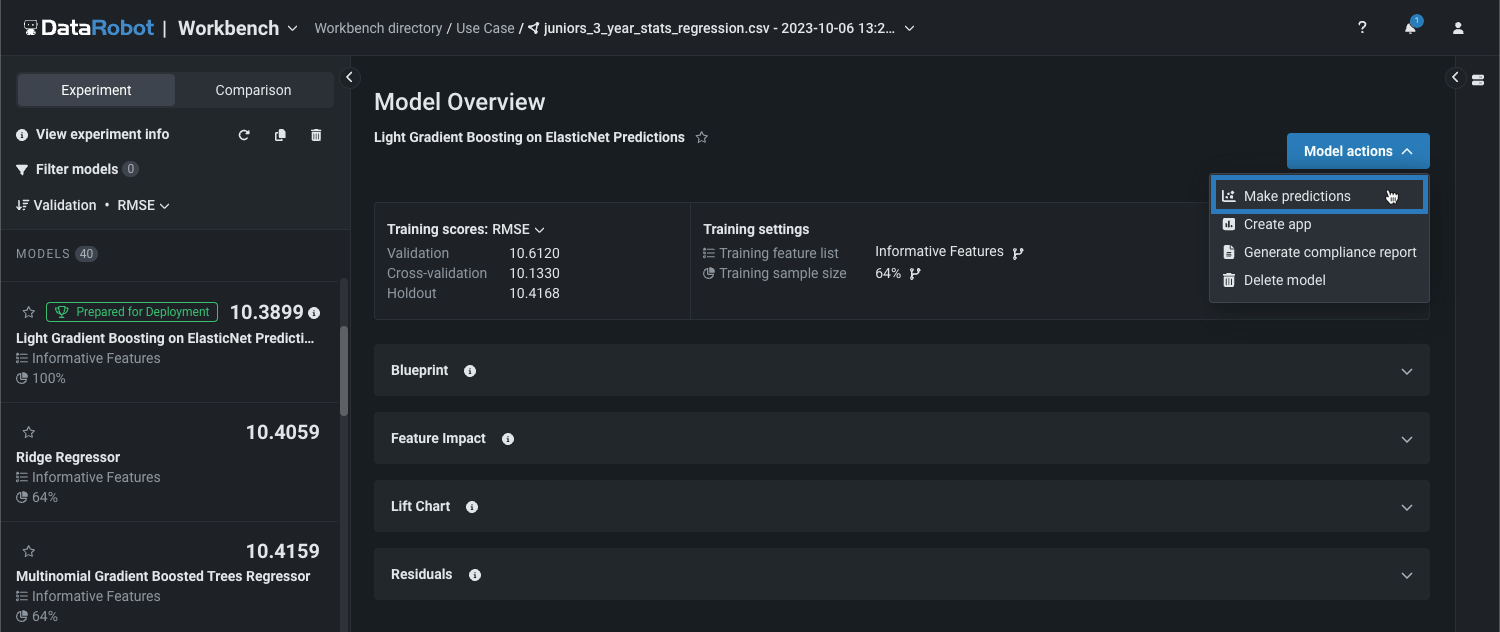
Select the model from the Models list and then click Model actions > Make predictions.
-
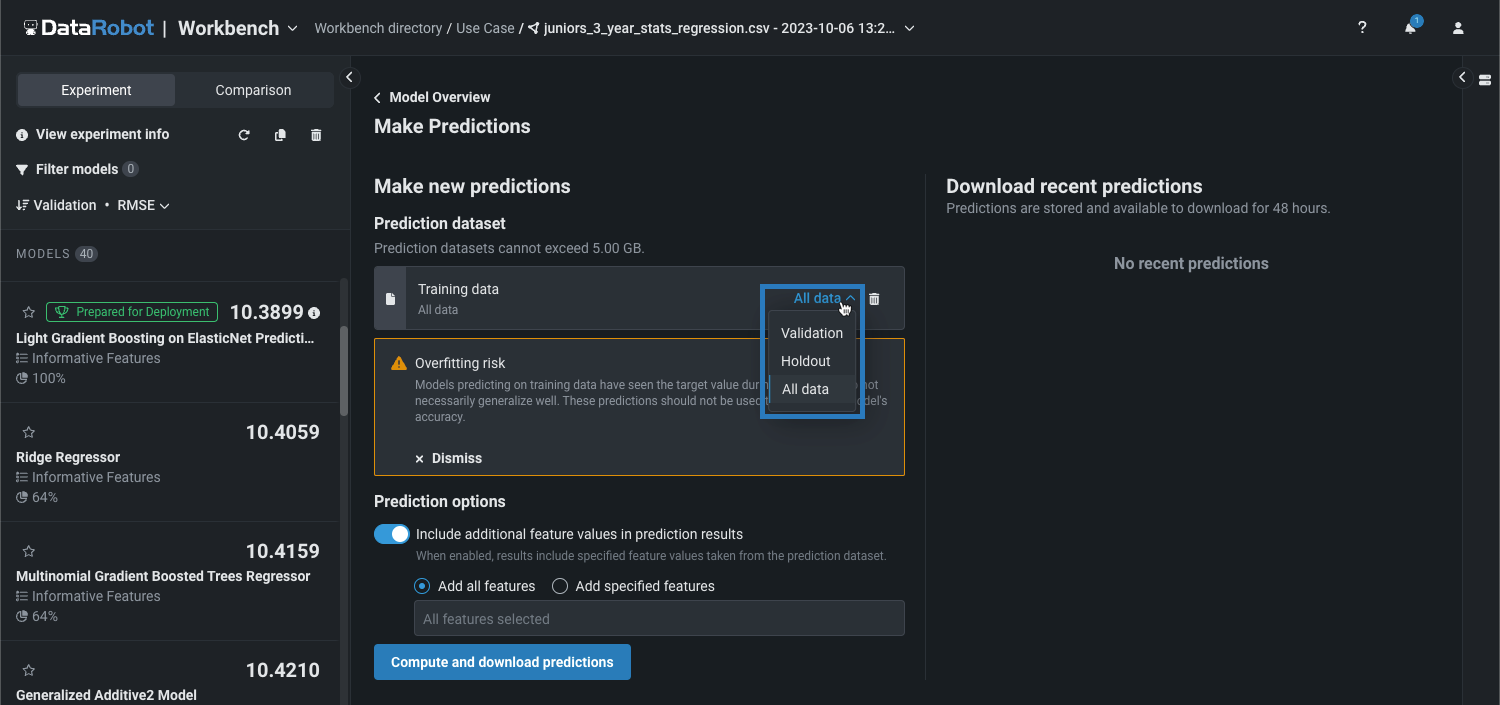
On the Make Predictions page, upload a Prediction source, drag a file into the Prediction dataset box, or click Choose file and select one of the following:
Upload method Description Upload local file Select a file from your local filesystem to upload that dataset for predictions. Use model training data Select a portion of the training data to use as a prediction dataset. Data Registry Select a file previously uploaded to the Data Registry. Wrangler recipe Select a recipe wrangled in Workbench from a Snowflake data connection or Data Registry dataset. In your local filesystem, select a dataset file, and then click Open.
When you upload a prediction dataset, it is automatically stored in the AI Catalog once the upload is complete. Be sure not to navigate away from the page during the upload, or the dataset will not be stored in the catalog. If the dataset is still processing after the upload, that means DataRobot is running EDA on the dataset before it becomes available for use.
Select one of the following options, depending on the project type:
Project type Options AutoML Select one of the following training data options: - Validation
- Holdout
- All data
OTV/Time Series Select one of the following training data options: - All backtests
- Holdout
In-sample prediction risk
Depending on the option you select and the sample size the model was trained on, predicting on training data can generate in-sample predictions, meaning that the model has seen the target value during training and its predictions do not necessarily generalize well. If DataRobot determines that one or more training rows are used for predictions, the Overfitting risk warning appears. These predictions should not be used to evaluate the model's accuracy.
In the Select recipe panel, select the checkbox for a recipe wrangled from a Snowflake data connection or from the Data Registry, and then click Select.
Filter and review recipes
To filter the list of wrangled recipes by source, click the Sources filter, and select Snowflake or Data Registry. To learn more about a recipe before selecting it, click the recipe row to view basic information and the wrangling SQL query, or, click Preview after selecting the recipe from the list.
Time series data requirements
Making predictions with time series models requires the dataset to be in a particular format. The format is based on your time series project settings. Ensure that the prediction dataset includes the correct historical rows, forecast rows, and any features known in advance. In addition, to ensure DataRobot can process your time series data, configure the dataset to meet the following requirements:
- Sort prediction rows by their timestamps, with the earliest row first.
- For multiseries, sort prediction rows by series ID and then by timestamp, with the earliest row first.
There is no limit on the number of series DataRobot supports. The only limit is the job timeout, as mentioned in Limits. For dataset examples, see the requirements for the scoring dataset
If you select the wrong dataset, you can remove your selection from the Prediction source setting by clicking the delete icon ().
-
Next, you can set the prediction options (for time series models, you can also set the time series options) and then compute predictions.
Set time series options
Time series options availability
If you selected Use model training data as the prediction source, you can't configure the time series options.
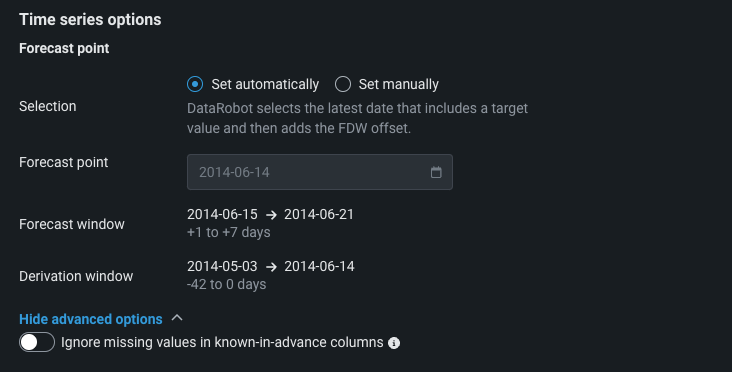
After you configure the Prediction source with a properly formatted time series prediction dataset, you can configure the time series-specific settings in the Time series options section. Under Forecast point, select a Selection method to define the date from which you want to begin making predictions:
-
Set automatically: DataRobot selects the latest date that includes a target value and then adds the FDW offset.
-
Set manually: Select a forecast point within the date range DataRobot detects from the provided prediction source (for example, "Select a date between
2012-07-05and2014-06-20").
In addition, you can click Show advanced options and enable Ignore missing values in known-in-advance columns to make predictions even if the provided source dataset is missing values in the known-in-advance columns; however, this may negatively impact the computed predictions.
Set prediction options
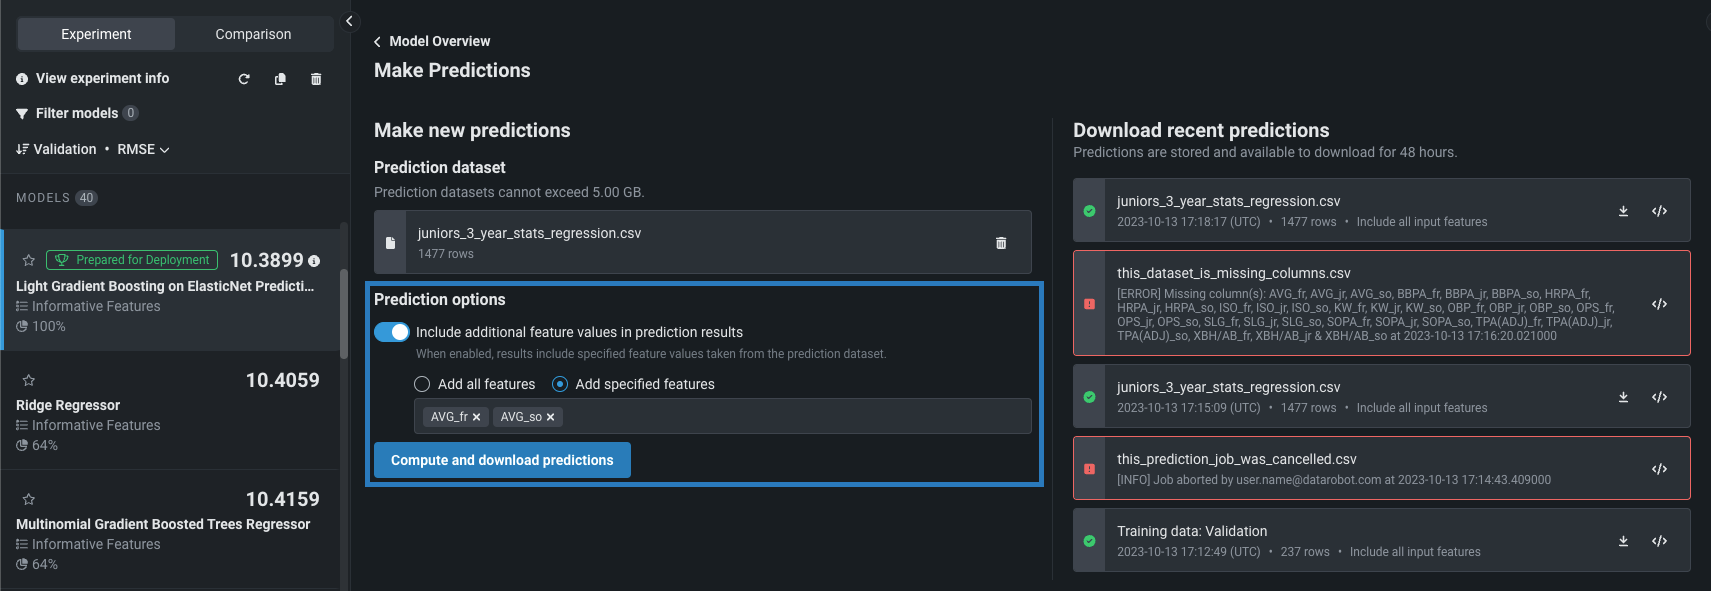
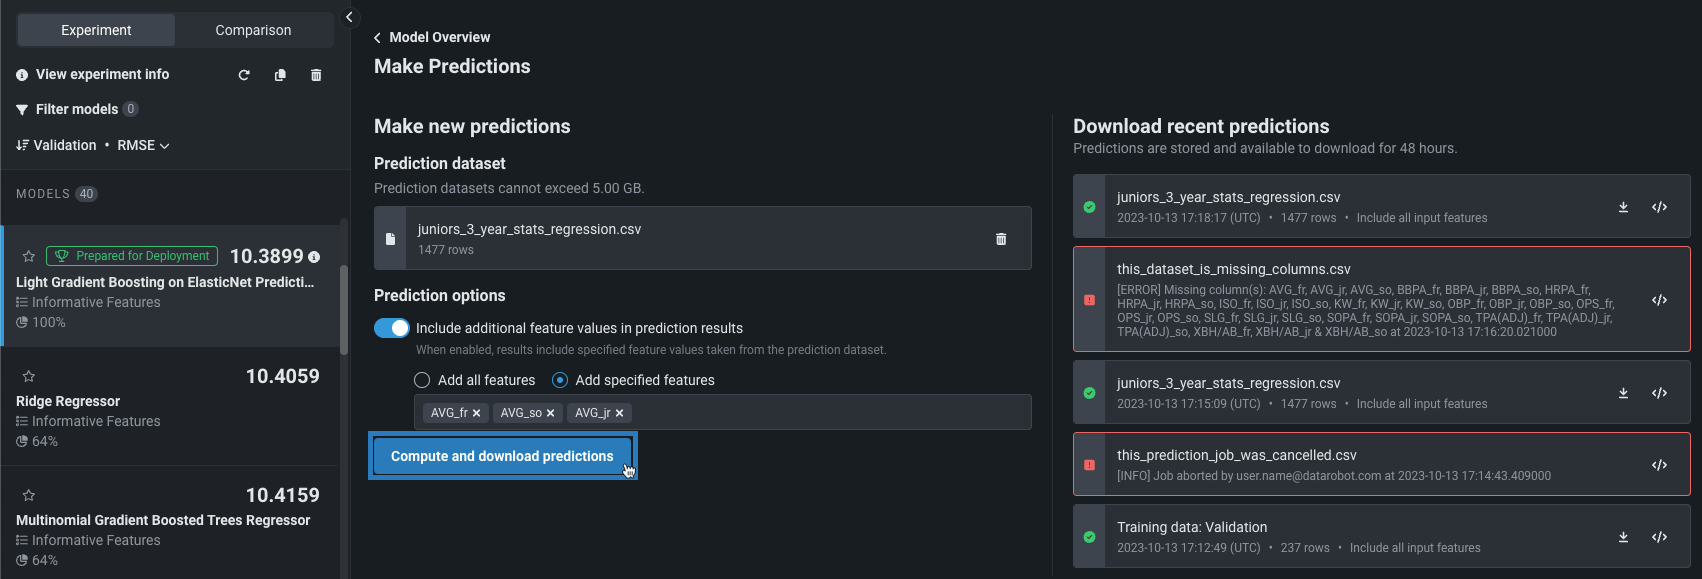
After you configure the Prediction source, you can configure optional settings in the Prediction options section:
| Setting | Description |
|---|---|
| Include additional feature values in prediction results | Include input features (columns) in the prediction results file alongside the predictions, based on the selection option:
|
| Include Prediction Explanations | Adds columns for Prediction Explanations to your prediction output.
|
| Classes | For multiclass models with Prediction Explanations enabled, control the method for selecting which classes are used in explanation computation. The Classes options include:
|
| Include prediction intervals | For time series models, include only predictions falling within the specified interval, based on the residual errors measured during the model's backtesting. |
Prediction intervals in DataRobot serverless prediction environments
In a DataRobot serverless prediction environment, to make predictions with time-series prediction intervals included, you must include pre-computed prediction intervals when registering the model package. If you don't pre-compute prediction intervals, the deployment resulting from the registered model doesn't support enabling prediction intervals.
Why can't I enable Prediction Explanations?
If you can't Include Prediction Explanations, it is likely because:
-
The model's validation partition doesn't contain the required number of rows.
-
For a Combined Model, at least one segment champion validation partition doesn't contain the required number of rows. To enable Prediction Explanations, manually replace retrained champions before creating a model package or deployment.
Compute and download predictions
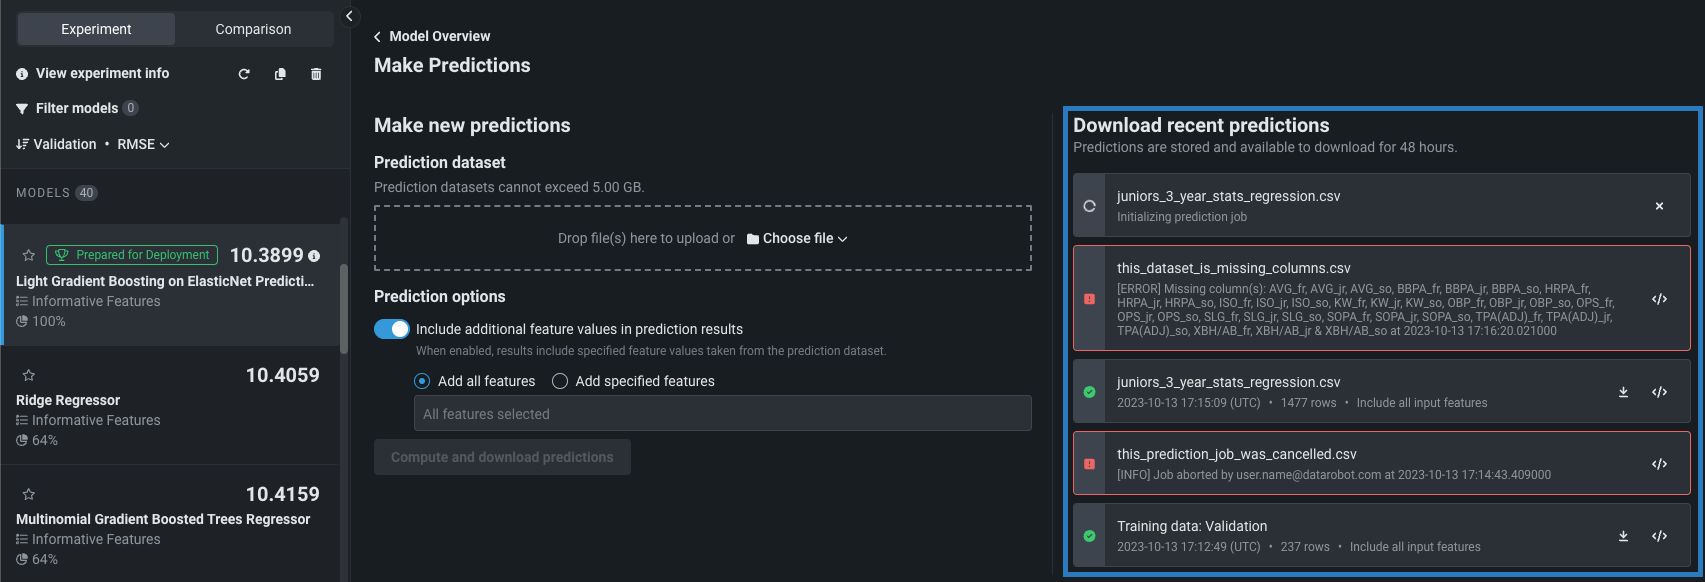
After you configure the Prediction options, click Compute and download predictions to start scoring the data, then view the scoring results under Download recent predictions:
From the Download recent predictions list, you can do the following:
-
While the prediction job is running, you can click the close icon () to stop the job.
-
If the prediction job is successful, click the download icon () to download a predictions file or the logs icon () to view and optionally copy the run details.
Note
Predictions are available for download for 48 hours from the time of prediction computation.
-
If the prediction job failed, click the logs icon () to view and optionally copy the run details.
