カスタムモデルバージョンの追加
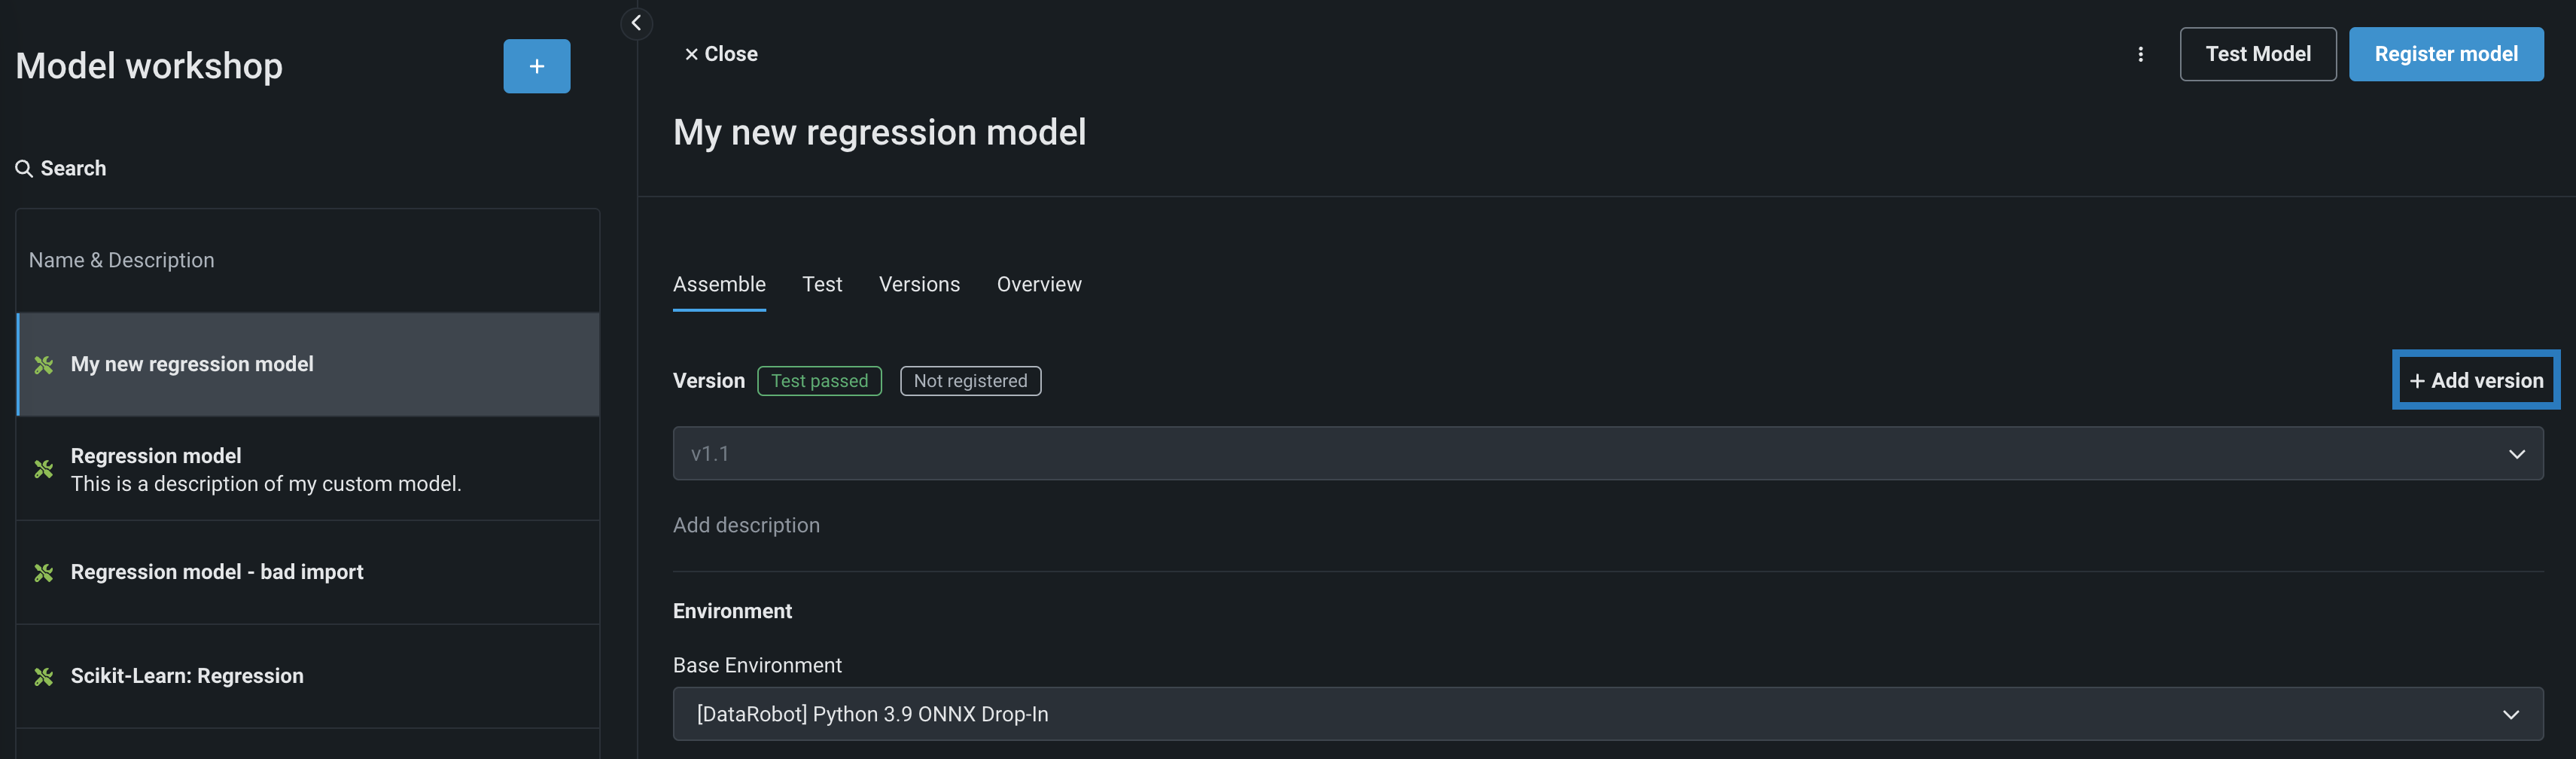
モデルを更新する場合は、モデルの新しいマイナーバージョン(1.1、1.2など)を作成できます。 これを行うには、ワークショップでカスタムモデルを開き、アセンブルタブに移動します。 アセンブルタブで、環境、ファイル、設定セクションのいずれかを変更すると、新しいマイナーバージョンが作成されます。
モデルの新しいメジャーバージョン(1.0、2.0など)を作成するには、以前のバージョンからコンテンツをコピーするか、空のバージョンを作成してから、バージョン設定を行います。
-
カスタムモデルの新しいメジャーバージョンを作成するには、次のいずれかを実行します。
-
バージョンを作成するカスタムモデルを開き、アセンブルタブのバージョンセクションで+ バージョンを追加をクリックします。
-
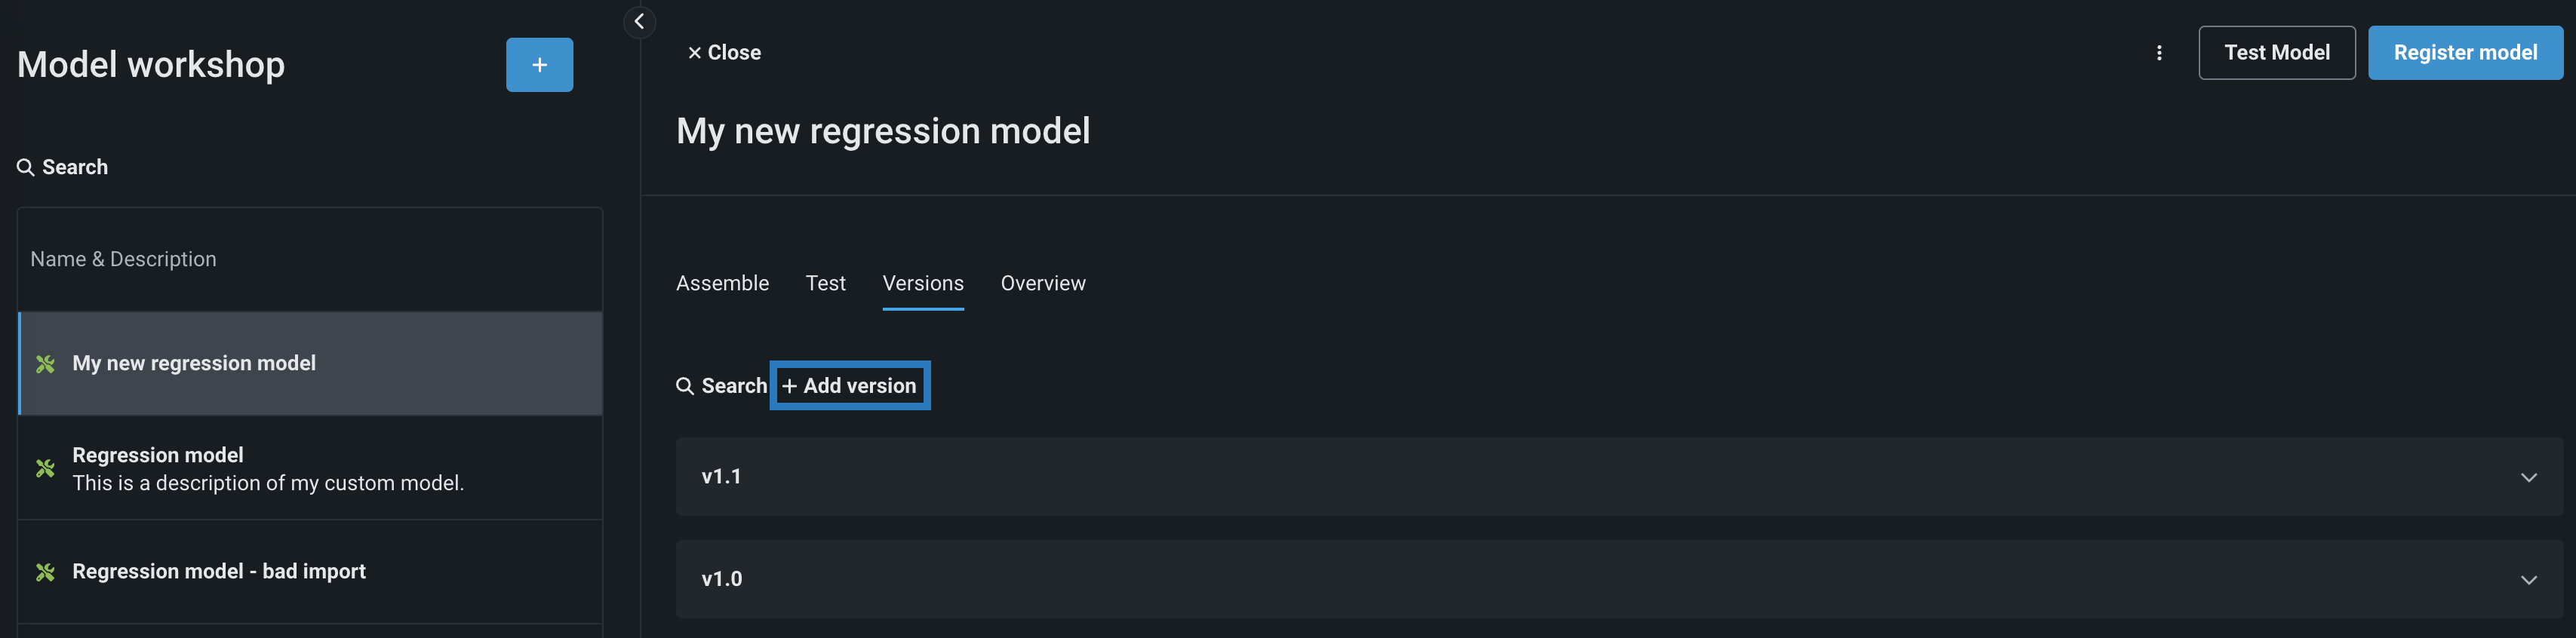
バージョンを作成するカスタムモデルを開き、バージョンタブをクリックして、バージョンタブで+ バージョンを追加をクリックします。
-
-
新しいモデルバージョンを作成ダイアログボックスで、バージョンコンテンツのオプションを選択し、新しいバージョンを設定します。
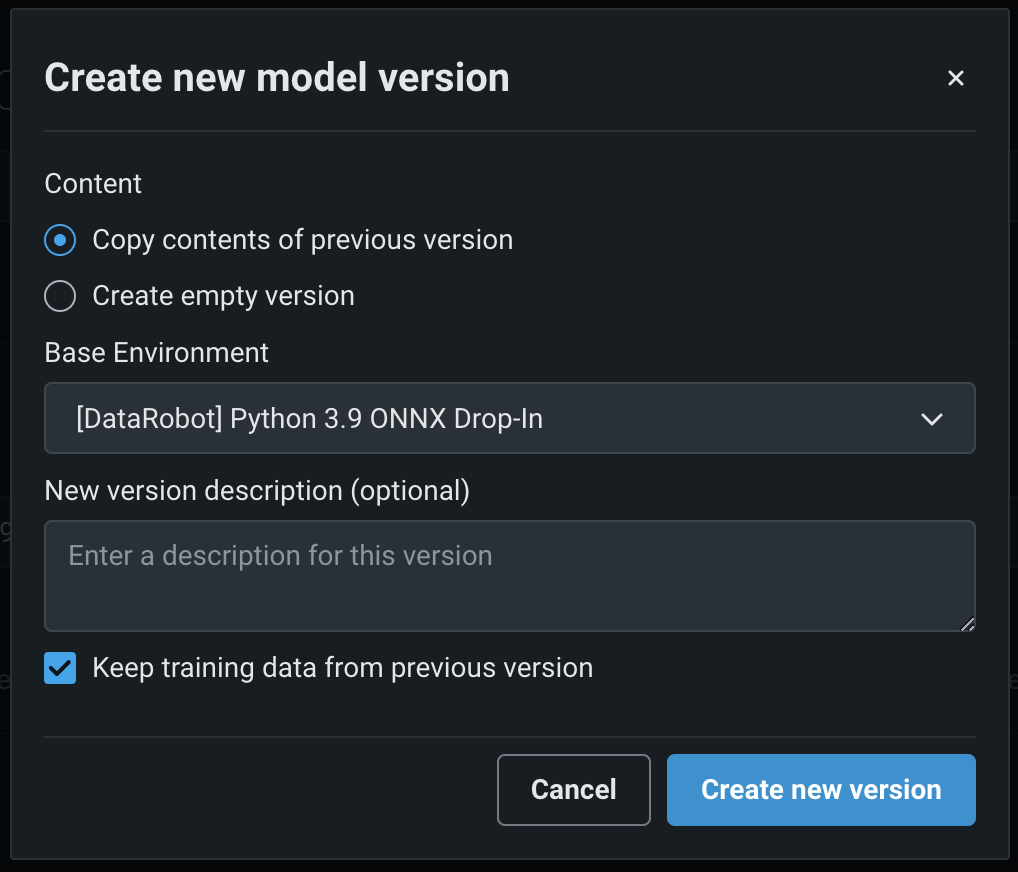
設定 説明 コンテンツ - 旧バージョンのコンテンツをコピー:現在のバージョンのコンテンツをカスタムモデルの新しいバージョンに追加します。
- 空のバージョンを作成:現在のバージョンのコンテンツを廃棄し、新しいファイルをカスタムモデルの新しいバージョンに追加します。
基本環境 新しいバージョンの基本実行環境を選択します。 現在のバージョンの実行環境がデフォルトで選択されています。 さらに、選択した実行環境が変更されない場合、新しい環境バージョンが使用可能であっても、その実行環境のバージョンは以前のカスタムモデルのバージョンから維持されます。 カスタムモデルのバージョンが最新バージョンの実行環境を使用するようにする方法の詳細については、 基本実行環境の更新をトリガーするを参照してください。 新しいバージョンの説明 新しいバージョンの説明を入力します。 バージョンの説明はオプションです。 前バージョンのトレーニングデータを維持 現在のバージョンのトレーニングデータを新しいカスタムモデルのバージョンに追加することを有効または無効にします。 この設定はデフォルトで有効になっています。 -
新しいバージョンを作成をクリックします。
基本実行環境の更新をトリガーする
新しい環境バージョンが使用可能であっても、実行環境バージョンがカスタムモデルバージョン間で保持される、実行環境バージョン選択のデフォルトの動作をオーバーライドするには、基本環境の設定を一時的に変更する必要があります。 これを行うには、別の基本環境設定を使用して新しいカスタムモデルバージョンを作成してから、目的の基本環境に切り替えて、新しいカスタムモデルバージョンを作成します。 この変更後、カスタムモデルの最新バージョンでは、実行環境の最新バージョンが使用されます。
バージョン情報の表示
カスタムモデルを作成し、少なくとも1つのモデルバージョンを構築した後、バージョン情報を表示したり、そのバージョンで表されるカスタムモデルのコードをダウンロードしたりできます。 バージョン情報を表示するには、表示するバージョンを含むカスタムモデルを開き、バージョンタブをクリックしてから、次のセクションを表示できるバージョンのパネルを開きます。
- 概要
- 環境情報
- データセット
- インサイト
- リソース
- ランタイムパラメーター(定義されている場合)
- ファイル
- 系統
カスタムモデルのバージョンパネルでは、バージョンの説明を設定し、(上記のカスタムモデルのバージョン情報の確認に加えて)その他多くの操作を実行できます。
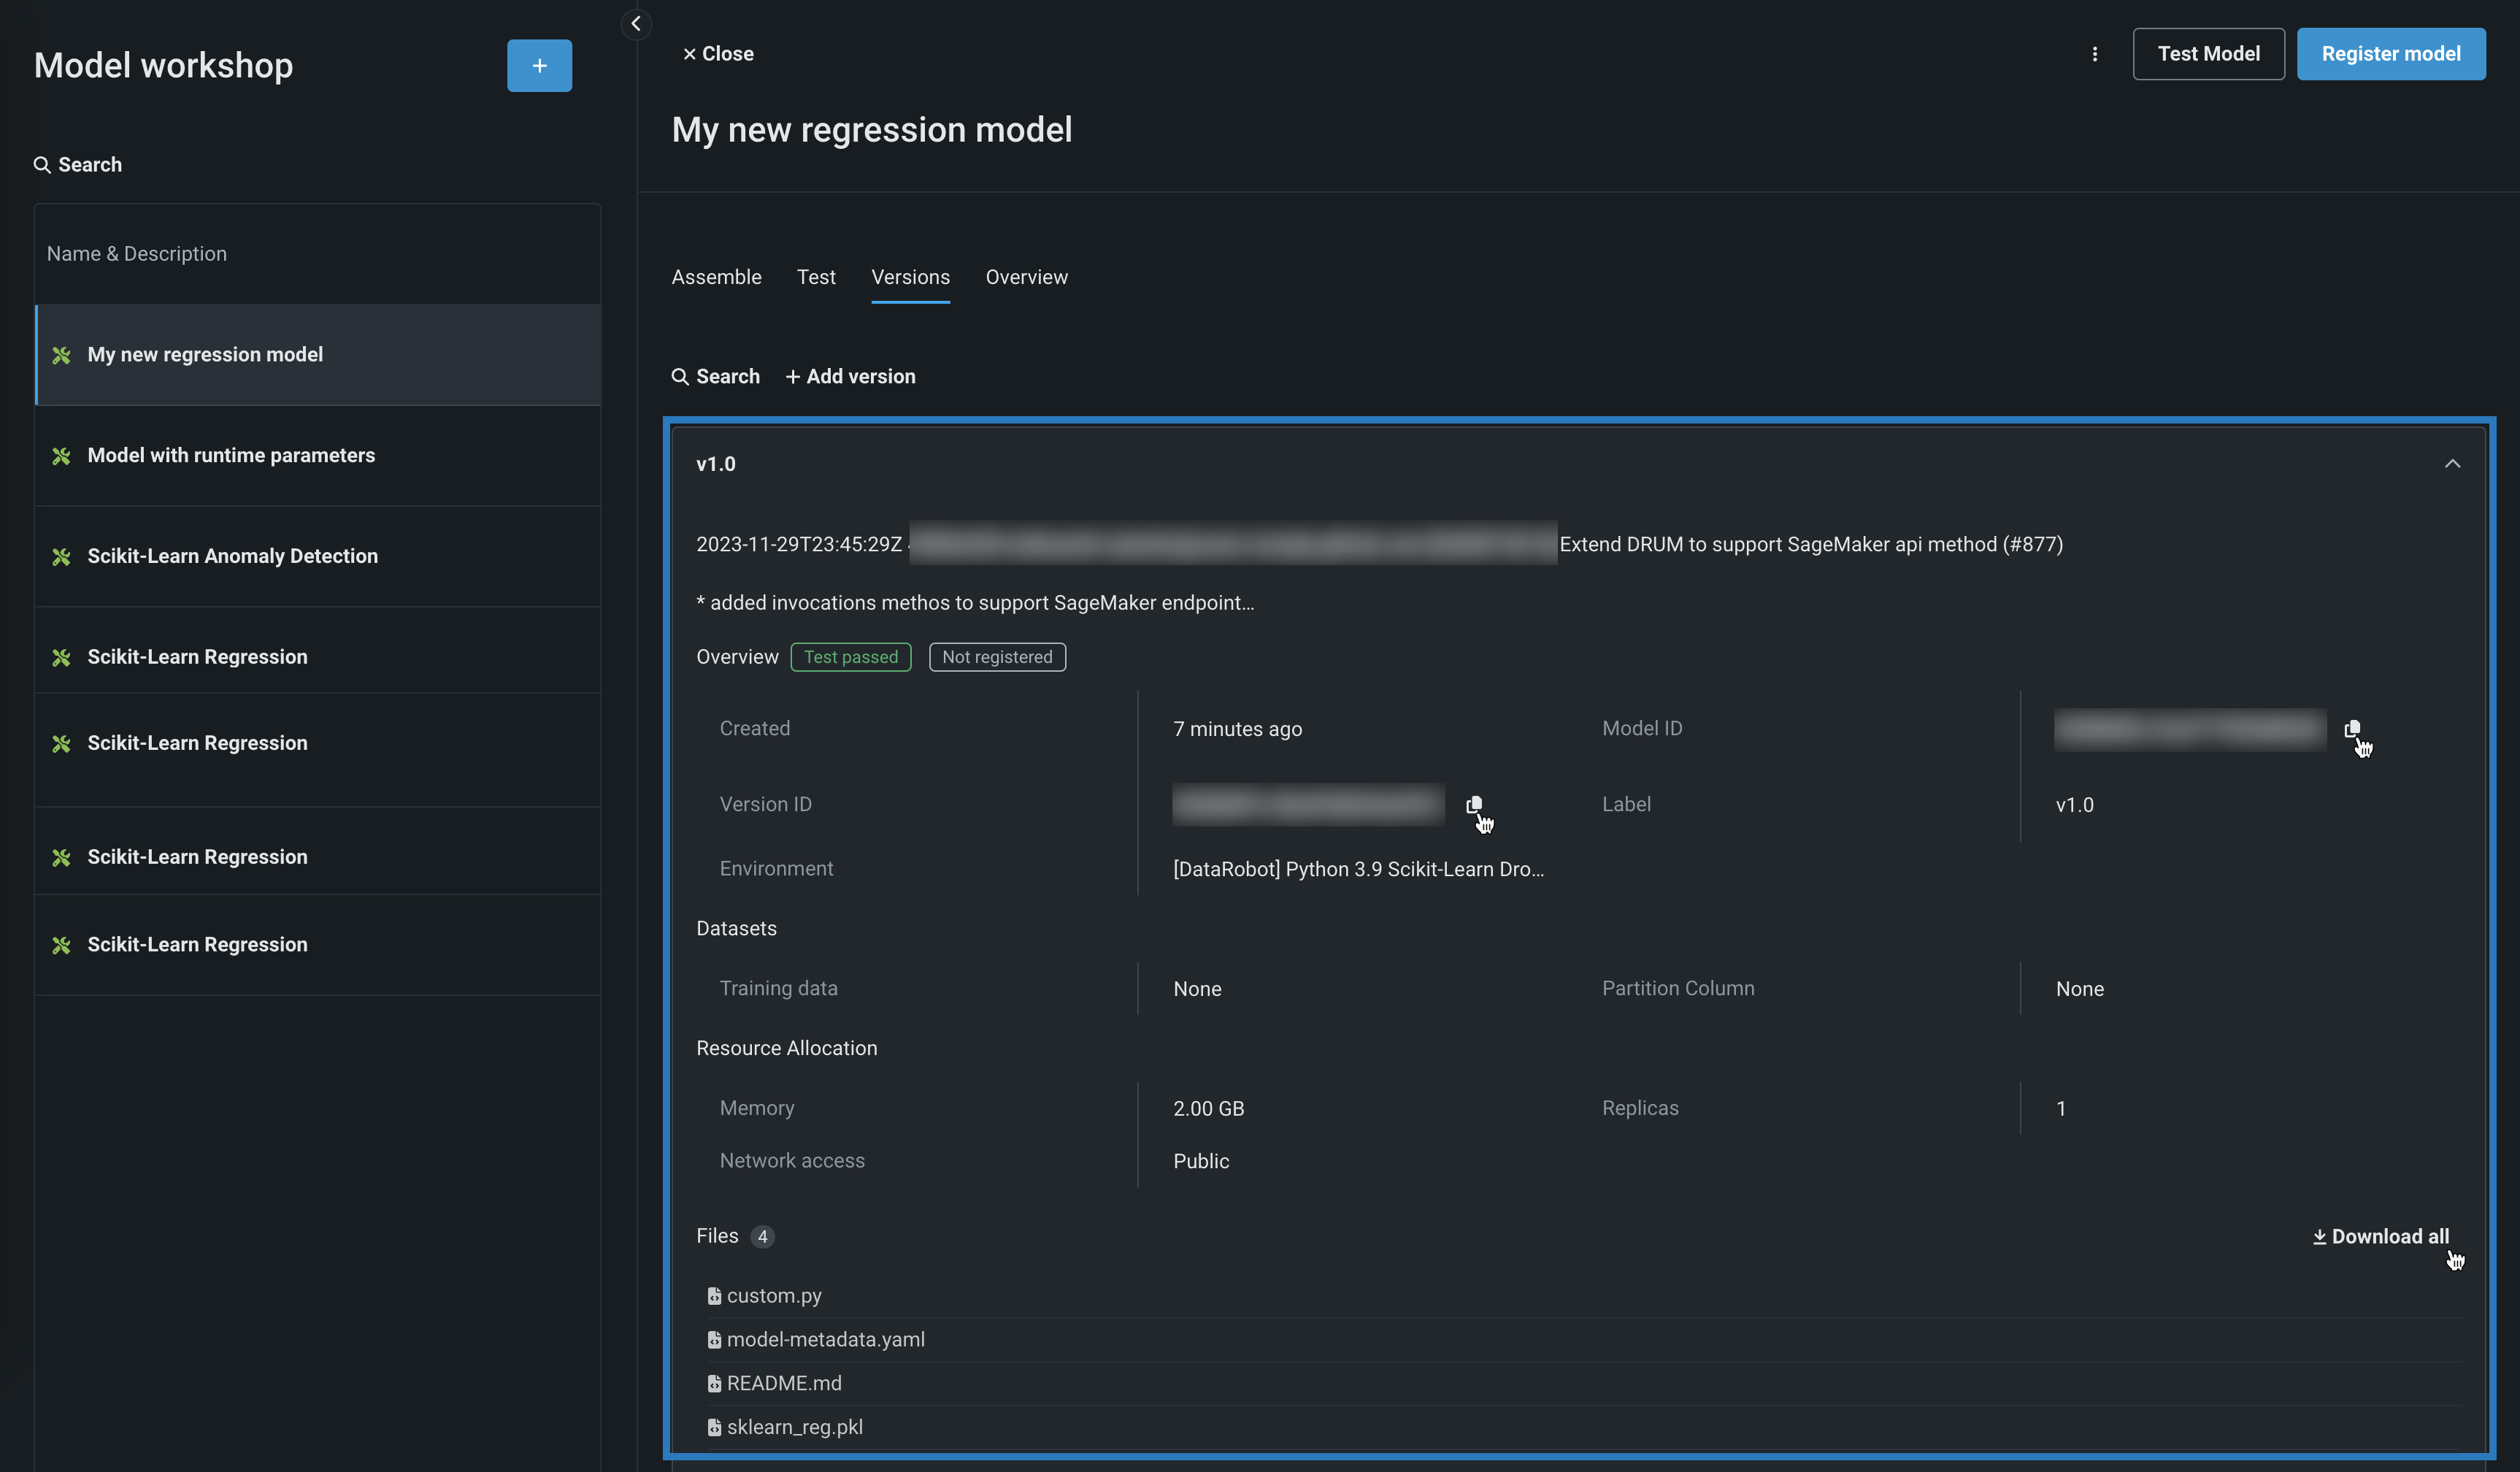
| 要素 | アクション |
|---|---|
| 概要 | |
| 1 | 概要セクションヘッダーの横にある登録済みモデルバージョンフィールドで、表示 をクリックすると、カスタムモデルバージョンから登録されたモデルのリストが表示されます。 リスト内の登録済みモデルバージョンをクリックすると、レジストリで開きます。 |
| 2 | モデルIDフィールドの横にあるコピーアイコン をクリックして、IDをクリップボードにコピーします。 |
| 3 | バージョンIDフィールドの横にあるコピーアイコン をクリックして、IDをクリップボードにコピーします。 |
| 環境情報 | |
| 4 | 環境IDフィールドの横にあるコピーアイコン をクリックすると、IDがクリップボードにコピーされます。 |
| 5 | 環境バージョンIDフィールドの横にあるコピーアイコン をクリックするとIDがクリップボードにコピーされ、表示アイコン をクリックすると環境タブで環境バージョンが開きます。 |
| データセット | |
| 6 | トレーニングデータセットIDフィールドの横にあるコピーアイコン をクリックして、IDをクリップボードにコピーします。 |
| 7 | トレーニングデータセットバージョンIDフィールドの横にあるコピーアイコン をクリックして、IDをクリップボードにコピーします。 |
| インサイト | |
| 8 | ログフィールドのログを表示をクリックすると、レジストリに登録および構築されたモデルのログが開きます。 モデルログの詳細については、 カスタムモデル構築のトラブルシューティングを参照してください。 |
| ファイル | |
| 9 | ファイルセクションのヘッダーの横にある すべてをダウンロードをクリックして、モデルファイルの.zipアーカイブをダウンロードします。 |
| 10 | 個々のファイルの横にある表示アイコン をクリックして、モデルファイルを開きます(オプションでコピーします)。 |
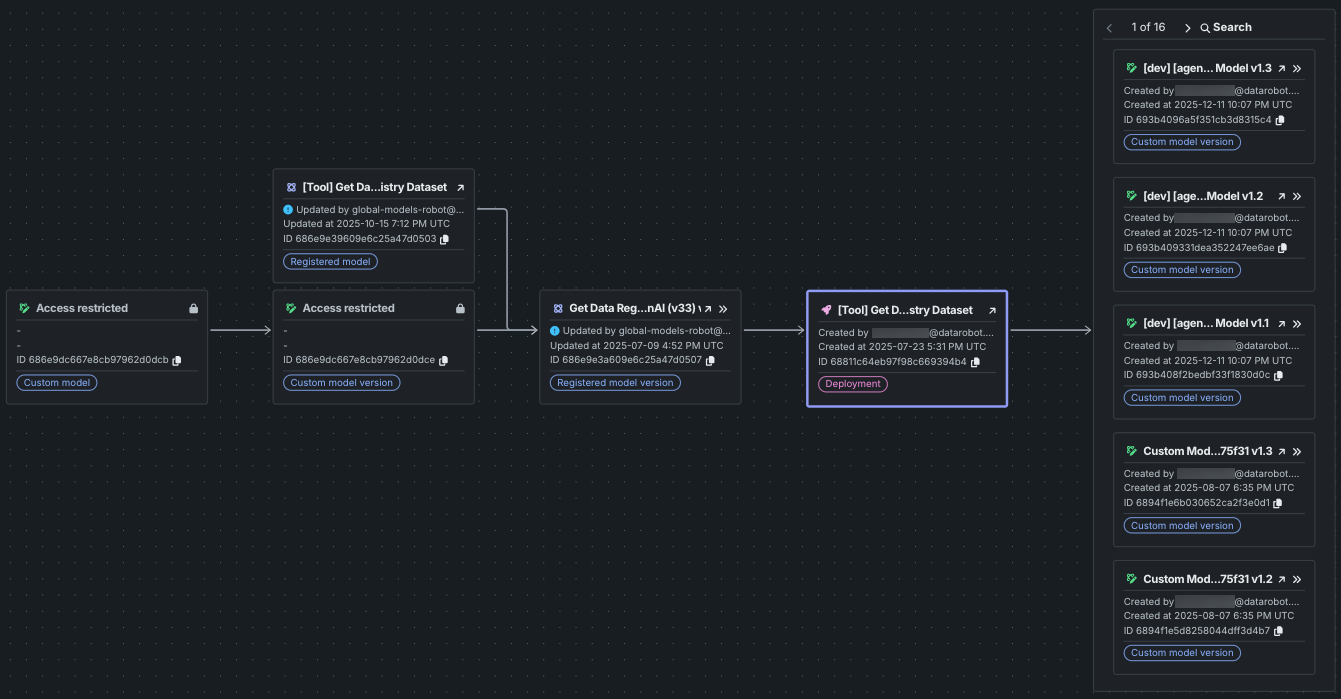
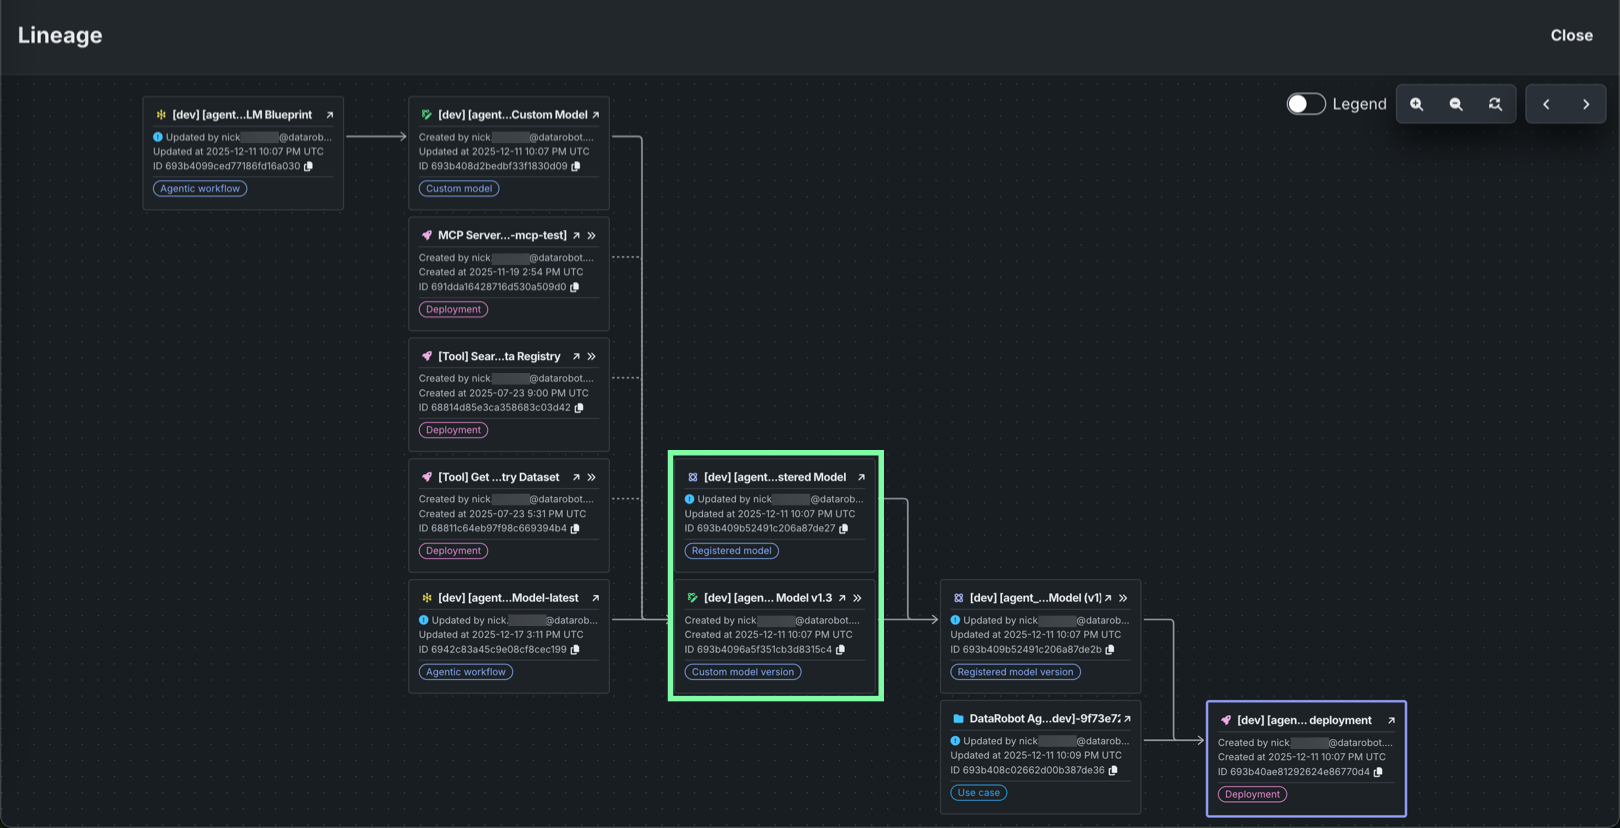
View asset lineage
The Lineage section provides an end-to-end visualization of the relationships and dependencies between your MLOps assets. This feature is essential for auditing complex workflows, tracking asset lifecycles, and managing the various components of agentic and generative AI systems. The lineage is presented as a Directed Acyclic Graph (DAG) consisting of nodes (assets) and edges (relationships).
When reviewing nodes, the asset you are currently viewing is distinguished by a purple outline. Nodes display key information such as ID, name (or version number), creator, and the last modification information (user and date).
When reviewing edges, solid lines represent concrete, persistent relationships within the platform, such as a registered model used to create a deployment. Dashed lines These are considered less reliable as they may change if a user modifies the underlying code or parameters. Arrows generally flow from the "ancestor" or container to the "descendant" or content (e.g., Registered model version to Deployment).
Inaccessible assets
If an asset exists but you do not have permission to view it, the node only displays the asset ID and is marked with an Asset restricted notice.
The view is highly interactive, allowing for deep exploration of your asset ecosystem. To interact with the graph area, use the following controls:
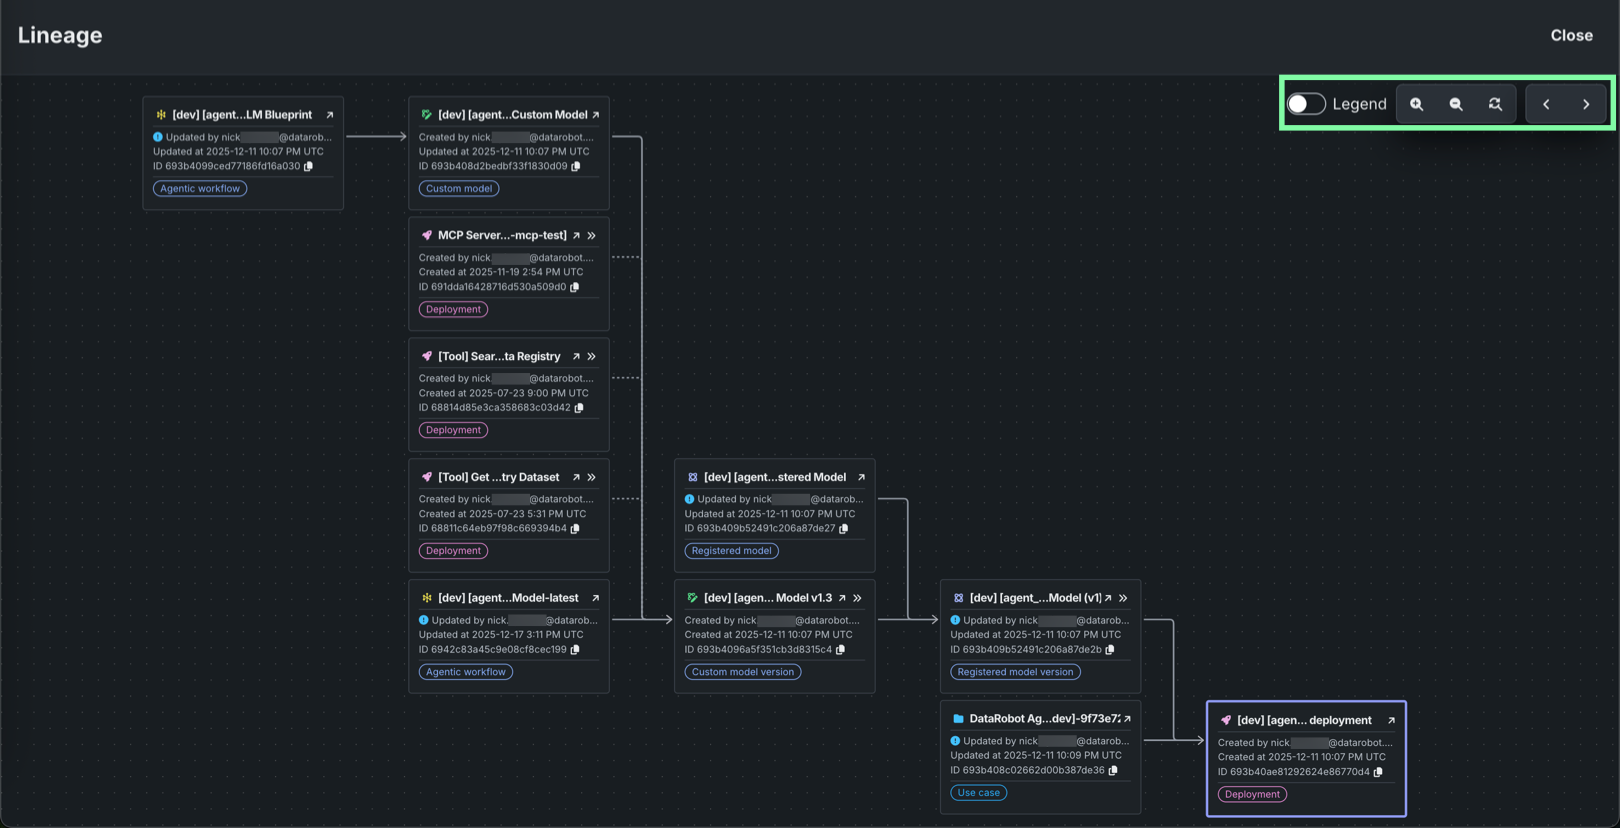
| コントロール | 説明 |
|---|---|
| 凡例 | View the legend defining how lines correspond to edges. |
| and | Control the magnification level of the graph view. |
| Reset the magnification level and center the graph view on the focused node. | |
| Open a fullscreen view of the related items lineage graph. | |
| and | In fullscreen view, navigate the history of selected nodes (assets/nodes viewed ). |
Graph area navigation
To navigate the graph, click and drag the graph area. To control the zoom level, scroll up and down.
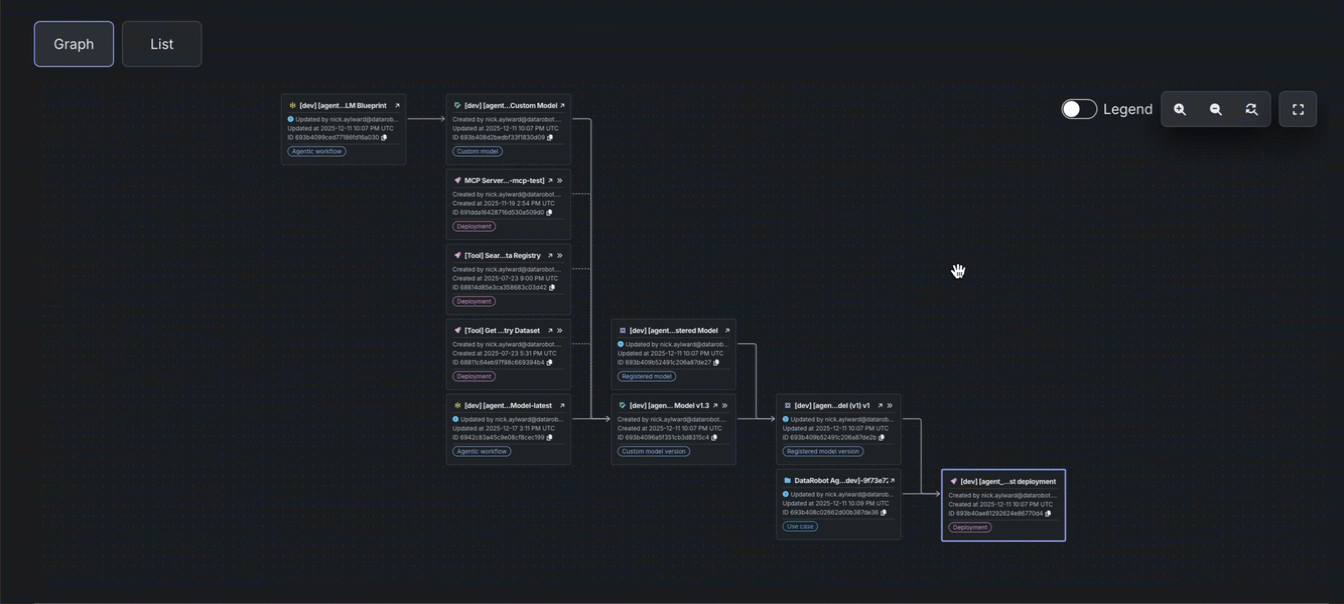
To interact with the related item nodes, use the following controls when they appear:
| コントロール | 説明 |
|---|---|
| Navigate to the asset in a new tab. | |
| Open a fullscreen view of the related items lineage graph centered on the selected asset node. | |
| Copy the asset's associated ID. |
One-to-many list view
If an asset is used by many other assets (e.g., one dataset version used for many projects), in the fullscreen view, the graph shows a preview of the 5 most recent items. Additional assets are viewable in a paginated and searchable list. If you don't have permission to view the ancestor of a paginated group, you can only view the 5 most recent items, without the option to change pages or search.