NVIDIA NIMによるインポートとデプロイ
プレミアム機能
DataRobotでNVIDIA Inference Microservices (NIM)を利用するには、GenAIのエクスペリメントとGPUを使用した推論のためのプレミアム機能にアクセスする必要があります。 これらの機能を有効にするには、DataRobotの担当者または管理者にお問い合わせください。
DataRobotとNVIDIA AI Enterprise Suiteとの連携により、ユーザーはDataRobot Serverless ComputeのGPUにNVIDIA Inference Microservices (NIM)をワンクリックでデプロイできます。 このプロセスはレジストリから始まり、NVIDIA AI EnterpriseのモデルカタログからNIMコンテナをインポートできます。 登録されたモデルはコンソールへのデプロイ向けに最適化され、DataRobotの監視およびガバナンスのフレームワークと互換性があります。
NVIDIA NIMでは、評価とエージェントブループリントへの組み込みのためにワークベンチのプレイグラウンドに追加できる最適化された基本モデル、ベクターデータベースの作成に使われる埋め込みモデル、エージェントアプリケーションのセキュリティを確保するためにDataRobotのモデレーションフレームワークで使用するNVIDIA NeMo Guardrailsを提供します。
NVIDIA GPU Cloud(NGC)からのインポート
レジストリのモデルタブで、利用可能なNIMモデルのギャラリーから登録モデルを作成し、モデル名とパフォーマンスプロファイルを選択して、モデルカードに記載されている情報を確認します。
NVIDIA NGCからインポートするには:
-
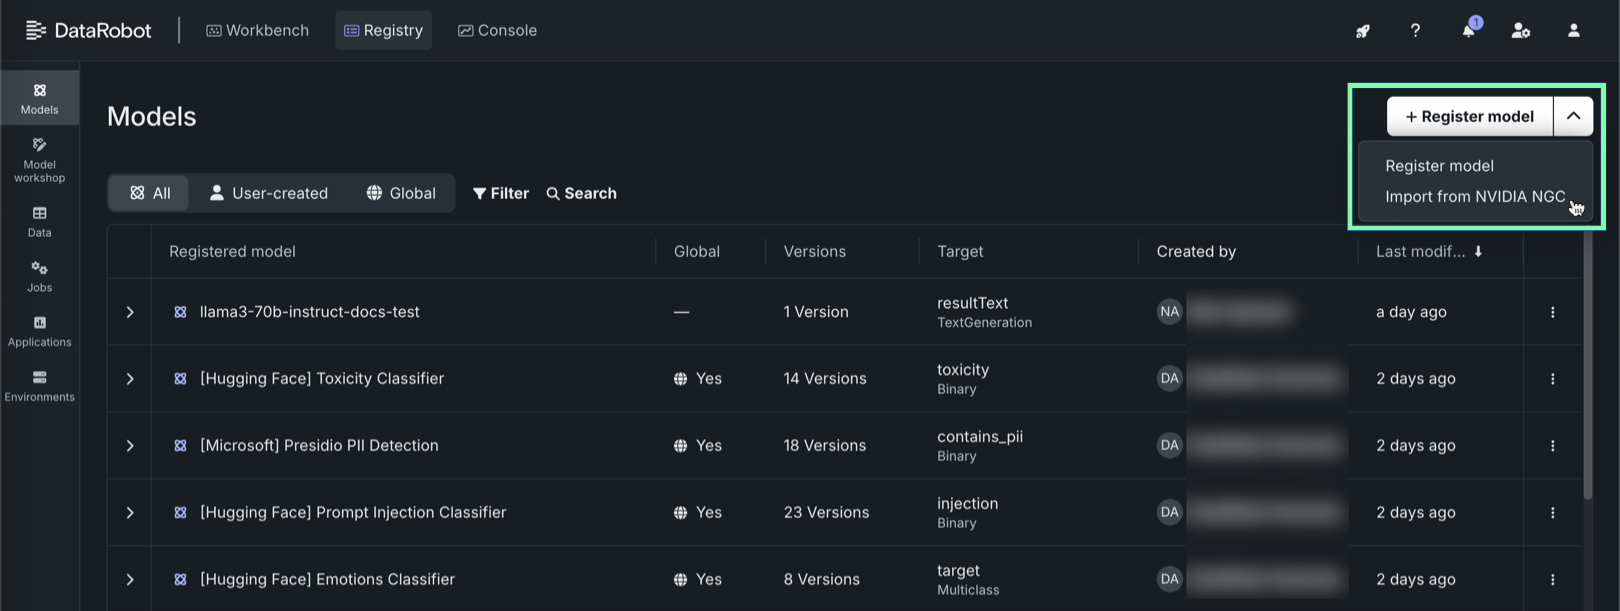
レジストリ > モデルタブで、+ モデルの登録の横にある をクリックし、NVIDIA NGCからインポートをクリックします。
-
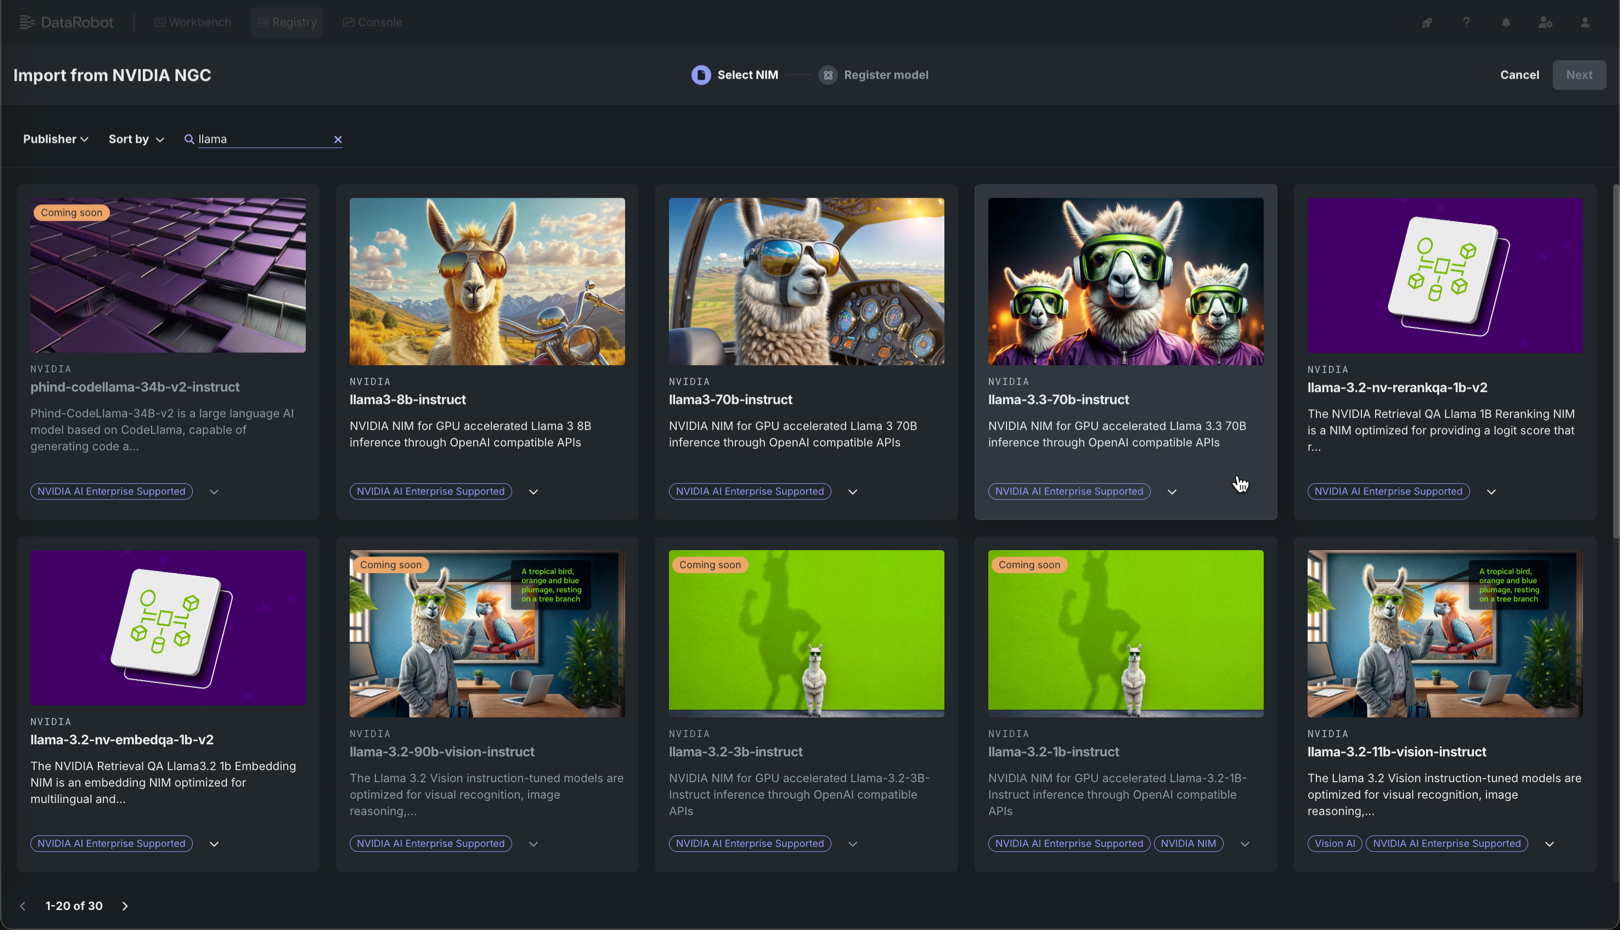
NVIDIA NGCからインポートパネルのNIMを選択タブで、ギャラリー内のNIMをクリックします。
ギャラリーの検索
検索を指示するには、 検索、パブリッシャーでフィルター、またはソート条件をクリックして、ギャラリーを追加日順またはアルファベット順(昇順または降順)に並べ替えます。
-
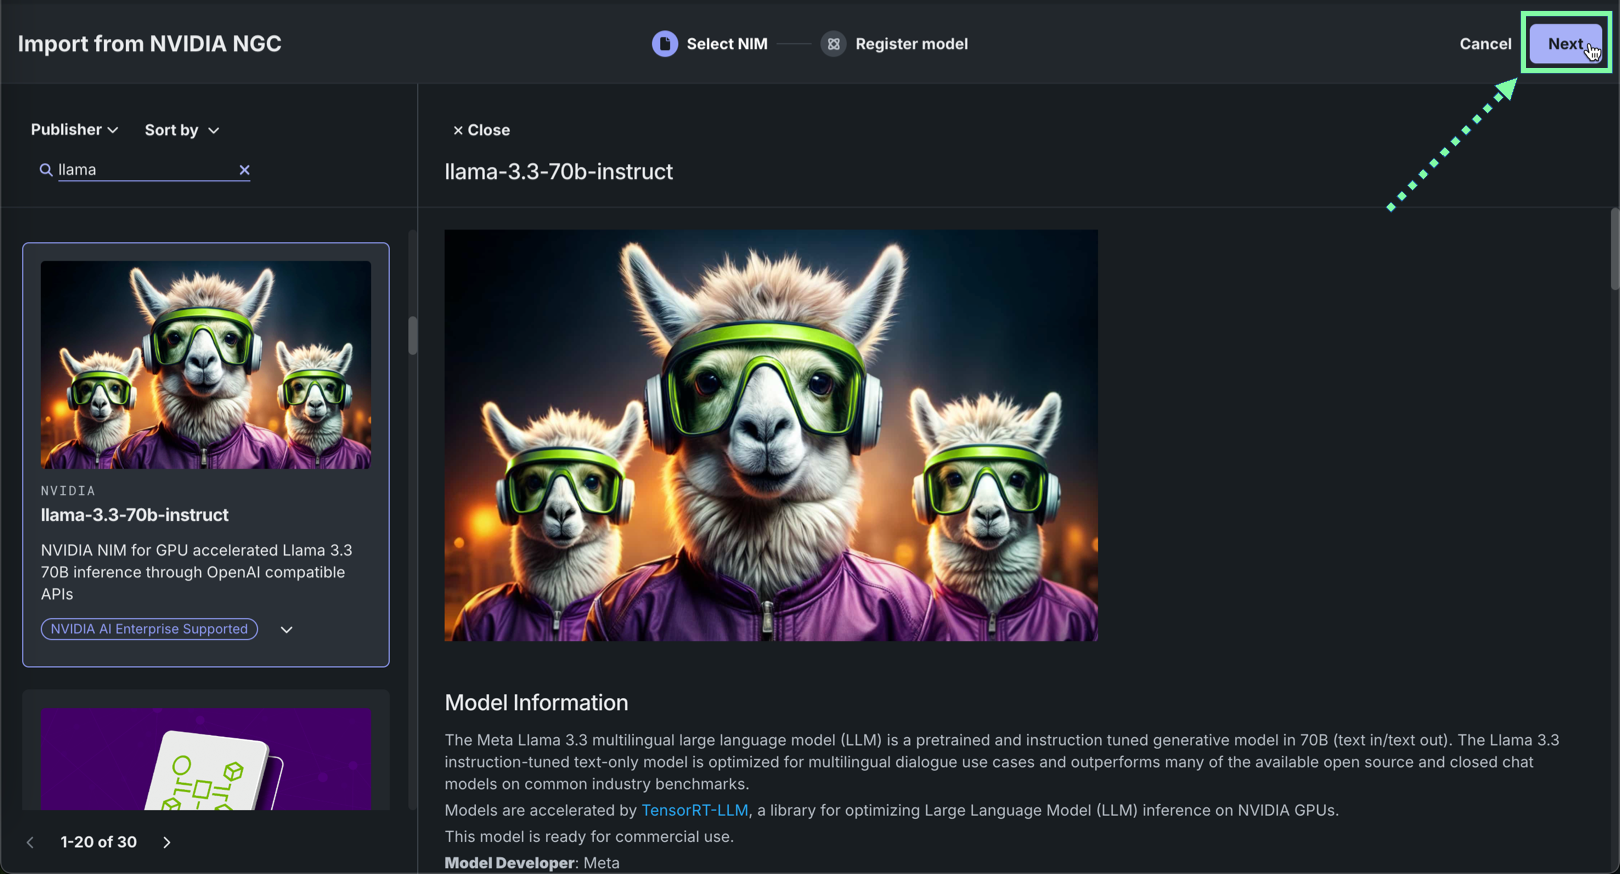
NVIDIA NGCソースのモデル情報を確認し、次へをクリックします。
-
モデルの登録タブで、以下のフィールドを設定し、登録をクリックします。
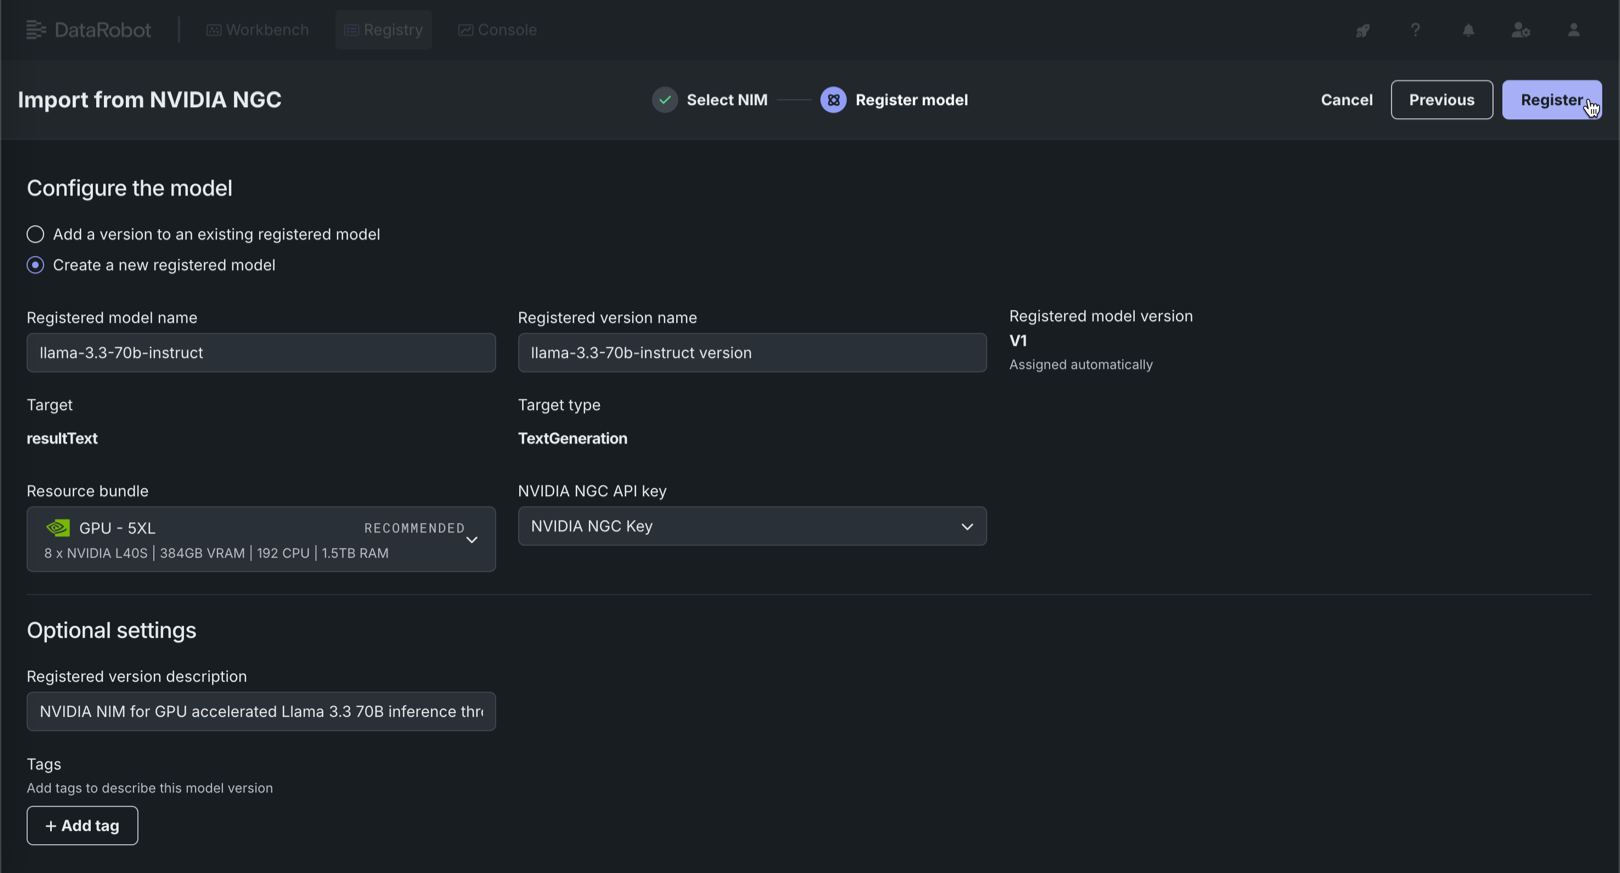
フィールド 説明 登録モデルの名前/登録済みのモデル 以下のいずれかを設定します。 - 登録モデルの名前:新しいモデルを登録するときは、その新規登録モデルに一意でわかりやすい名前を入力します。 組織内のどこかに存在する名前を選択すると、モデルの登録に失敗したという警告が表示されます。
- 登録済みのモデル:新規バージョンを追加する既存の登録済みモデルを選択します。
登録バージョンの名前 モデル名と versionが自動的に入力されます。 必要に応じて、バージョン名を変更するか、デフォルトのバージョン名を修正します。登録モデルのバージョン 自動的に割り当て済み。 作成するバージョンの予想バージョン番号(V1, V2, V3など)が表示されます。 新しいモデルとして登録を選択すると、これは常にV1になります。 リソースバンドル 自動的に推奨されます。 可能な場合、選択したモデルのGPU要件がリソースバンドルに置き換えられます。 ただし、互換性のあるリソースバンドルを検出できない場合があります。 十分なVRAMを備えたリソースバンドルを判別するには、そのNIMのドキュメントを参照してください。
マネージドAIプラットフォームの場合、GPU - 5XLリソースバンドルはオンデマンドでの調達が困難な場合があります。 可能であれば、より小さなリソースバンドルも検討します。NVIDIA NGCのAPIキー NVIDIA NGCのAPIキーに関連付けられた資格情報を選択します。 NVIDIA NGC APIキーの組織間共有はサポートされていないため、選択したNVIDIA NGC APIキーがDataRobot組織内に存在することを確認します。 また、この制限により、NVIDIA NIMで作成されたグローバルモデルの組織間共有はサポートされていません。 オプション設定 登録バージョンの説明 このモデルパッケージが解決するビジネス上の問題、またはより一般的に、このバージョンで表されるモデルについて説明します。 タグ + タグを追加をクリックし、モデルの バージョン にタグ付けするキーと値のペアごとに、キーと値を入力します。 新規モデルの登録時に追加されたタグがV1に適用されます。
登録されたNVIDIA NIMのデプロイ
NVIDIA NIMが登録されたら、DataRobotのサーバーレス予測環境にデプロイします。
登録モデルをDataRobotのサーバーレス予測環境にデプロイするには:
-
レジストリ > モデルタブで、登録されたNIMを探してクリックし、デプロイするバージョンをクリックします。
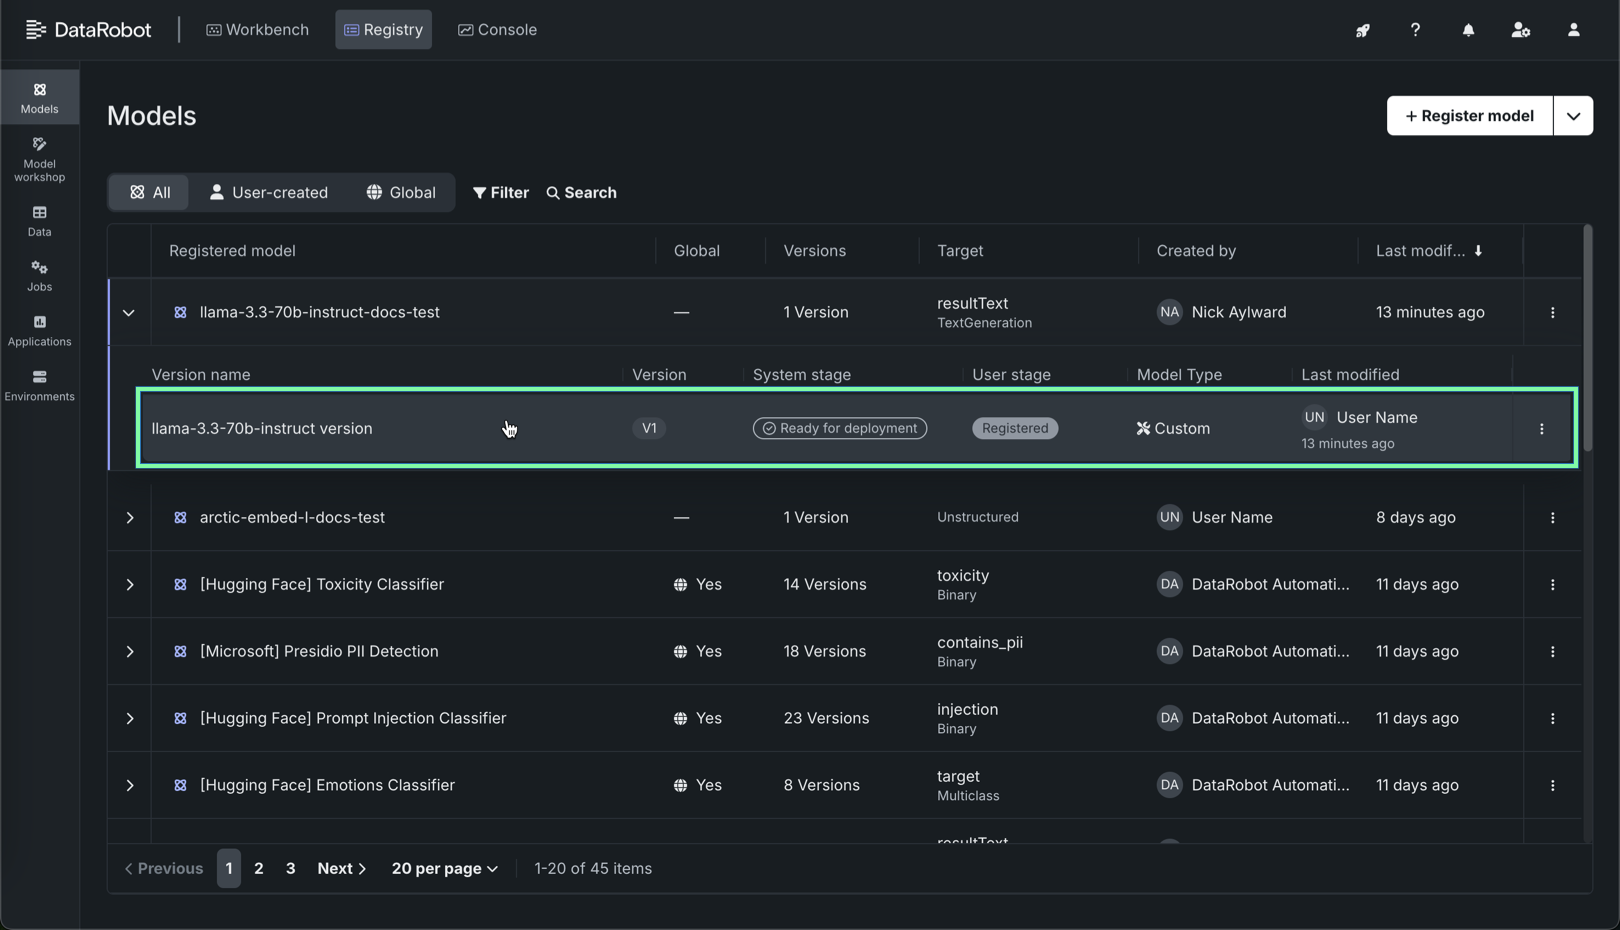
-
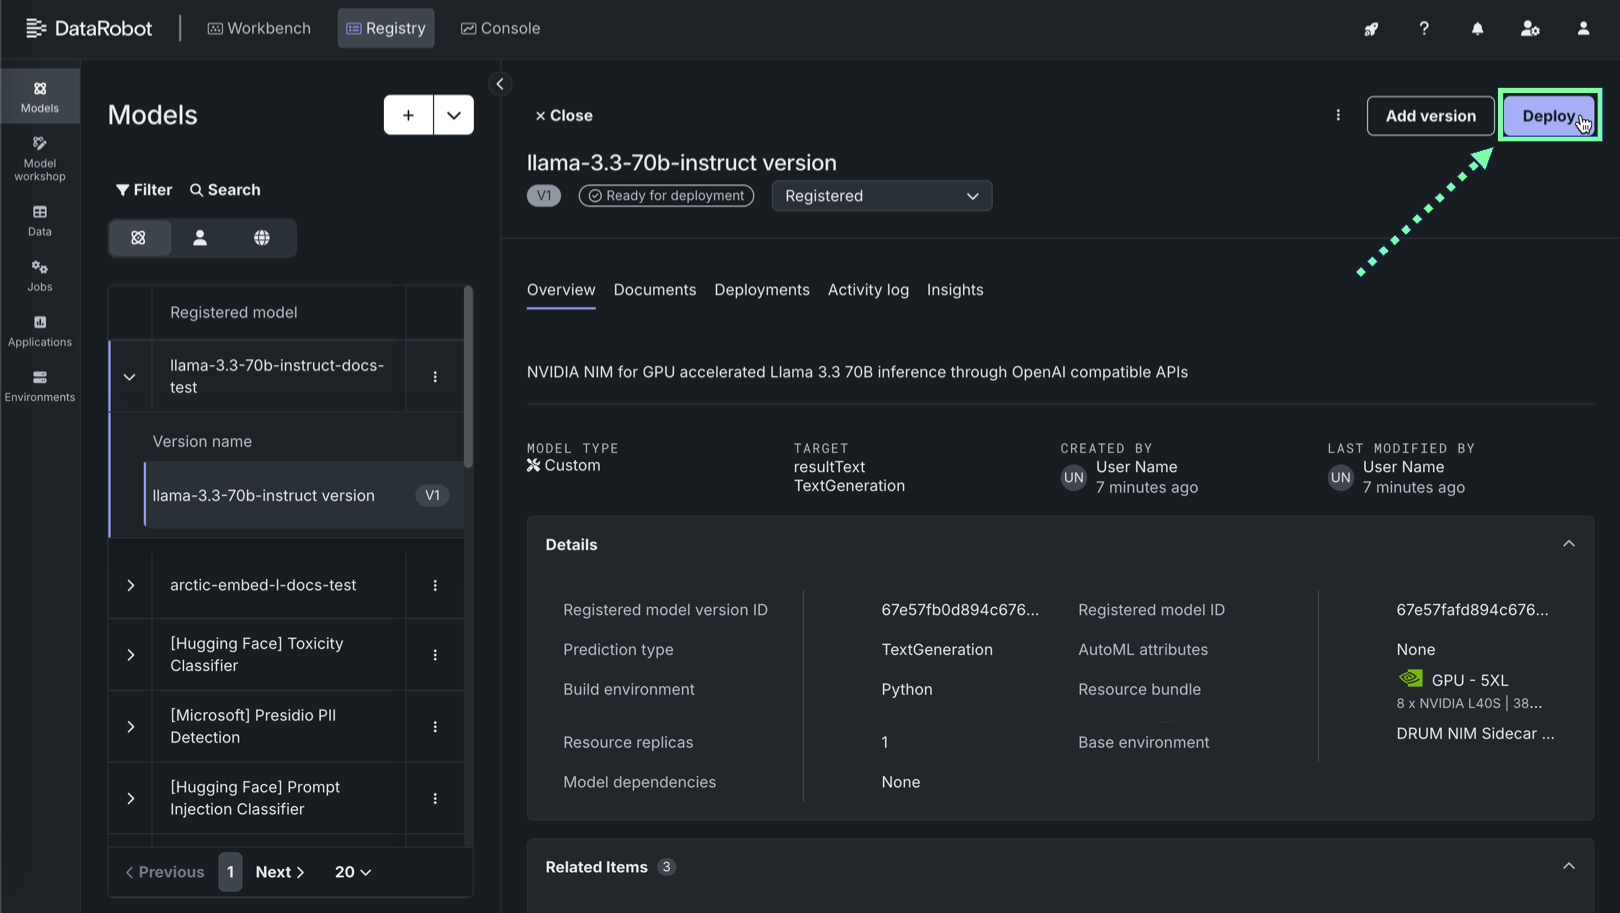
登録モデルのバージョンで、バージョン情報を確認し、デプロイをクリックします。
-
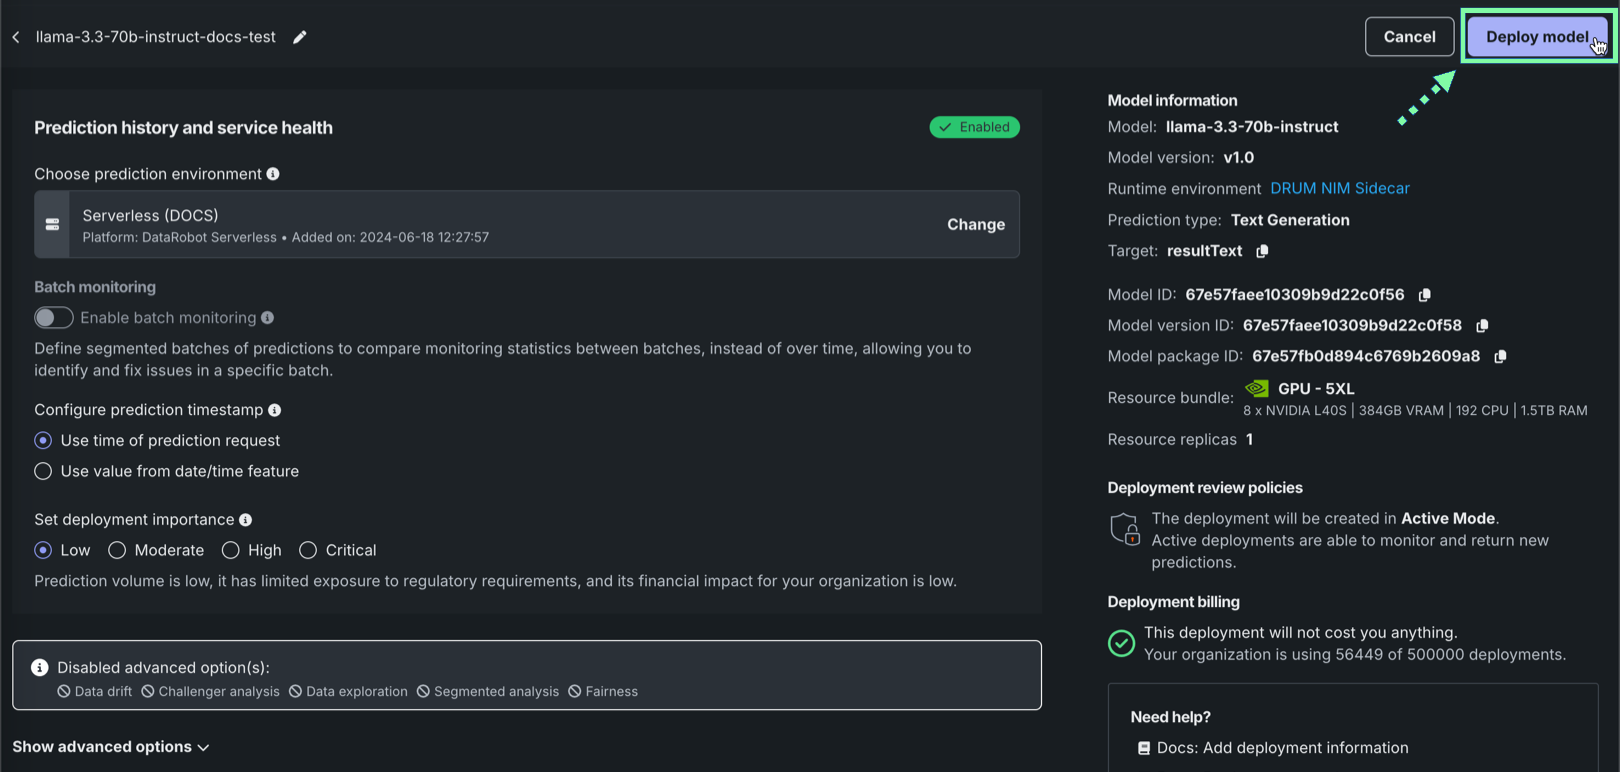
予測履歴とサービスの正常性セクションの予測環境を選択で、プラットフォーム:DataRobotサーバーレスが選択されていることを確認します。
DataRobotサーバーレス環境の変更
正しいDataRobotサーバーレス環境が選択されていない場合は、変更をクリックします。 予測環境を選択パネルのDataRobotサーバーレスタブで、リストから別のサーバーレス予測環境を選択します。
-
オプションで追加のデプロイ設定を構成。 次に、デプロイが設定されたら、モデルをデプロイをクリックします。
トレーステーブルを有効にする
NIMのデプロイでトレーステーブルを有効にするには、データ探索(またはチャレンジャー)の設定で予測行ごとの履歴保存を有効化し、関連付けIDの定義に必要なデプロイ設定を行います。
デプロイされたNVIDIA NIMでの予測
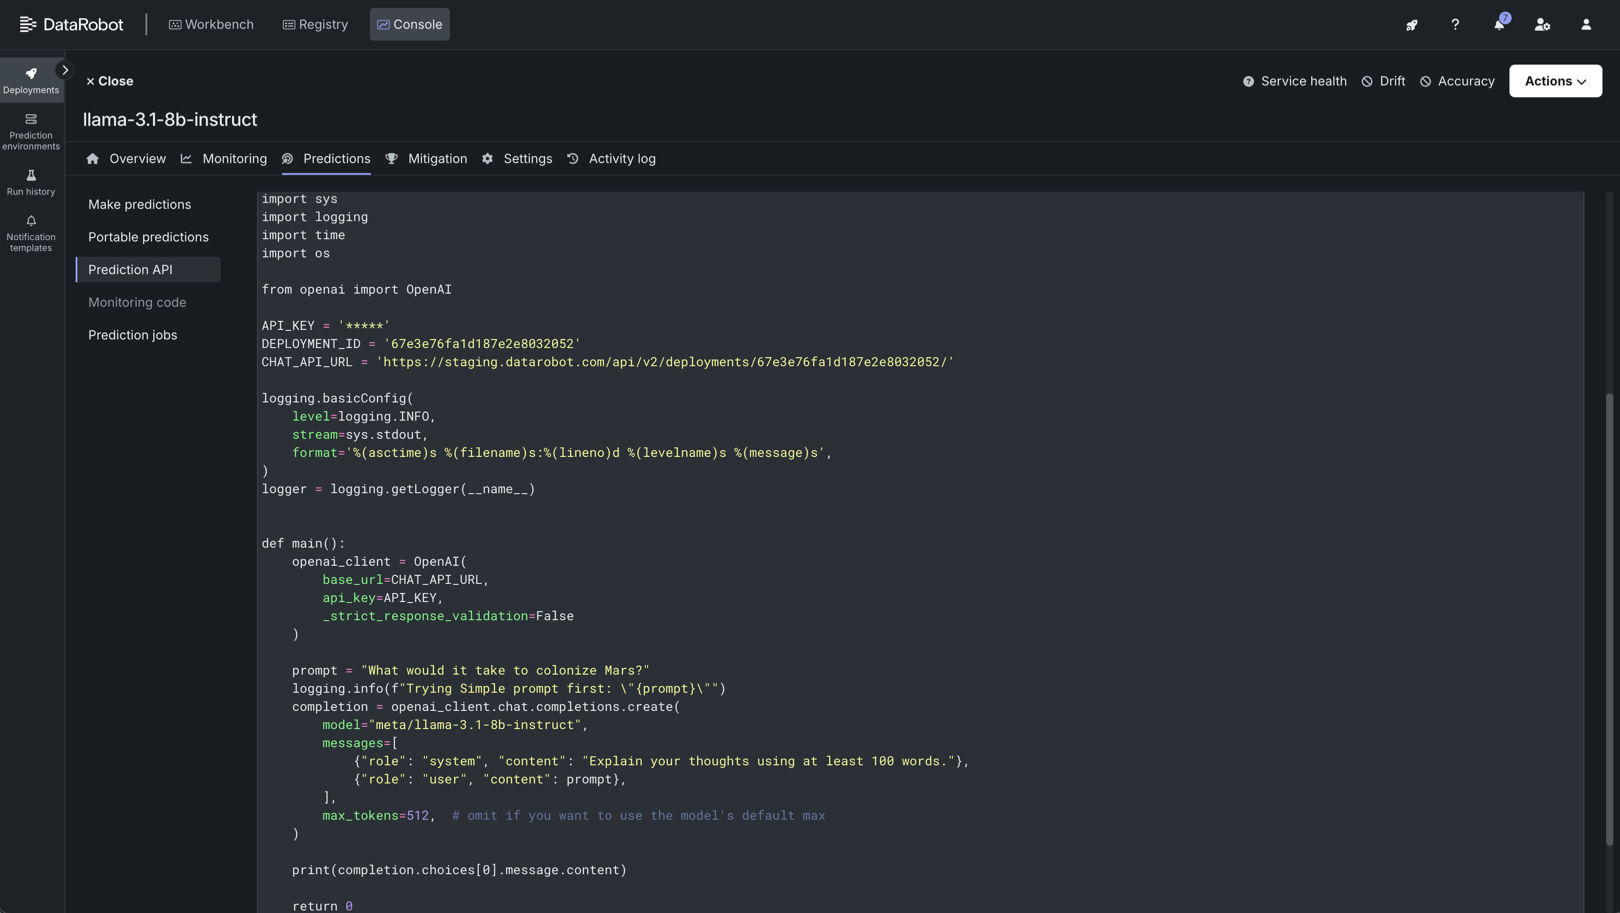
モデルがDataRobotサーバーレス予測環境にデプロイされたら、デプロイの予測タブからリアルタイムの予測スニペットにアクセスできます。 予測スニペットを実行するための要件は、モデルのタイプ(テキスト生成または非構造化)によって異なります。
DataRobotのレジストリにNIMを追加すると、LLMがテキスト生成モデルとしてインポートされ、ボルトオンのガバナンスAPIを使って、デプロイされたNIMと通信できるようになります。 他のタイプのモデルは非構造化モデルとしてインポートされ、NIMコンテナが提供するエンドポイントは、デプロイされたNIMと通信するために公開されます。 これにより、DataRobot Serverless Computeを使用してGPUインフラストラクチャにNIMをデプロイするために必要な柔軟性が得られます。
| ターゲットタイプ | サポートされているエンドポイントのタイプ | 説明 |
|---|---|---|
| テキスト生成 | /chat/completions |
デプロイされたテキスト生成 NIM モデルでは、/chat/completionsエンドポイントにアクセスできます。 予測タブに表示されているコードスニペットを使用して、予測を行います。 |
| 非構造化 | /directAccess/nim/ |
デプロイされた非構造化NIMモデルでは、 /directAccess/nim/エンドポイントにアクセスできます。 予測タブに表示されているコードスニペットを変更して、NIM URLのサフィックスと適切な形式のペイロードを指定します。 |
| 非構造化(埋め込みモデル) | 両方 | デプロイされた非構造化NIM埋め込みモデルでは、/directAccess/nim/と/chat/completionsの両方のエンドポイントにアクセスできます。 使用目的に合わせて、予測タブに表示されているコードスニペットを変更します。 |
CSV予測エンドポイントの使用
インポートしたテキスト生成NIMを使用すると、/predictionsエンドポイント(CSV 入力対応)へのリクエストも可能です。 /predictionsエンドポイントに送信されるCSV入力では、テキスト生成モデルへのユーザープロンプトの列名としてpromptTextを使用してください。 CSV入力がこの形式で指定されていない場合、その予測はデプロイのトレーステーブルに表示されません。
テキスト生成モデルのエンドポイント
デプロイの予測 > 予測 APIタブで、予測APIのスクリプトコードにアクセスします。 テキスト生成モデルの場合、必要なエンドポイントのリンクは、DataRobotデプロイのベースURLです。 詳細については、ボルトオンのガバナンスAPIのドキュメントを参照してください。
プライベートCA環境での予測スニペット
プライベート認証局(プライベートCA)環境でのセルフマネージドAIプラットフォームでは、組織のITチームがプライベートCA環境をどのように構成したかによって、予測タブに表示されるスニペットの更新が必要な場合があります。
組織のプライベートCA環境において、提供されている予測スニペットに変更を加える必要がある場合は、以下のコードを見つけます。
| Standard Prediction API scripting code | |
|---|---|
1 2 3 4 5 | |
上記のコードを更新し、予測スニペットがプライベートCAのバンドルファイルにアクセスできるように、以下の変更を加えます。
| Private CA Prediction API scripting code | |
|---|---|
1 2 3 4 5 6 7 8 | |
非構造化モデルのエンドポイント
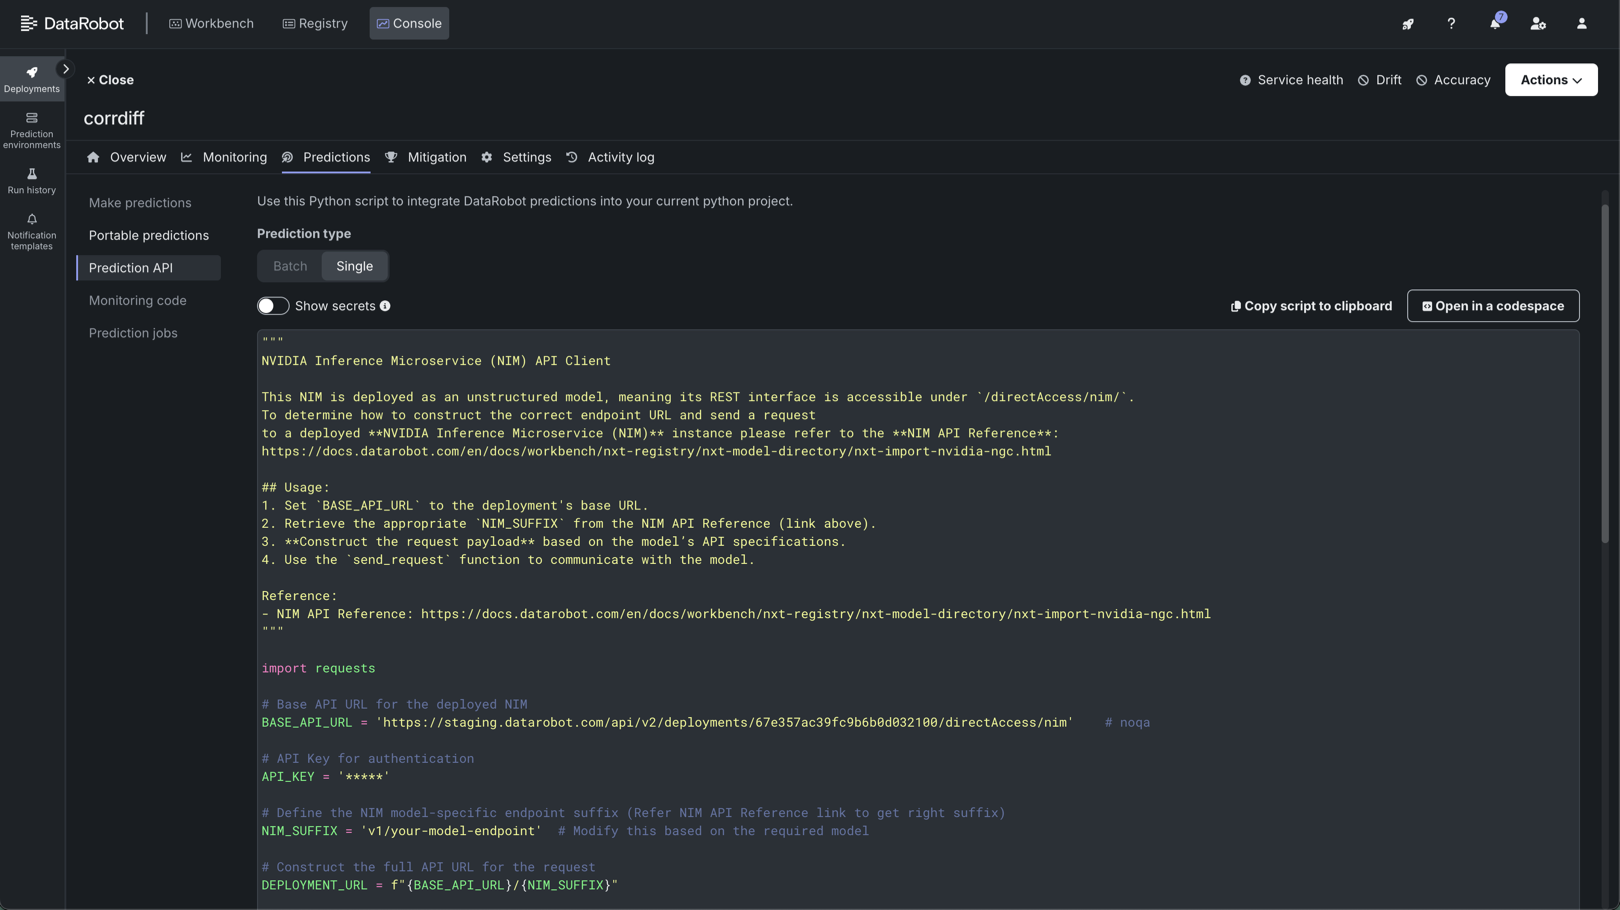
デプロイの予測 > 予測 APIタブから予測APIのスクリプトコードにアクセスします。 非構造化モデルの場合、NIMコンテナが提供するエンドポイントが公開され、デプロイされたNIMとの通信が可能になります。 正しいエンドポイントURLを作成し、デプロイされたNVIDIA NIMインスタンスにリクエストを送信する方法を確認するには、以下にリストされている登録およびデプロイされたNIMのドキュメントを参照してください。
ダイレクトアクセスエンドポイントのオブザーバビリティ
NVIDIA NIMのほとんどの非構造化モデルでは、/directAccess/nim/エンドポイントへのアクセスのみが可能です。 このエンドポイントは、一部のオブザーバビリティ機能と互換性があります。 たとえば、/directAccess/nim/エンドポイントでは、精度とドリフトの追跡はサポートされていません。
予測APIスクリプトコードを使用するには、以下の手順を実行し、send_request関数を使用してモデルと通信します。
BASE_API_URL(4行目)を確認します。 これはエンドポイントのプレフィックスです。 デプロイのベースURLが自動的に入力されます。- 適切な
NIM_SUFFIXを取得します(10行目)。 これはNIMエンドポイントのサフィックスです。 このサフィックスについては、デプロイされたモデルのNVIDIA NIMドキュメントを参照してください。 - リクエストペイロードを構築します(
sample_payload、45行目)。 このリクエストペイロードは、デプロイされたモデルのNVIDIA NIMドキュメントに記載されているモデルのAPI仕様に基づいて構成する必要があります。
| Prediction API scripting code | |
|---|---|
1 2 3 4 5 6 7 8 9 10 11 12 13 14 15 16 17 18 19 20 21 22 23 24 25 26 27 28 29 30 31 32 33 34 35 36 37 38 39 40 41 42 43 44 45 46 47 48 49 50 51 52 53 54 | |
非構造化モデルのNVIDIA NIMドキュメントリスト
非構造化モデルの場合、必要なNIMエンドポイントはNIMのドキュメントに記載されています。 以下のリストは、NIM_SUFFIXとsample_payloadを構築するために必要なドキュメントのリンクです。
- arctic-embed-l
- boltz-2
- cuopt
- diffdock
- genmol
- llama-3.2-nv-embedqa-1b-v2
- llama-3.2-nv-rerankqa-1b-v2
- molmim
- nemoguard-jailbreak-detect
- nemoretriever-graphic-elements-v1
- nemoretriever-page-elements-v2
- nemoretriever-parse
- nemoretriever-table-structure-v1
- nv-embedqa-e5-v5
- nv-embedqa-e5-v5-pb24h2
- nv-embedqa-mistral-7b-v2
- nv-rerankqa-mistral-4b-v3
- nvclip
- openfold3
- paddleocr
- proteinmpnn
- rfdiffusion
テキスト生成をサポートする非構造化モデル
埋め込みモデルは、チャット補完を要求する機能を維持しながら、非構造化モデルとしてインポートおよびデプロイされます。 以下の埋め込みモデルでは、ダイレクトアクセスエンドポイントとチャット補完エンドポイントの両方をサポートしています。
arctic-embed-lllama-3.2-nv-embedqa-1b-v2nv-embedqa-e5-v5nv-embedqa-e5-v5-pb24h2nv-embedqa-mistral-7b-v2nvclip
各埋め込みNIMは非構造化モデルとしてデプロイされ、/directAccess/nim/でRESTインターフェイスを提供します。 さらに、これらのモデルはチャット補完を返すことができるので、コードスニペットは(構造化)テキスト生成モデルで使用される/chat/completionsエンドポイントをBASE_API_URLに提供します。 予測APIスクリプトコードを使用するには、以下の表を確認して、各エンドポイントのタイプにアクセスするために予測スニペットを変更する方法を決めます。
| エンドポイントのタイプ | 要件 |
|---|---|
| 直接アクセス | BASE_API_URL(4行目)を更新し、/chat/completionsを/directAccess/nim/に置き換えます。 リクエストペイロードを構造化するには、デプロイされたモデルのNVIDIA NIMドキュメントに記載されているモデルのAPI仕様を確認します。 |
| チャット補完 | DEPLOYMENT_URL(13行目)を更新し、/{NIM_SUFFIX}を削除して、DEPLOYMENT_URL = BASE_API_URLを作成します。 リクエストペイロードを構造化するには、デプロイされたモデルのNVIDIA NIMドキュメントに記載されているモデルのAPI仕様を確認します。 |
| Prediction API scripting code | |
|---|---|
1 2 3 4 5 6 7 8 9 10 11 12 13 | |