外部モデルのカスタムモデルプロキシを作成
外部モデルのプロキシとしてカスタムモデルを作成するには、新しいプロキシモデルをワークショップに追加します。 プロキシモデルには、外部モデルと接続するために作成されたプロキシコードが含まれており、DataRobotの外部のインフラストラクチャで動作するモデルでコンプライアンスドキュメント、チャレンジャー分析、カスタムモデルテストなどの機能を利用できます。
プロキシモデルを作成するには、次の操作を行います。
-
(オプション)モデルメタデータ(
model-metadata.yaml)を介してカスタムモデルに ランタイムパラメーターを追加します。 -
カスタムモデルファイル(
custom.py)を使用して、カスタムモデルにプロキシコードを追加します。 -
ワークショップでプロキシモデルを作成し、モデルファイルを構築します。
プロキシコードを追加
外部モデル用のプロキシとして作成するカスタムモデルでは、custom.pyファイルにプロキシモデルと外部でホストされたモデルを接続するためのカスタムコードを含める必要があります。このコードがプロキシコードです。 カスタムモデルコードの記述の詳細については、 カスタムモデル構築のドキュメントを参照してください。
custom.pyファイル内のプロキシコードは、次のことを行う必要があります。
-
必要なモジュールと、オプションで ランタイムパラメーターを
model-metadata.yamlからインポートします。 -
HTTPS接続または外部モデルで必要とされるネットワークプロトコルを介して、カスタムモデルを外部モデルに接続します。
-
予測をリクエストし、必要に応じて予測データを変換します。
プロキシコードの再利用を簡素化するために、model-metadata.yamlファイルのモデルメタデータによって ランタイムパラメーターを追加できます。
name: runtime-parameter-example
type: inference
targetType: regression
runtimeParameterDefinitions:
- fieldName: endpoint
  type: string
  description: The name of the endpoint.
- fieldName: API_KEY
  type: credential
  description: The HTTP basic credential containing the endpoint's API key in the password field (the username field is ignored).
モデルメタデータでランタイムパラメーターを定義した場合、それらをcustom.pyファイルにインポートしてプロキシコードで使用できます。 これらのパラメーターをインポートした後、それらをプロキシコードの変数に割り当てることができます。 これにより、外部モデルに接続して予測データを取得する予測リクエストを作成できます。 次の例では、custom.pyファイルの基本構造の概要を説明します。
# Import modules required to make a prediction request.
import json
import ssl
import urllib.request
import pandas as pd
# Import SimpleNamespace to create an object to store runtime parameter variables.
from types import SimpleNamespace
# Import RuntimeParameters to use the runtime parameters set in the model metadata.
from datarobot_drum import RuntimeParameters

# Override the default load_model hook to read the runtime parameters.
def load_model(code_dir):
    # Assign runtime parameters to variables.
    api_key = RuntimeParameters.get("API_KEY")["password"]
    endpoint = RuntimeParameters.get("endpoint")

    # Create scoring endpoint URL.
    url = f"https://{endpoint}.example.com/score"

    # Return an object containing the variables necessary to make a prediction request.
    return SimpleNamespace(**locals())

# Write proxy code to request and convert scoring data from the external model.
def score(data, model, **kwargs):
    # Call make_remote_prediction_request.
    # Convert prediction data as necessary.

def make_remote_prediction_request(payload, url, api_key):
    # Connect to the scoring endpoint URL.
    # Request predictions from the external model.
プロキシモデルの作成
外部モデルのプロキシとしてカスタムモデルを作成するには、新しいプロキシモデルをワークショップに追加します。 プロキシモデルには、外部モデルと接続するために作成したプロキシコードが含まれます。
モデルワークショップを介してプロキシモデルを追加するには:
-
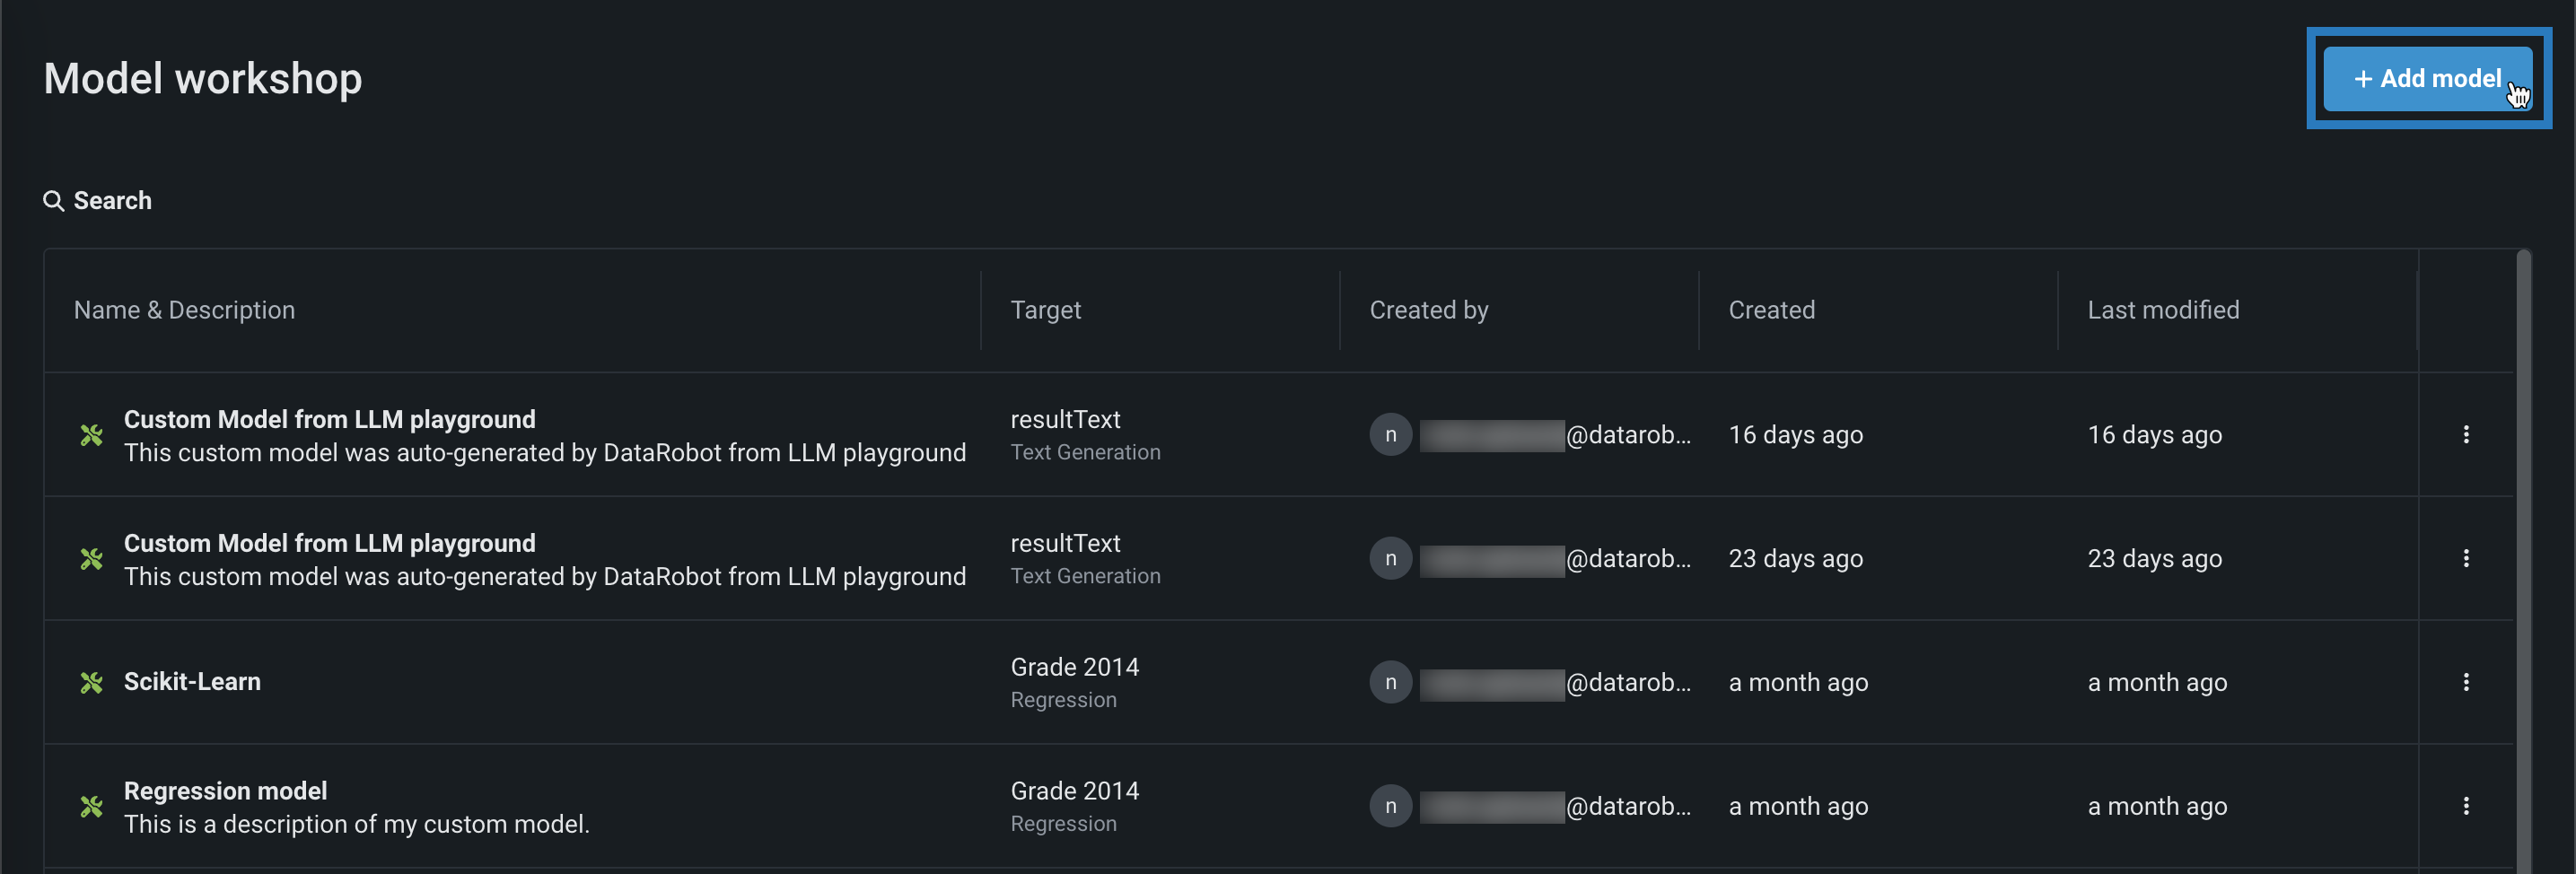
レジストリ > ワークショップをクリックします。
-
ワークショップタブで、+ モデルを追加をクリックします。
-
モデルを追加パネルで、プロキシを選択し、モデル情報を追加します。
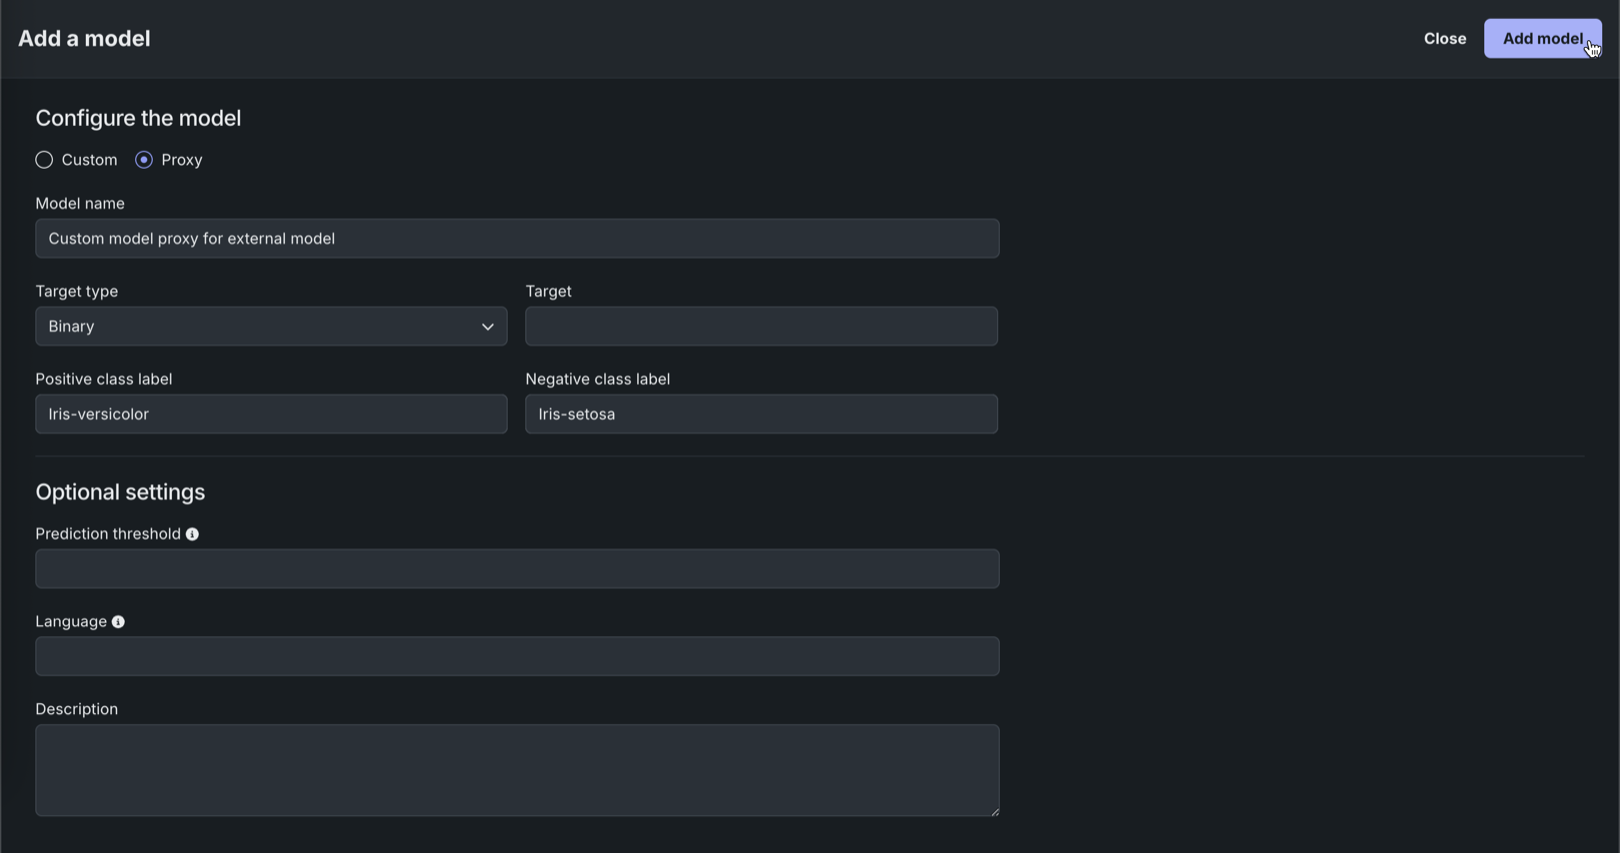
フィールド 説明 モデル名 カスタムモデルのわかりやすい名前。 ターゲットタイプ モデルが行っている予測のタイプ。 予測タイプに応じて、追加の設定を行う必要があります。 - 二値:二値分類モデルの場合は、PositiveクラスラベルとNegativeクラスラベルを入力します。 次に、必要に応じて予測しきい値を入力します。
- 連続値:追加設定なし。
- 時系列(二値):プレビュー機能。 二値分類モデルの場合は、PositiveクラスラベルとNegativeクラスラベルを入力し、時系列設定を行います。 次に、必要に応じて予測しきい値を入力します。
- 時系列(連続値):プレビュー機能 Configure the 時系列設定を行います。
- 多クラス:多クラス分類モデルでは、ターゲットのターゲットクラスを1行に1クラスずつ入力またはアップロード(
.csv、.txt)します。 クラスがモデルの予測に正しく適用されるように、モデルが予測したクラスの確率と同じ順序でクラスを入力してください。 - 多ラベル:多ラベル分類モデルでは、ターゲットのターゲットラベルを1行に1ラベルずつ入力またはアップロード(
.csv、.txt)します。 ラベルがモデルの予測に正しく適用されるように、モデルが予測したラベルの確率と同じ順序でラベルを入力してください。 - テキスト生成:プレミアム機能。 No additional settings.
- Anomaly Detection: No additional settings.
- Vector Database: Preview feature No additional settings.
- Location: Premium feature. 追加設定はありません。
- エージェントのワークフロー:プレミアム機能。 追加設定はありません。
- MCPサーバー:プレミアム機能。 追加設定なし。 MCPサーバーは、DataRobot APIをエージェントが利用できるツールとして公開するためのツールです。
ターゲット名 モデルが予測するデータセット列。 多クラスや多ラベルなど、ターゲット列を使用するターゲットタイプに必要です。 このフィールドは、異常検知モデルでは使用できません。 オプション設定 予測しきい値 二値分類モデルの場合、0から1までの10進数値です。この値を超える予測スコアは、すべてPositiveクラスに割り当てられます。 言語 モデルの構築に使用されるプログラミング言語。 説明 モデルのコンテンツと目的の説明。 -
フィールドに入力したら、モデルを追加をクリックします。
プロキシモデルの構築
プロキシモデルを構築するには、外部モデルと接続するために作成したプロキシコードをワークショップに持ち込み、プロキシモデルがネットワークにアクセスできることを確認します。
-
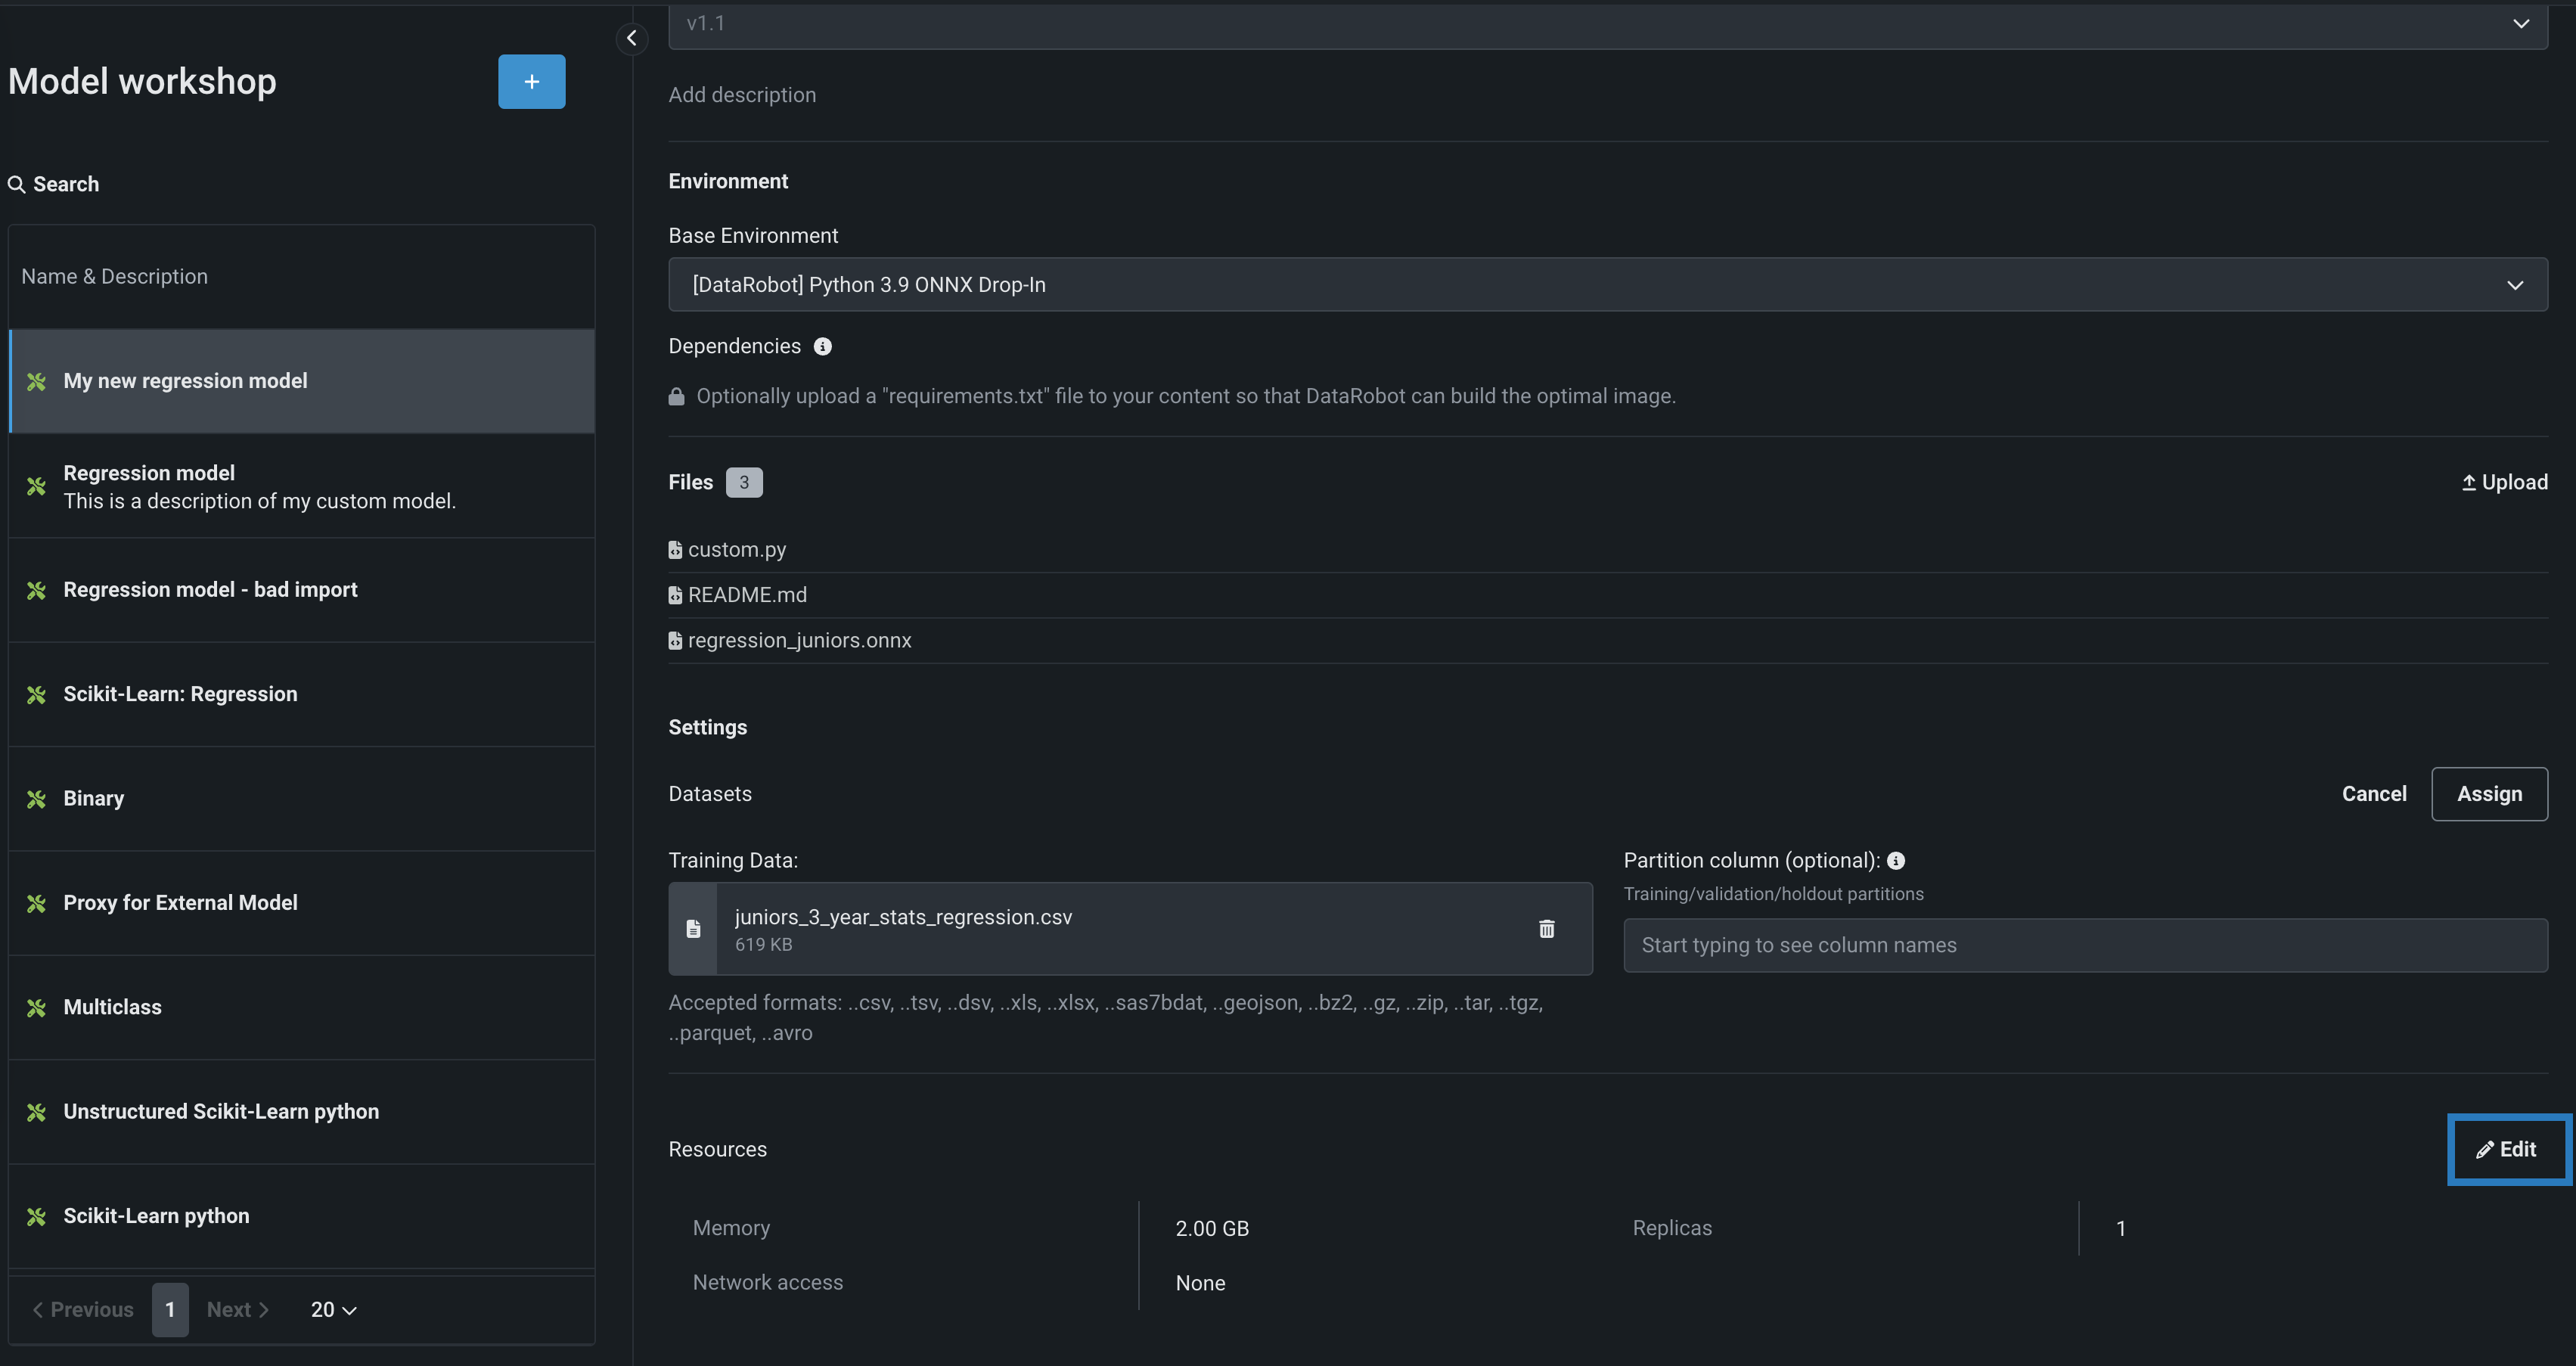
アセンブルタブで、環境セクションに移動し、基本環境ドロップダウンメニューからモデル環境を選択します。
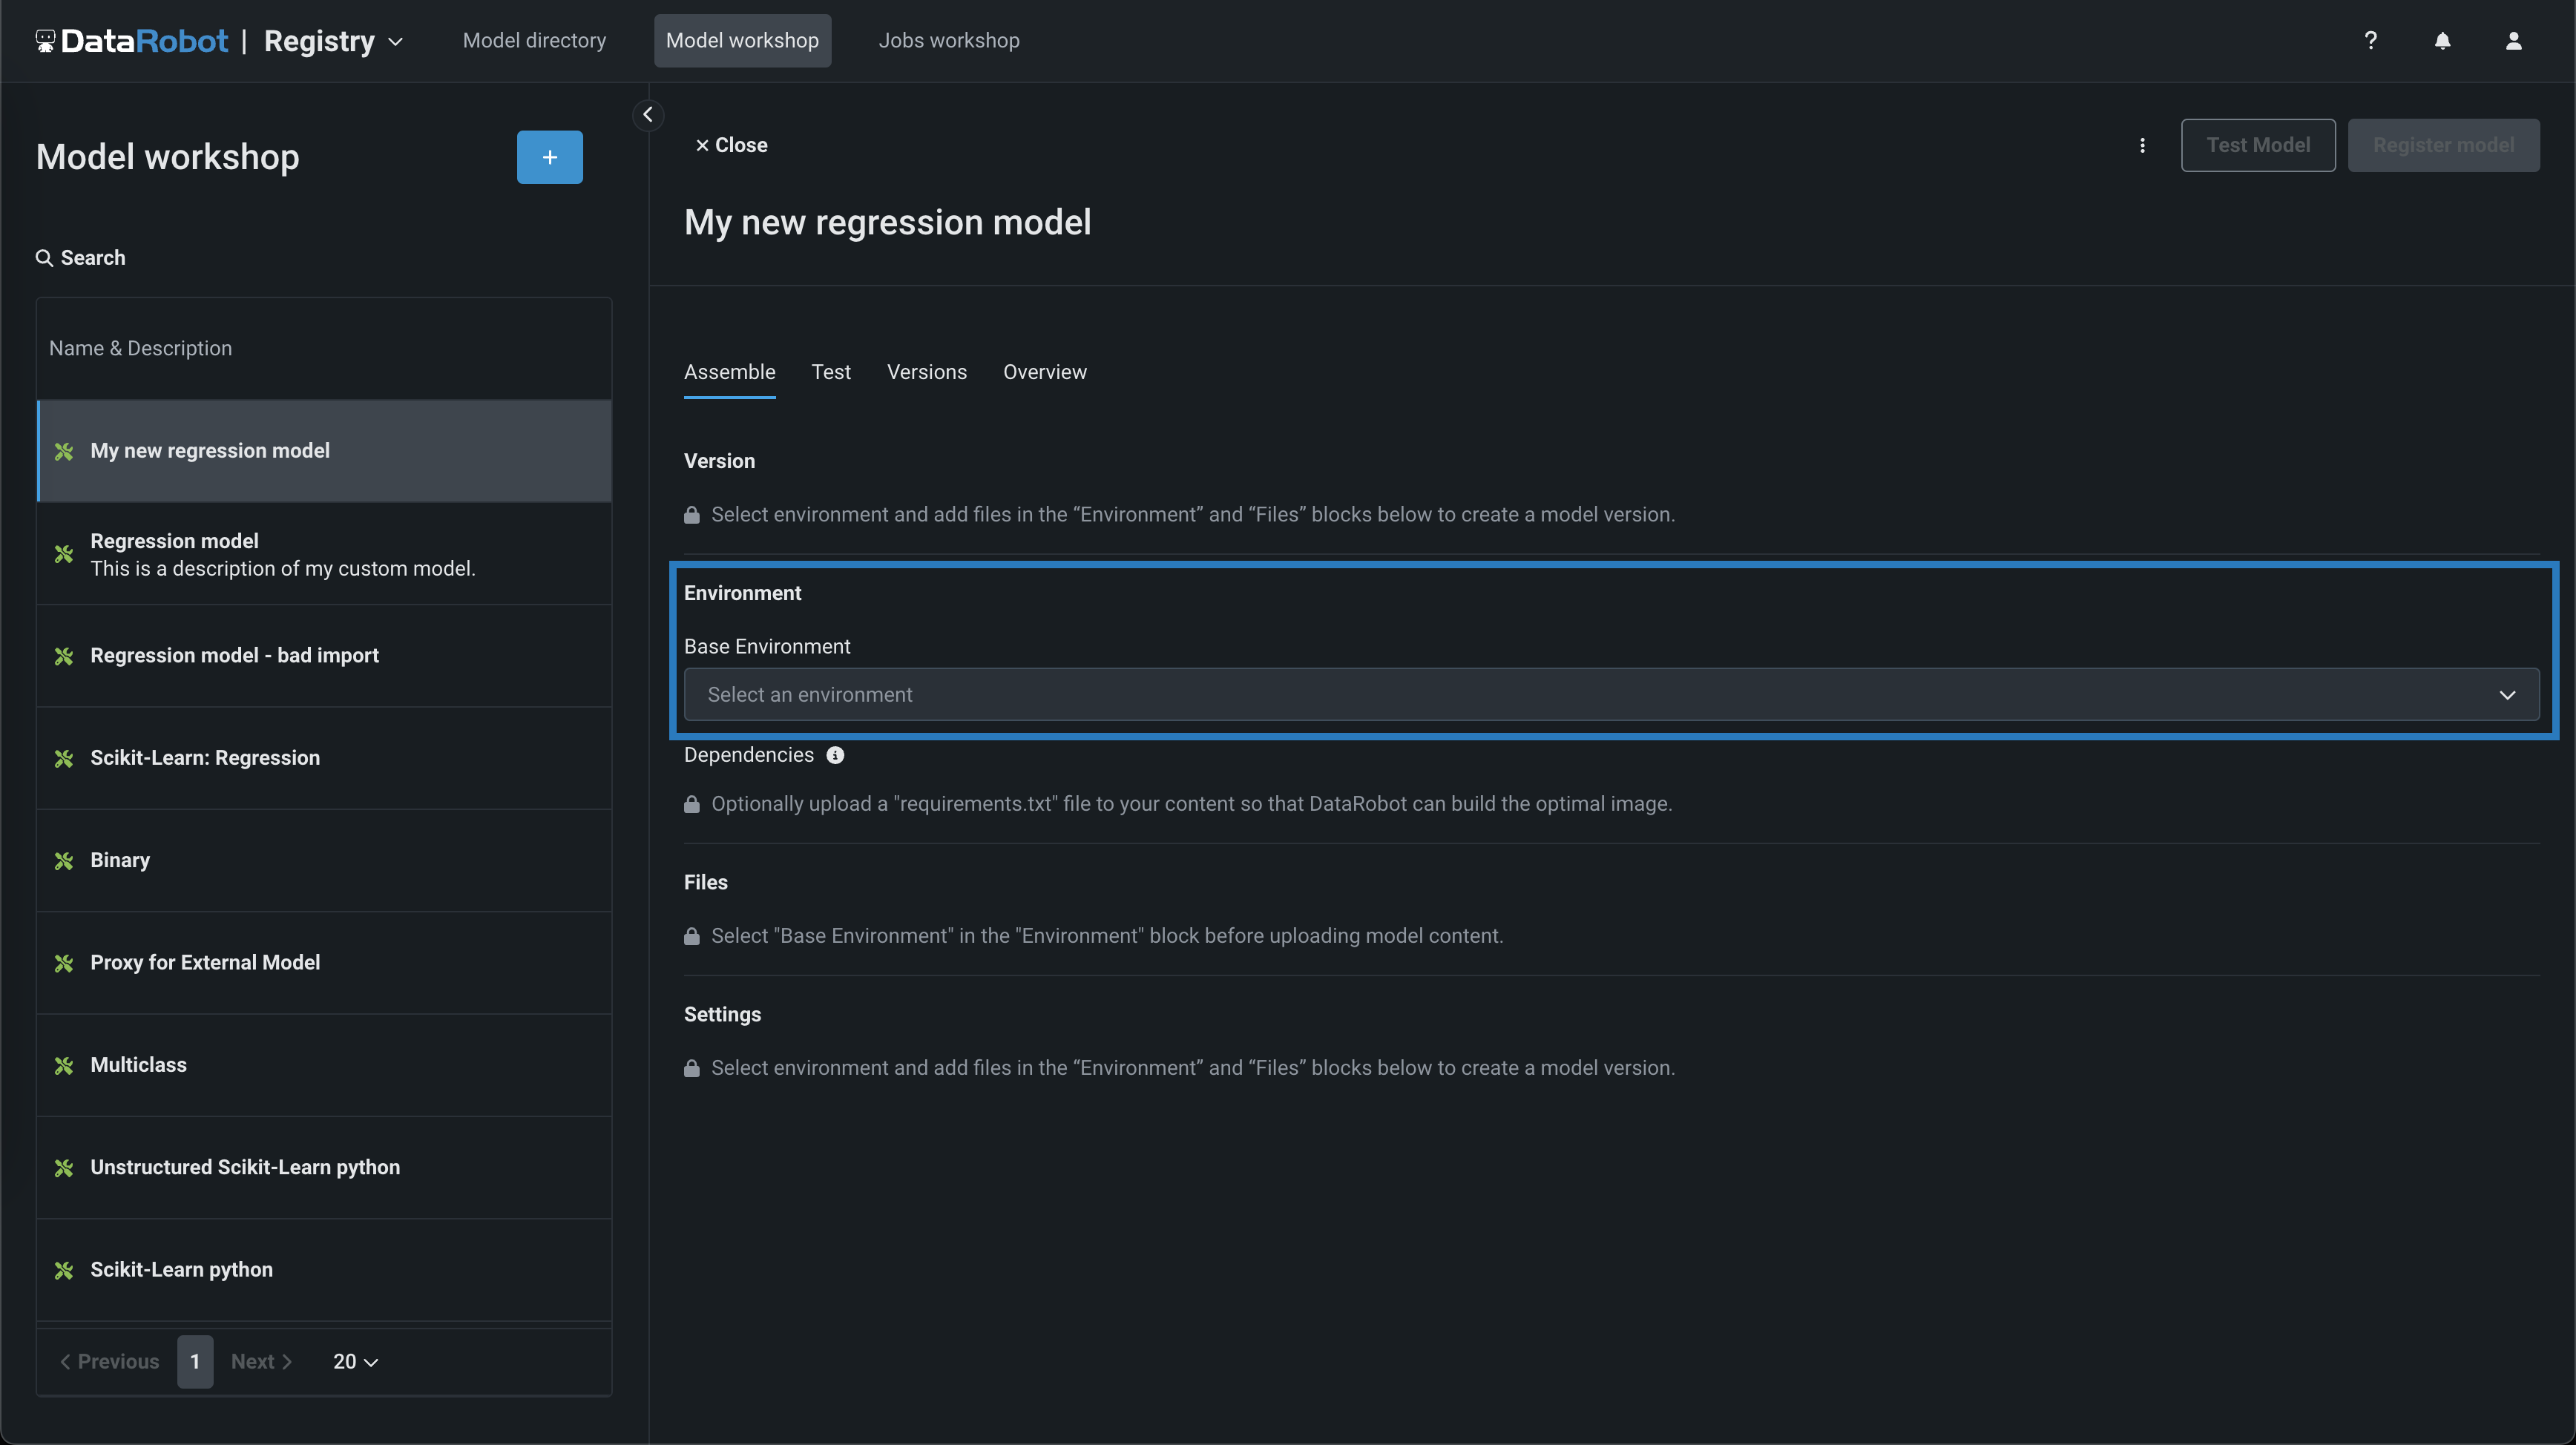
モデル環境
モデル環境は、カスタムモデルのテストとデプロイに使用されます。 基本環境ドロップダウンリストには、 ドロップインモデル環境と、作成可能な カスタム環境が含まれています。 デフォルトでは、カスタムモデルは、正常に構築され、選択された環境の最新バージョンを使用します。
-
依存関係セクションに入力するために、ファイルセクションで
requirements.txtファイルをアップロードし、DataRobotが最適なイメージを構築できるようにします。 -
ファイルセクションで、必要なプロキシモデルファイルを追加します。 モデルと ドロップイン環境をペアリングしていない場合、これにはカスタムモデル環境要件と
start_server.shファイルが含まれます。 ファイルの追加方法はいくつかあります。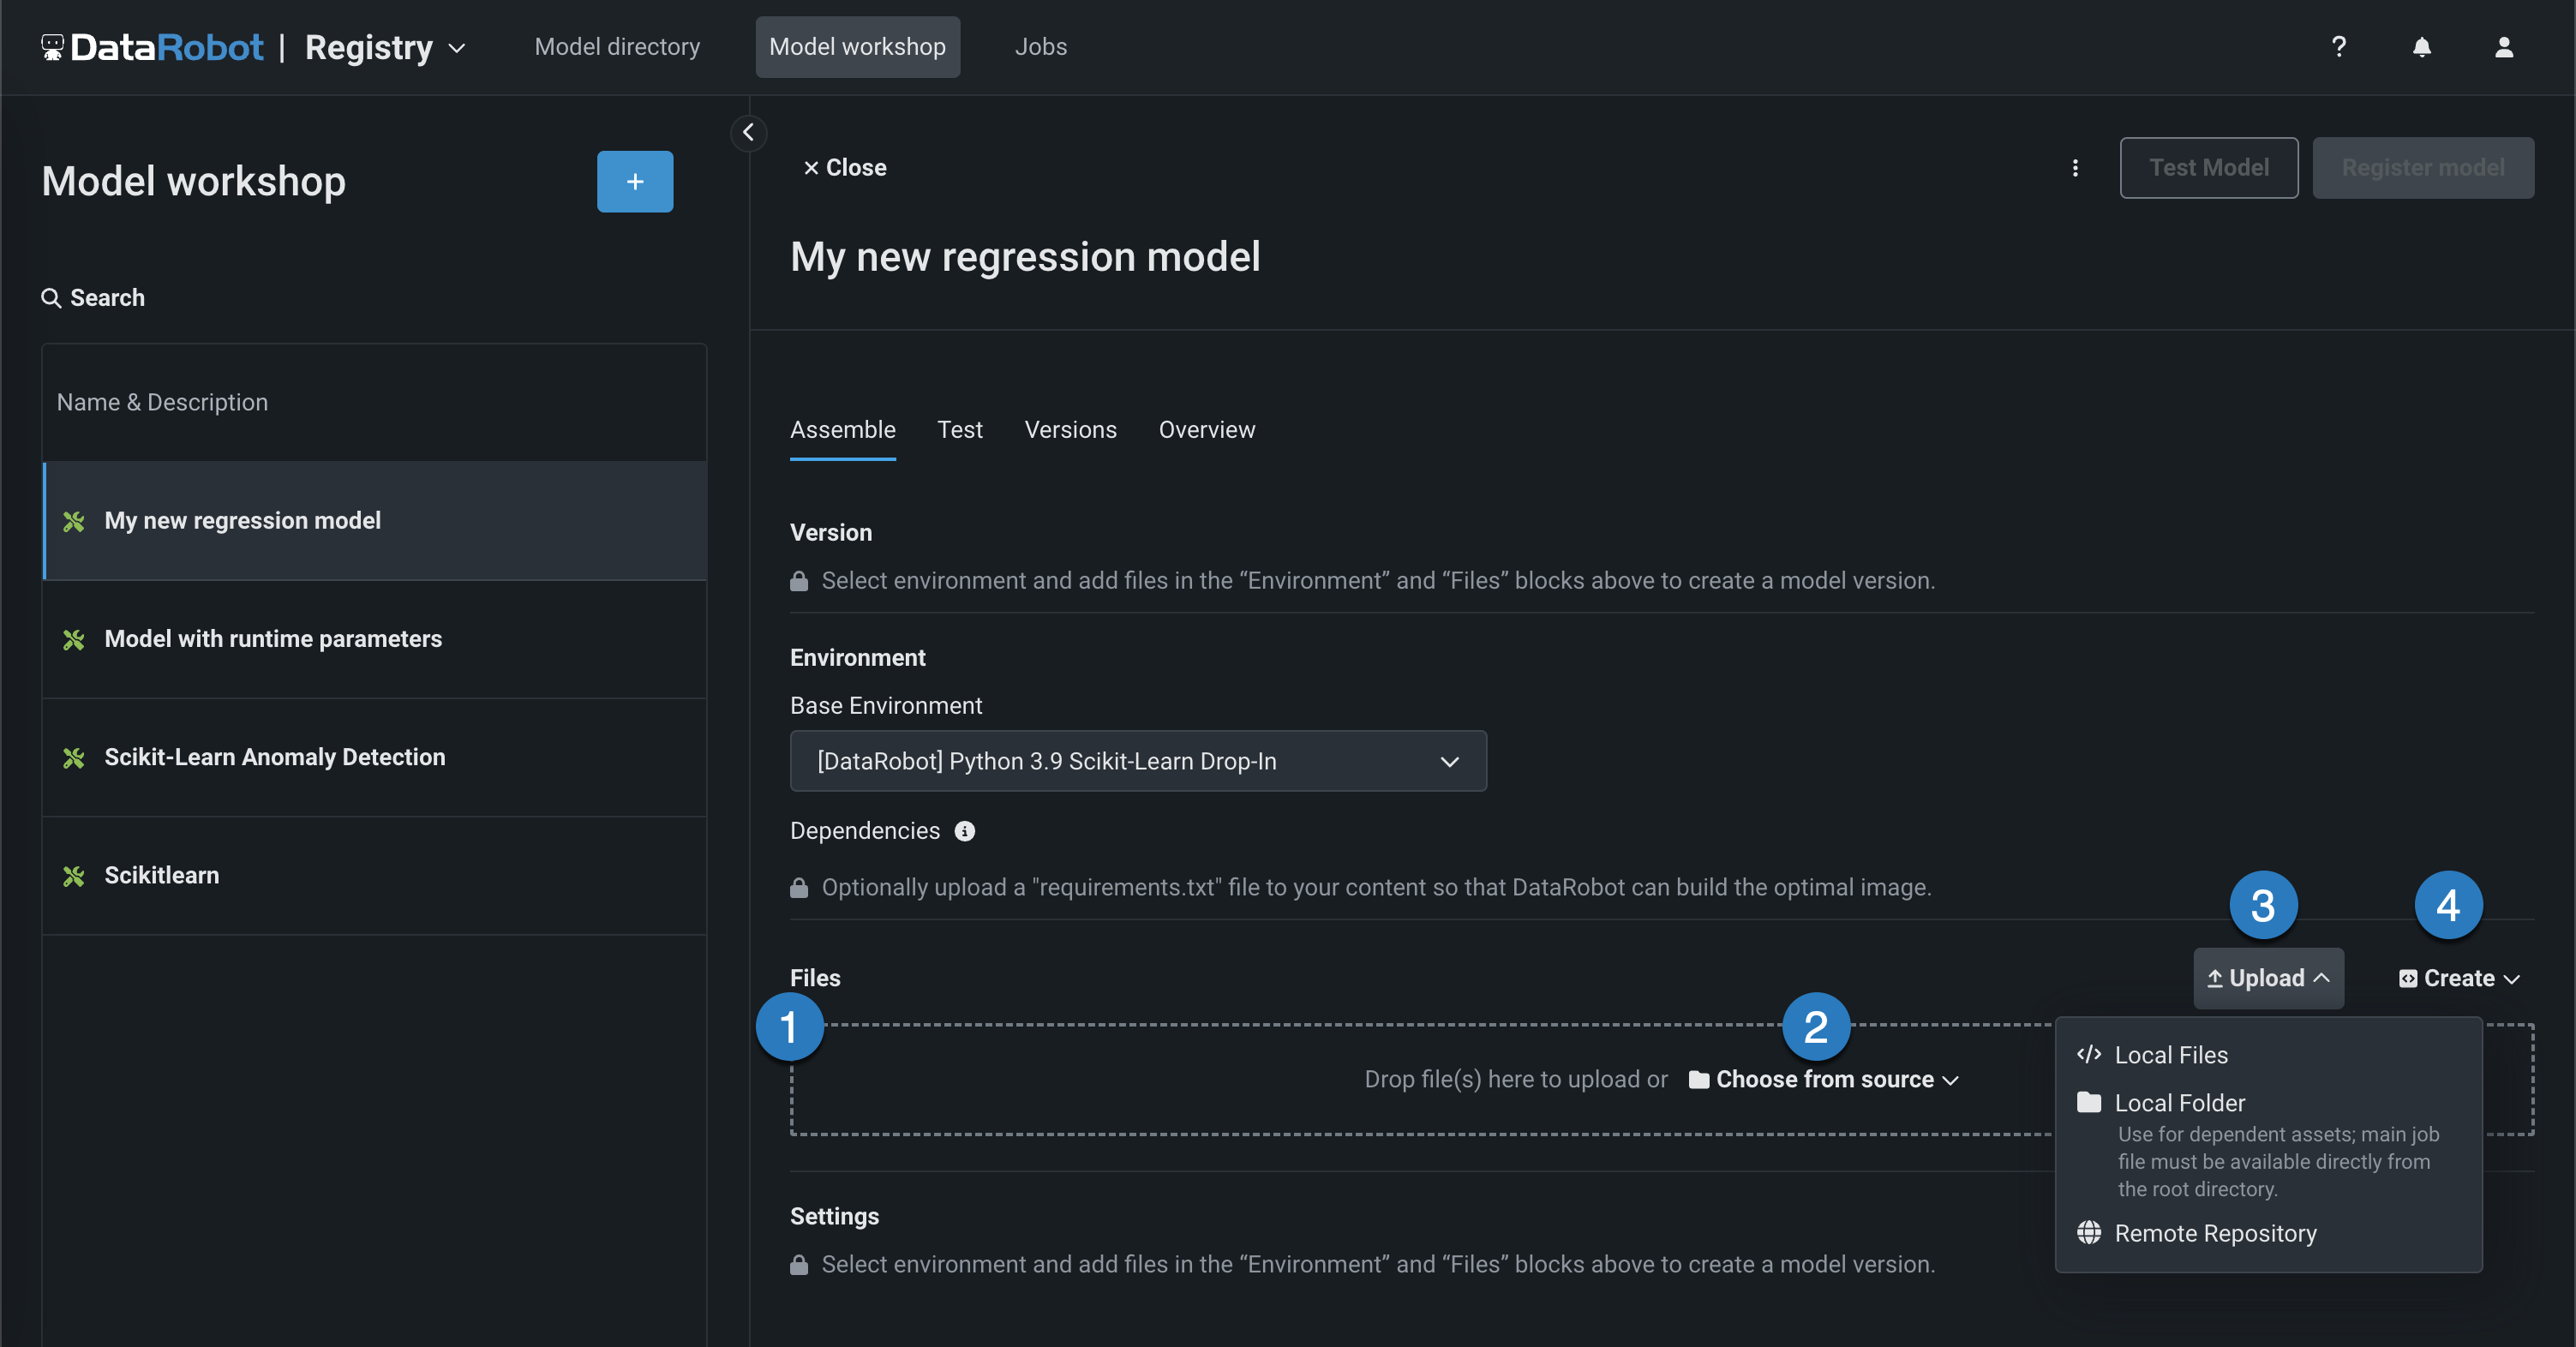
要素 説明 1 ファイル ファイルをグループボックスにドラッグしてアップロードします。 2 ソースから選択 クリックしてローカルファイルまたはローカルフォルダーを参照します。 リモートリポジトリからファイルをプルするには、 アップロードメニューを使用します。 3 アップロード クリックしてローカルファイルまたはローカルフォルダーを参照するか、 リモートリポジトリからファイルをプルします。 4 作成 空のファイルまたはテンプレートとして新しいファイルを作成し、カスタムモデルに保存します。 - model-metadata.yamlを作成:ランタイムパラメーターファイルの基本的で編集可能な例を作成します。
- 空白ファイルを作成:空のファイルを作成します。 名称未設定の横にある編集アイコン()をクリックしてファイル名と拡張子を入力し、カスタムコンテンツを追加します。
ファイルに関する注意事項
既存のファイルと同じ名前の新しいファイルを追加する場合、保存をクリックすると、ファイルセクションで古いファイルが置き換えられます。 ローカルフォルダーからファイルを追加する場合は、モデルファイルがすでにカスタムモデルのルートにあることを確認してください。 アップロードされたフォルダーは、モデル自体ではなく、モデルに必要な依存ファイルおよび追加のアセット用です。 モデルファイルがフォルダーに含まれている場合でも、ファイルがルートレベルに存在しない限り、DataRobotからモデルファイルにアクセスすることはできません。 ルートにあるファイルは、フォルダー内の依存関係を指定することができます。
-
アセンブルタブの設定セクションで、リソースの横にある()編集をクリックし、ネットワークアクセスを公開に設定します。
-
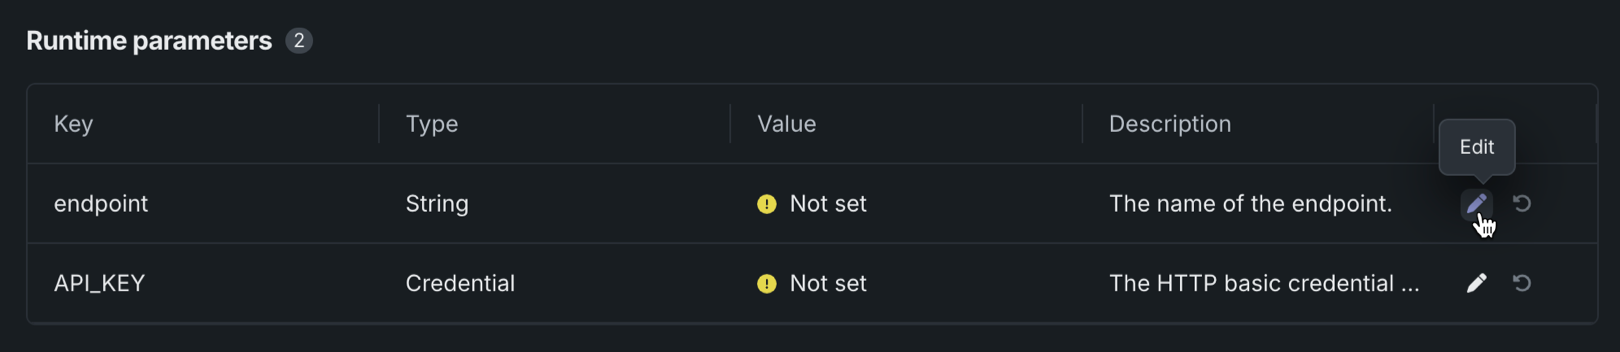
モデルメタデータでランタイムパラメーターを提供した場合、環境を構築し、新しいバージョンを作成すると、ランタイムパラメーターセクションでそれらのパラメーターを設定できます。
-
最後に、カスタムモデルを登録して、デプロイ可能なプロキシモデルを作成できます。