Time series model package prediction intervals
Availability information
Time series prediction interval support for model packages, available as a preview feature, is off by default. Contact your DataRobot representative or administrator for information on enabling the feature.
Feature flag: Enable computation of all Time-Series Intervals for .mlpkg
Now available for preview, you can enable the computation of a model's time series prediction intervals (from 1 to 100) during model package generation when you download or register a time series model package.
Note
The Compute prediction intervals option is off by default because the computation and inclusion of prediction intervals can significantly increase the amount of time required to generate a model package.
Download a model package with prediction intervals
To run a DataRobot time series model in a remote prediction environment, you download a model package (.mlpkg file) from the model's deployment or the Leaderboard. In both locations, you can now choose to Compute prediction intervals during model package generation. You can then run prediction jobs with a portable prediction server (PPS) outside DataRobot.
Deployment model package download
To download a model package with prediction intervals from a deployment, ensure that your deployment supports model package downloads. The deployment must have a DataRobot build environment and an external prediction environment, which you can verify using the Governance Lens in the deployment inventory:

-
In the external deployment, click Predictions > Portable Predictions.
-
Click Compute prediction intervals, then click Download model package (.mlpkg).
The download appears in the downloads bar when complete.
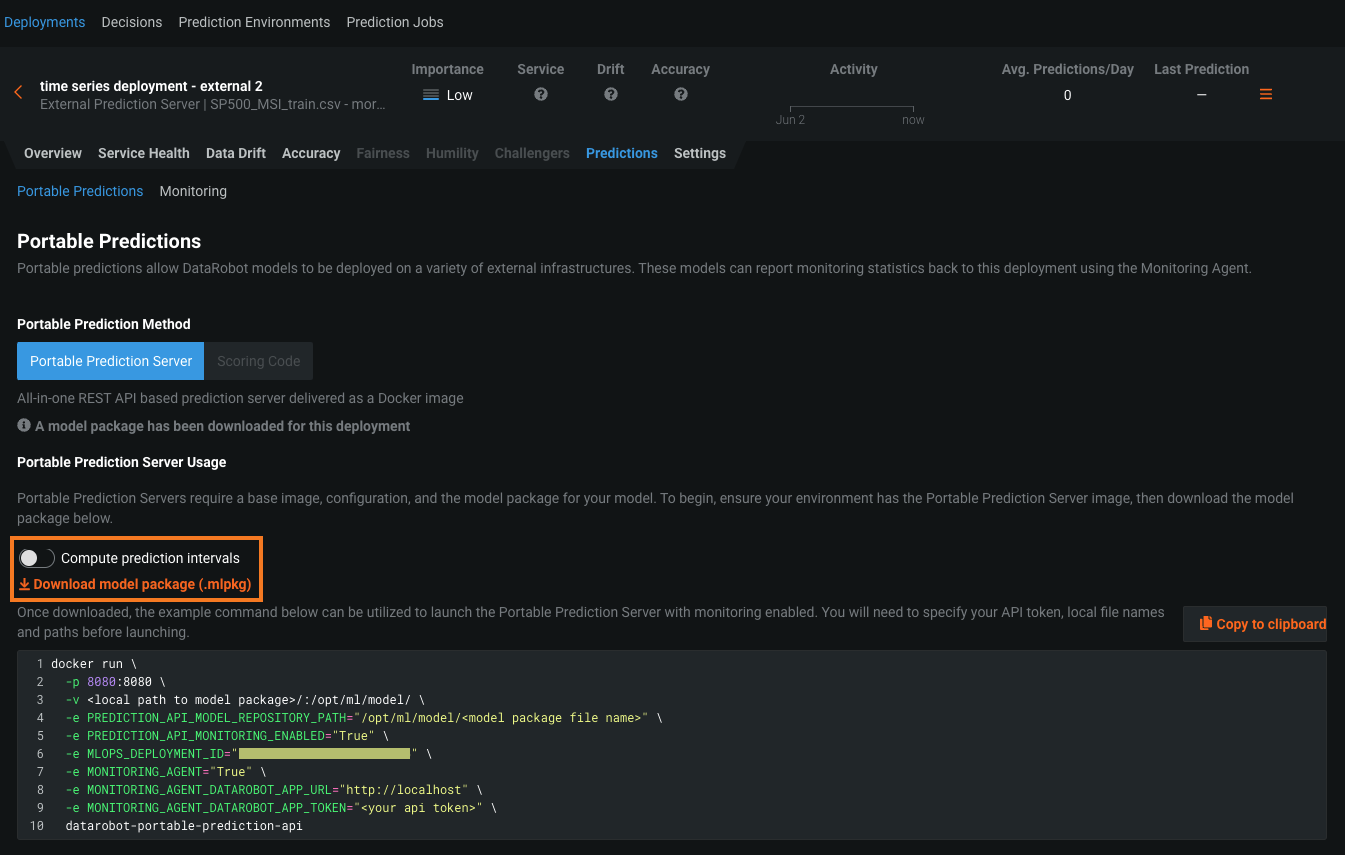
-
Once the PPS download completes, use the provided code snippet to launch the Portable Prediction Server with the downloaded model package.
Leaderboard model package download
To download a model package with prediction intervals from a model on the Leaderboard, you can use the Predict > Deploy or Predict > Portable Predictions tab.
Availability information
The ability to download a model package from the Deploy tab requires the Enable MMM model package export preview feature flag.
To download from the Predict > Deploy tab, take the following steps:
-
Navigate to the model in the Leaderboard, then click Predict > Deploy.
-
Click Compute prediction intervals, and then click Download .mlpkg.
The download appears in the downloads bar when complete.

Availability information
The ability to download a model package from the Portable Predictions tab depends on the MLOps configuration for your organization.
To download from the Predict > Portable Predictions tab, take the following steps:
-
Navigate to the model in the Leaderboard, then click Predict > Portable Predictions.
-
Click Compute prediction intervals, and then click Download .mlpkg.
The download appears in the downloads bar when complete.

-
Once the PPS download completes, use the provided code snippet to launch the Portable Prediction Server with the downloaded model package.
PPS prediction interval configuration
After you've enabled prediction intervals for a model package and deployed the model to a portable prediction server, you can configure the prediction intervals percentile and exponential trend in the .yaml PPS configuration file or through the use of PPS environment variables. For more information on PPS configuration, see the Portable Prediction Server documentation.
Note
The environment variables below are only used if the YAML configuration isn't provided.
| YAML Variable / Environment Variable | Description | Type | Default |
|---|---|---|---|
prediction_intervals_percentile / MLOPS_PREDICTION_INTERVALS_PERCENTILE |
Sets the percentile to use when defining the prediction interval range. | integer | 80 |
Register and deploy a model package with prediction intervals
You can also include prediction intervals in a model package when you register a time series model to the Model Registry. When you deploy the resulting model package, you can access the Predictions > Prediction Intervals tab in the deployment.
-
On the Leaderboard, select the model to use for generating predictions. DataRobot recommends a model with the Recommended for Deployment and Prepared for Deployment badges. The model preparation process runs feature impact, retrains the model on a reduced feature list, and trains on a higher sample size, followed by the entire sample (latest data for date/time partitioned projects).
Important
The Deploy tab behaves differently in environments without a dedicated prediction server, as described in the section on shared modeling workers.
-
Click Predict > Deploy. If the Leaderboard model doesn't have the Prepare for Deployment badge, DataRobot recommends you click Prepare for Deployment to run the model preparation process for that model.
Tip
If you've already added the model to the Model Registry, the registered model version appears in the Model Versions list and you can click Deploy next to the model in and skip the rest of this process.
-
Under Deploy model, click Register to deploy.
-
In the Register new model dialog box, provide the following model package information, enable Include prediction intervals to compute prediction intervals during the time series model package build process.
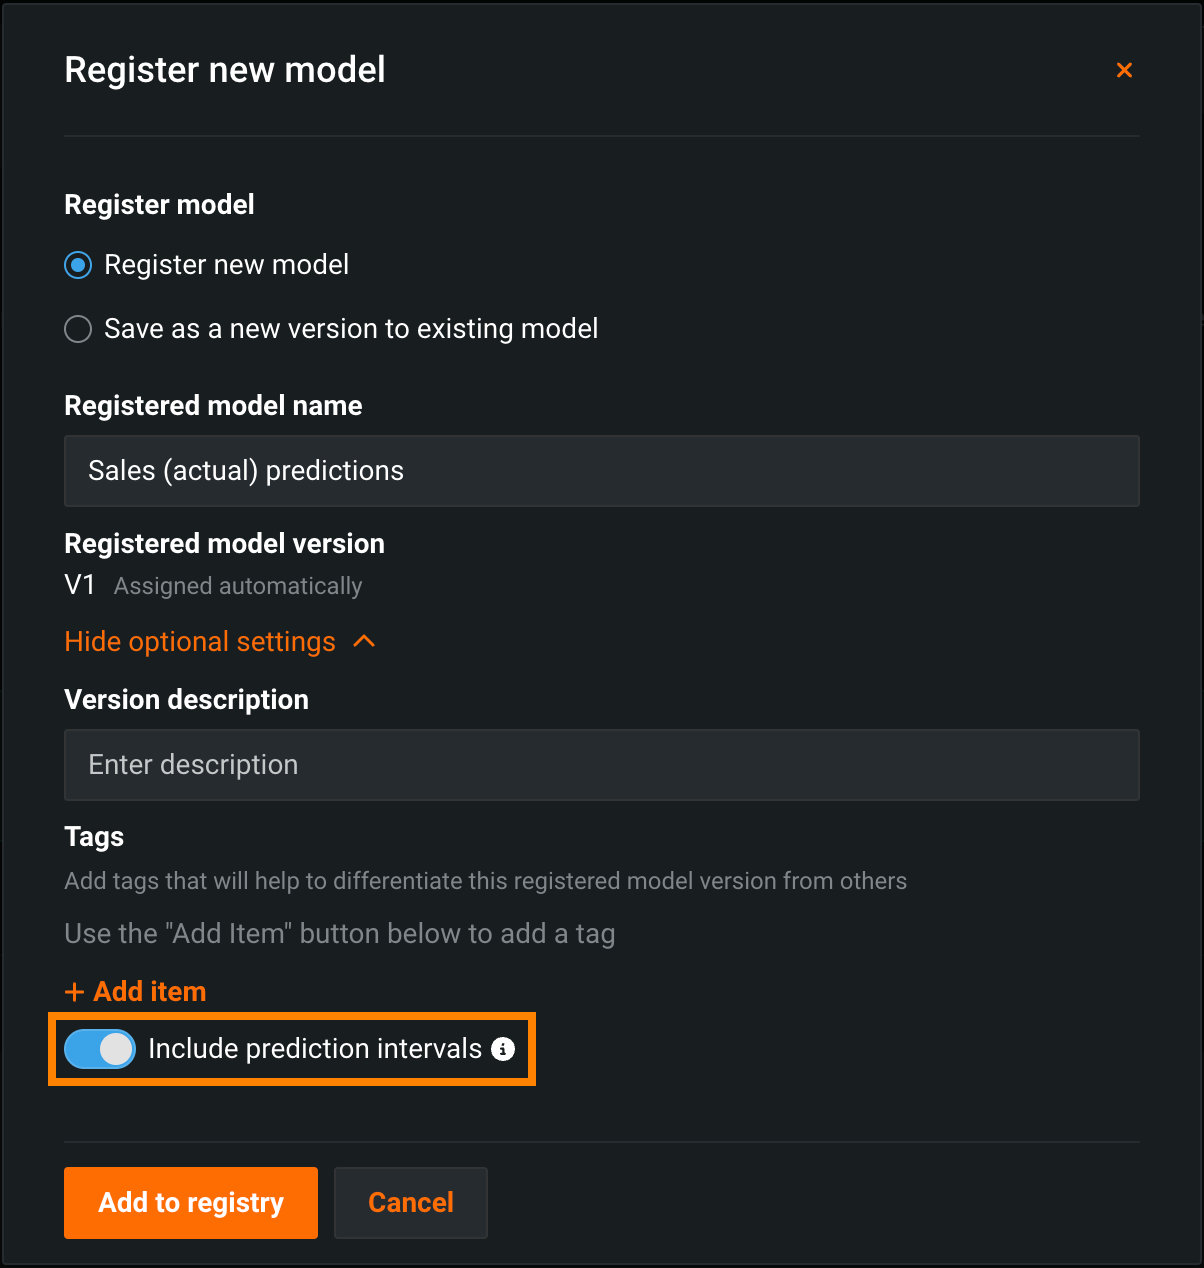
Preview: Time series prediction intervals
When you deploy a model package with prediction intervals, the Predictions > Prediction Intervals tab is available in the deployment. For deployed model packages built without computing intervals, the deployment's Predictions > Prediction Intervals tab is hidden; however, older time series deployments without computed prediction intervals may display the Prediction Intervals tab if they were deployed prior to August 2022.
-
Click Add to registry. The model opens on the Model Registry > Registered Models tab.
-
While the registered model builds, click Deploy and then configure the deployment settings.
-
Click Deploy model.