Create custom jobs
When you create a custom job, you must assemble the required execution environment and files before running the job. Only the execution environment and an entry point file (typically run.sh) are required; however, you can designate any file as the entry point. If you add other files to create the job, the entry point file should reference those files. In addition, to configure runtime parameters, create or upload a metadata.yaml file containing the runtime parameter configuration for the job.
Add a custom job
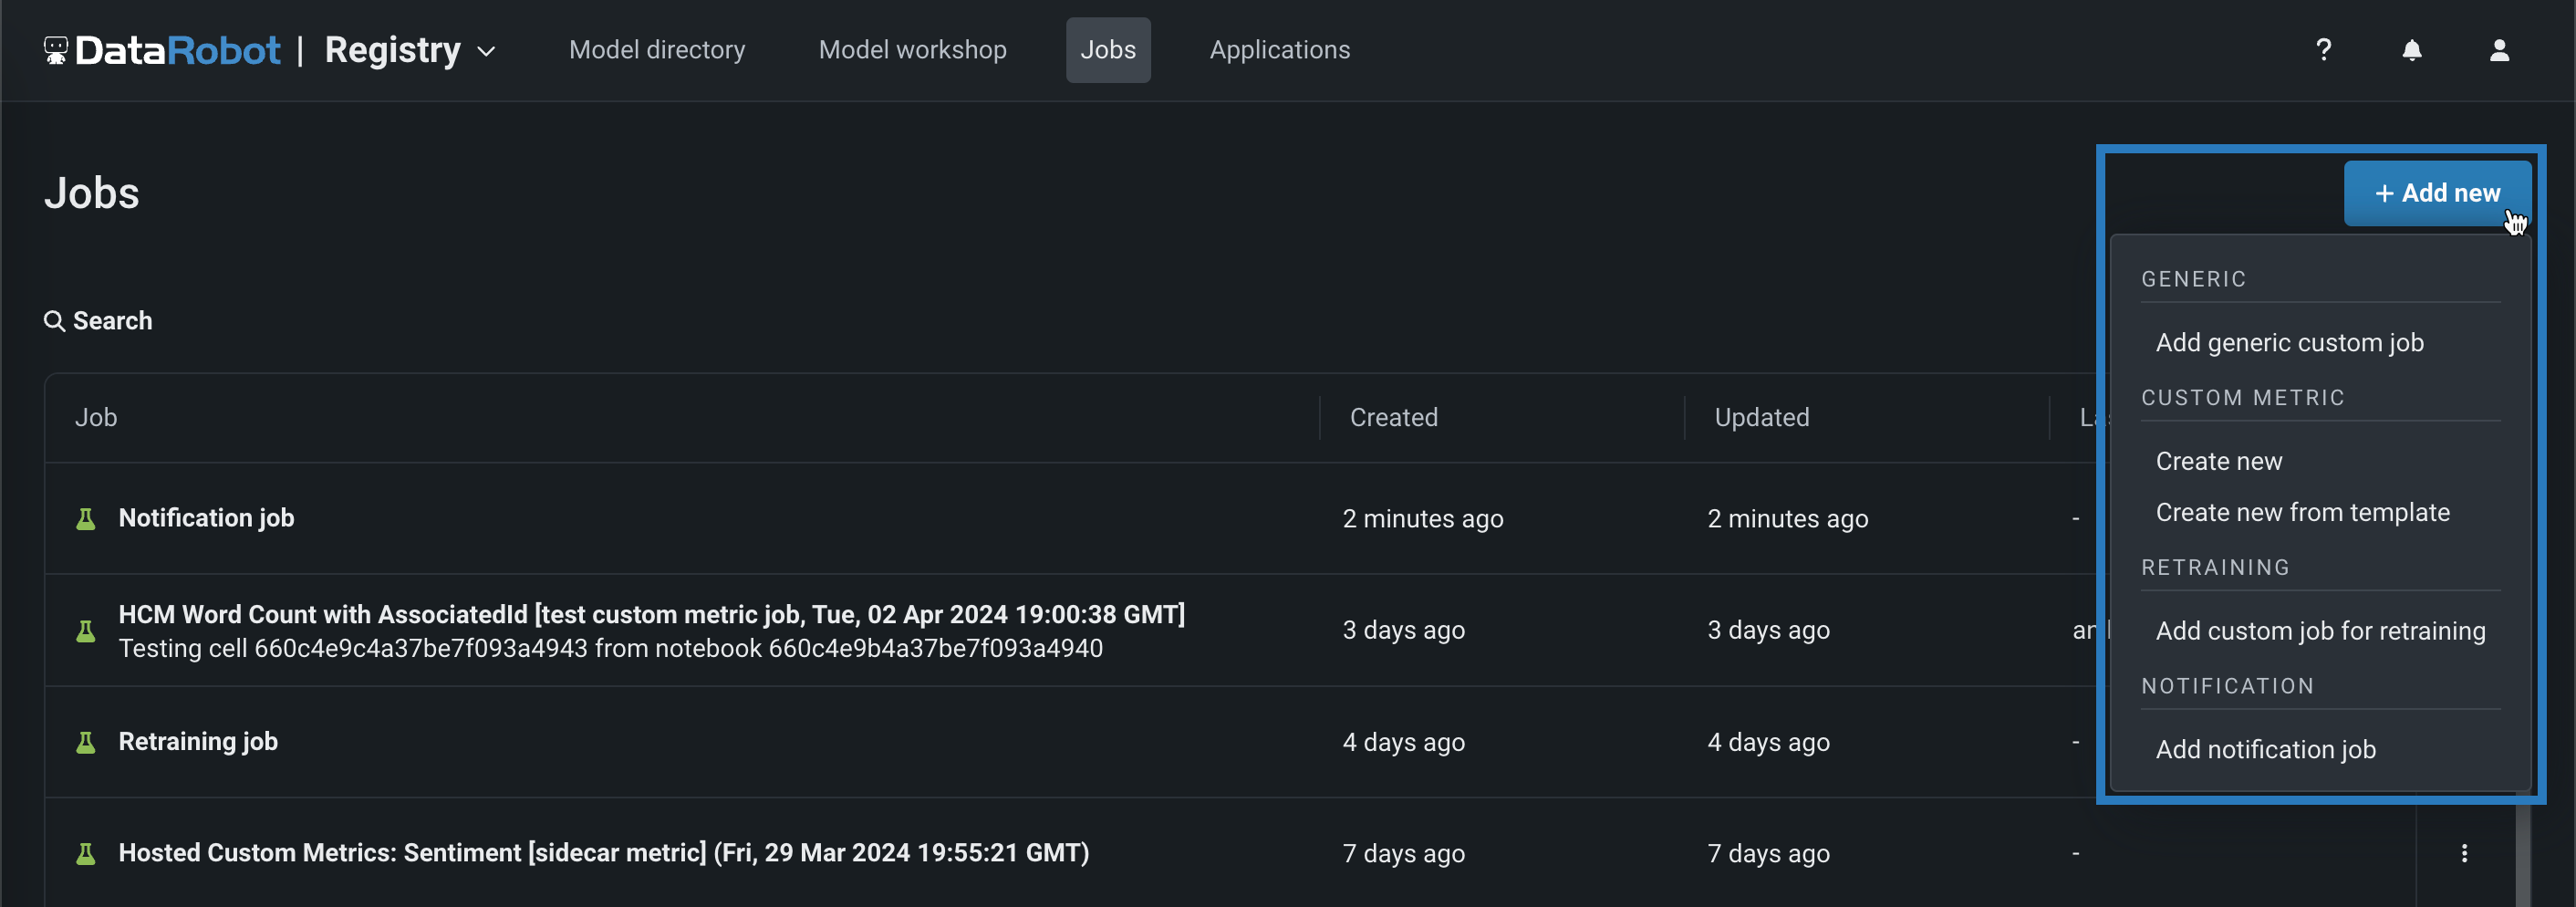
To register and assemble a new custom job in the Registry, click Registry > Jobs, click + Add new (or the button when the custom job panel is open), select one of the following custom job types, and proceed to the configuration steps linked in the table:
| Custom job type | Description |
|---|---|
| Add generic custom job | Add a custom job to implement automation (for example, custom tests) for models and deployments. |
| Create new | Add a custom job for a new hosted custom metric, defining the custom metric settings and associating the metric with a deployment. |
| Create new from template | Add a custom job for a custom metric from a template provided by DataRobot, associating the metric with a deployment and setting a baseline. |
| Add custom job for retraining | Add a custom job implementing a code-based retraining policy. |
| Add notification job | Add a custom job implementing a code-based notification policy. |
Create a generic custom job
To create a generic job:
-
On the Assemble tab for the new job, click the edit icon () to update the job name:

-
In the Environment section, select a Base environment for the job.
-
In the Files section, assemble the custom job. Drag files into the box, or use the options in this section to create or upload the files required to assemble a custom job:
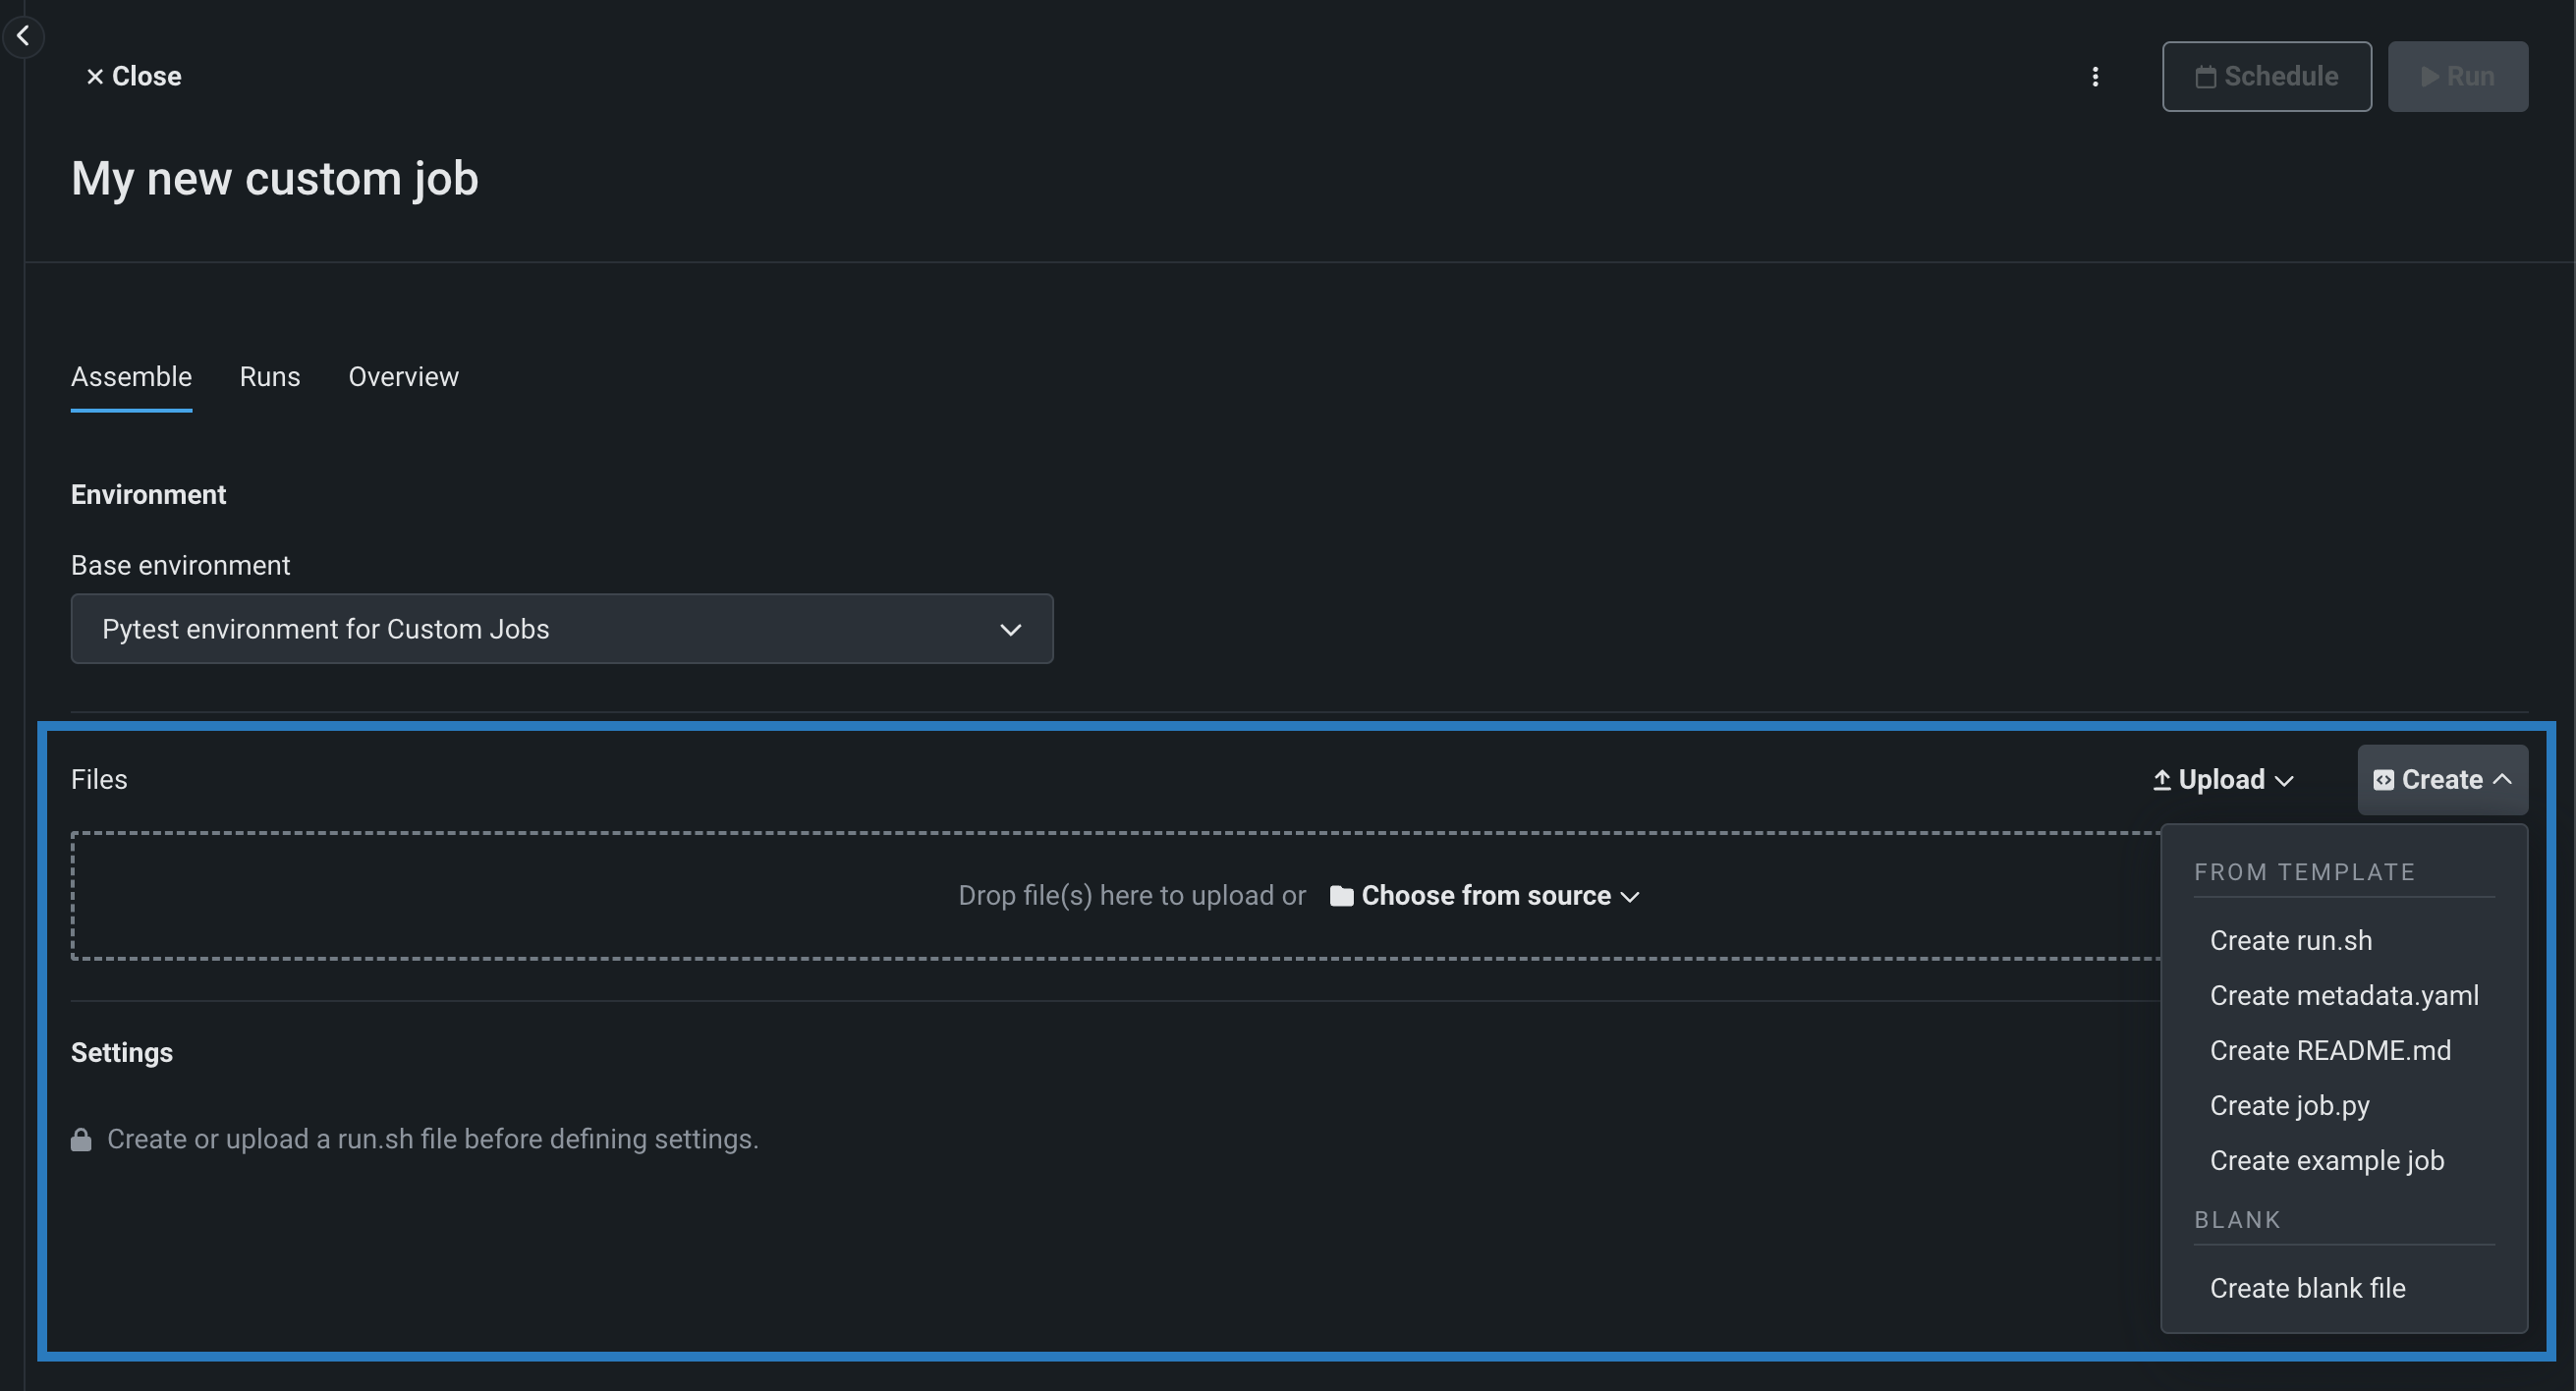
Option Description Choose from source / Upload Upload existing custom job files ( run.sh,metadata.yaml, etc.) as Local Files or a Local Folder.Create Create a new file, empty or containing a template, and save it to the custom job: - Create run.sh: Creates a basic, editable example of an entry point file.
- Create metadata.yaml: Creates a basic, editable example of a runtime parameters file.
- Create README.md: Creates a basic, editable README file.
- Create job.py: Creates a basic, editable Python job file to print runtime parameters and deployments.
- Create example job: Combines all template files to create a basic, editable custom job. You can quickly configure the runtime parameters and run this example job.
- Create blank file: Creates an empty file. Click the edit icon () next to Untitled to provide a file name and extension, then add your custom contents. In the next step, it is possible to identify files created this way, with a custom name and content, as the entry point. After you configure the new file, click Save.
File replacement
If you add a new file with the same name as an existing file, when you click Save, the old file is replaced in the Files section.
-
In the Settings section, configure the Entry point shell (
.sh) file for the job. If you've added arun.shfile, that file is the entry point; otherwise, you must select the entry point shell file from the drop-down list. The entry point file allows you to orchestrate multiple job files.: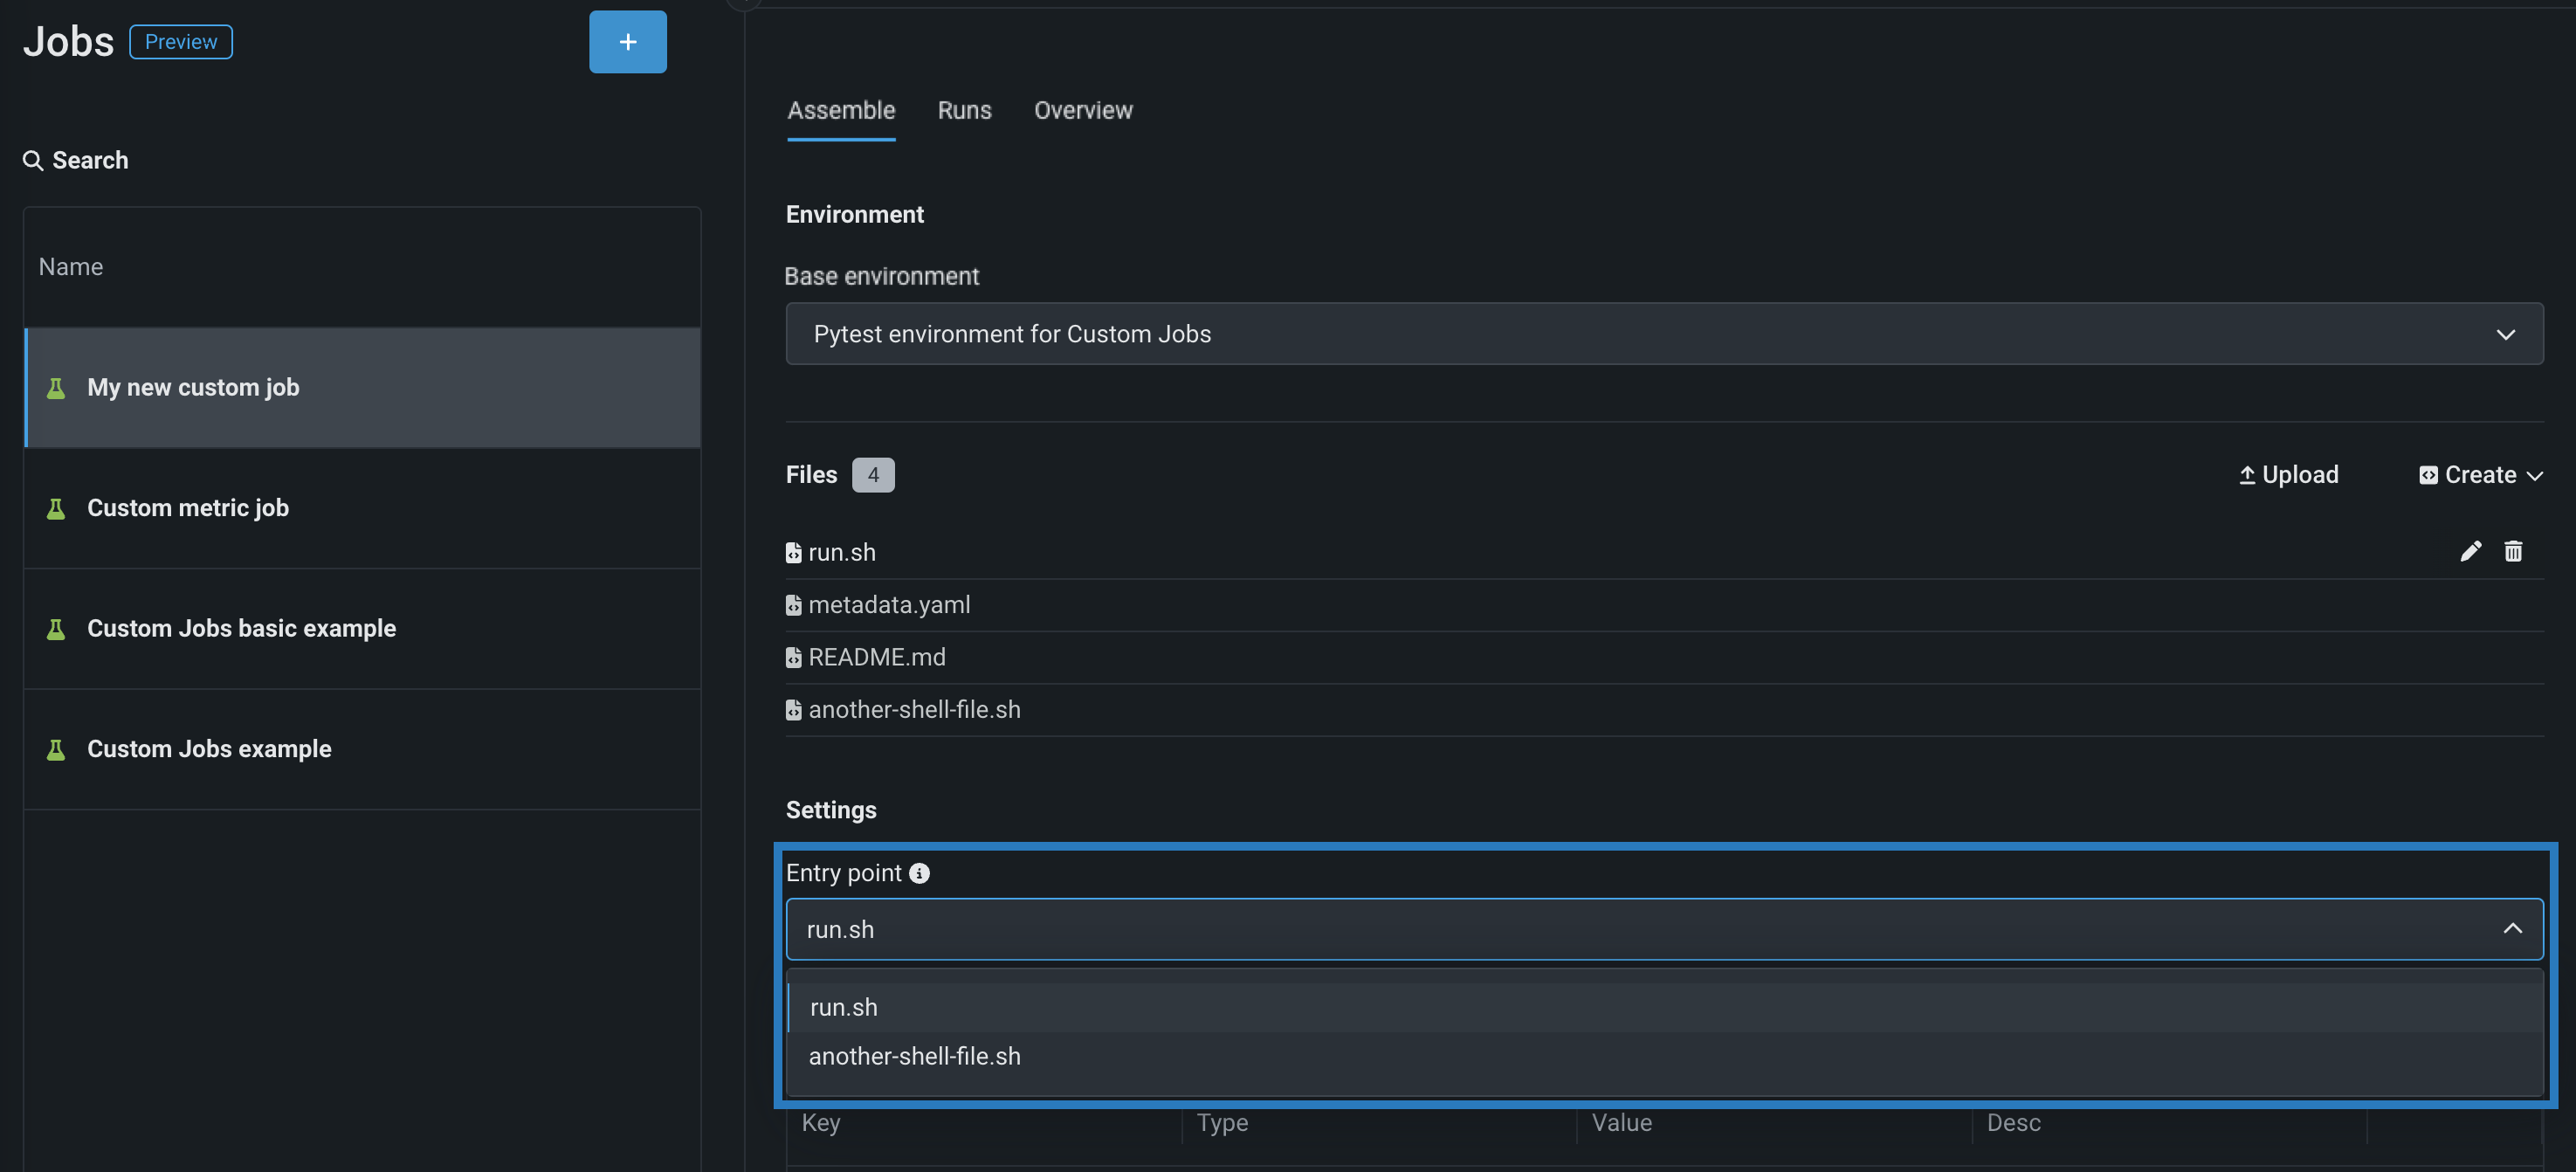
-
In the Resources section, next to the section header, click Edit and configure the following:
Availability information
Custom job resource bundles are available for preview and off by default. Contact your DataRobot representative or administrator for information on enabling this feature.
Feature flag: Enable Resource Bundles

Setting Description Resource bundle Preview feature. Configure the resources the custom job uses to run. Network access Configure the egress traffic of the custom job. Under Network access, select one of the following: - Public: The default setting. The custom job can access any fully qualified domain name (FQDN) in a public network to leverage third-party services.
- None: The custom job is isolated from the public network and cannot access third party services.
Default network access
For the Managed AI Platform, the Network access setting is set to Public by default and the setting is configurable. For the Self-Managed AI Platform, the Network access setting is set to None by default and the setting is restricted; however, an administrator can change this behavior during DataRobot platform configuration. Contact your DataRobot representative or administrator for more information.
-
(Optional) If you uploaded a
metadata.yamlfile, define the Runtime parameters, clicking the edit icon () for each key value row you want to configure.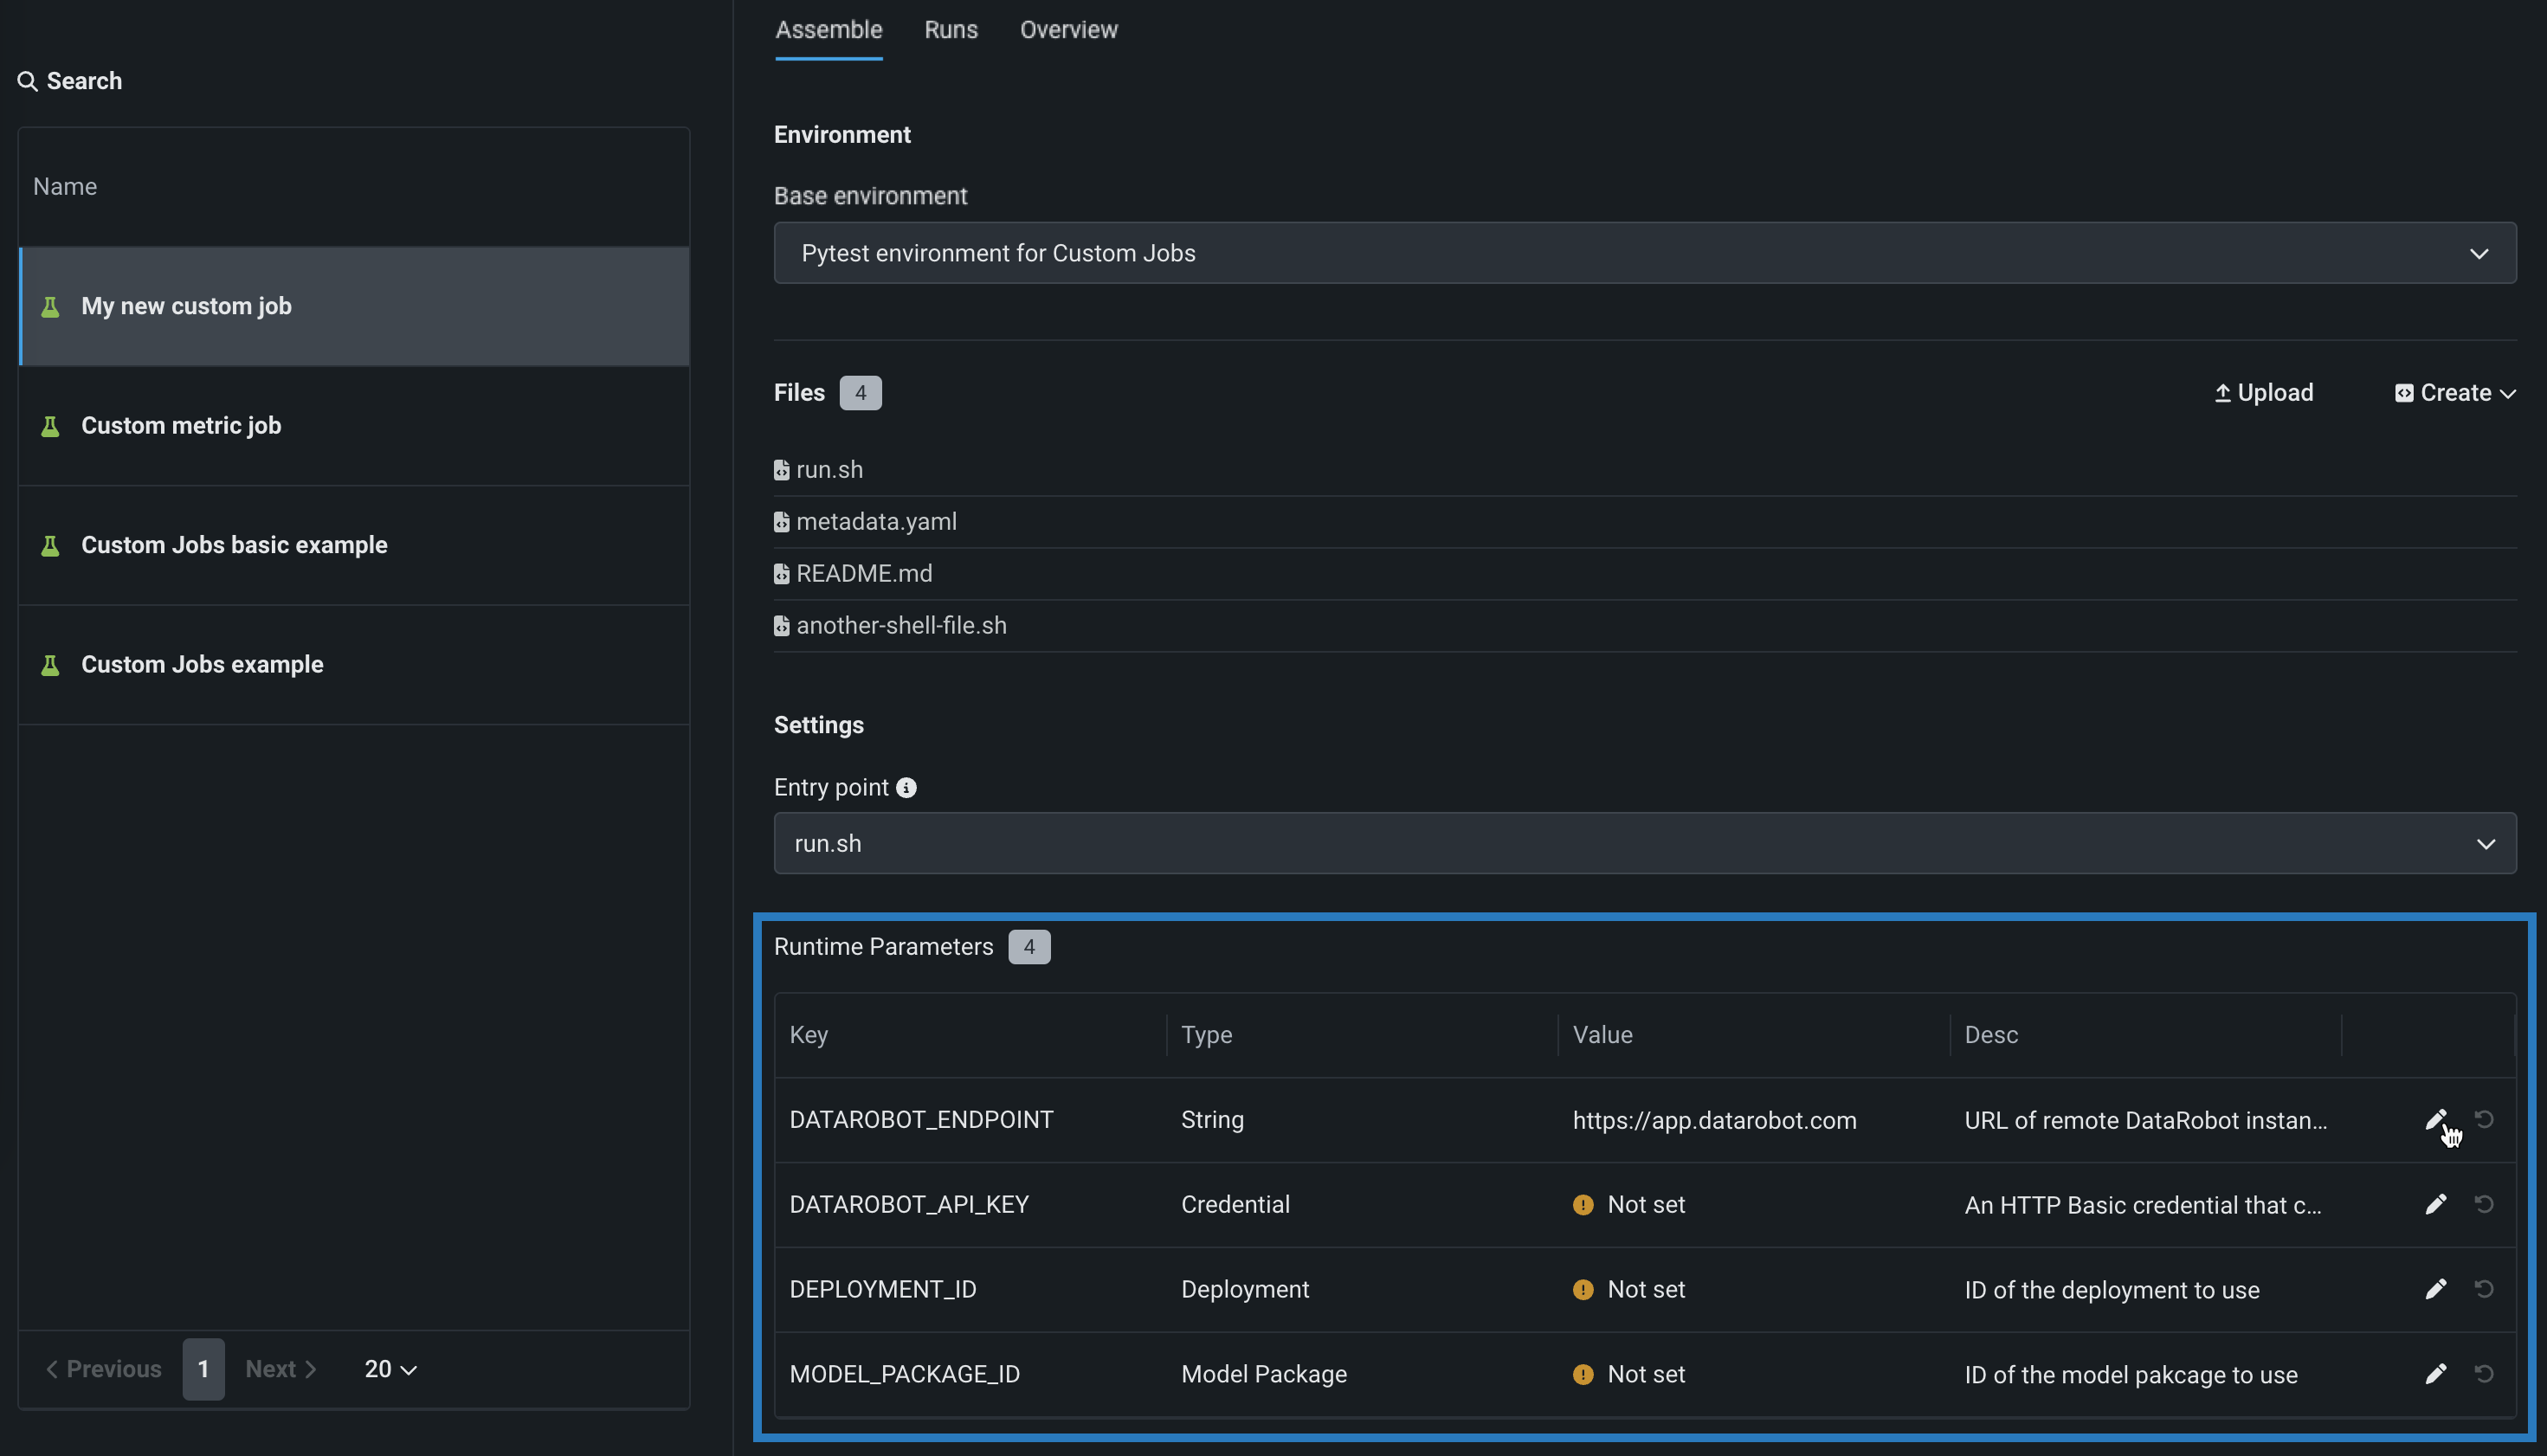
-
(Optional) Configure additional Key values for Tags, Metrics, Training parameters, and Artifacts.
Create a hosted custom metric job
To create a hosted custom metric job:
-
On the Assemble tab for the new custom metric job, click the edit icon () to update the job name:
-
In the Environment section, select a Base environment for the job.
-
In the Metadata section, configure the following custom metric job fields:
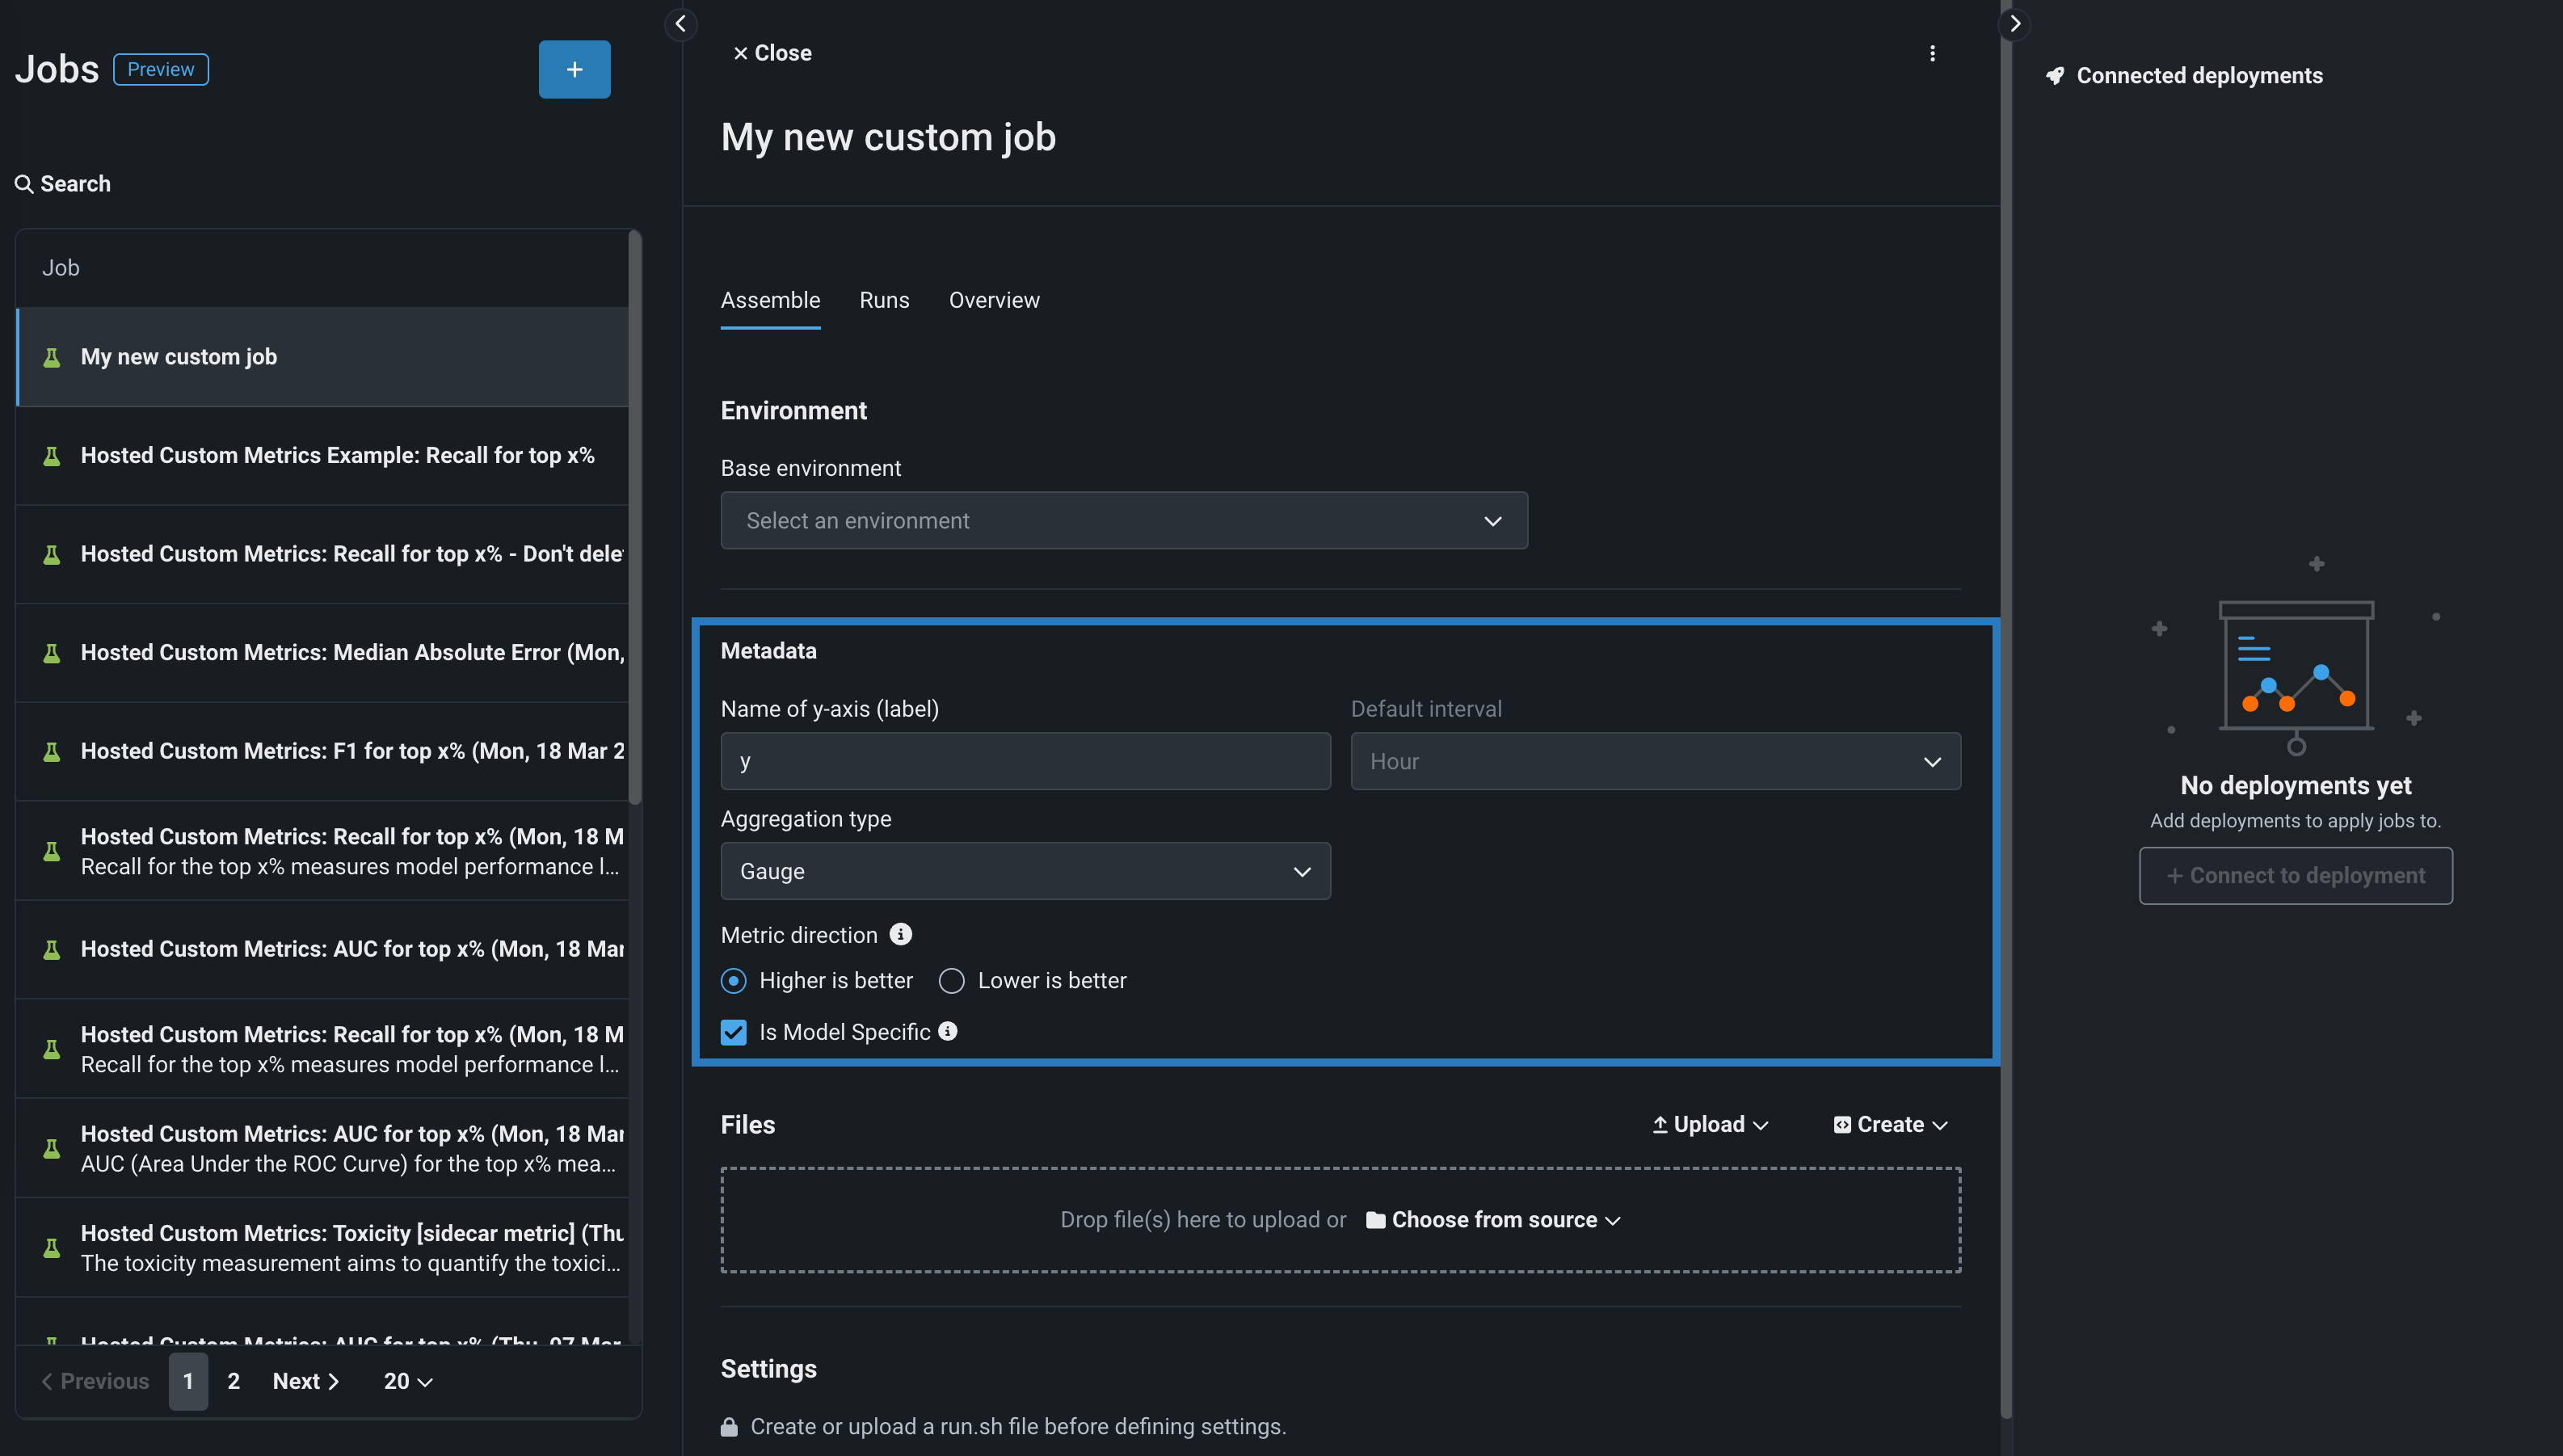
Field Description Name of y-axis (label) A descriptive name for the dependent variable. This name appears on the custom metric's chart on the Custom Metric Summary dashboard. Default interval Determines the default interval used by the selected Aggregation type. Only HOUR is supported. Aggregation type Determines if the metric is calculated as a Sum, Average, or Gauge—a metric with a distinct value measured at single point in time. Metric direction Determines the directionality of the metric, which controls how changes to the metric are visualized. You can select Higher is better or Lower is better. For example, if you choose Lower is better a 10% decrease in the calculated value of your custom metric will be considered 10% better, displayed in green. Is Model Specific When enabled, this setting links the metric to the model with the Model Package ID (Registered Model Version ID) provided in the dataset. This setting influences when values are aggregated (or uploaded). For example: - Model specific (enabled): Model accuracy metrics are model specific, so the values are aggregated completely separately. When you replace a model, the chart for your custom accuracy metric onlys show data for the days after the replacement.
- Not model specific (disabled): Revenue metrics aren't model specific, so the values are aggregated together. When you replace a model, the chart for your custom revenue metric doesn't change.
-
In the Files section, assemble the custom job. Drag files into the box, or use the options in this section to create or upload the files required to assemble a custom job:

Option Description Choose from source / Upload Upload existing custom job files ( run.sh,metadata.yaml, etc.) as Local Files or a Local Folder.Create Create a new file, empty or containing a template, and save it to the custom job: - Create run.sh: Creates a basic, editable example of an entry point file.
- Create metadata.yaml: Creates a basic, editable example of a runtime parameters file.
- Create README.md: Creates a basic, editable README file.
- Create job.py: Creates a basic, editable Python job file to print runtime parameters and deployments.
- Create example job: Combines all template files to create a basic, editable custom job. You can quickly configure the runtime parameters and run this example job.
- Create blank file: Creates an empty file. Click the edit icon () next to Untitled to provide a file name and extension, then add your custom contents. In the next step, it is possible to identify files created this way, with a custom name and content, as the entry point. After you configure the new file, click Save.
File replacement
If you add a new file with the same name as an existing file, when you click Save, the old file is replaced in the Files section.
-
In the Settings section, configure the Entry point shell (
.sh) file for the job. If you've added arun.shfile, that file is the entry point; otherwise, you must select the entry point shell file from the drop-down list. The entry point file allows you to orchestrate multiple job files:
-
In the Resources section, next to the section header, click Edit and configure the following:
Availability information
Custom job resource bundles are available for preview and off by default. Contact your DataRobot representative or administrator for information on enabling this feature.
Feature flag: Enable Resource Bundles

Setting Description Resource bundle (preview) Configure the resources the custom job uses to run. Network access Configure the egress traffic of the custom job. Under Network access, select one of the following: - Public: The default setting. The custom job can access any fully qualified domain name (FQDN) in a public network to leverage third-party services.
- None: The custom job is isolated from the public network and cannot access third party services.
Default network access
For the Managed AI Platform, the Network access setting is set to Public by default and the setting is configurable. For the Self-Managed AI Platform, the Network access setting is set to None by default and the setting is restricted; however, an administrator can change this behavior during DataRobot platform configuration. Contact your DataRobot representative or administrator for more information.
-
(Optional) If you uploaded a
metadata.yamlfile, define the Runtime parameters. Click the edit icon () for each key value row you want to configure.
-
(Optional) Configure additional Key values for Tags, Metrics, Training parameters, and Artifacts.
-
In the Connected deployments panel, click + Connect to deployment, define a Custom metric name, and select a Deployment ID to connect it to that deployment.
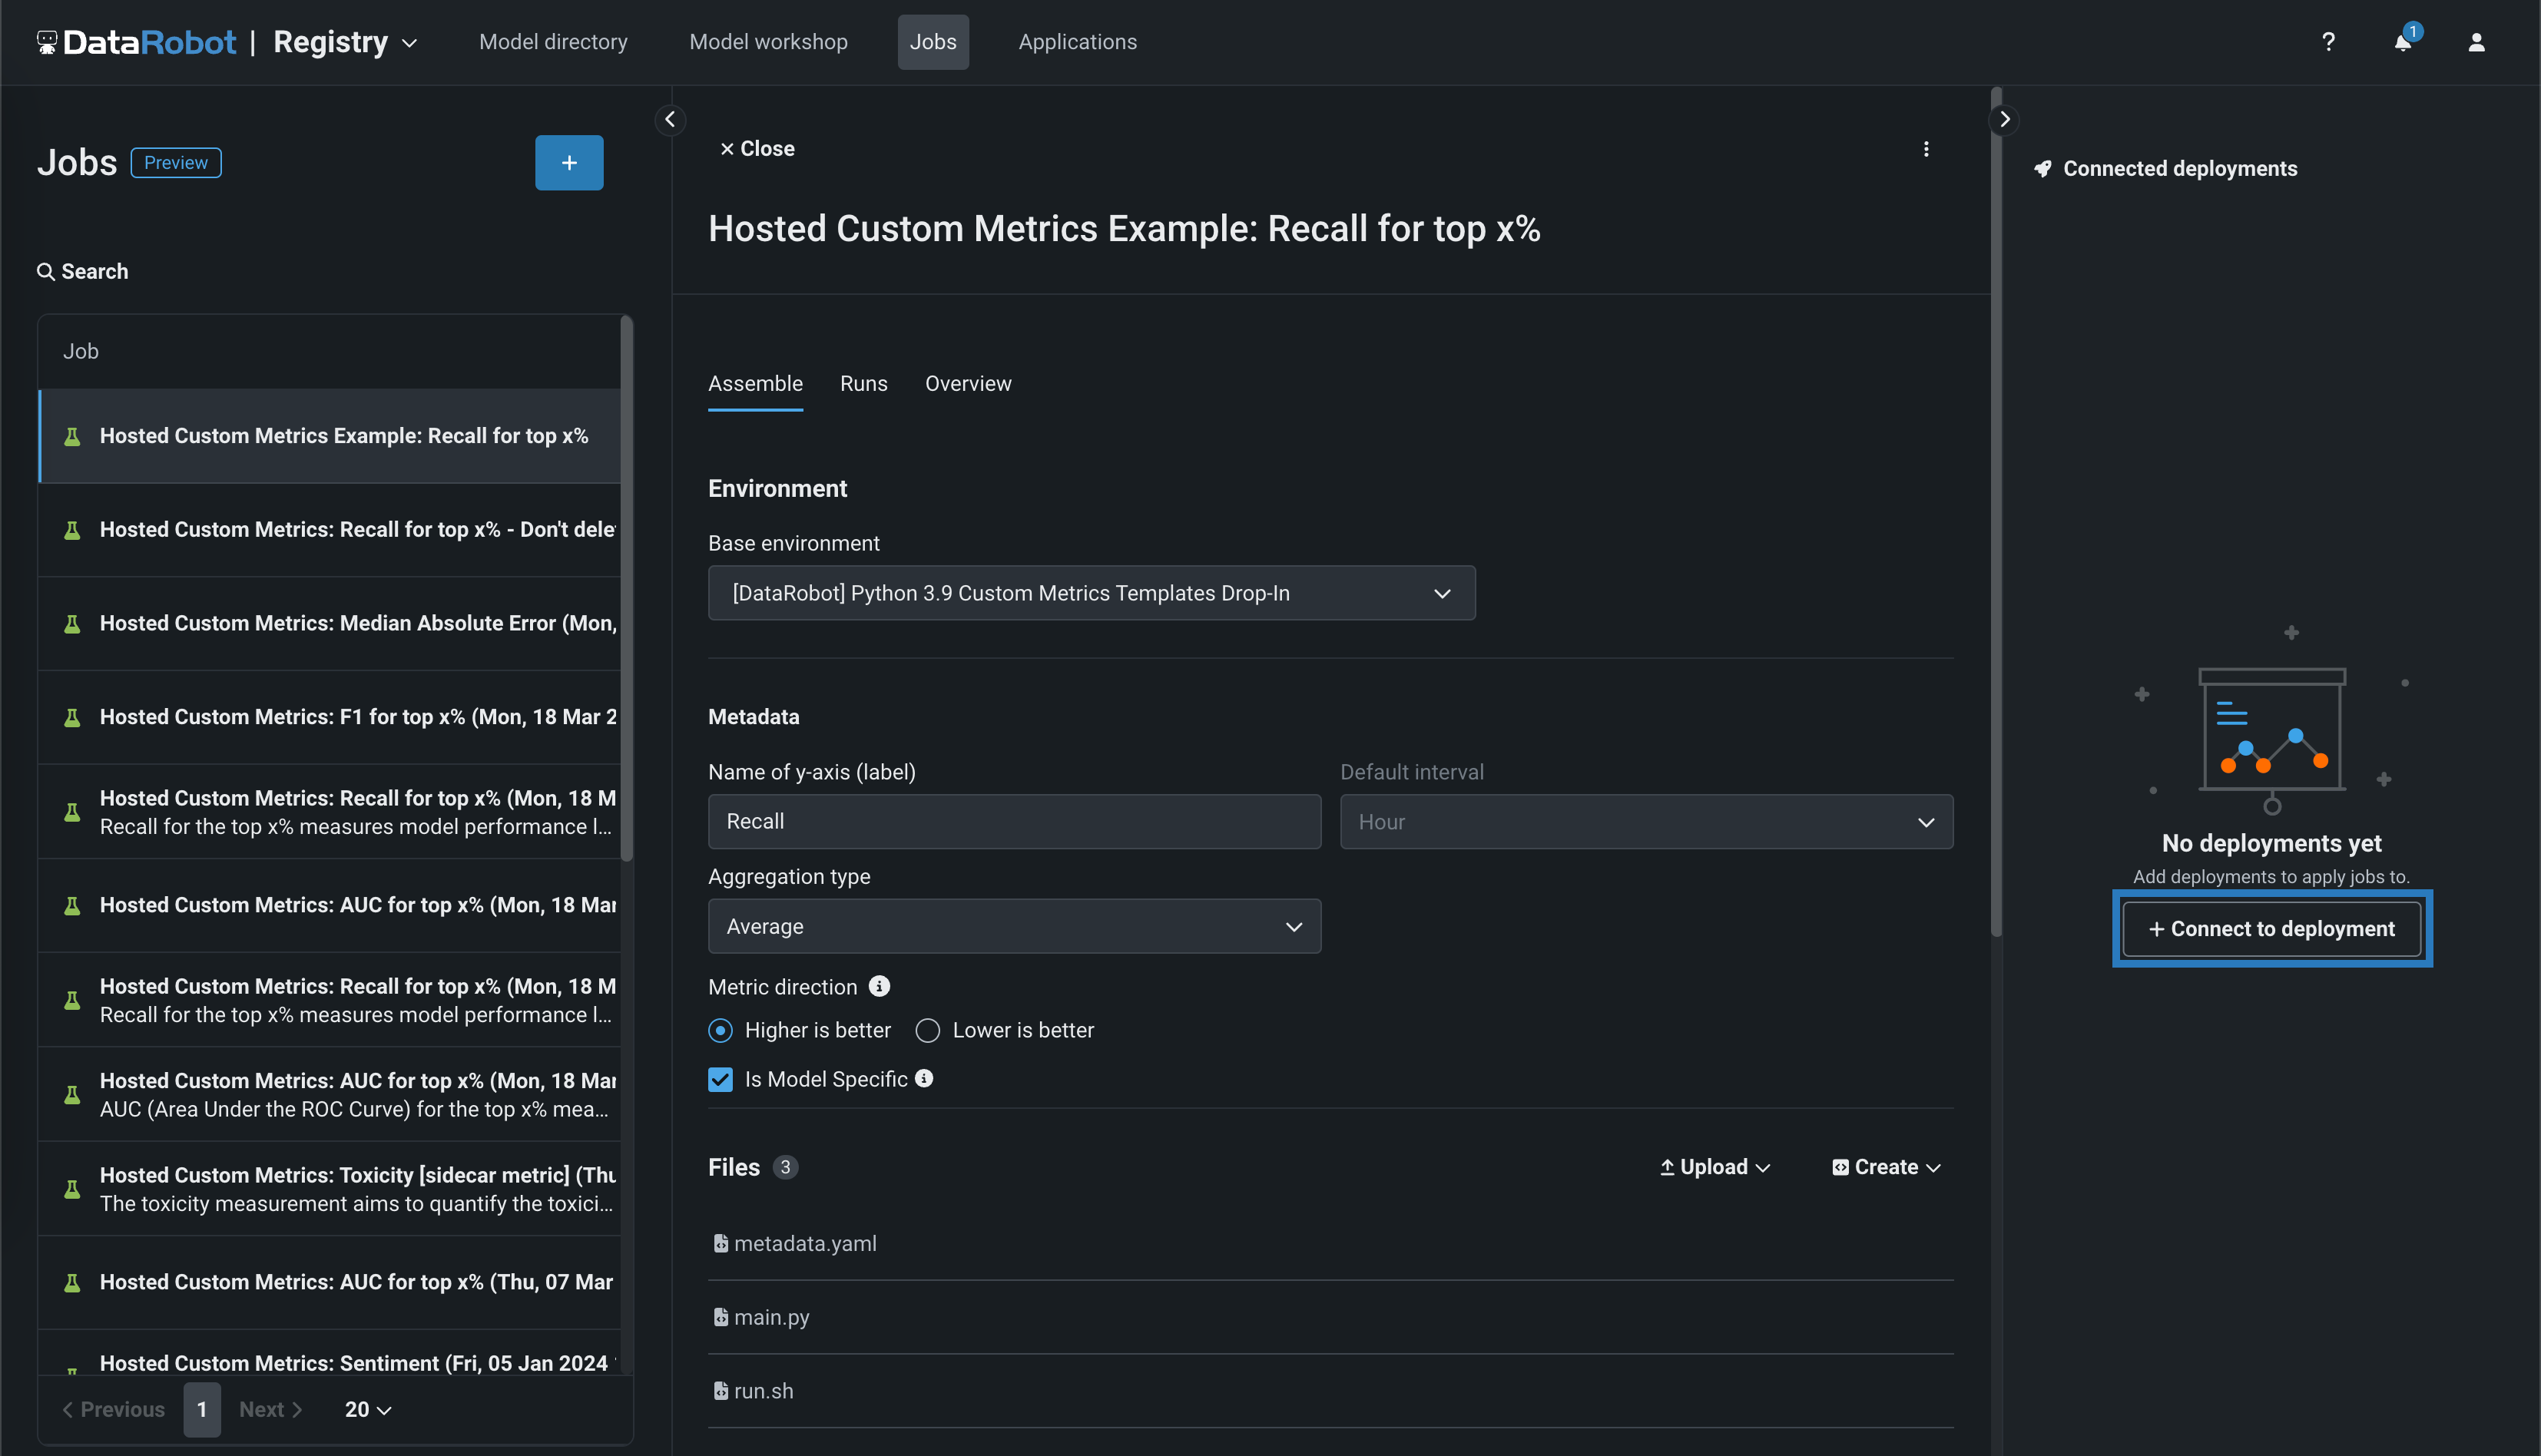
-
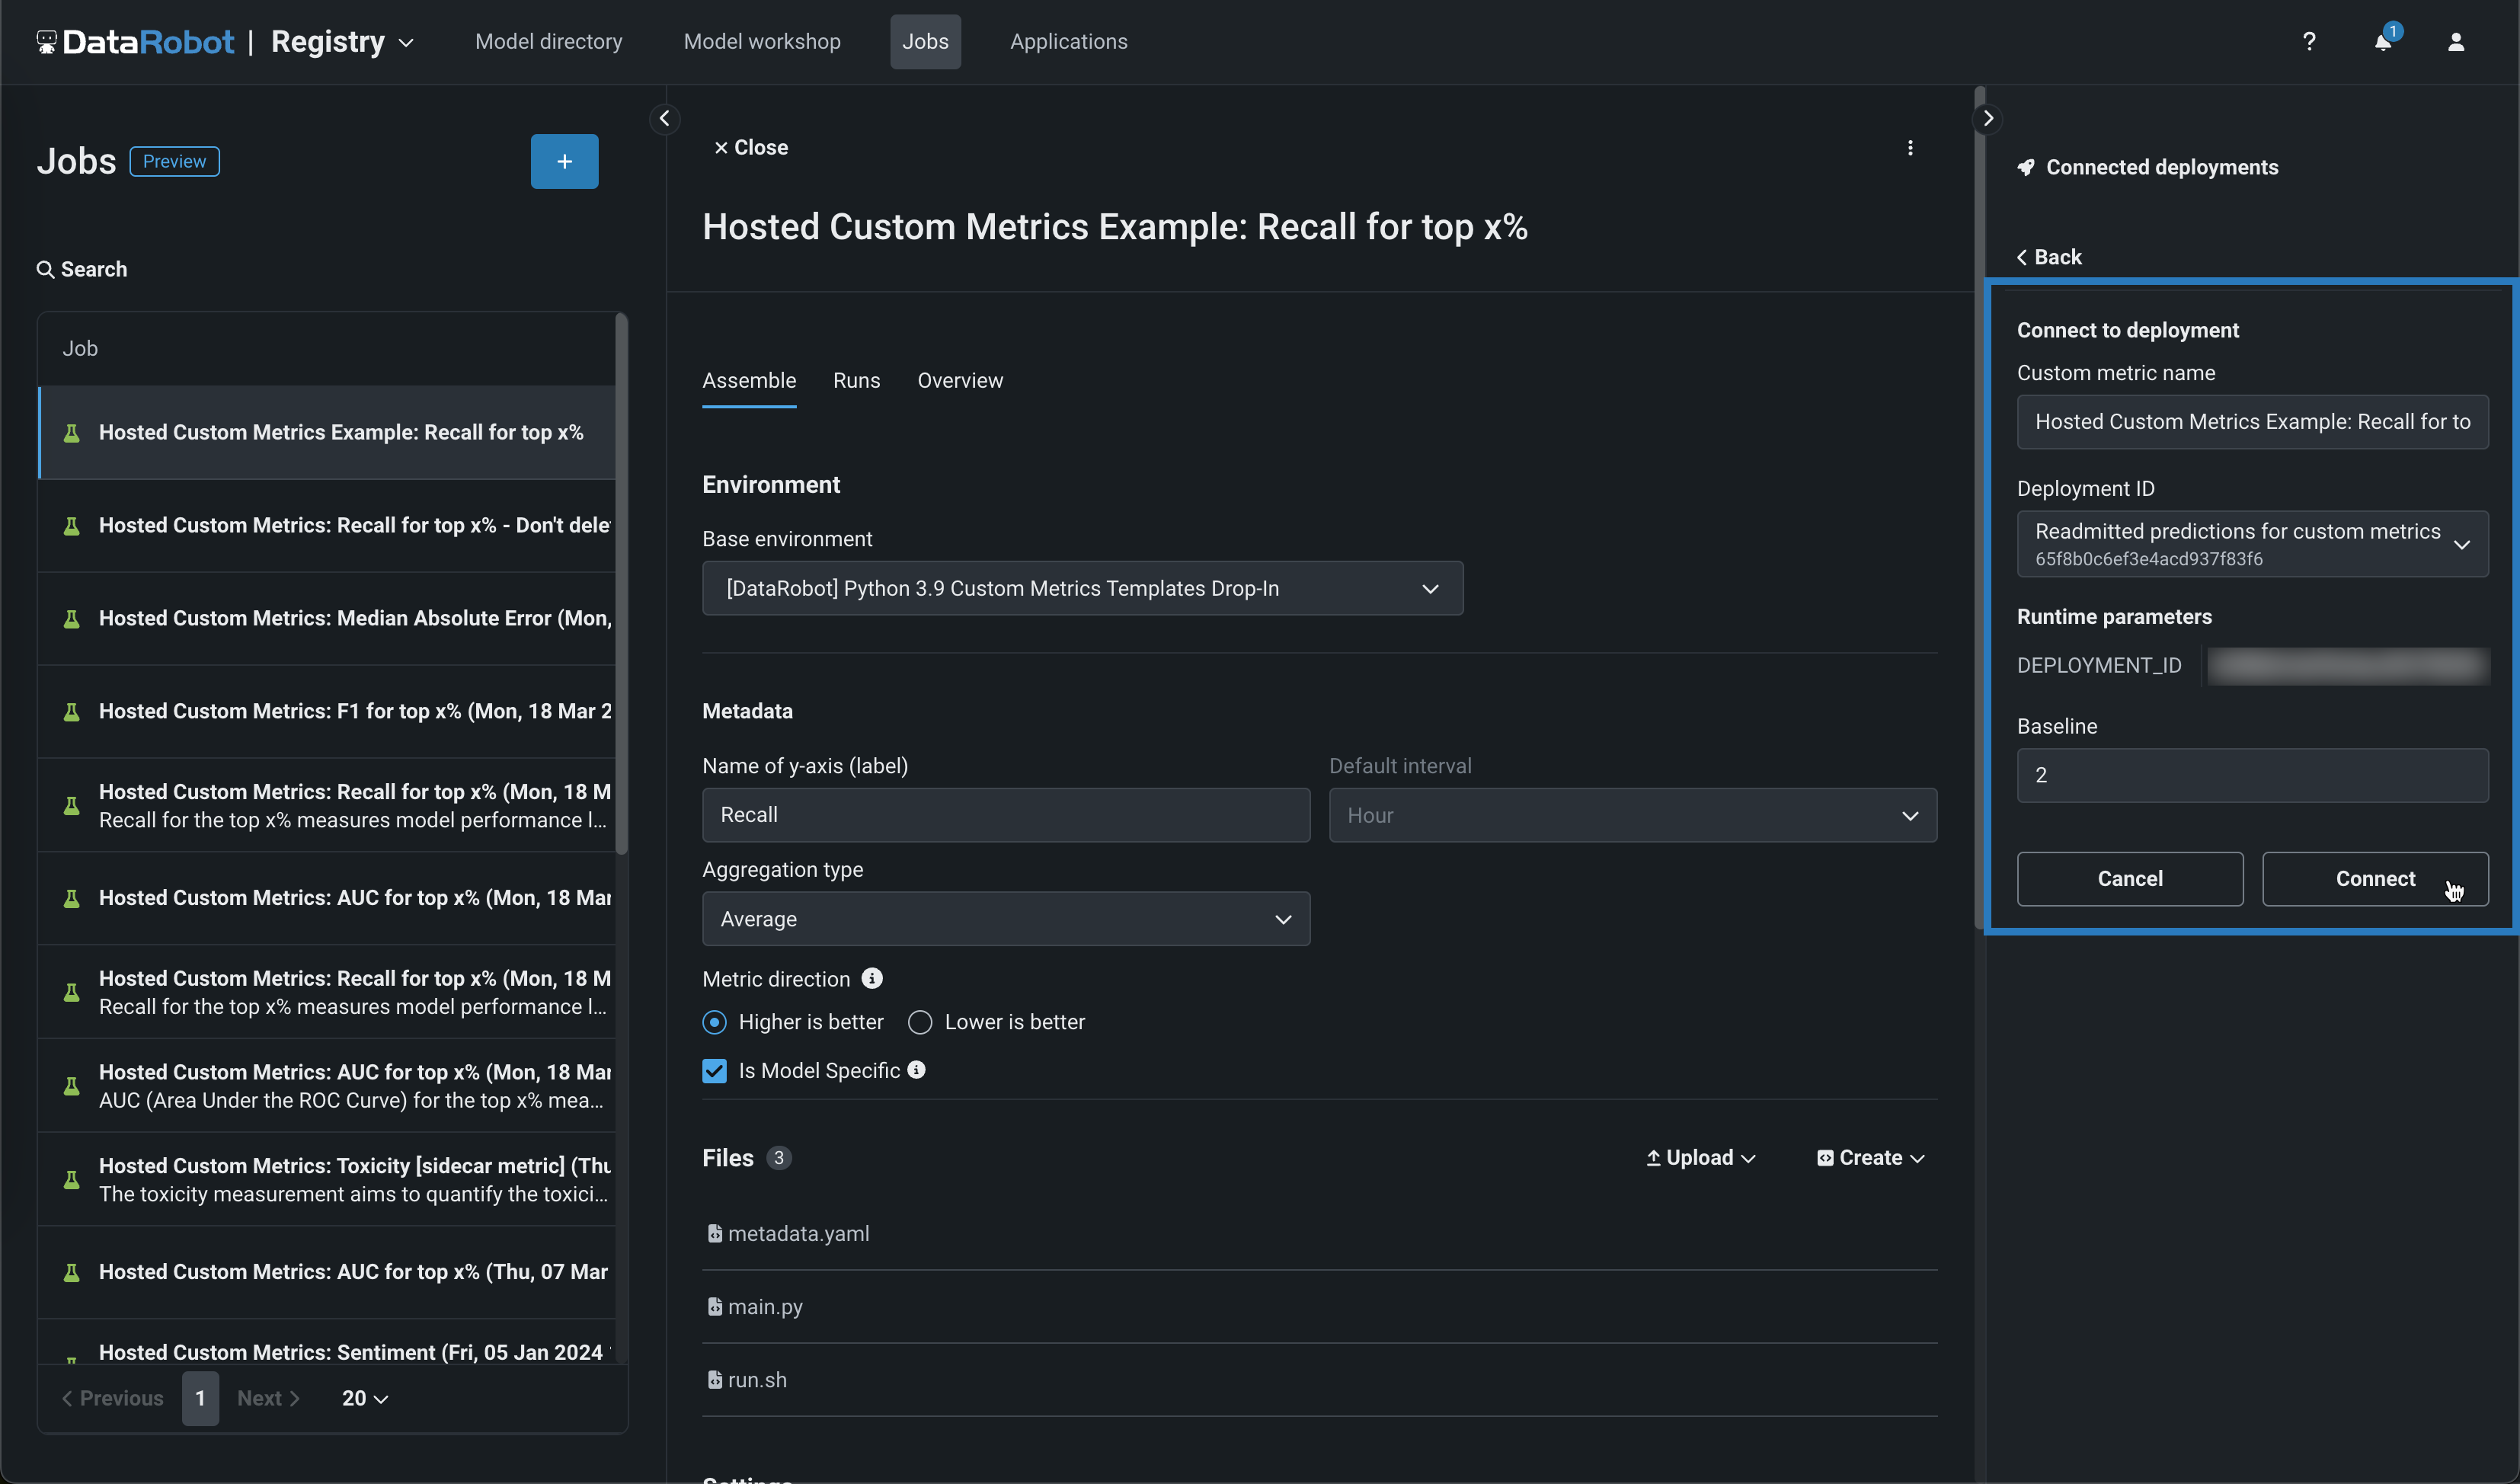
Edit the Custom metric name and select a Deployment ID, then, set a Baseline—the value used as a basis for comparison when calculating the x% better or x% worse values—and click Connect.
How many Deployments can I connect to a hosted custom metric job?
You can connect up to 10 deployments to a hosted custom metric job.
Connected deployments and runtime parameters
After you connect a deployment to a hosted custom metric job and schedule a run, you can't modify the
metadata.yamlfile for runtime parameters. You must disconnect all connected deployments to make any modifications to themetadata.yamlfile.
Create a hosted custom metric job from a template
To add a pre-made custom metric from a template:
-
In the Add custom metric panel, select a custom metric template applicable to your intended use case and click Create metric.
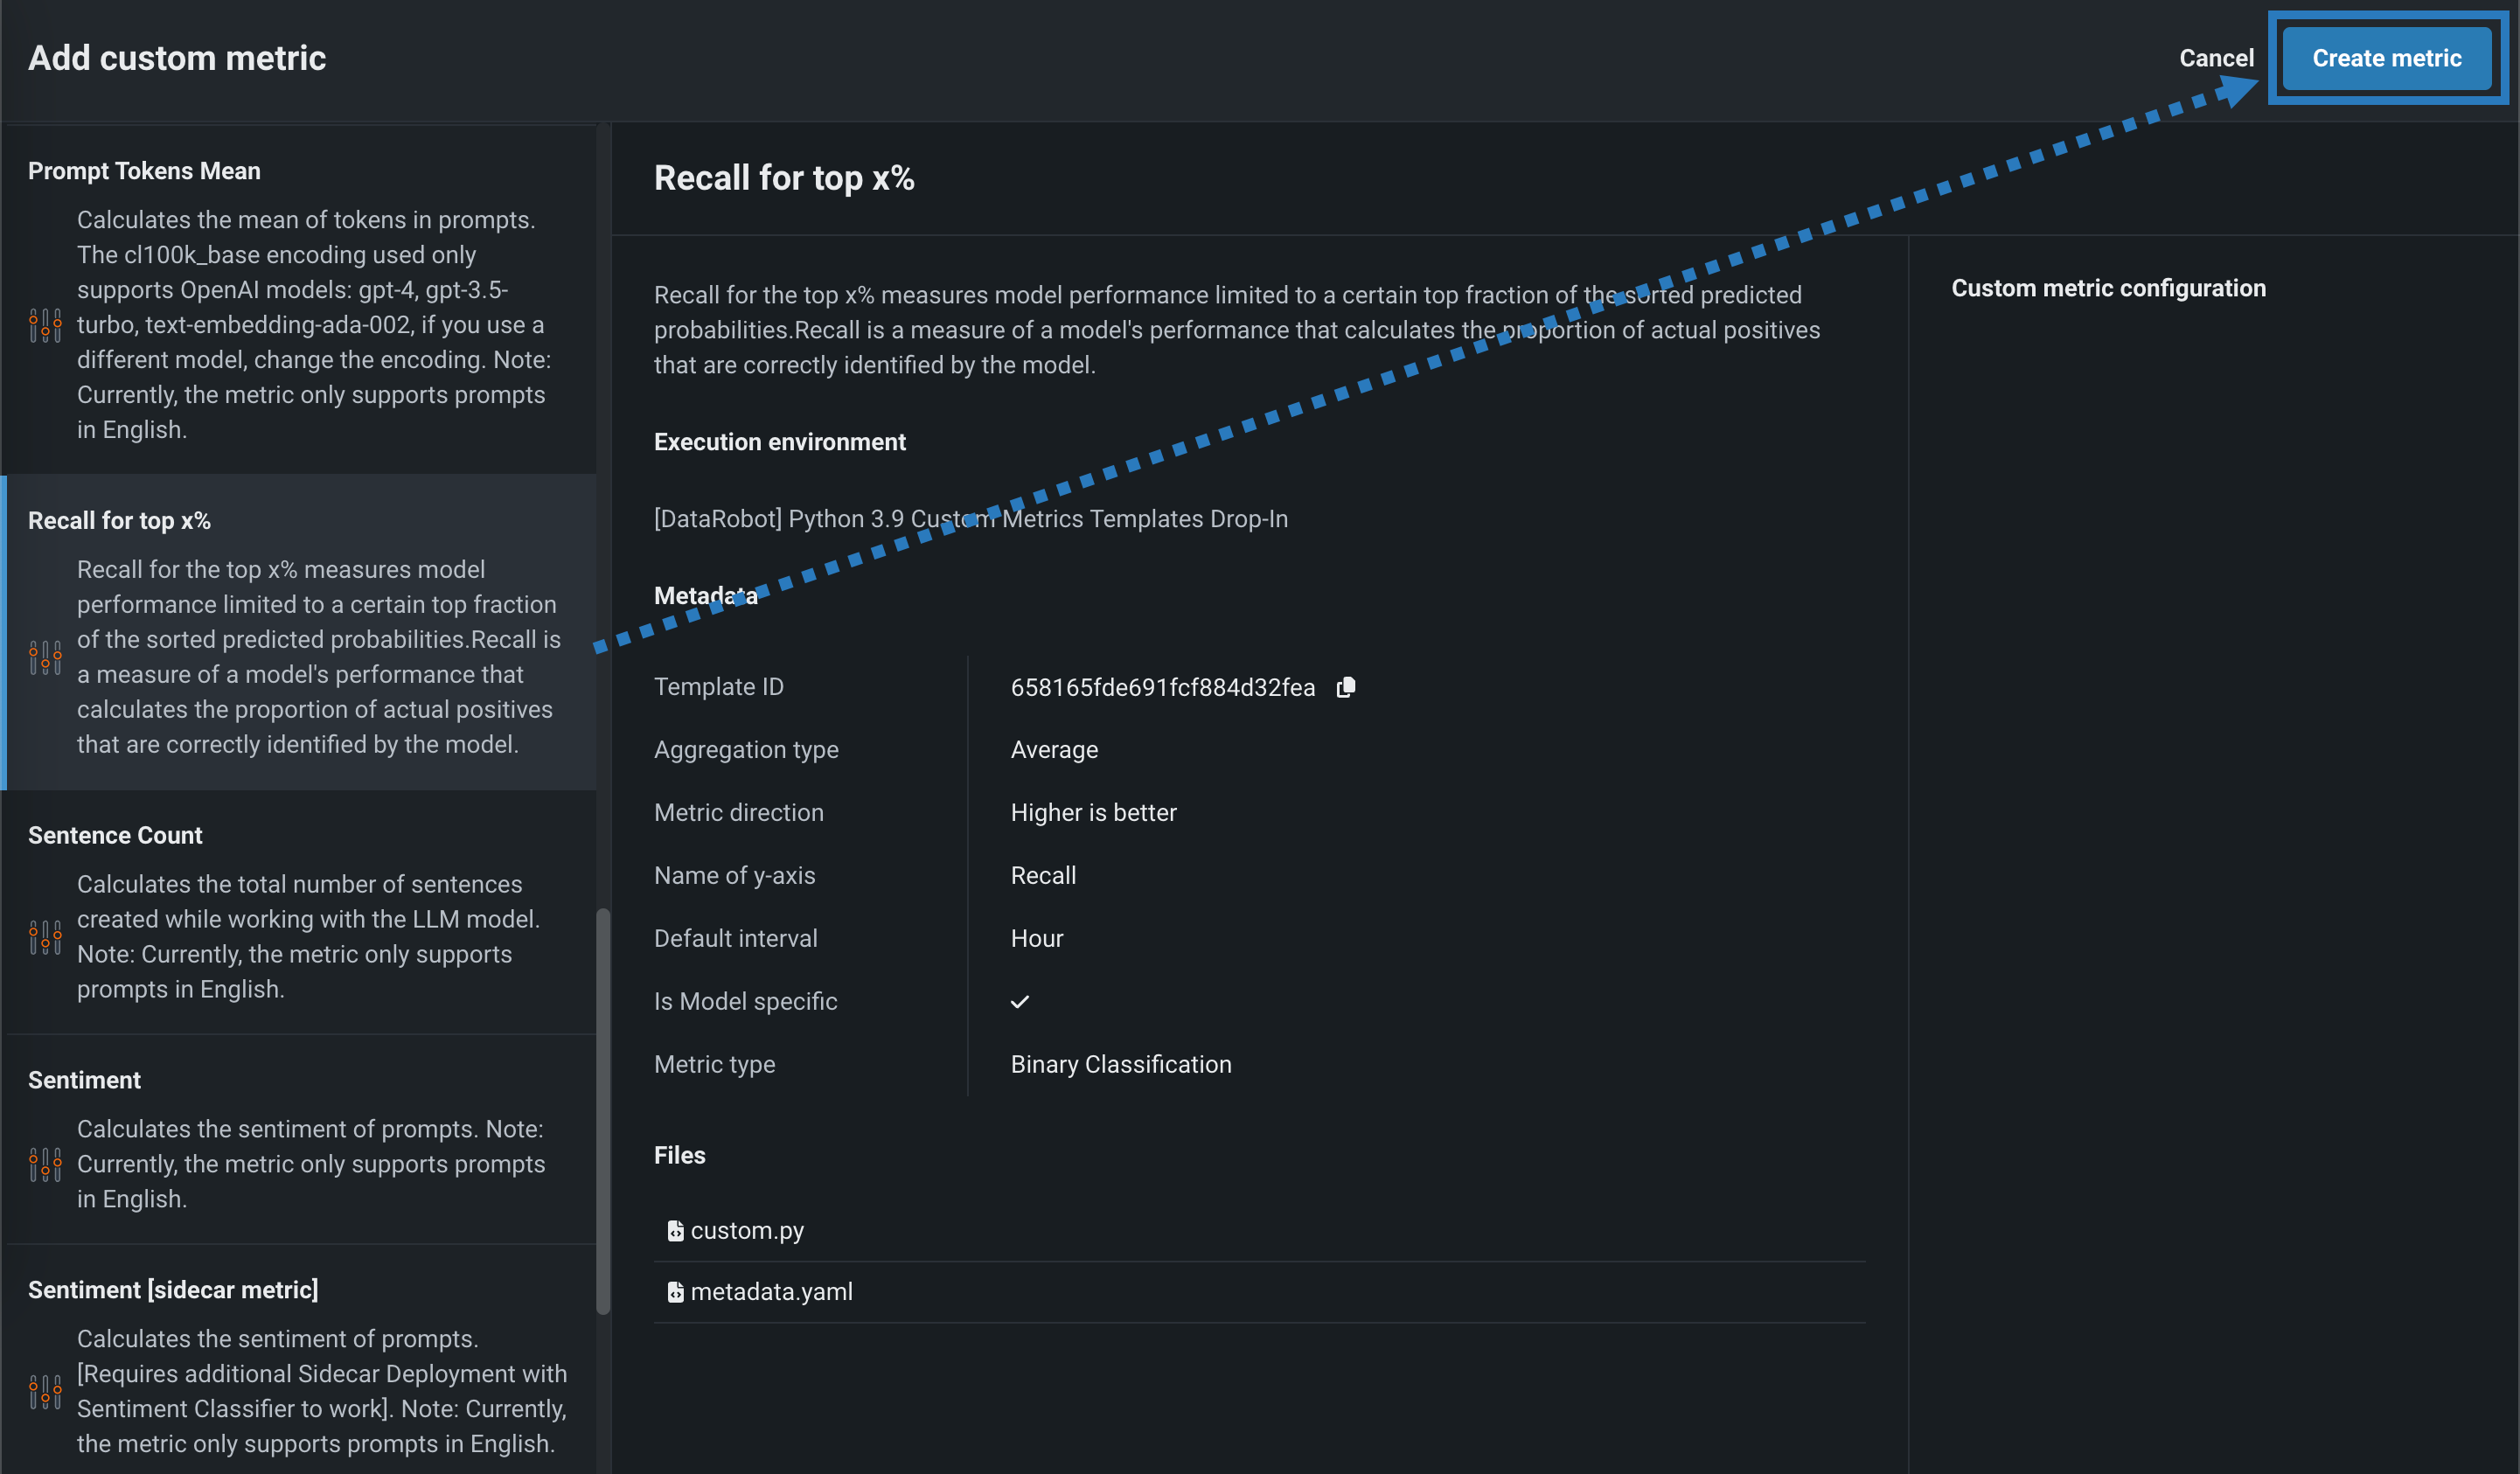
The new hosted custom metric opens on the Registry > Jobs tab.
-
On the Assemble tab, you can optionally modify the template's default name, Environment, Files, Settings, Resources, Runtime Parameters, or Key values, just as with a standard custom metric job.
-
In the Connected deployments panel, click + Connect to deployment.

Connected deployments and runtime parameters
After you connect a deployment to a hosted custom metric job and schedule a run, you can't modify the
metadata.yamlfile for runtime parameters. You must disconnect all connected deployments to make any modifications to themetadata.yamlfile. -
Edit the Custom metric name and select a Deployment ID, then, set a Baseline—the value used as a basis for comparison when calculating the x% better or x% worse values—and click Connect.

How many Deployments can I connect to a hosted custom metric job?
You can connect up to 10 deployments to a hosted custom metric job.
Sidecar metrics
If you selected a
[sidecar metric], when you open on the Assemble tab, navigate to the Runtime Parameters section to set theSIDECAR_DEPLOYMENT_ID, associating the sidecar metric with the connected deployment required to calculate that metric. If you haven't deployed a model to calculate the metric, you can find pre-defined models for these metrics as global models.
Create a custom job for retraining
Availability information
Code-based retraining custom jobs are off by default and require custom notebook environments. Contact your DataRobot representative or administrator for information on enabling this feature.
Feature flags: Enable Custom Job Based Retraining Polices, Enable Notebooks Custom Environments
To create a custom job for code-based retraining:
-
On the Assemble tab for the new job, click the edit icon () to update the job name:

-
In the Environment section, select a Base environment for the job.
-
In the Files section, assemble the custom job. Drag files into the box, or use the options in this section to create or upload the files required to assemble a custom job:

Option Description Choose from source / Upload Upload existing custom job files ( run.sh,metadata.yaml, etc.) as Local Files or a Local Folder.Create Create a new file, empty or containing a template, and save it to the custom job: - Create run.sh: Creates a basic, editable example of an entry point file.
- Create metadata.yaml: Creates a basic, editable example of a runtime parameters file.
- Create README.md: Creates a basic, editable README file.
- Create job.py: Creates a basic, editable Python job file to print runtime parameters and deployments.
- Create example job: Combines all template files to create a basic, editable custom job. You can quickly configure the runtime parameters and run this example job.
- Create blank file: Creates an empty file. Click the edit icon () next to Untitled to provide a file name and extension, then add your custom contents. In the next step, it is possible to identify files created this way, with a custom name and content, as the entry point. After you configure the new file, click Save.
File replacement
If you add a new file with the same name as an existing file, when you click Save, the old file is replaced in the Files section.
-
In the Settings section, configure the Entry point shell (
.sh) file for the job. If you've added arun.shfile, that file is the entry point; otherwise, you must select the entry point shell file from the drop-down list. The entry point file allows you to orchestrate multiple job files.:
-
In the Resources section, next to the section header, click Edit and configure the following:
Availability information
Custom job resource bundles are available for preview and off by default. Contact your DataRobot representative or administrator for information on enabling this feature.
Feature flag: Enable Resource Bundles

Setting Description Resource bundle Preview feature. Configure the resources the custom job uses to run. Network access Configure the egress traffic of the custom job. Under Network access, select one of the following: - Public: The default setting. The custom job can access any fully qualified domain name (FQDN) in a public network to leverage third-party services.
- None: The custom job is isolated from the public network and cannot access third party services.
Default network access
For the Managed AI Platform, the Network access setting is set to Public by default and the setting is configurable. For the Self-Managed AI Platform, the Network access setting is set to None by default and the setting is restricted; however, an administrator can change this behavior during DataRobot platform configuration. Contact your DataRobot representative or administrator for more information.
-
(Optional) If you uploaded a
metadata.yamlfile, define the Runtime parameters, clicking the edit icon () for each key value row you want to configure.
-
(Optional) Configure additional Key values for Tags, Metrics, Training parameters, and Artifacts.
After you create a custom job for retraining, you can add it to a deployment as a retraining policy.
Create a custom job for notifications
To create a custom job for notifications:
-
On the Assemble tab for the new job, click the edit icon () to update the job name:

-
In the Environment section, select a Base environment for the job.
-
In the Files section, assemble the custom job. Drag files into the box, or use the options in this section to create or upload the files required to assemble a custom job:

Option Description Choose from source / Upload Upload existing custom job files ( run.sh,metadata.yaml, etc.) as Local Files or a Local Folder.Create Create a new file, empty or containing a template, and save it to the custom job: - Create run.sh: Creates a basic, editable example of an entry point file.
- Create metadata.yaml: Creates a basic, editable example of a runtime parameters file.
- Create README.md: Creates a basic, editable README file.
- Create job.py: Creates a basic, editable Python job file to print runtime parameters and deployments.
- Create example job: Combines all template files to create a basic, editable custom job. You can quickly configure the runtime parameters and run this example job.
- Create blank file: Creates an empty file. Click the edit icon () next to Untitled to provide a file name and extension, then add your custom contents. In the next step, it is possible to identify files created this way, with a custom name and content, as the entry point. After you configure the new file, click Save.
File replacement
If you add a new file with the same name as an existing file, when you click Save, the old file is replaced in the Files section.
-
In the Settings section, configure the Entry point shell (
.sh) file for the job. If you've added arun.shfile, that file is the entry point; otherwise, you must select the entry point shell file from the drop-down list. The entry point file allows you to orchestrate multiple job files.:
-
In the Resources section, next to the section header, click Edit and configure the following:
Availability information
Custom job resource bundles are available for preview and off by default. Contact your DataRobot representative or administrator for information on enabling this feature.
Feature flag: Enable Resource Bundles

Setting Description Resource bundle Preview feature. Configure the resources the custom job uses to run. Network access Configure the egress traffic of the custom job. Under Network access, select one of the following: - Public: The default setting. The custom job can access any fully qualified domain name (FQDN) in a public network to leverage third-party services.
- None: The custom job is isolated from the public network and cannot access third party services.
Default network access
For the Managed AI Platform, the Network access setting is set to Public by default and the setting is configurable. For the Self-Managed AI Platform, the Network access setting is set to None by default and the setting is restricted; however, an administrator can change this behavior during DataRobot platform configuration. Contact your DataRobot representative or administrator for more information.
-
(Optional) If you uploaded a
metadata.yamlfile, define the Runtime parameters, clicking the edit icon () for each key value row you want to configure.
-
(Optional) Configure additional Key values for Tags, Metrics, Training parameters, and Artifacts.
After you create a custom job for notifications, you can add it to a notification template as a notification channel.